Implement Two-Factor Authentication (2FA) in 30 Seconds with Twilio Verify
Time to read: 4 minutes
March 02, 2023
Written by
Reviewed by

Twilio Verify is a service that enables businesses to easily and securely validate users through various channels, including SMS, WhatsApp, voice, and email. It provides a simple and scalable way to add Two-factor Authentication (2FA) to any applications or services, helping to protect against fraud and unauthorized access.
In this tutorial you will prototype a complete 2FA implementation in four quick steps. Once you learn how everything works you’ll be well on your way to incorporate 2FA into your application.
Requirements
To complete this tutorial you will need a Twilio account. If you are new to Twilio, click here to create a free account. Besides the account, all you need to complete this tutorial is a web browser and the curl command line utility.
Step 1: Create a Twilio Verify service
The first step is to create an instance of Twilio Verify in your account. To do this, open the Twilio Verify dashboard in your browser and click the “Create new” button.
Enter a friendly name for your Verify service such as My Verify Service, and then enable the channels that you’d like to use. In this tutorial you will be able to test the SMS, WhatsApp, and Voice channels.
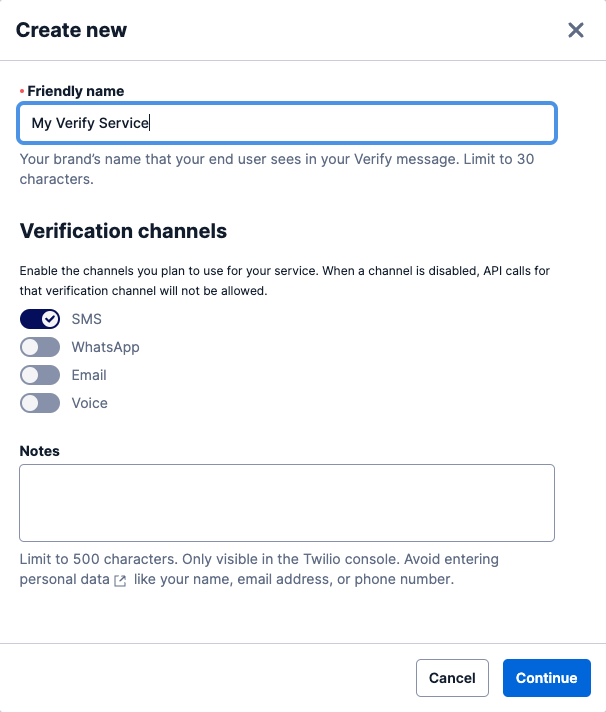
Click “Continue”. If you enabled SMS, you will now be asked about the Fraud Guard feature, which protects you against unwanted charges to your account due to fraud.
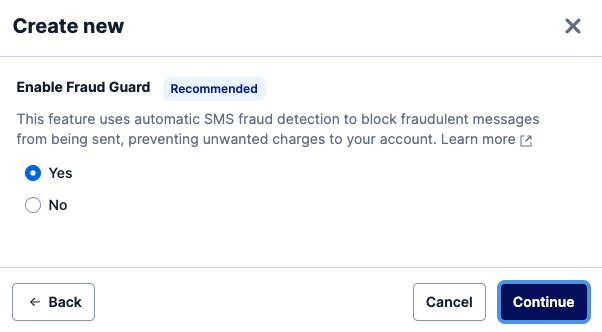
Select “Yes” and click “Continue” to create your Verify service.
Step 2: Configure your credentials
In this step, you will gather three account credentials that are needed to use the Verify service. These will be installed as environment variables in a terminal session.
The first one is the “Service SID” that was assigned to the Twilio Verify service you created in Step 1. This is displayed in the “Service Settings” page you were redirected to after creating the Verify service.
Click the “Copy” button to the right of the Service SID. Then open your terminal window and set an environment variable with this code. If you are using a bash or zsh prompt, this is how to do it:
If you are using a different shell, you will need to adapt the above statement. We have a dedicated tutorial on setting environment variables that you can consult if you need help with this.
You can find the other two credentials in the main dashboard of the Twilio Console. Find the “Account Info” section and copy the “Account SID” and “Auth Token” codes to environment variables as shown below:
Step 3: Send a verification code
And now we get to the fun part. In this step you are going to send a verification code to your personal cell phone. With Twilio Verify this is done with a single API call that is so simple that it can be issued from the terminal using curl.
For a real-world application you can implement the same HTTP request using any HTTP client of your choice. If you prefer, you can also use the Twilio server-side helper library for your programming language of choice.
Send a verification code to yourself using this command:
For complete details about the verification endpoint used here see the documentation.
This command uses the environment variables you defined in Step 2, so make sure you run it in the same terminal where those variables were entered. The request has two input variables called To and Channel, which you can see next to the --data-urlencode options. For the To variable you have to enter your cellular phone number in E.164 format.
For example, for a number based in the US the format is +1AAABBBCCCC, with AAA being the area code and BBB-CCCC the local number.
For the Channel variable there are a few options:
smsto issue the code via SMScallto issue the code via voice callwhatsappto issue the code via WhatsApp messageemailto issue the code via email (note that this requires additional configuration of a SendGrid account)
The response from this request is a JSON structure that after formatting looks like this:
The most important field in this response is status, which should be returned as pending for a successful call.
A few moments after you run the curl command, you will receive a verification code through your selected channel.
Step 4: Verify a code
The final step is to verify that a code provided by the user is correct. This is done with the HTTP request that you see below:
For complete details about the verification check endpoint used above see the documentation.
This request uses the same three credentials, and also has two variables. The To variable must have the same value that was used when requesting a code to be sent out. The Code variable must include the code that the user provided as verification.
When the verification succeeds, the following response is returned:
The important value to check from this response is status, once again, which should now be set to approved to indicate that the validation was successful.
If the code that is entered is incorrect, the response that is returned is this:
Here you can see that the status variable remains set to pending. In this situation the user should be allowed another chance to type the code, as the error could have been due to a typing mistake.
Conclusion
So there you have it, a complete 2FA flow implemented in four short steps. My hope is that with this gentle introduction you will be able to add 2FA support to your application without trouble.
If you’d like to learn more about Twilio Verify, the official documentation is the best resource. In addition to the traditional 2FA implementation demonstrated in this article you will learn about other more advanced solutions such as:
- TOTP standard soft-tokens generated by Authy, Google Authenticator and other apps
- Push verifications on iOS, Android, web and desktop apps
- Silent device approval
I’d love to see what you build with Twilio Verify!
Miguel Grinberg is a Principal Software Engineer for Technical Content at Twilio. Reach out to him at mgrinberg [at] twilio [dot] com if you have a cool project you’d like to share on this blog!

Related Resources
Twilio Docs
From APIs to SDKs to sample apps
API reference documentation, SDKs, helper libraries, quickstarts, and tutorials for your language and platform.
Resource Center
The latest ebooks, industry reports, and webinars
Learn from customer engagement experts to improve your own communication.
Ahoy
Twilio's developer community hub
Best practices, code samples, and inspiration to build communications and digital engagement experiences.