Build a Messaging App Demo Proof of Concept with the Twilio Conversations API

Time to read: 6 minutes
December 01, 2022
Written by
Reviewed by
Twilio’s Conversations API is described as “A single API for seamless conversational messaging”. That sounds really cool, but what kind of things can you actually build with the Conversations API?
For starters, the Conversations API is a foundational component in Twilio’s offering and our industry leading software applications, Twilio Flex, and Twilio Frontline, are built on top of the Conversations API.
But the Conversations API can also be used to power your own multi-party or multi-channel applications. In this blog post, I will walk through configuring and deploying a digital channel Support and Messaging Application powered by Twilio Conversations.
Applications Architecture
Before we start building, let me show you the end result. Here is a short video that shows the Conversations API’s functionality:
And here’s an overview of the architecture of our app:
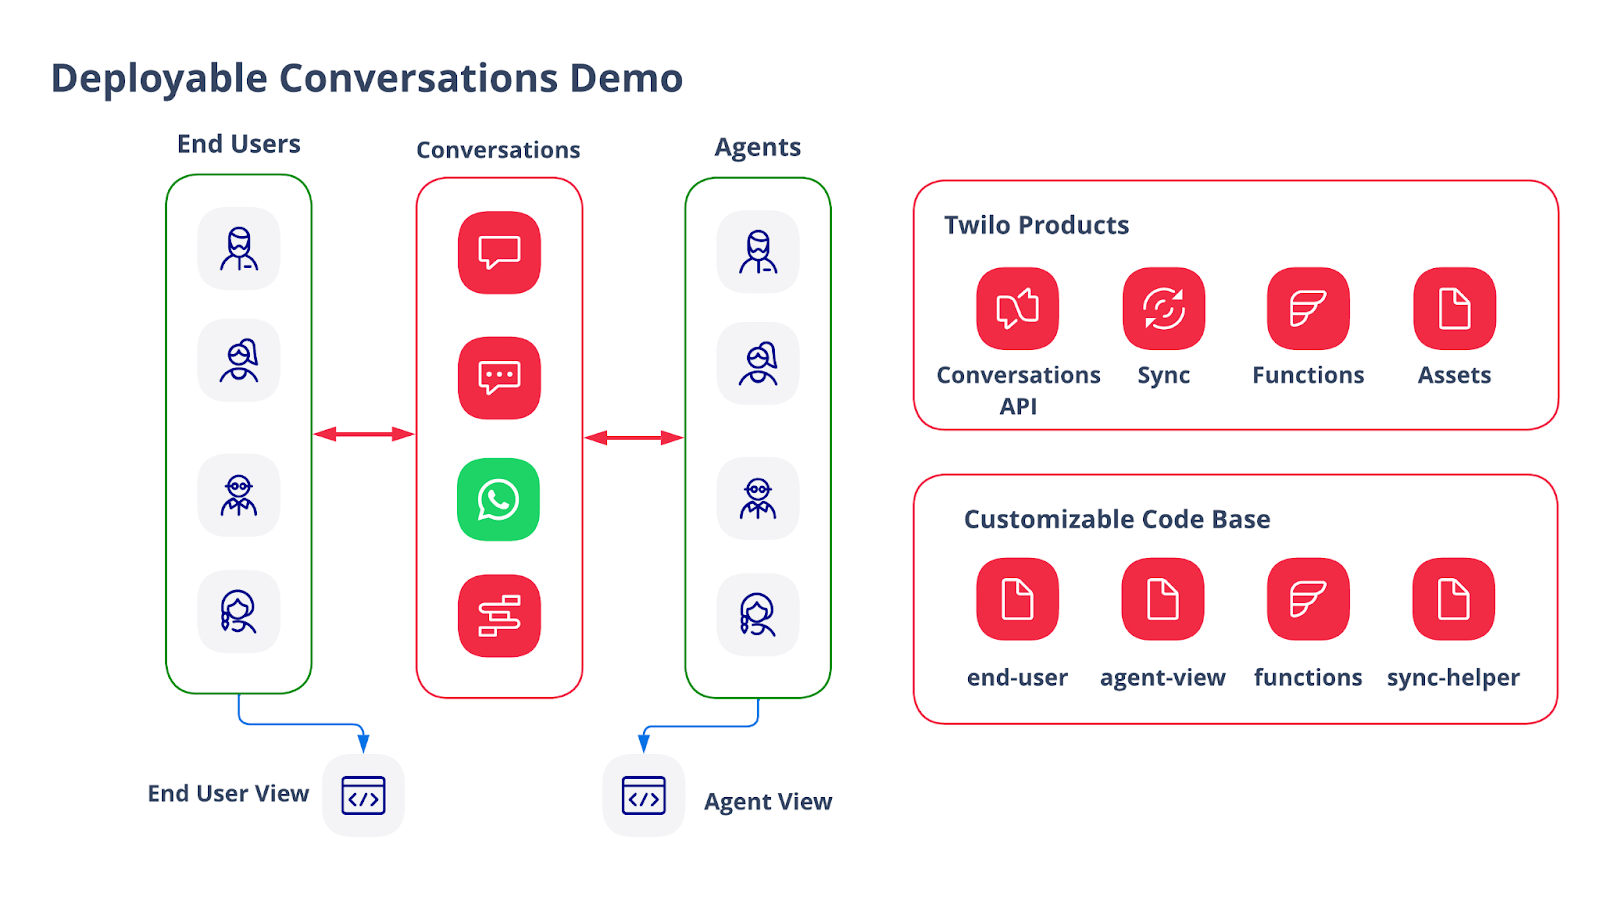
The Deployable Conversations Demo enables end users and agents to communicate over SMS, Chat, WhatsApp, and even with a bot (via Twilio Studio, for example).
Twilio products used in this code base are the Conversations API, Twilio Sync, Twilio Functions, and Twilio Assets.
The Customizable Code Base holds all of the application logic and are packaged together in a Twilio Serverless Project and deployed as Single Page Applications (SPAs). The SPAs are written in Vue.js and already built, so you will not need to do anything with them. The source code is available if you want to check out the code and play around with the functionality.
Prerequisites
- Twilio Account – If you don’t yet have one, you can sign up for a free account here.
- Twilio CLI – CLI Quickstart
- Twilio Serverless Plugin – Install
- One Twilio Numbers with SMS – Purchase a number
Let’s Build it!
Here are the basic steps of our serverless multichannel build today.
- Download the Twilio Serverless Project
- Provision and Configure the Twilio Resources
- Update the Project Environment Variables
- Deploy the Serverless Project
- Update the Application Datasource (Twilio Sync)
- Try it out!
Here is an instructional video showing these steps in action:
1. Download the Twilio Serverless Project
Download and clone this repo: https://github.com/danbartlett-twilio/twilio-dcd
From the main directory, run the following to install all of the dependencies:
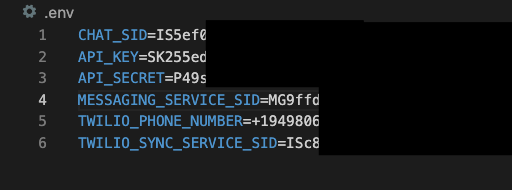
Make a copy of the file sample.env and rename it to .env. Next, we will go and provision the necessary resources in Twilio and we will update this .env file as we go. Your .env file will look like this now:

…but we will replace all of the values in the next step.
2. Provision and Configure the Twilio Resources
In this section we will buy a Twilio Phone number and create:
- a Twilio Conversation Service
- a Twilio Sync Service
- a Twilio Messaging Service
- an API Key & Token.
I am going to assume that you have an empty Twilio project, and your Twilio console page looks like this:
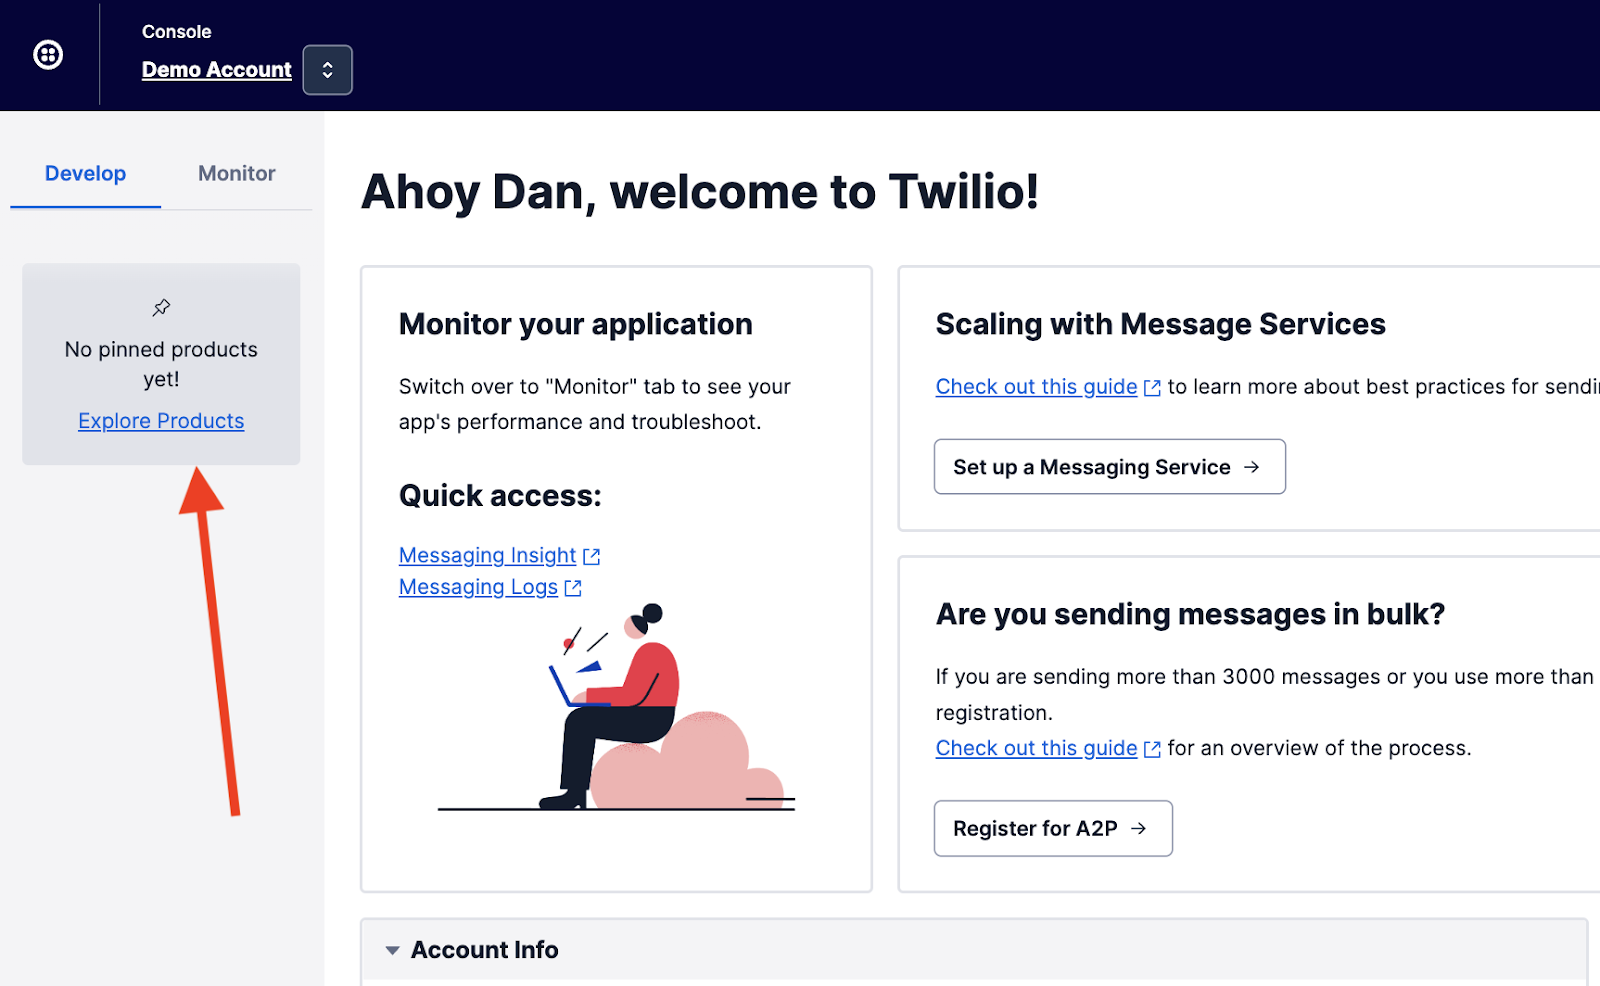
Click on the Explore Products link.
From the next page, you can “PIN” the following products by pushing on the pushpin icon for each:
- Messaging
- Conversations
- Phone Numbers
- Sync
- Functions and Assets
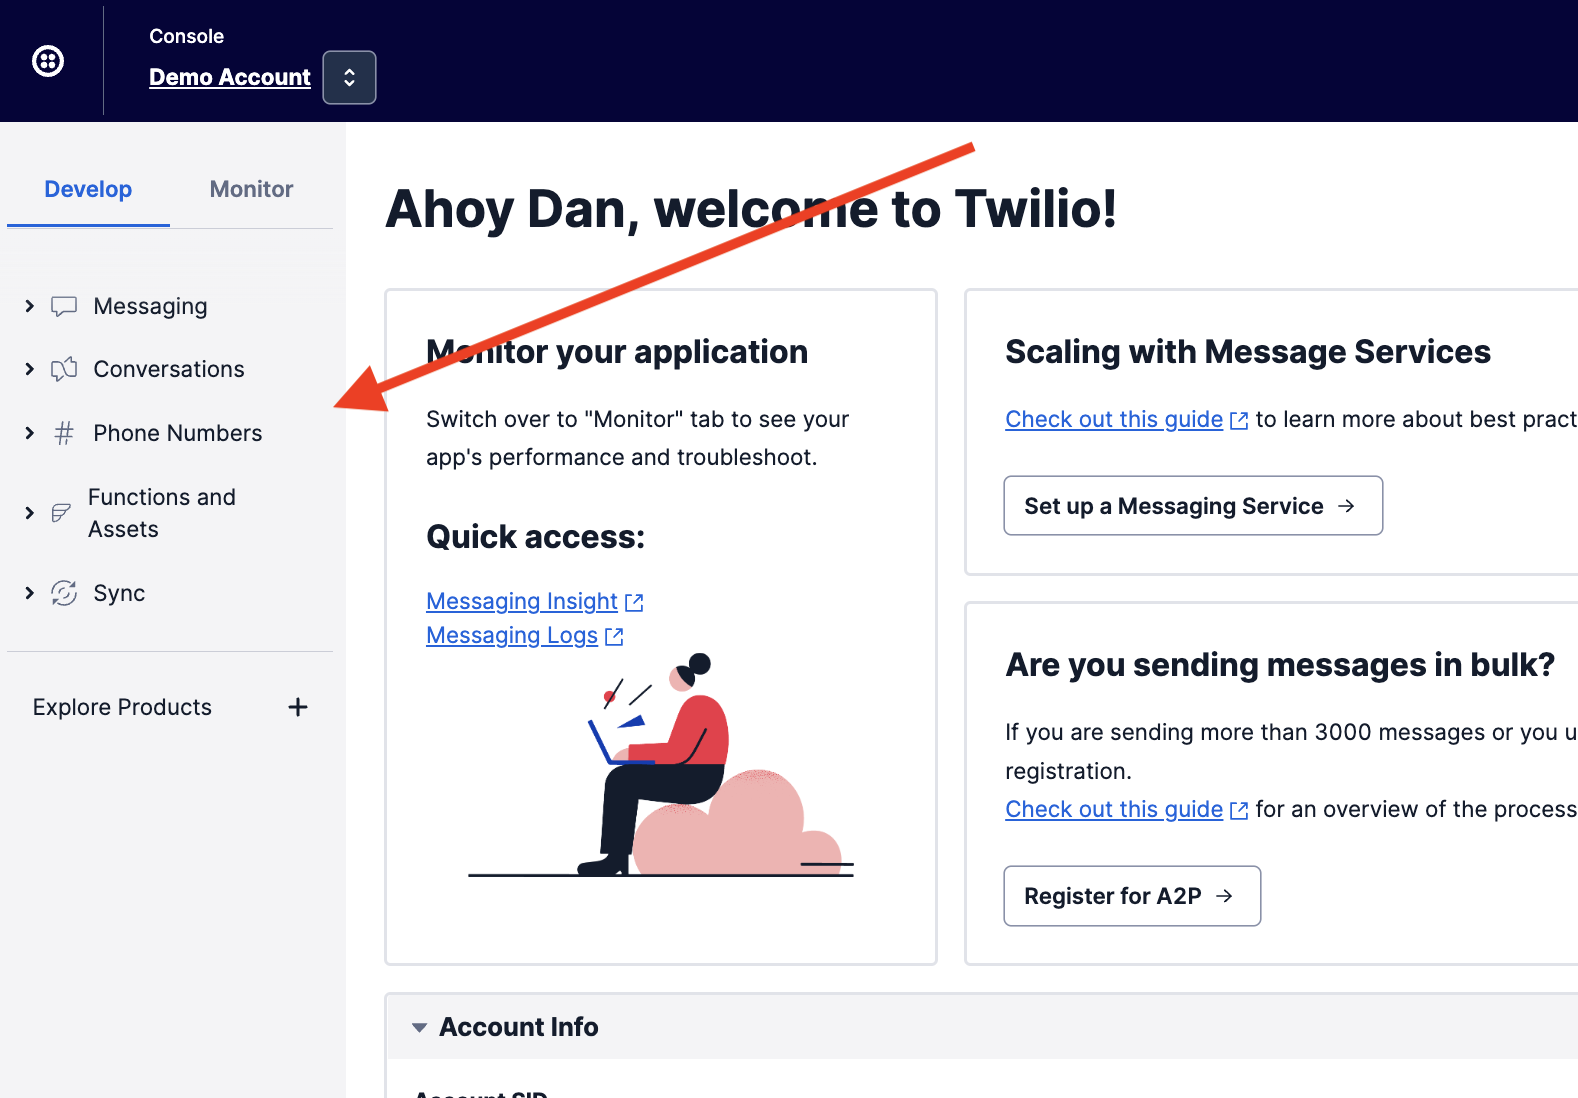
You should then have those products in the left column of your screen like this:
Now, we can purchase a Twilio Phone Number. Click on on Active Numbers under # Phone Numbers in the left column and then select Buy a Number in the upper right corner.
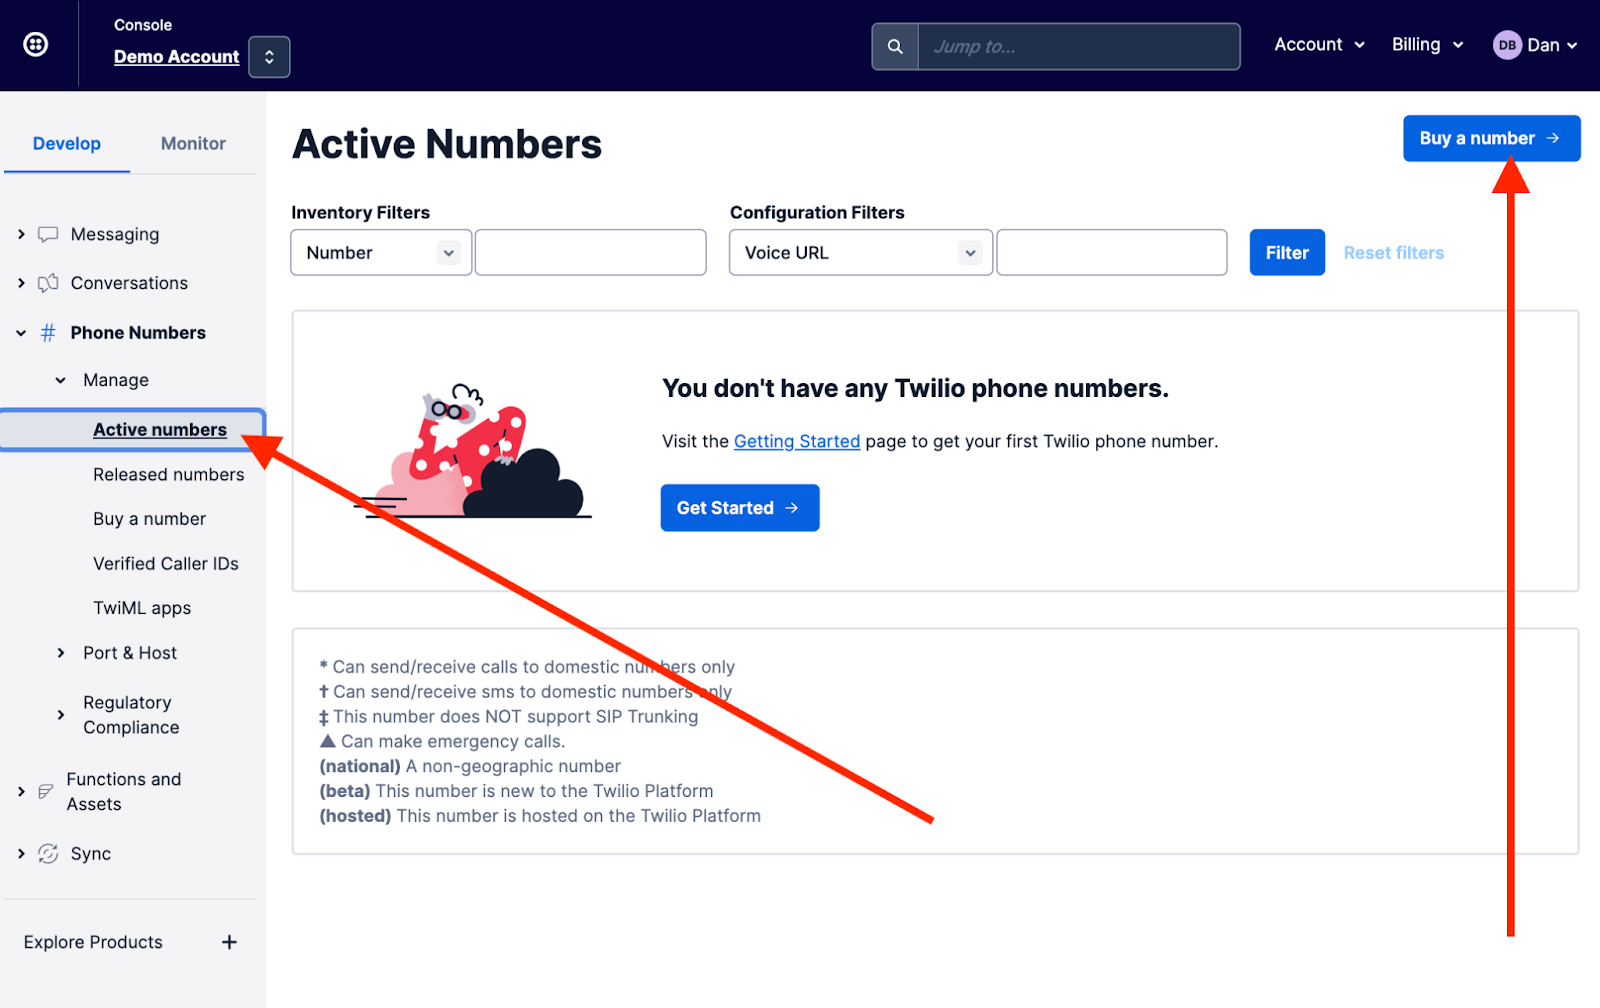
Make sure you purchase a number with SMS capabilities. Copy the phone number and format it into E.164 format and then paste it into the .env file next to the TWILIO_PHONE_NUMBER property.
Next, we will create a Conversation Service. In the left column, click Conversations, then Services, and then select Create a new Service.
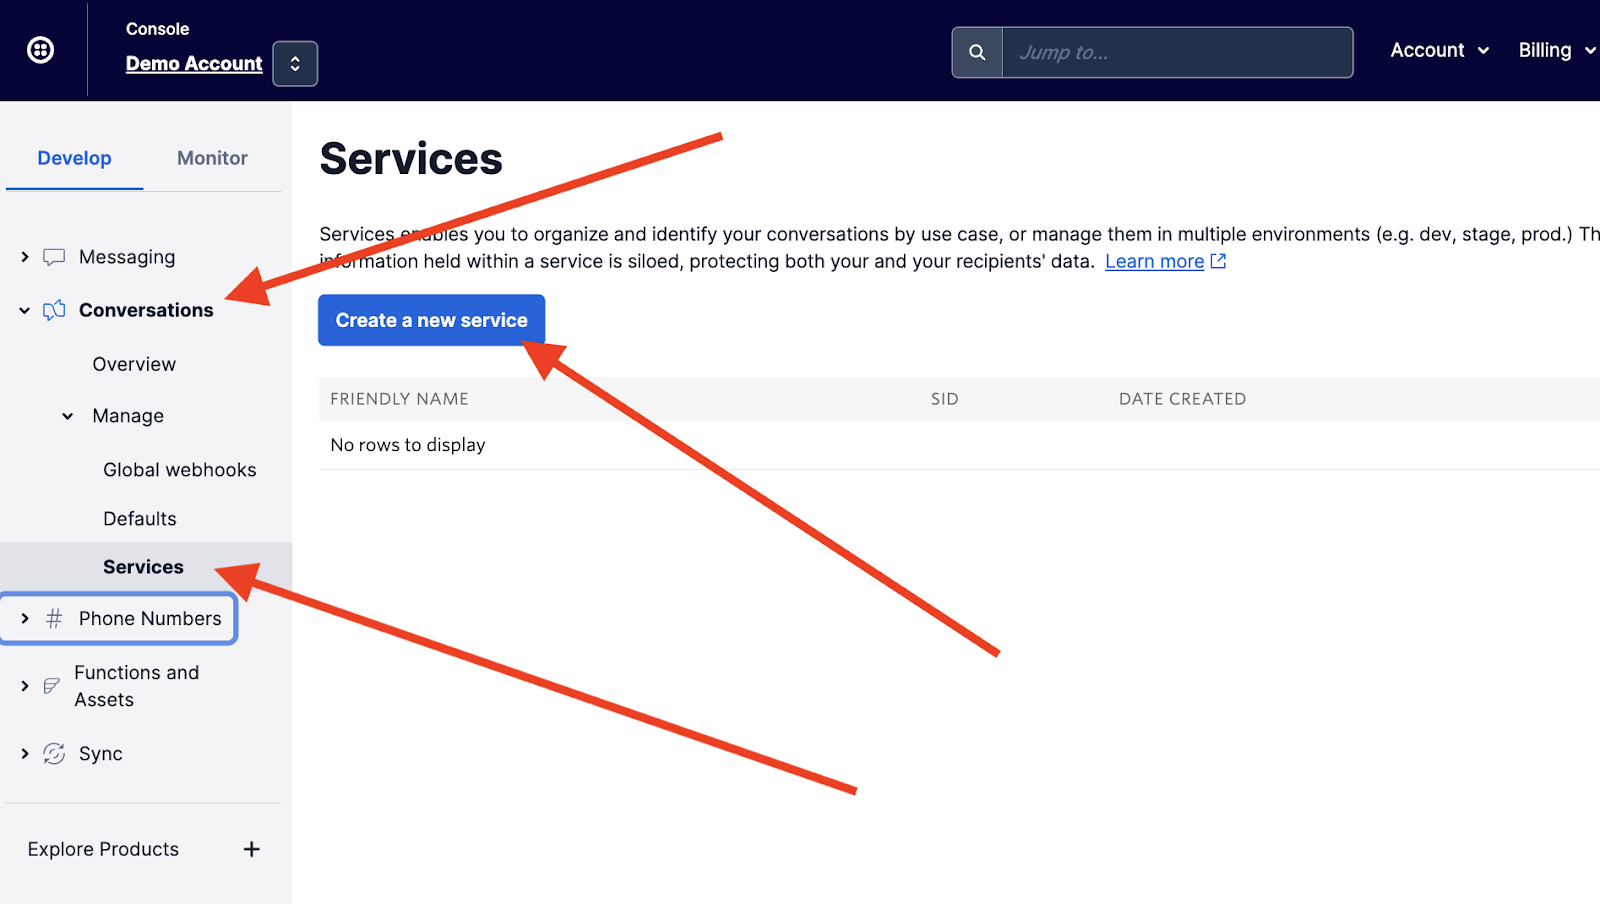
You can enter whatever you like for the friendly name (for example “DCD Conversation Service”). When you save your changes, copy the Service SID and paste it into the .env file next to the CHAT_SID property.
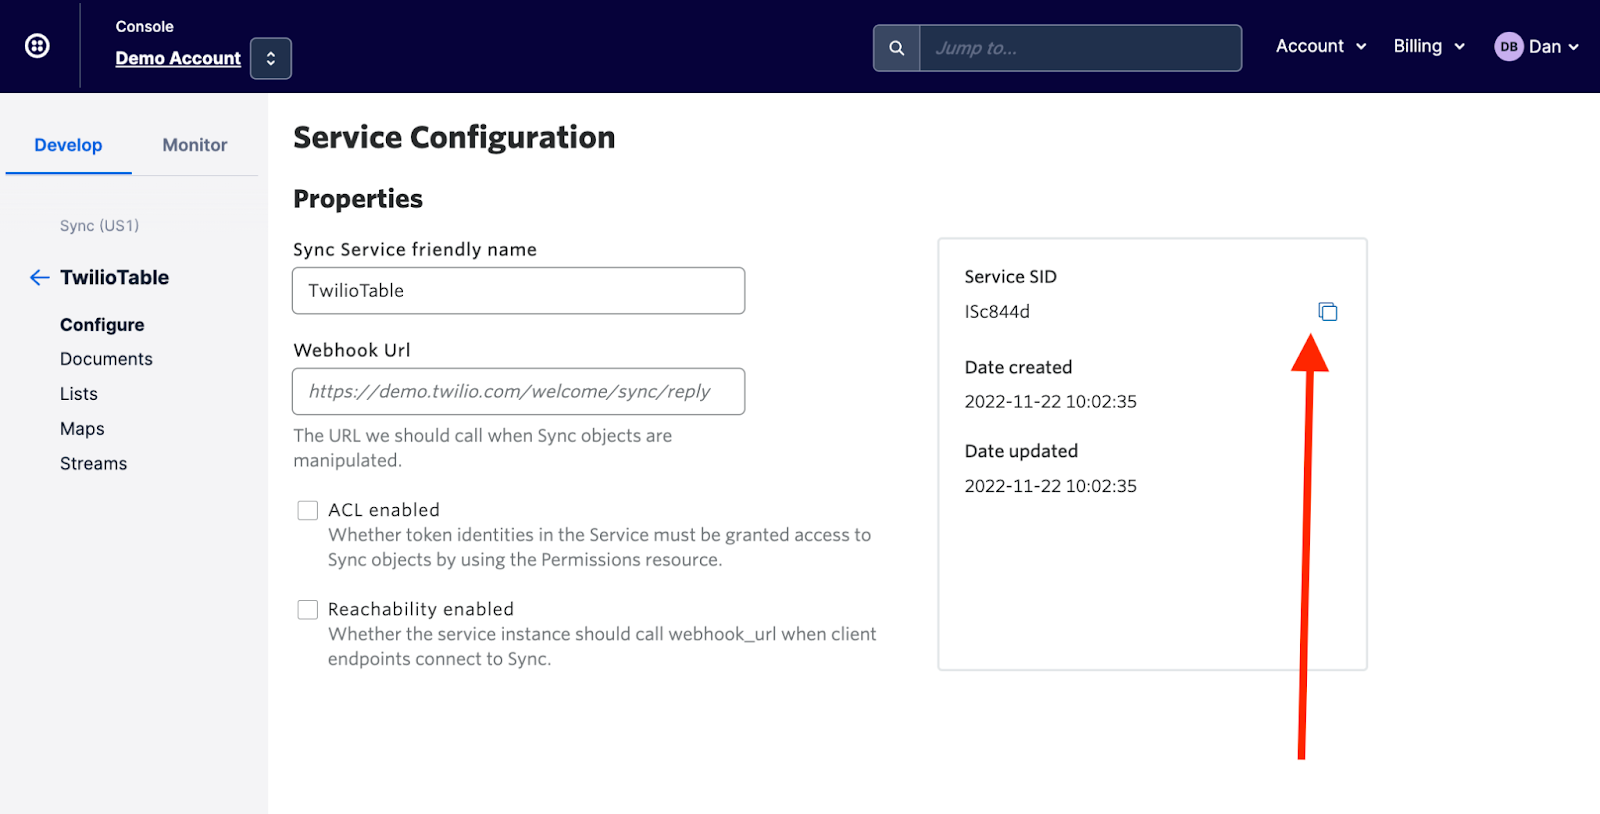
Next, we will create a new Sync Service to store data for our application. Go to Services under Sync and click on Create a new Sync Service.
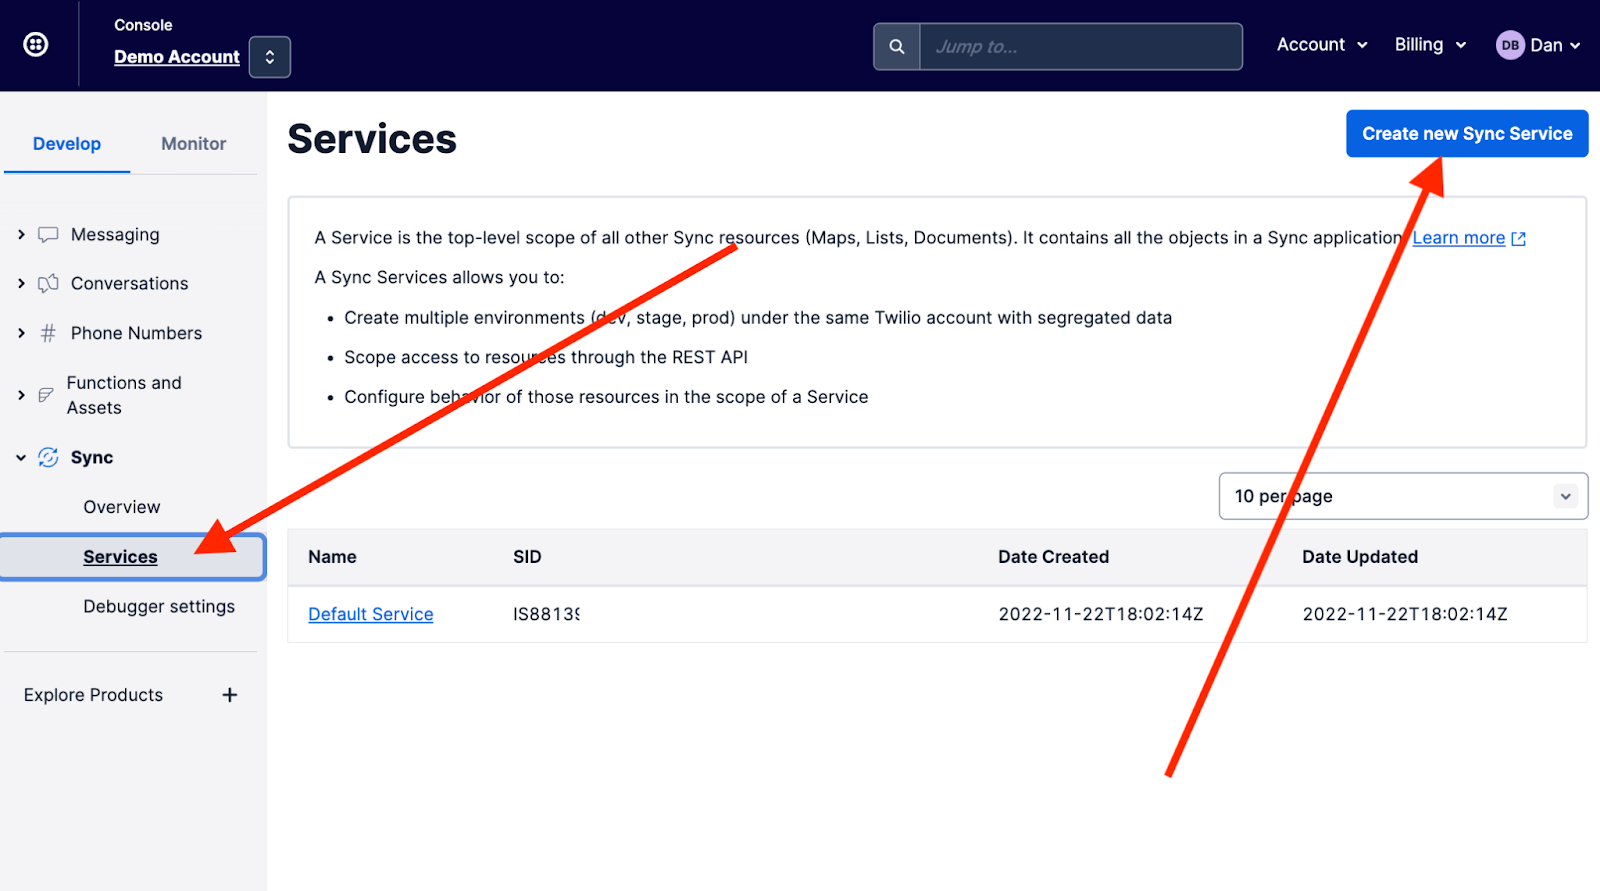
You can enter whatever you like for the friendly name, but, as above, copy the new Service SID and paste it into the .env file next to the TWILIO_SYNC_SERVICE_SID property.
We are almost there!
We need an API Key to be able to create access tokens for web clients. Under Account in the upper right hand corner, select API keys & tokens.
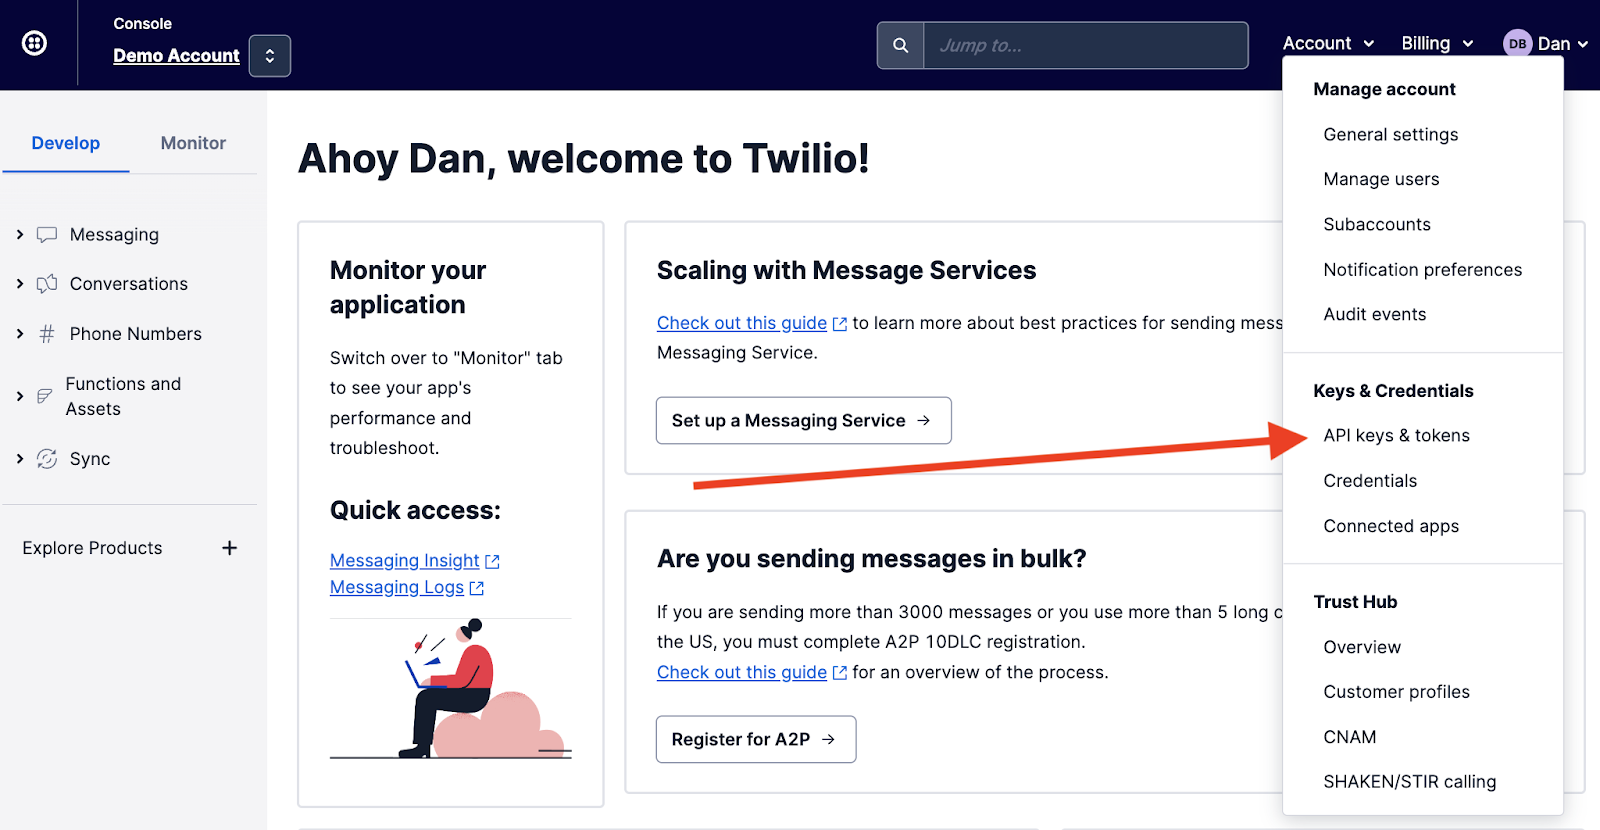
Click the Create API key button and then enter a friend name like ConversationsDemoKey and set the Key type to Standard. The next screen will look like this:
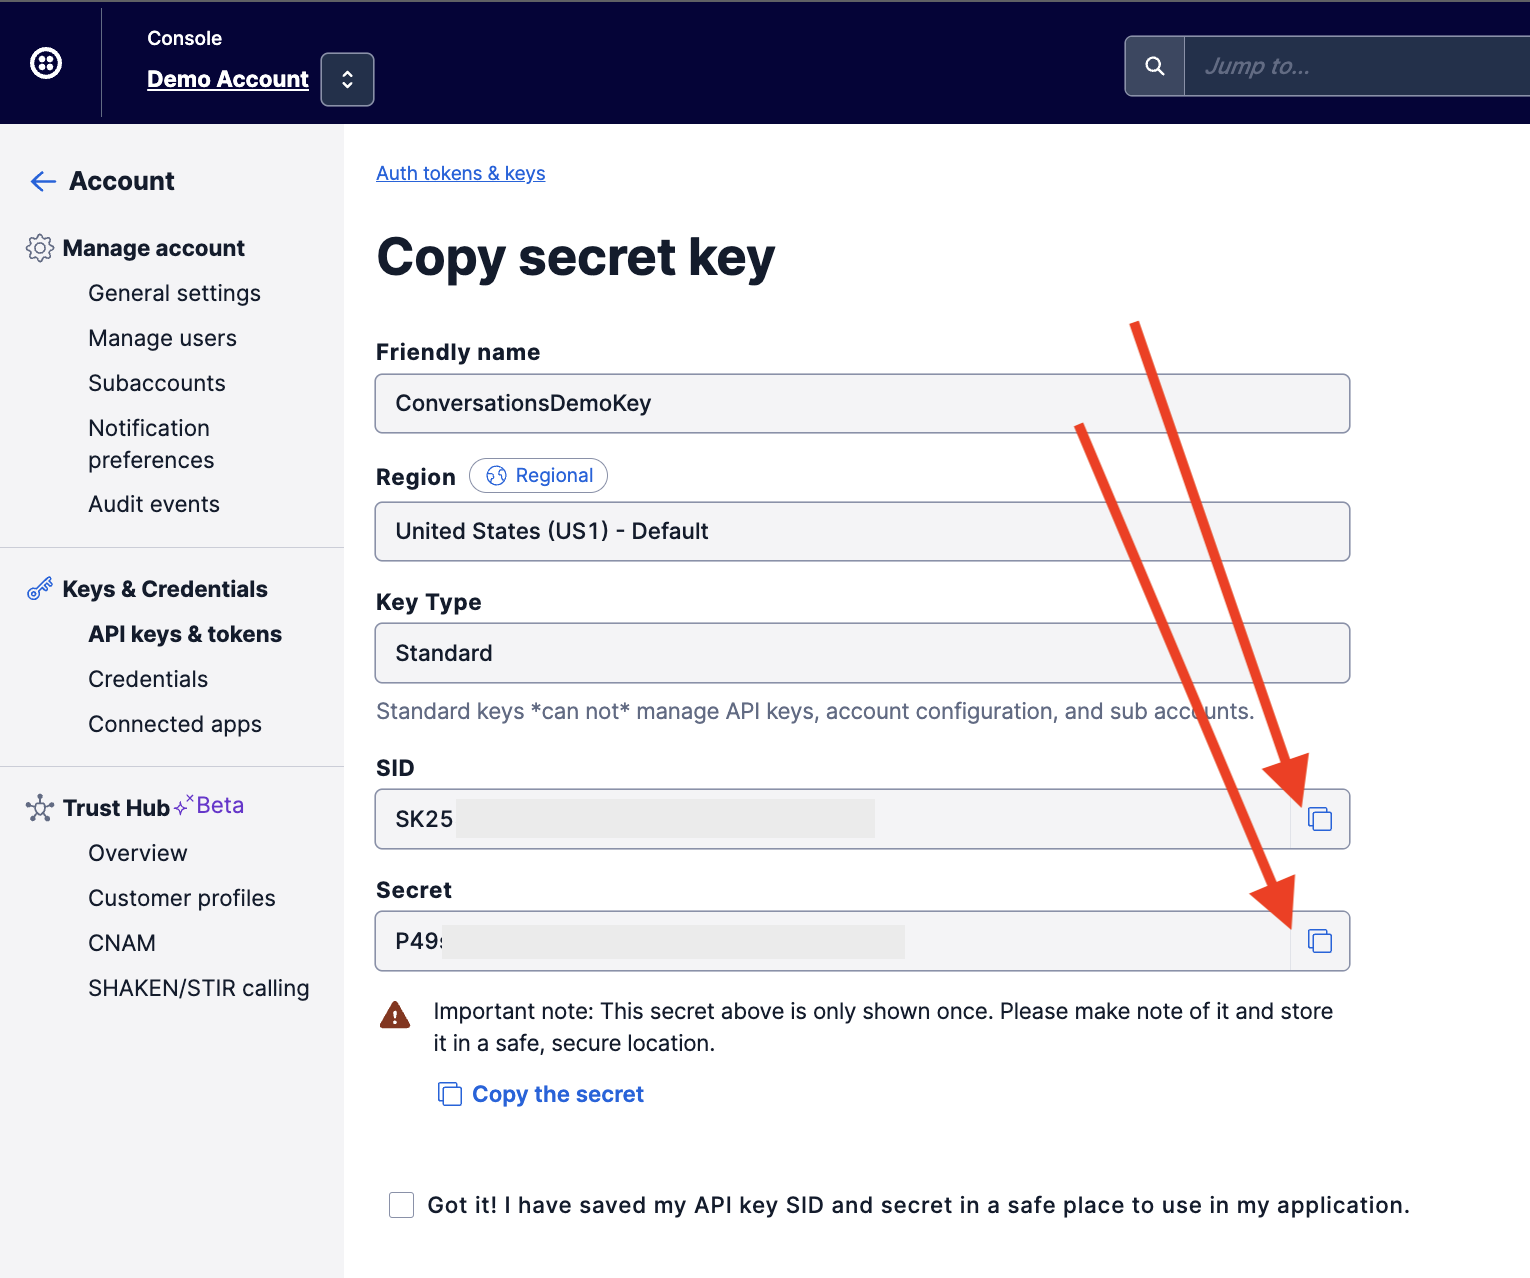
Copy the SID and paste it into the .env file next to the API_KEY property.
Copy the Secret and paste it into the .env file next to the API_SECRET property.
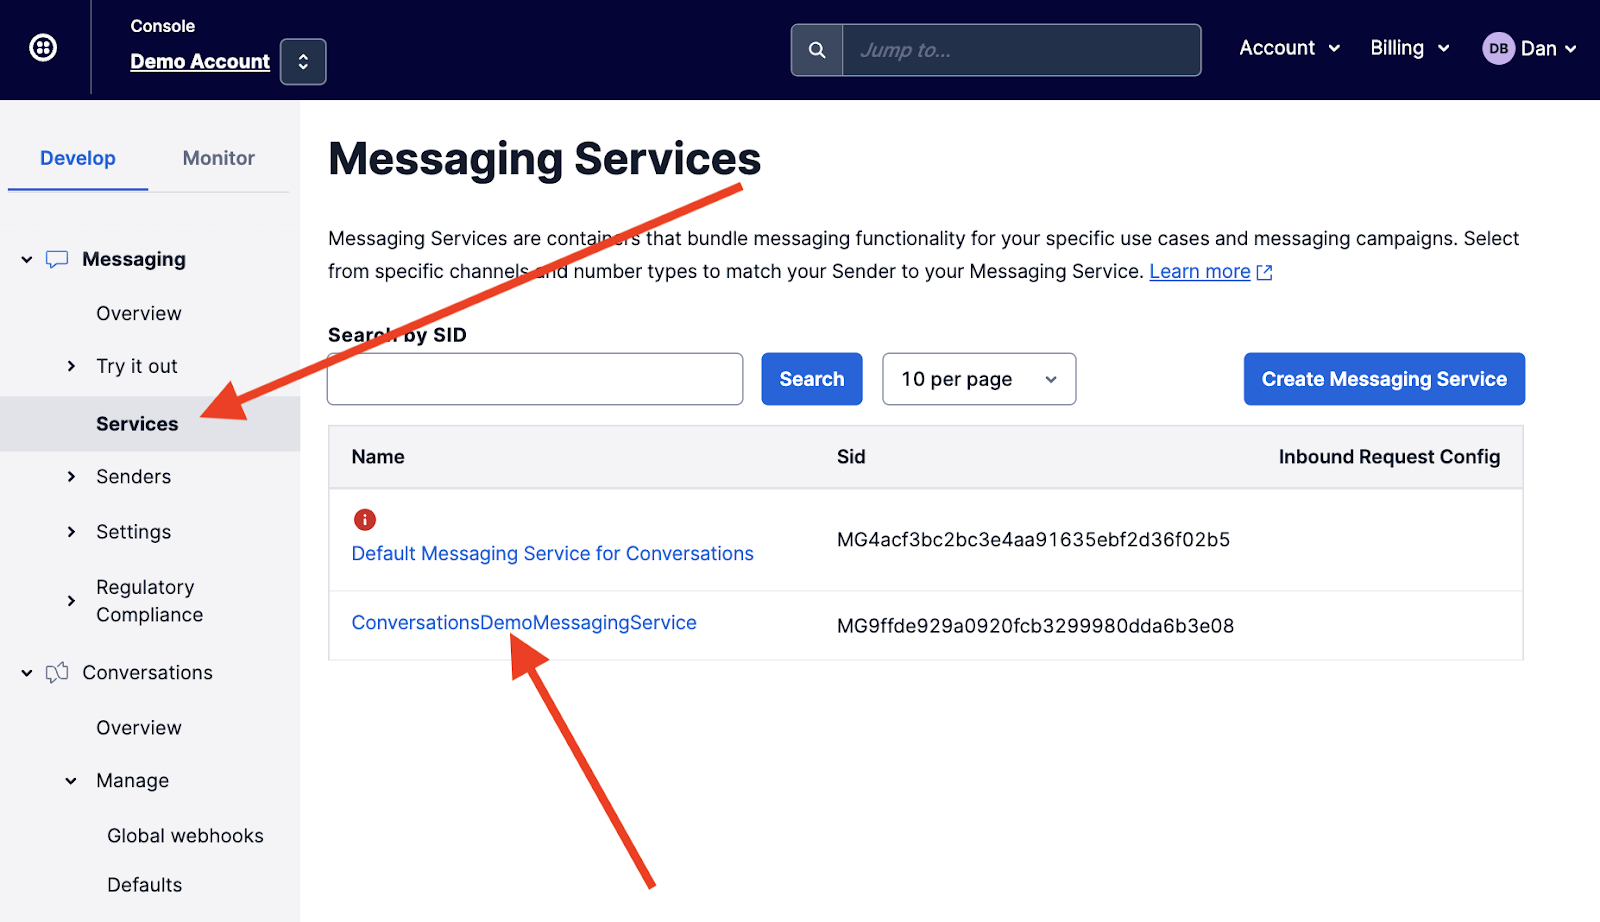
The last step is to create a Messaging Service. Select Services under Messaging and then click on Create Messaging Service.
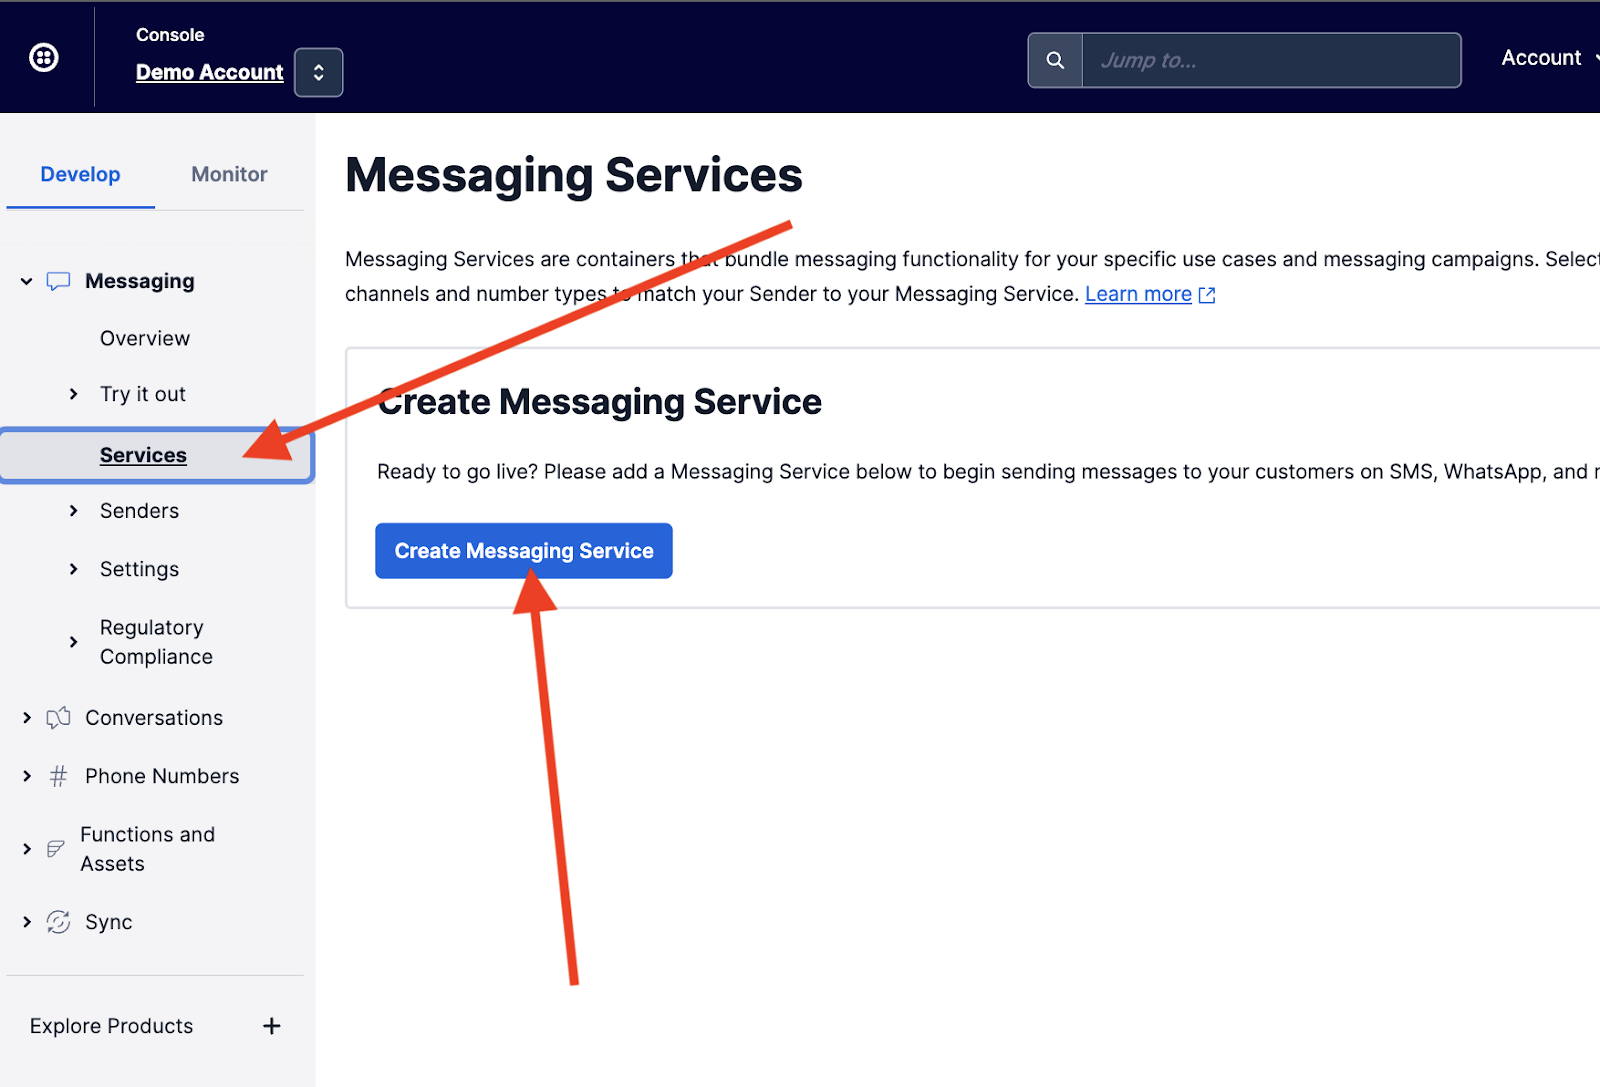
Enter a friendly name like “ConversationsDemoMessagingService” in Step 1, and then in Step 2, add the Phone Number that you created to the Sender Pool of this new Messaging Service. Click the checkbox next to the phone number and then click Add Senders.
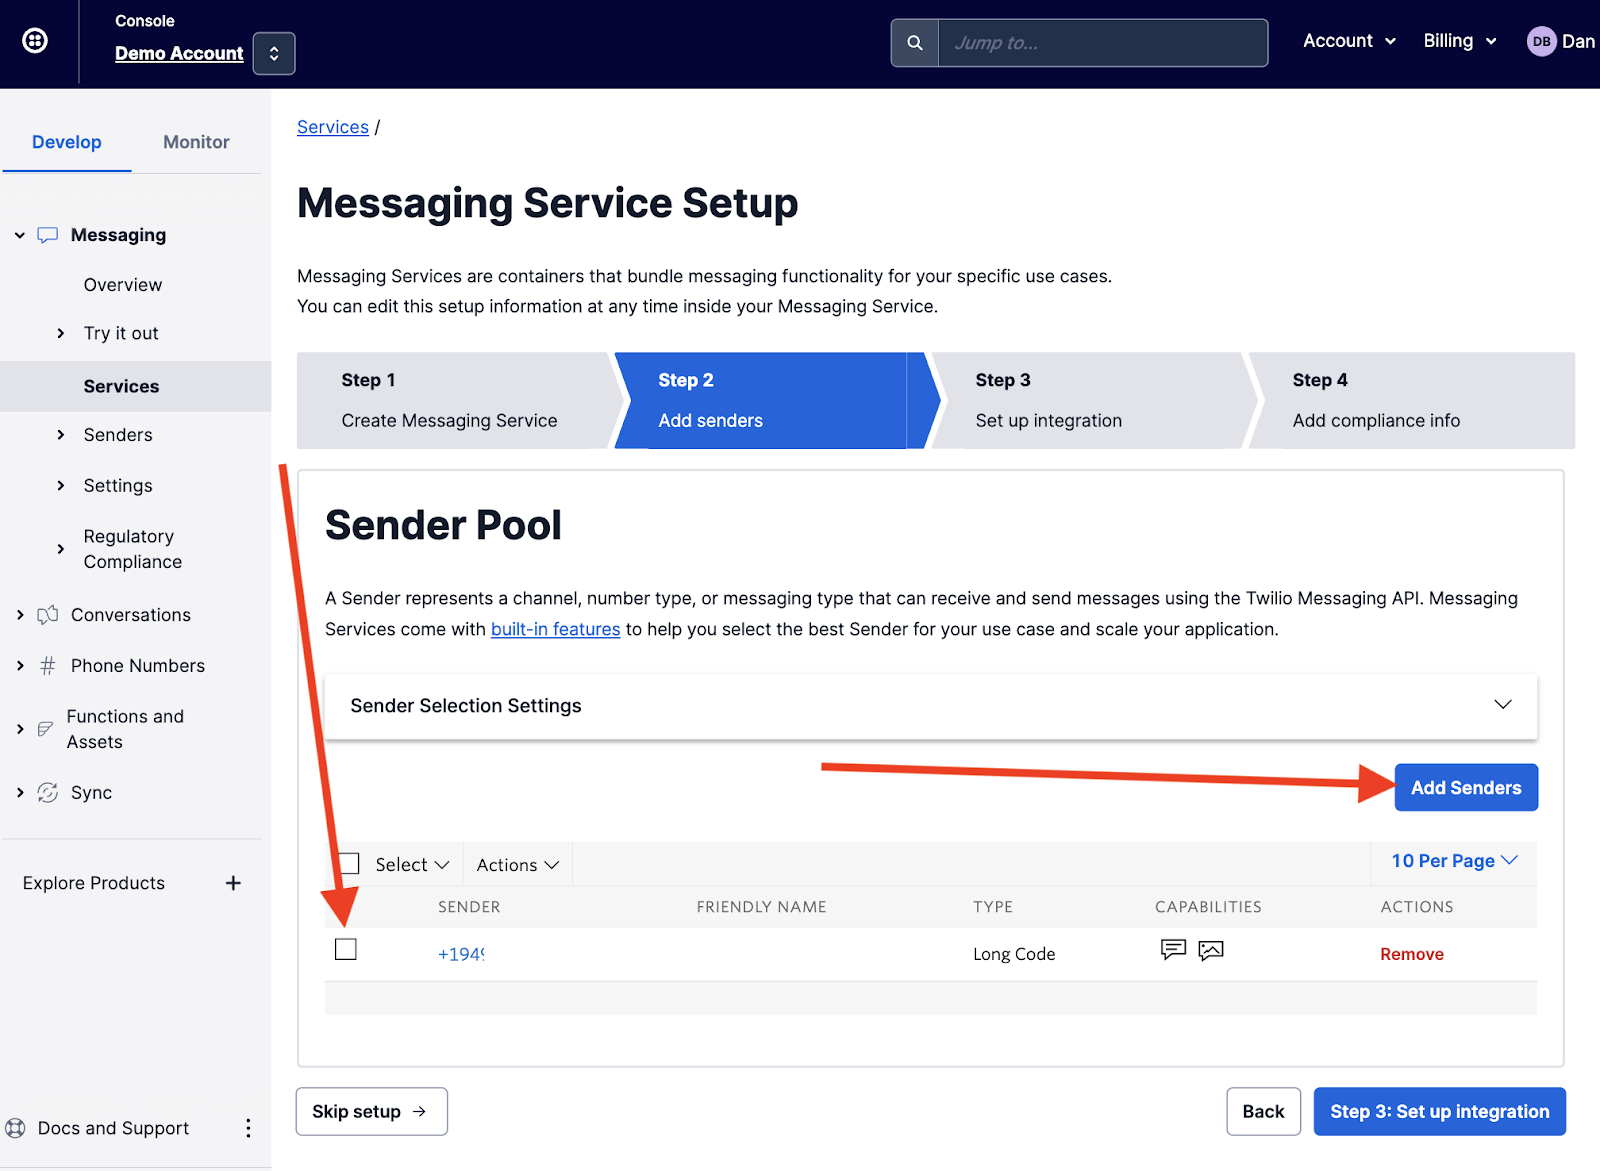
Once you have successfully added your phone number to the Sender Pool, click on Skip setup.
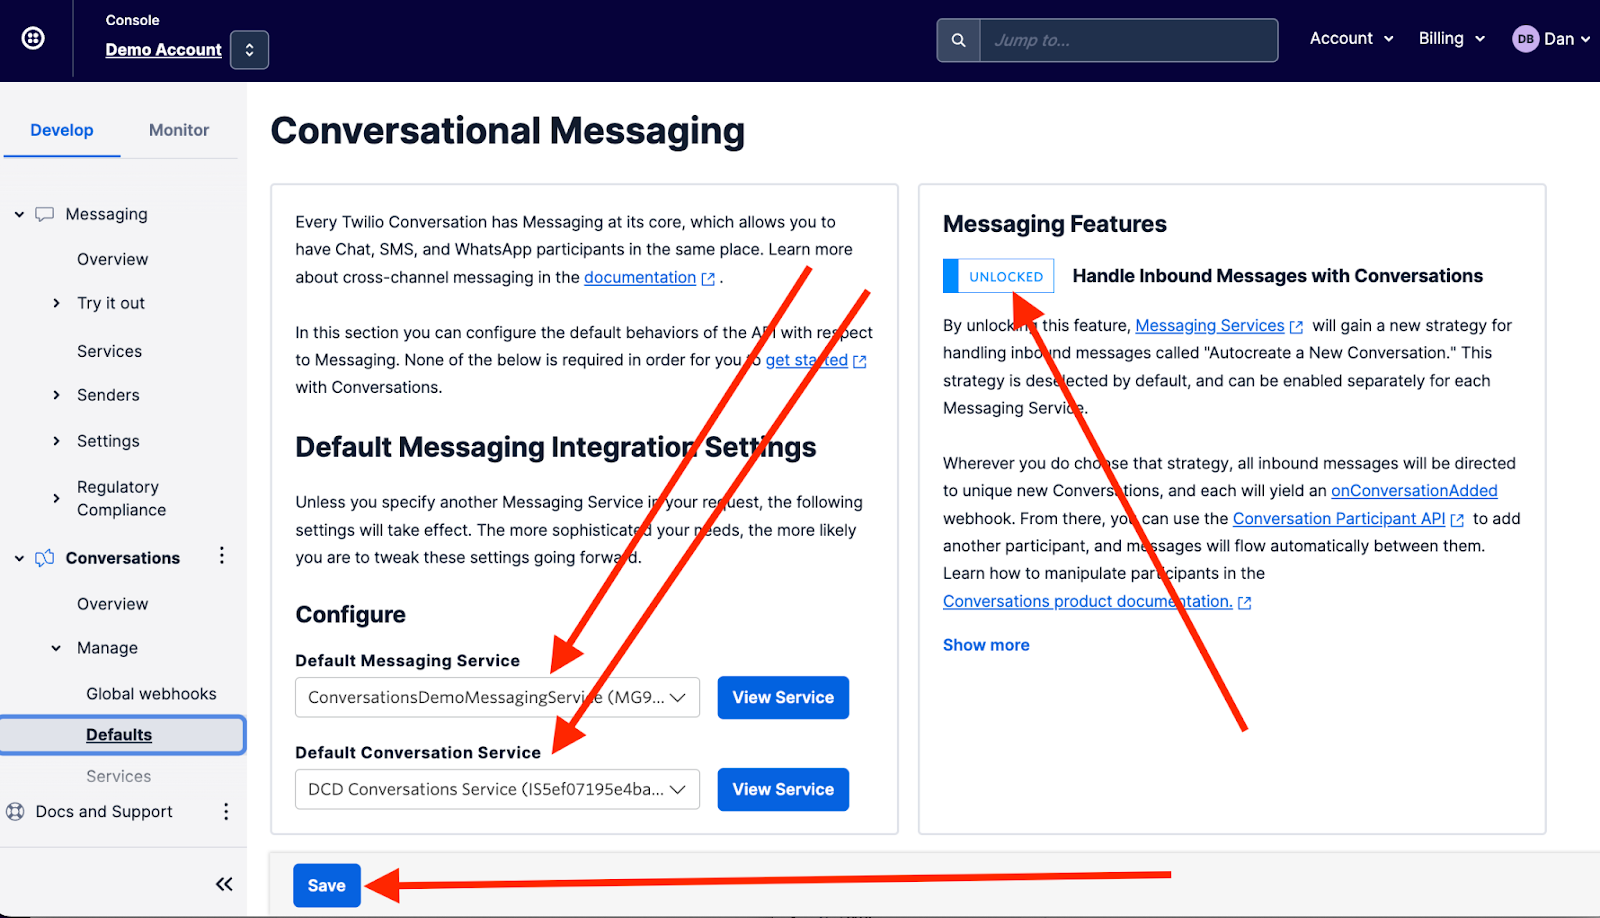
The last thing we need to do in this section is connect the Messaging Service to the Conversations Service…
From the left column, select Defaults under Conversations and do the following:
- Set Handle inbound Messages with Conversations to Unlocked
- Set the Default Messaging Service to the Messaging Service you just created
- Set the Default Conversations Service to the Conversation Service you created earlier
- Click the Save button
Now, click on Services under Messaging and select the Messaging Service you created earlier.
Once in that Messaging Service, click Integration in the left column and then select the Autocreate a Conversation radio button, and then save your changes.
Whew!
We just provisioned and configured a Conversations Service, a Messaging Service, a Sync Service, an API Key, and a Phone Number!
3. Update the Project Environment Variables
If you have been copying and pasting the Twilio variables into your .env file from the previous section, your .env file should look like this:
If you missed some properties, you can go back and fill them in. Otherwise, let’s deploy!
4. Deploy the Serverless Project
You are now ready to deploy the Twilio Serverless Project which will upload all of the Twilio Functions and Assets needed to run the application.
From the root of the repo directory…
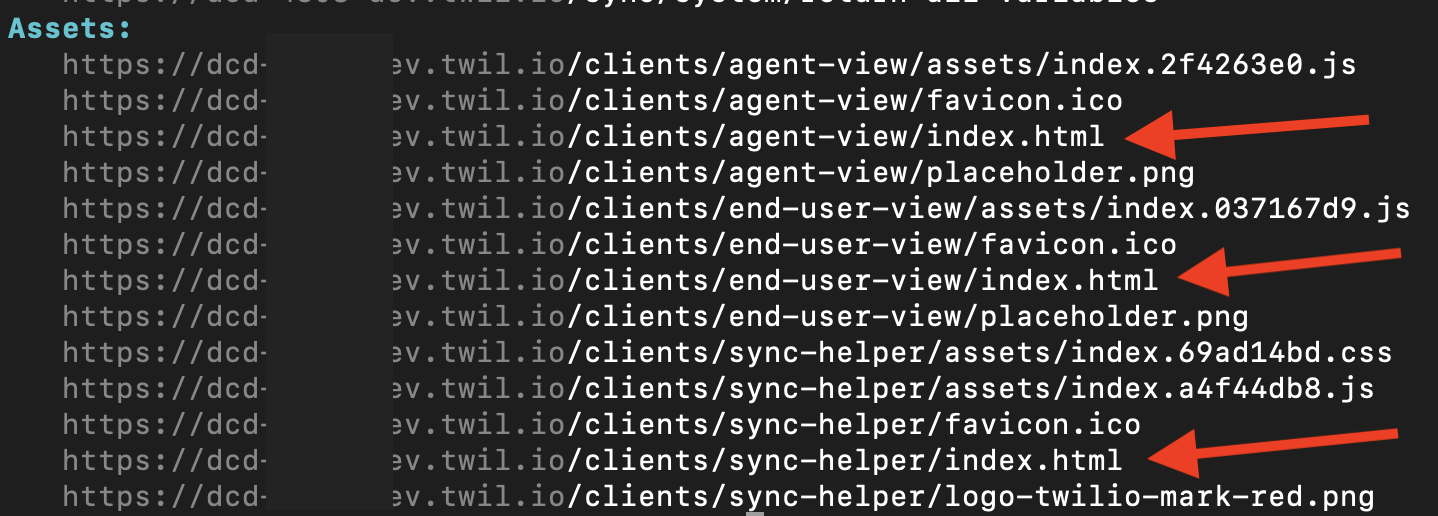
Once the deployment is complete, the command will list all of the Functions and Assets that have been deployed. Copy the urls of the three files ending in index.html
5. Update the Application Datasource (Twilio Sync)
Before we start playing with the application, we need to finish setting up the data layer. This application uses Twilio Sync, Twilio's state synchronization service, as the application’s persistence layer.
Sync Helper is a collection of GUI tools and Twilio Functions that makes it easier to manage tables and data with Twilio Sync.
Paste the URL ending with /sync-helper/index.html into a web browser.
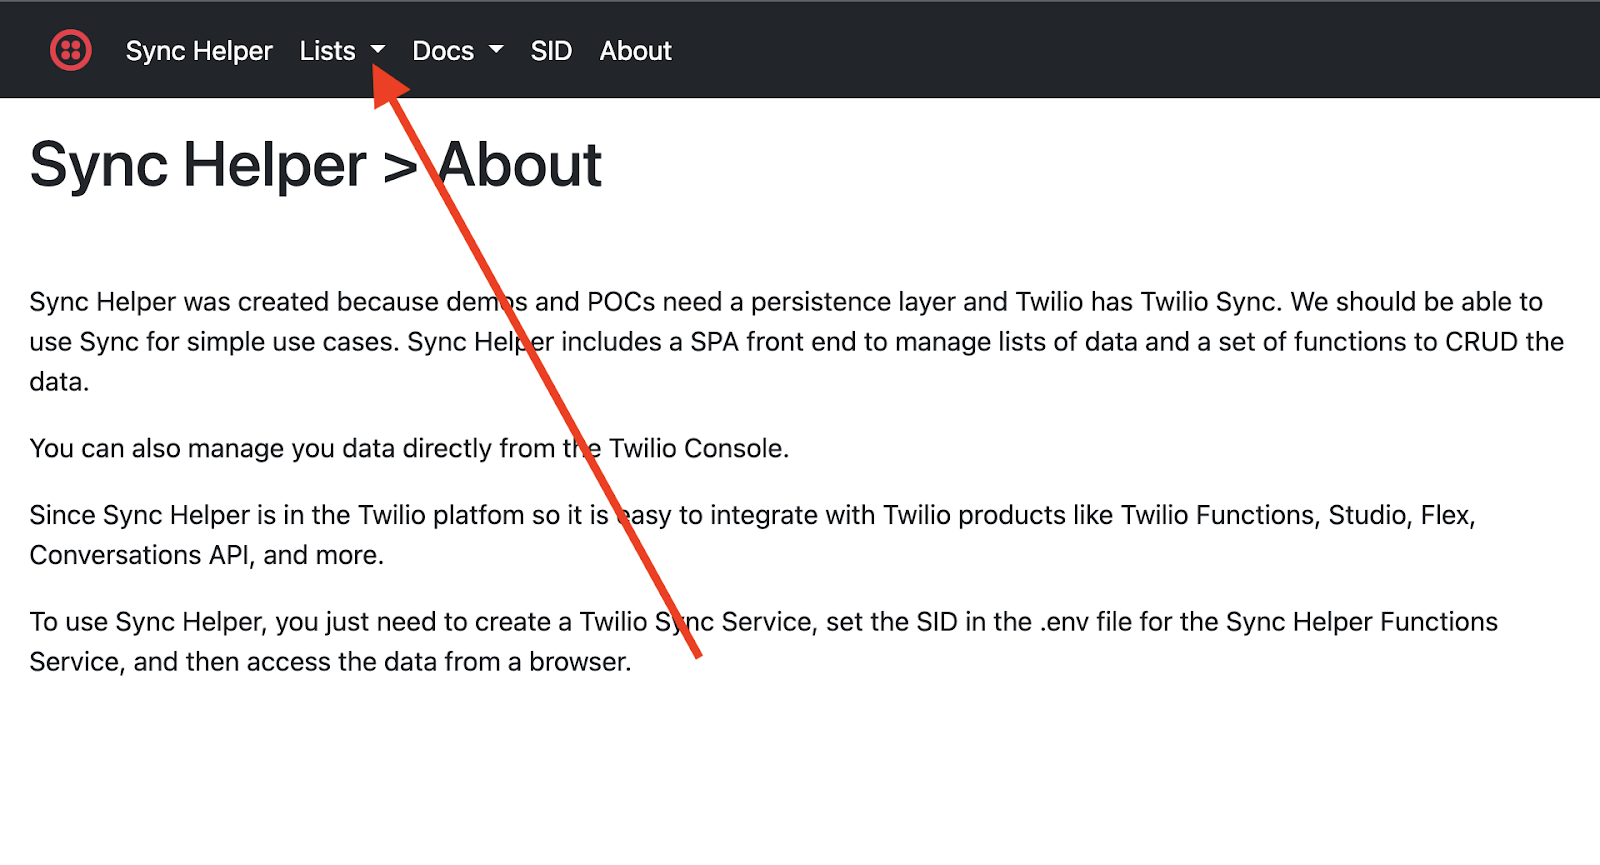
Under Lists select All Lists.
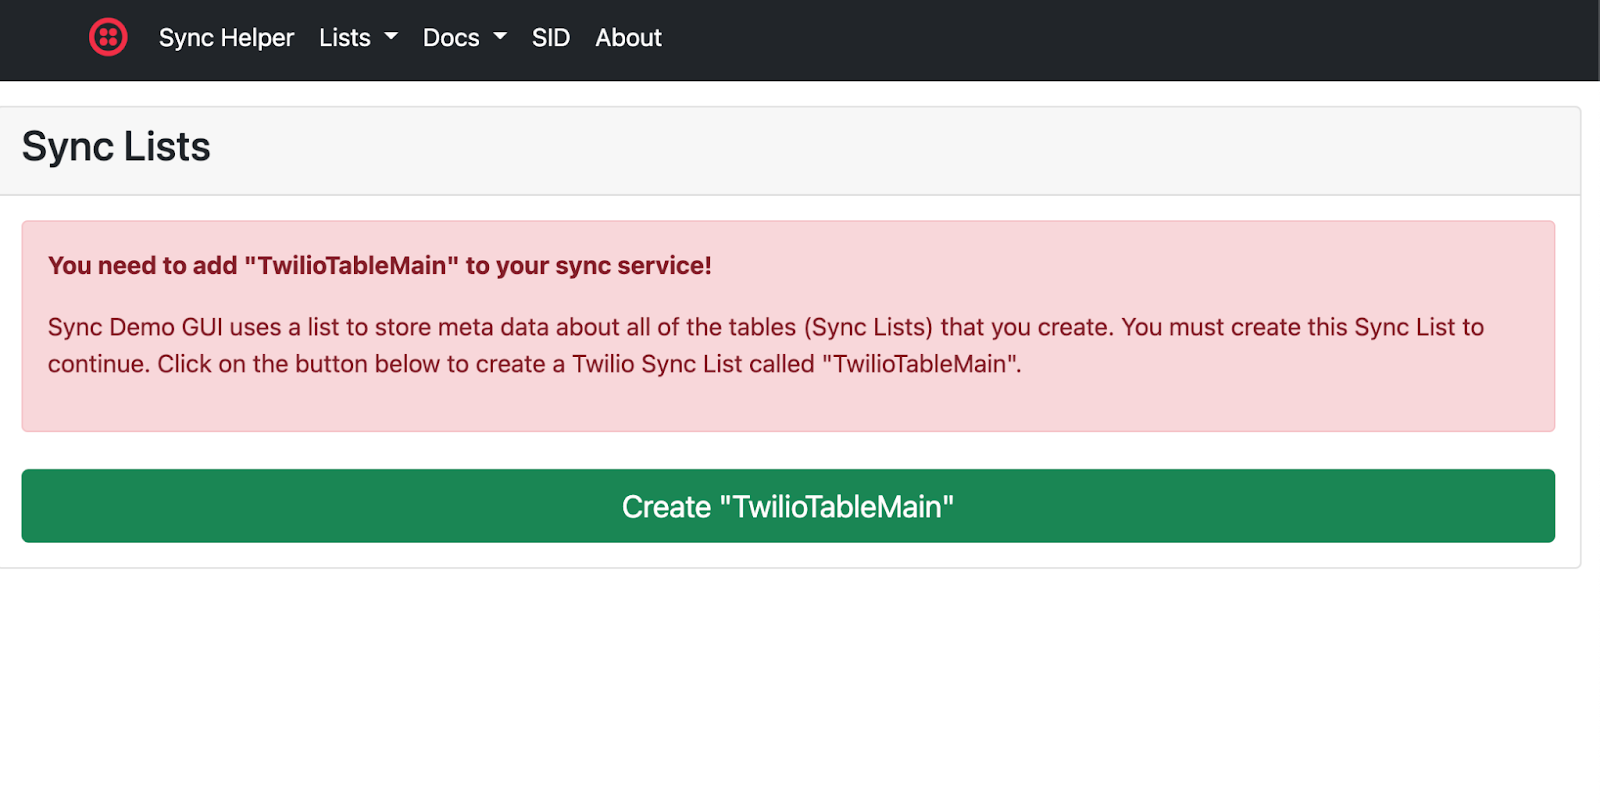
Then click the green button to Create “TwilioTableMain” – this will create a Sync List to hold metadata about all of the other tables.
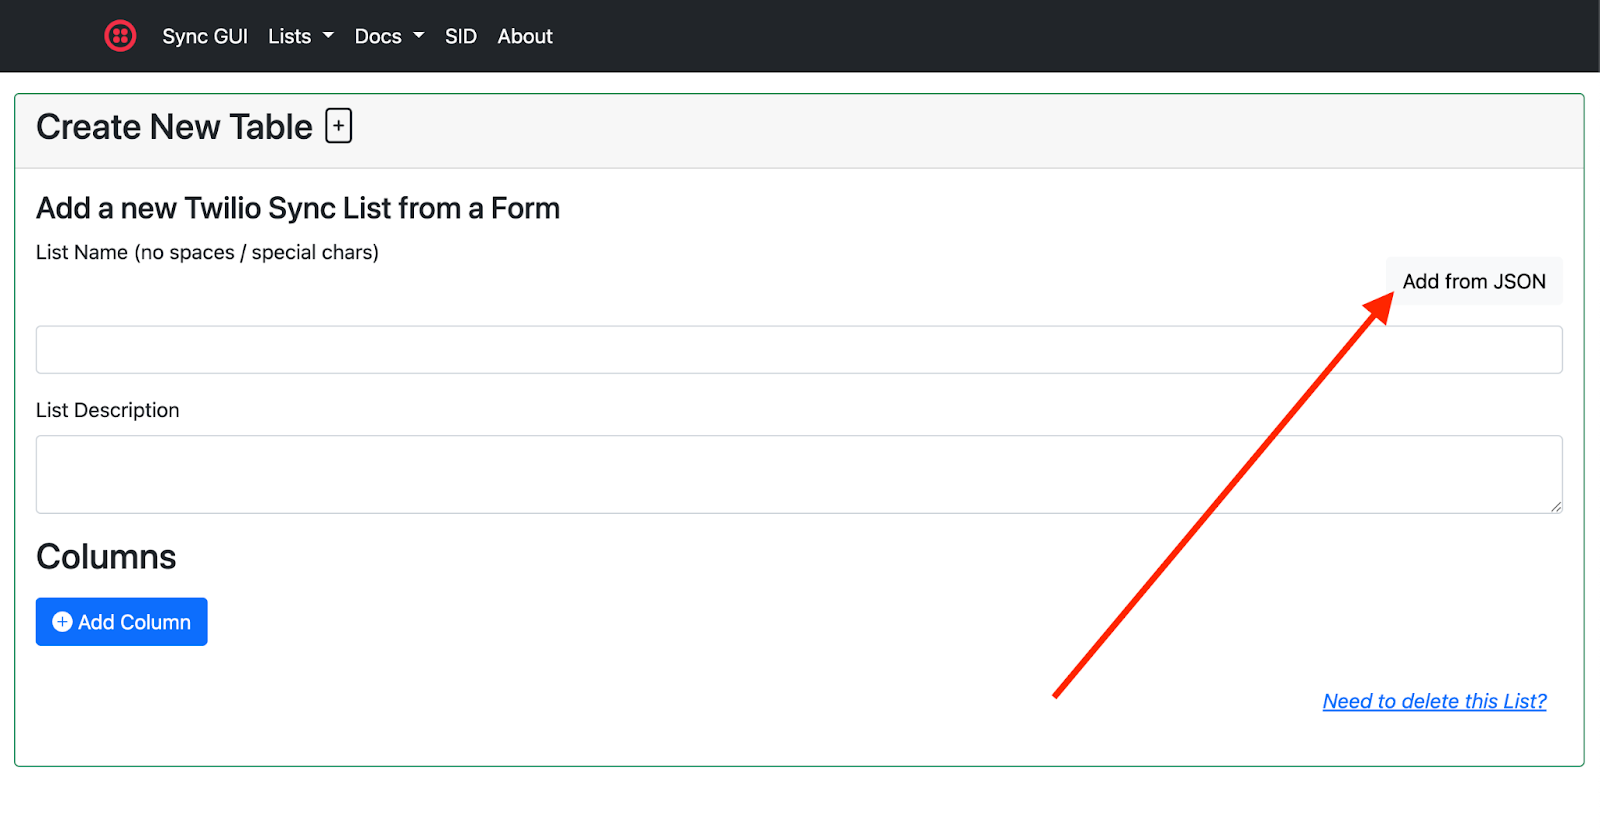
Under Lists select New List, and then click the Add from JSON button...
In the code repository, open the folder /sync-json and then open the file AgentList.json and copy the contents.
Paste the contents into the form and then click Save New List From JSON.
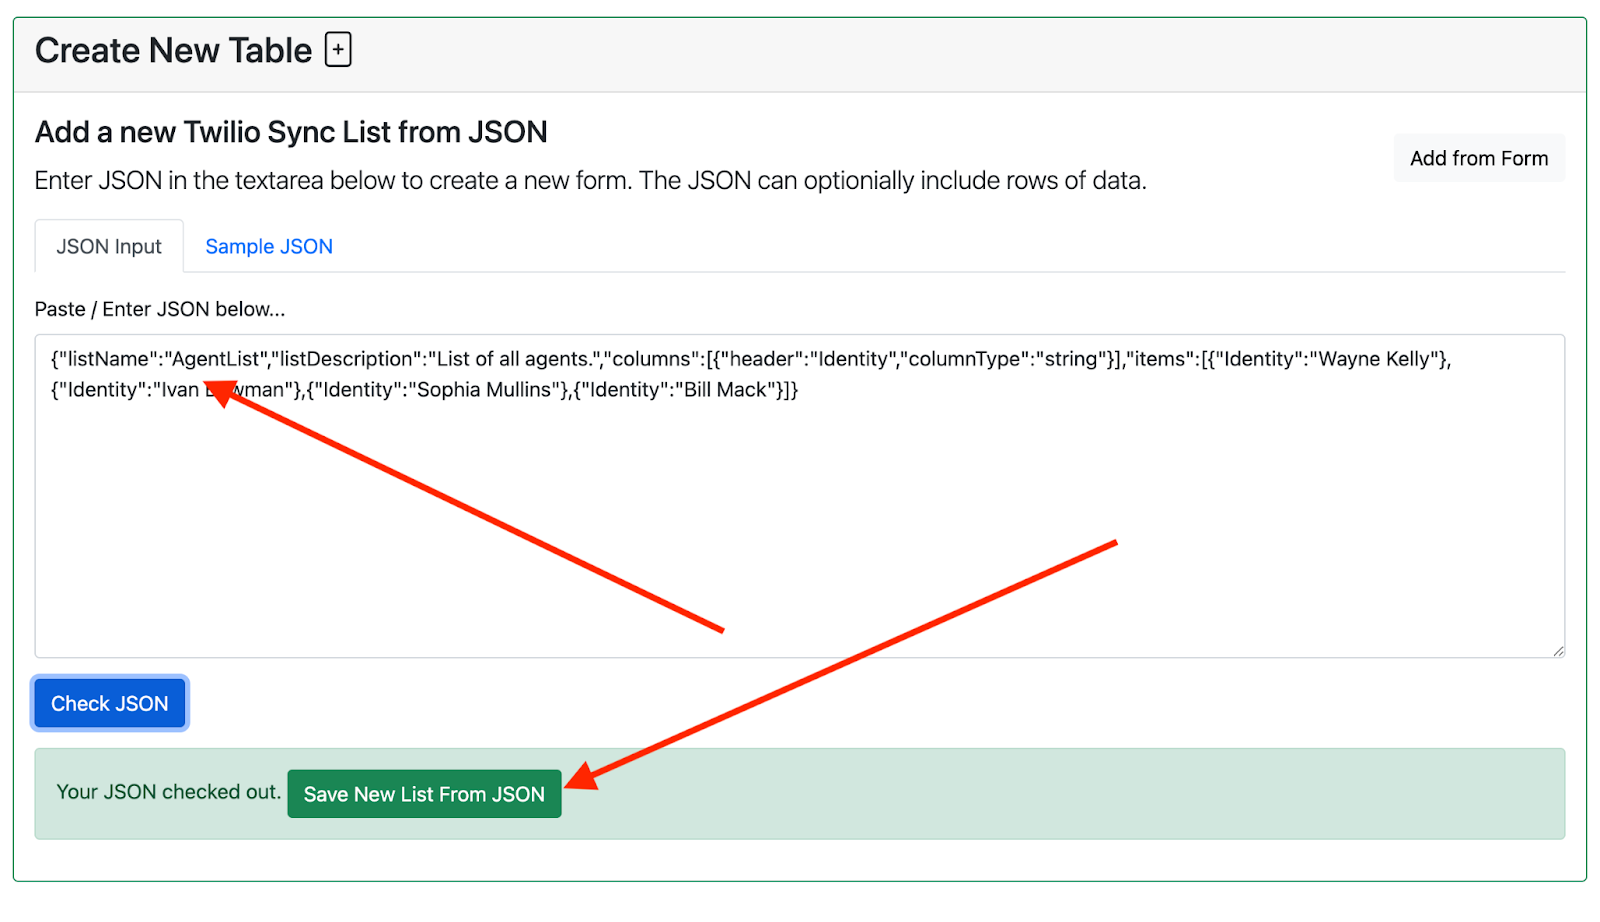
This will create a new list containing agent names. Follow the same steps for the other two files in that directory (ChatButtonList.json and WebhookList.json).
6. Try it out!
We are ready to roll!
Paste the URL ending with /agent-view/index.html into a web browser tab.
Paste the URL ending with /end-user-view/index.html into another web browser.
Webhooks
This demo supports webhooks. Watch the video below to see how to configure and use webhooks:
WhatsApp is supported in this demo, but you need to provision a WhatsApp Sender and add it to the Messaging Service.
Customizing and Local Development
The source code for the single page applications SPAs are included in the repo under the /client-src directory.
If you want to customize the SPAs, you can go into a folder and run…
Each directory has a file called .env.development. To be able to run the SPA from your local machine, open that file and enter your Twilio domain for your deployed serverless project (step 4).
You can then run…
…to run the SPA locally. You can make changes and play around all you like.
If you want to deploy your changes, run
…and that will update the files in the /assets directory. You would then run twilio serverless:deploy (from step 4) to update the files deployed to Twilio.
Conclusion
In short order you just created a multichannel messaging and support application!
Next up – you could take this application and customize it to your specific needs. Use the patterns introduced here to build your awesome application!
Need more inspiration? See how AppFueled used Conversations API to build a two-way portal that helps auto repair shops support automated and conversational engagement.
Need even more inspiration? Using Conversations API, CLOUDWORK|PRO built a messaging app that makes it easy for users on both sides of their marketplace to connect, get questions answered, schedule work, and complete jobs.
Ready to start writing code? Check out our awesome Conversations API docs!
Dan Bartlett has been building web applications since the first dotcom wave. The core principles from those days remain the same but these days you can build cooler things faster. He can be reached at dbartlett [at] twilio.com.
Related Resources
Twilio Docs
From APIs to SDKs to sample apps
API reference documentation, SDKs, helper libraries, quickstarts, and tutorials for your language and platform.
Resource Center
The latest ebooks, industry reports, and webinars
Learn from customer engagement experts to improve your own communication.
Ahoy
Twilio's developer community hub
Best practices, code samples, and inspiration to build communications and digital engagement experiences.