Build an Online Presentation System with Python, JavaScript, and Twilio Programmable Video
Time to read: 15 minutes
February 18, 2021
Written by

In this tutorial, we will implement an online presentation system where the presenter can share the screen contents and their video and audio in real-time, while attendees who join the presentation can watch.
For the back end portion of this application we will use Flask, a Python web application framework, while the front end will be built using vanilla JavaScript. The Twilio Programmable Video service will be used for video and audio streaming.
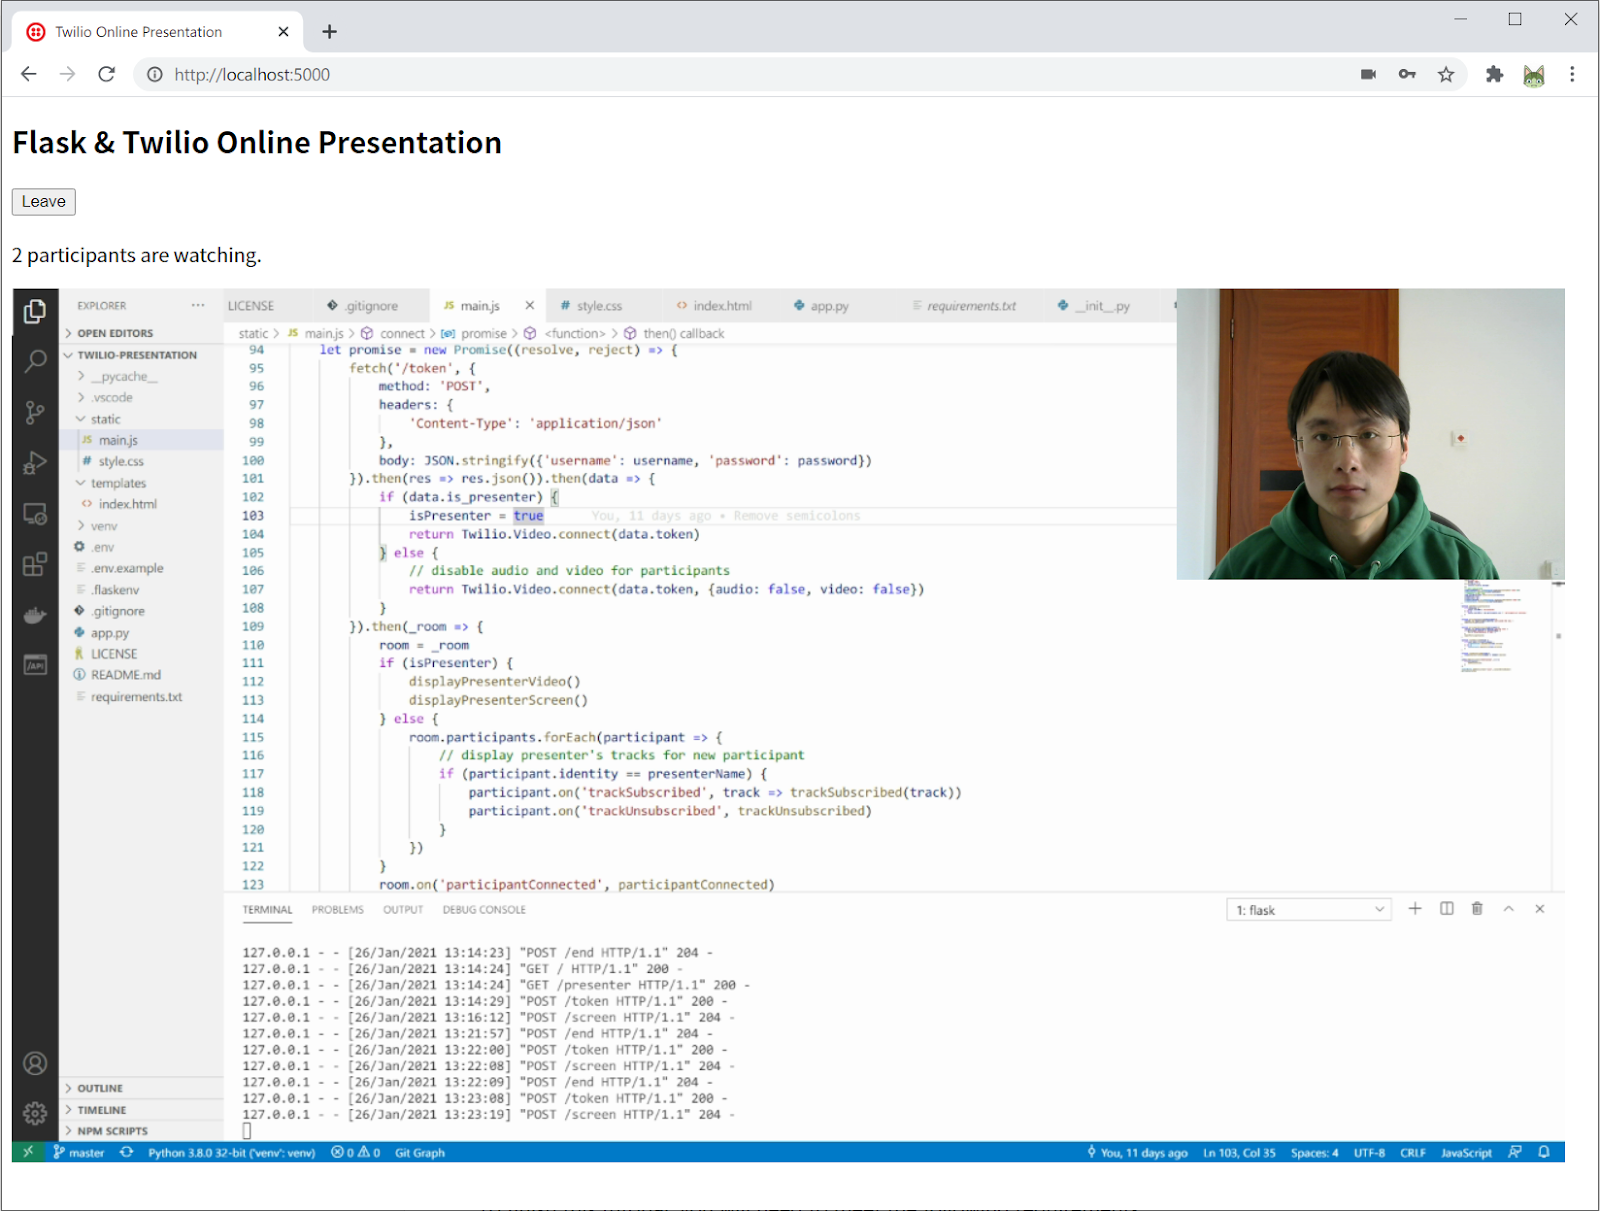
The final application is shown below:
Tutorial requirements
To finish this tutorial, you will need to meet the following requirements:
- A computer with Python 3.6 or newer version installed. If your operating system does not provide a Python package, download an official build from python.org. You can check it by typing the
pythonorpython3command then pressEnterin your terminal. - A free or paid Twilio account. If you use this link to register, you will receive a $10 credit when you upgrade to a paid account.
Project environment setup
First, we need to create a directory to save our project:
Then change into the directory, create a Python virtual environment with Python's venv module:
Note that in the last command above, your Python interpreter may be called python instead of python3 if you are using Windows. The second "venv" in the command above is the name of the virtual environment, a folder called "venv" will appear in our project directory after you executed this command.
Now we can activate the virtual environment we just created by using the activate script inside our virtual environment folder. If you are using Linux or macOS:
Or if you are using Windows:
From now on, you will see a (venv) prompt in your terminal or command line window, to indicate that you have activated the environment successfully:
Next step is install the dependencies for our project, which are:
- Flask: A Python micro web framework.
- twilio: A library for communicating with the Twilio API.
- python-dotenv: A library for importing environment variables from .env file.
Use the command below to install these packages:
The last step is to generate a requirements file (normally named requirements.txt) to record the dependencies in the current environment so that you can replicate the same environment on other machines:
The content of the requirements file will look like this:
Twilio service setup
To connect your application with Twilio, we have to create a file called .env, where we can save the needed Twilio account credentials as environment variables:
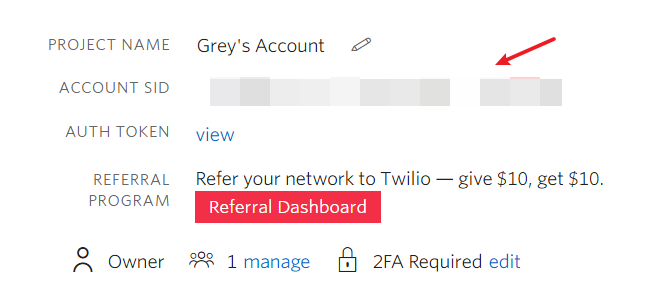
These values used to identify your account when you connect and talk to the Twilio servers. You can obtain them from your Twilio Console. You can find the Twilio Account SID field in your dashboard:
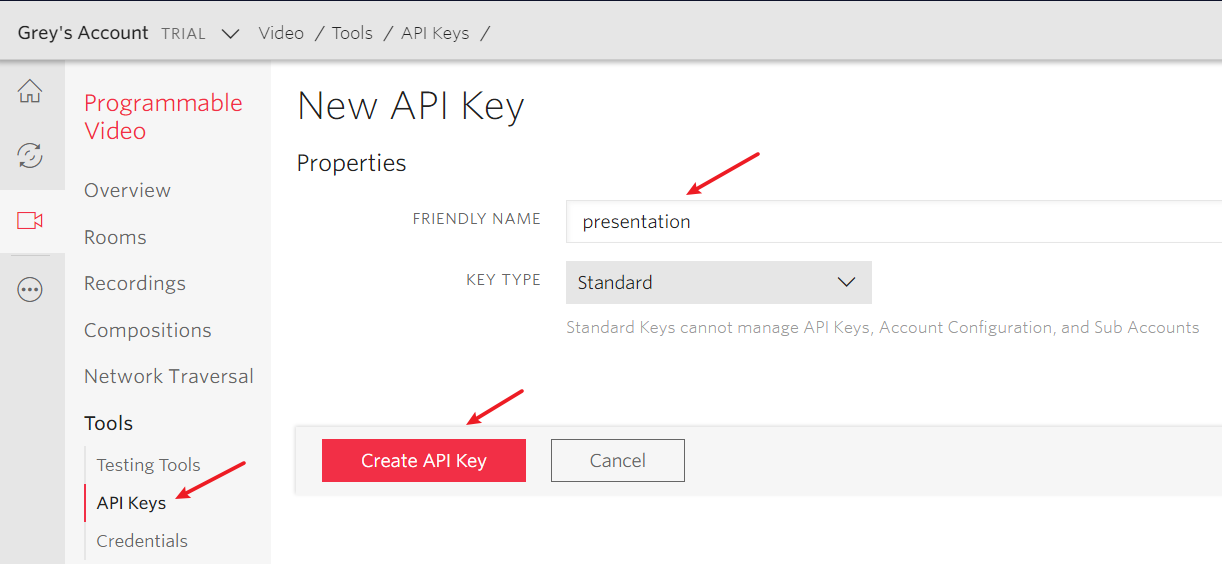
The remaining two variables require a bit of extra work. First we need to find the "All products & Services" button on the left sidebar of the Twilio Console page, then find the "Programmable Video" service in the "Communications Cloud" section (click the "Pin" button to pin it on your left sidebar for convenient access). From there access the "API Keys" page on the "Tools" menu. Click the red "+" button to create a new API key for this project. Give it a friendly name (here I used presentation), and keep the "KEY TYPE" as "Standard".
After clicking the "Create API Key" button, you will see the API Key ("SID" field) and the API Secret ("SECRET" field):
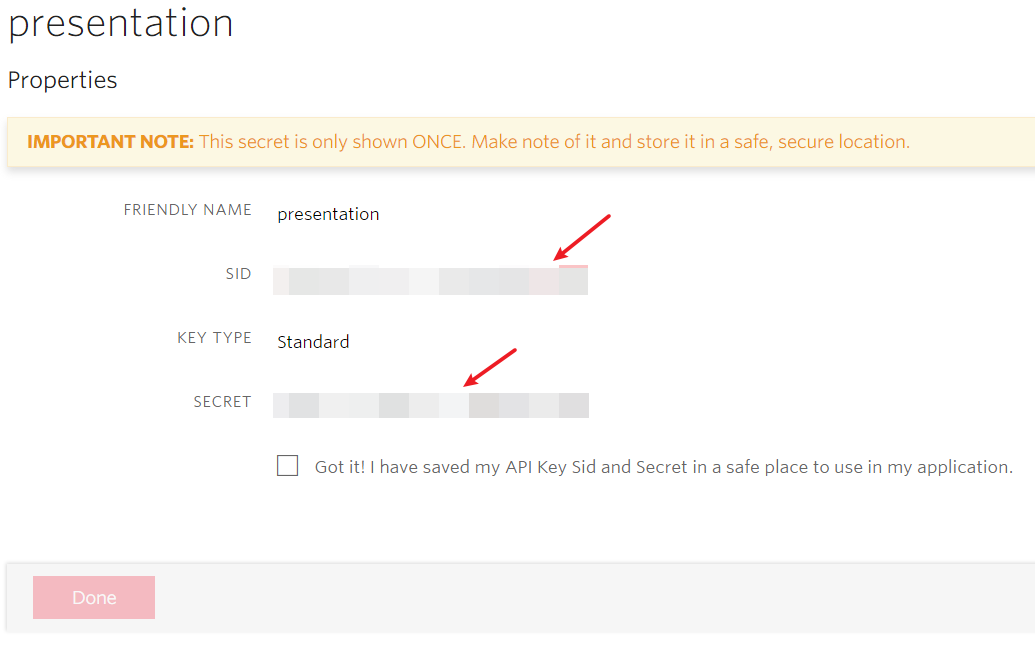
Copy and paste these values to the last two variables in your .env file.
Since these environment variables contain sensitive data, if you are going to use Git to manage your project, be sure to add .env to your .gitignore file to prevent it from ever being committed into your Git history.
Now everything is ready, let's start coding!
Implementing the front end page layout
In the Flask application, the HTML templates and static files will be saved in templates and static folders respectively. We will create these two folders at the root of the project directory:
When we have multiple pages in a web application, we don’t need to write the same layout element (e.g. <head></head>, navigation bar, page footer, etc.) in every HTML template. With Jinja’s template inheritance, we can create a base template which contains the basic page elements and layout. Then we can define some Jinja blocks in the base template that will be filled or updated in the child templates. You can learn more about template inheritance at Flask’s documentation.
In the templates folder, we will create a base template to display the basic page layout called base.html. Below is the content of the templates/base.html file:
We introduced two static files in the code above. The style.css in the <head> section will be added later. This file will have the CSS rules to style our page.
At the bottom of the <body> element, we loaded the Twilio Video JavaScript SDK library. We imported this file from the CDN server provided by Twilio:
We also created two blocks. The main block will house the main content of the page:
The script block will be used to add more JavaScript files in the child templates used for the presenter and attendee pages.
Attendee user interface
Our application is going to have two main URLs, one for the presenter and one for attendees. Below you can see the web page that will be used for attendees. This will be in a template file called templates/index.html that you need to store in the templates folder of the project:
Firstly, we use extends Jinja tag to declare that this template inherits from the base.html template added in the previous section.
Secondly, we have a main block to put our page content. In this block, we create a connection button to let the user join the presentation. The <p id=”status”> element will be used to display the connection status. The two <div> elements are where the video streams will be presented: one for the screen track, and one for the presenter video track.
Thirdly, we also have a scripts block, in order to append the attendee specific JavaScript to the corresponding block in the base template. The {{ super() }} allows us to preserve the content this block has in the base template.
The new JavaScript file that we are importing is called main.js. This is where the front end application for attendees will be added.
We will use the following CSS styles, which go in the static/style.css file. These will help to format the two video elements so that the video window is pinned to the top right corner of the screen window:
To help us distinguish the screen and video parts before the presentation starts, we give them different background colors: the screen window will be displayed in lightgrey, and the video window will be displayed in darkgrey.
In order to display the index page, we will need to render the HTML file with Flask. Copy the following code in a file named app.py in the top-level directory of the project:
In the code above, we created a Flask application instance called app, then registered a function as a route with the app.route() decorator. The index() view function is used for rendering the index page we just created.
Run the Flask server with the flask run command, as follows:
Now visit http://localhost:5000 on your web browser, and you will see our main application page:

Flask can automatically restart and reload the application when code changes and display useful debug information for errors. To enable these features in your Flask application, we will need to set the environment variable FLASK_ENV to development. We can do this in a file named .flaskenv, which is used to store Flask-specific environment variables:
Now when you run flask run the application starts in debug mode:
Presenter user interface
Now we will create a template page for the presenter called presenter.html. The content for this page is shown below. Save the presenter.html file to the templates directory.
The content of presenter.html is very similar to the one we created for index.html. In the main block, we changed the text of the connection button to Start Presenting!. We also do not have the container element of screen share.
In the scripts block, we referenced a new JavaScript file for the presenter called presenter.js where we will write the presenter client logic.
To expose the presenter page, we need to create a route for it in app.py. Add the following code at the bottom of app.py:
For your reference, here is a diagram with the current project structure:
Generating access tokens for clients
The JavaScript front end will need to connect to Twilio to access the streaming and sharing features of the Programmable Video service. To connect to the Twilio servers, the clients need to authenticate with an access token, which is generated in our server.
Below you can see an updated app.py that adds the login() view function to generate Twilio access tokens for clients.
Near the top of the file we retrieve the credential values that we saved in the .env file, which Flask will automatically import into the system environment when python-dotenv is installed. For this we use the os.getenv() function from the Python standard library:
In the new /login route, we check if the request was sent with a query parameter present and in that case we assume that the request was sent by the presenter. The query variable can be obtained with request.args.get() method. If the request came from the presenter, then we set the username to presenter. Otherwise, we just generate a random username for the attendee with uuid.uuid4().hex. The username is stored in the user session, so that it can be recalled later.
The request variable is part of the flask package, while uuid is imported directly from the Python standard library.
To use Fask’s session object, we will need to set a secret key in the Flask application instance:
The Twilio package for Python provides the AccessToken class, which is used to create access tokens. We pass account_sid, api_key, api_secret, and the identity as arguments:
We then use the VideoGrant class to provision the token with access to the video service. The room argument limits the token to a specific room:
The room name is defined in the global variable room_name:
To complete the function, we generate the token and return a JSON response that contains it:
Connecting the presenter to the presentation
To connect the presenter to the presentation, we will create a function to handle the connection logic. Add this code to a presenter.js file in the static directory:
In the snippet above, we create a connectButtonHandler() function that will be triggered when the presenter clicks the “Start Presenting!” button. Note how the function is bound to the click event of the button in the last line.
To determine the current connection status, we will use a connected variable that is initialized to false. The connect button acts as a toggle, so based on the state of the connected variable it will initiate a connection to the video room, or disconnect from it.
When starting a connection, we call the connect() function to finish the actual connection process and eventually set connected to true. When disconnecting, we will call the disconnect() function to disconnect the user and end the presentation. The label and status of the connect button is always updated based on the connection status.
Now let's jump into the connect() function. Add the code below to the presenter.js file:
In this function we return a promise, which will let the caller bind success and error callbacks to it. The result of the promise is controlled by the resolve() and reject() functions that are passed as arguments when creating the Promise object.
We begin the connection process by obtaining an access token from the server. For this we use the fetch() function to fire an AJAX request:
Notice we pass the query string ?present=true in the URL to tell the server that this is a request from the presenter. We also set the request method to POST by passing an options object.
Next, we use then() method to continue the call on the return value of the fetch() call and turn the return value into JSON format with res => res.json(). Since the then() method will return a Promise object, we can bind additional then() clauses to it. In the subsequent then() call, we grab the token from the JSON response and connect the user to the video room by calling the Twilio.Video.connect() function from the twilio-video.js library, with the access token passed as an argument. We also pass an additional options object to set automaticSubscription to false. This is because by default, a participant in a video room subscribes to all media streams published by other participants. Since the presenter doesn’t need to subscribe to any other streams, we use this setting to overwrite the default subscribe-to-all rule. You can find more details about this in the Overriding the Default Rule section in the Track Subscriptions Documentation.
In another subsequent .then() call, we catch the return value of the Twilio.Video.connect() function, which is the room the user is connected to. Here we save the _room object returned by Twilio.Video.connect() to variable room for future use:
Next, we publish the presenter’s screen share track. We will talk about the details of the publishPresenterScreen() function later.
In the remaining code, we define event handlers for when a participant connects or disconnects from the video room, update the state to connected, and finally resolve the promise.
Below you can see the two event handlers for participantConnected and participantDisconnected event, which also go in the static/presenter.js file:
In these two functions, we just call the updateParticipantCount() function, which updates the number of participants shown in the page. Add this function also in static/presenter.js:
Publishing the presenter's video feed and screen
The video and audio tracks for the presenter will automatically be published to the video room upon connection, as this is the default. But we also want the presenter to see their own video. To display the video for the presenter, we will create a displayPresenterVideo function in static/presenter.js, which will be called when the presenter opens the page:
In this function, we call Twilio.Video.createLocalVideoTrack() to create the local video track. Once the video track is created, we append it to the video element of the page.
In addition to the video and audio tracks, we need to create a video track for the presenter’s screen and publish it to the video room. Below we define a publishPresenterScreen() function, which will be called when the presenter is connected. Add this function to presenter.js in the static directory:
Here we use navigator.mediaDevices.getDisplayMedia() method exposed by web browsers to capture the screen stream via WebRTC (Web Real-Time Communication) technology, passing an options object to set the video height and width to fit the screen container element that we will use to display the feed to attendees. You can read more on screen sharing in MDN's Screen Capture API Documentation.
The navigator.mediaDevices.getDisplayMedia() method returns a Promise object. In the callback function, we create a video track object and save it to the variable screenTrack. We pass the screen sharing stream as an argument, and we also pass an options object that sets the name of the track to screen. Giving the screen track a custom track name is useful so that we can distinguish it from other tracks when displaying the page for the participants.
We then publish the screen track to the room with room.localParticipant.publishTrack() method, passing the screen track as an argument.
To complete the screen sharing set up, we bind the onended event of this stream to the connectButtonHandler function, so that the presentation ends if the presenter clicks the “Stop sharing” button:

Disconnecting the presenter
The connectButtonHandler() defined above works as a toggle. When it is invoked to disconnect the video call it calls a disconnect() function to disconnect the presenter from the room and end the presentation. Here is the disconnect() function for the presenter, which also goes in static/presenter.js:
This function is quite simple, we just call room.disconnect() to disconnect the user from the room. This will also unpublish the video and audio tracks. Then we set connected to false and call the updateParticipantCount() and the endPresentation() function.
In the endPresentation() function, also in static/presenter.js, we stop the screen share and unpublish the screen track from the room.:
If the presenter refreshes the page or closes the page, the presentation may not reset correctly. To cover these rare cases, we will add a function to listen the window's beforeunload event in static/presenter.js, that will be called when the user refresh/close the browser tab:
Starting a presentation
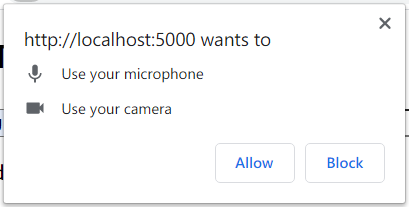
Make sure that your Flask server is running, make sure the URL in your browser is http://localhost:5000/present in the refresh your page to force the browser to update all the files. You should now see your video stream. Then click the Start Presenting! button to begin a presentation. The browser will ask for your permission to enable the camera and the microphone:
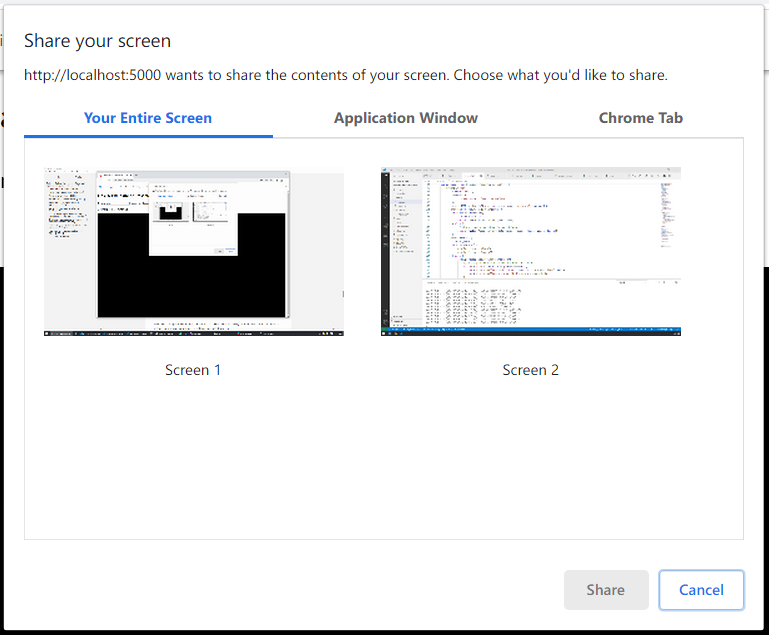
Then you will be prompted to choose the screen/window/tab to share:
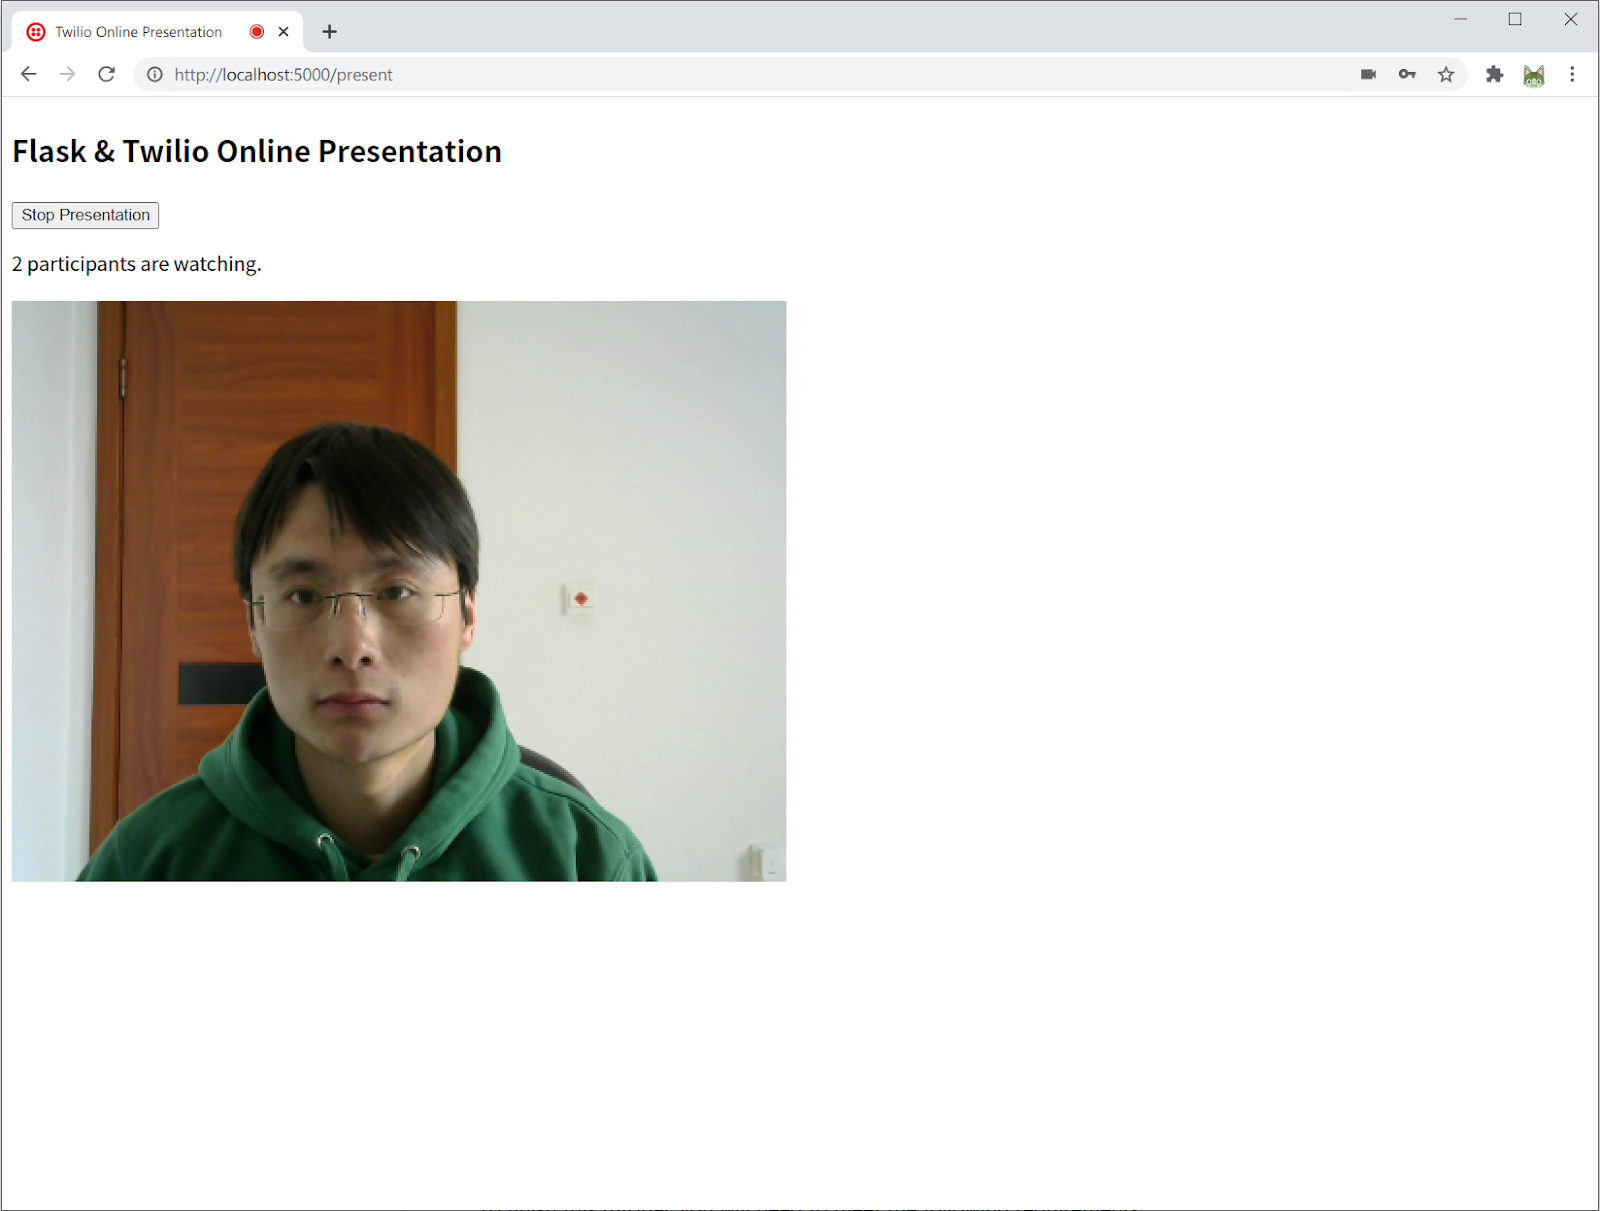
The final application when the presentation starts will look like this:
Connecting attendees to the presentation
In the following sections we are going to implement the attendee front end logic, which has some differences to the presenter, but overall follows the same structure. The JavaScript file that will have the attendee logic is going to be called main.js, and will also be stored in the static directory.
The connectButtonHandler function for participants is almost the same as the one we created for the presenter:
However, the connect() function is a little different:
When calling the Twilio.Video.connect() method, we set audio and video to false in the options argument, to prevent the audio and video from the participant from being published to the video room when connecting to the Twilio server. We also set automaticSubscription to false to disable the default subscribe-to-all subscribe rule since we only want the participant to subscribe the presenter’s tracks instead of every participant:
Once the connection is made we call a subscribe() function to set the participant’s subscribe rule. Here is the definition of this function, which also goes in static/main.js:
In this function, we just send a POST request to the URL /subscribe on our server, where the subscribe rule will be set. We will define the server route soon.
After setting the subscribe rule, we can receive the presenter’s tracks and display them on the attendee page. We iterate over the whole room.participants map, which stores the information of all the participants and call the participantConnected() function for each. We also set up handlers to receive callbacks when new participants join or leave the room in the future:
Here is the implementation of the participantConnected() function. Add it at the bottom of static/main.js:
The participant.identity attribute stores the participant's username. If the joining participant is the presenter, then we define handlers for the trackSubscribed and trackUnsubscribed events, which would allow us to receive the video, audio and screen streams.
Here are the implementations of trackSubscribed() and trackUnsubscribed(). Add them to static/main.js:
The trackSubscribed event will be triggered when the presenter track is published to the video room. The event handler receives the track object as an argument. To display the track to the participant, we append it to the related element container. We use the track.name attribute to assign the video track and the screen track into the right containers.
The trackUnsubscribed event will be triggered when the track is unpublished, which will happen when the presenter leaves the video room. In the trackUnsubscribed() callback function, we detach the track from the HTML element and remove the corresponding media element.
Finally, the attendee logic also uses the updateParticipantCount() function, which is identical to the one used in the presenter logic. Add a copy to static/main.js:
To complete the attendee connection logic we have to add the /subscribe route to our Flask server. Add the following view function at the bottom of app.py to handle the subscribe rule update:
To set the subscribe rule for a participant, we will need to create a Twilio Client object with twilio.rest.Client class and passing API Key and API Secret as arguments:
We obtain the username from the Flask user session. To update the subscribe rule for a specific user in a specific room, we use the client.video.rooms(room_name).subscribe_rules.update() method, passing the room_name variable and the username we acquired from the session object.
The update() method accepts a list of rules in the rules keyword argument. Each rule is a dictionary in the following format:
Since we only need the participant to subscribe to the presenter’s tracks, we use the include rule type and set the publisher filter to the presenter’s username, which is presenter.
You can learn more about the subscribe rule at the Specifying Subscribe Rules section in the Twilio Subscriptions documentation.
Disconnecting participants
To disconnect the participants from the presentation, we will create a disconnect() function in static/main.js:
In this function, we also need to call updateParticipantCount() to update the participant count message to show that we are disconnected.
We also need to define a participantDisconnected() event handler in static/main.js:
Here we add a notification for the participants when the presenter leaves the presentation.
At this point the logic for the presenter and the attendees is complete. You can open two web browser tabs on your computer, connect to http://localhost:5000/present in one, and to http://localhost:5000 in the other and test the two sides of this application.
This is how the attendee’s user interface looks like:

Host your online presentation with ngrok
Congratulations! We have finished the whole application. If you want to host a real online presentation and let your friends or coworkers join, you have to make your application public on the Internet. Instead of deploying your application to a web hosting service, we can use a tunnel forwarding tool to expose your local server to the Internet. While this isn’t as robust as a full deployment on a host, it is a good and simple solution to test the application. Here we will use ngrok, we can install it via a third-party Python package called pyngrok. Make sure the terminal on which you run the following command has the Python virtual environment activated:
Make sure your application is still running, then in a different terminal window, activate the virtual environment and type the following commands to let ngrok expose http://localhost:5000 to the Internet:
Pyngrok will download and install the ngrok client when you execute the ngrok command for the first time. Then It will output a command-line dashboard like this:
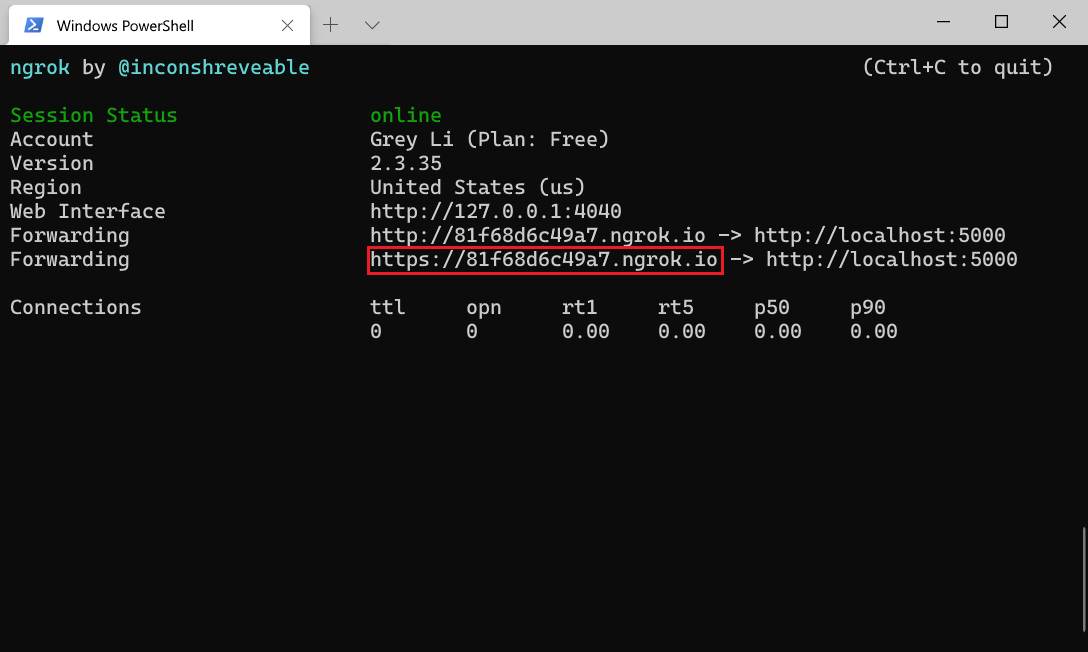
You can find a randomly generated public URL (https://xxx.ngrok.io) in the Forwarding section. Share this URL to your friends, tell them to join your online presentation! The presenter will use the https://xxx.ngrok.io/present URL to access the presenter page.
Conclusion
In this tutorial, we only explored some basics of the Twilio Video service. You can learn more about it in the Twilio Programmable Video Documentation. The complete example code for this tutorial can be found on GitHub. Please feel free to fork the project and add more features. Enjoy the adventure!
This tutorial is inspired by two related tutorials written by Miguel Grinberg. If you want to learn more details, check out the following tutorials:
- Build a Video Chat Application with Python, JavaScript and Twilio Programmable Video
- Screen Sharing with JavaScript and Twilio Programmable Video
Grey Li is a freelance web developer and technical writer. He is also a maintainer of the Flask web application framework. You can learn more about him at his website, GitHub, and Twitter.

Related Resources
Twilio Docs
From APIs to SDKs to sample apps
API reference documentation, SDKs, helper libraries, quickstarts, and tutorials for your language and platform.
Resource Center
The latest ebooks, industry reports, and webinars
Learn from customer engagement experts to improve your own communication.
Ahoy
Twilio's developer community hub
Best practices, code samples, and inspiration to build communications and digital engagement experiences.