Personalize Communication Channel Outreach using Segment and Twilio
Time to read: 8 minutes
August 23, 2021
Written by

Do you want to automatically discover and communicate with your users on their preferred channels? In this post, learn how to measure and personalize your user’s preferred channel using Sendgrid, Programmable SMS, Programmable Voice, Segment Functions, and Segment Personas.
Why would you want to measure and customize your users’ preferred communications channel?
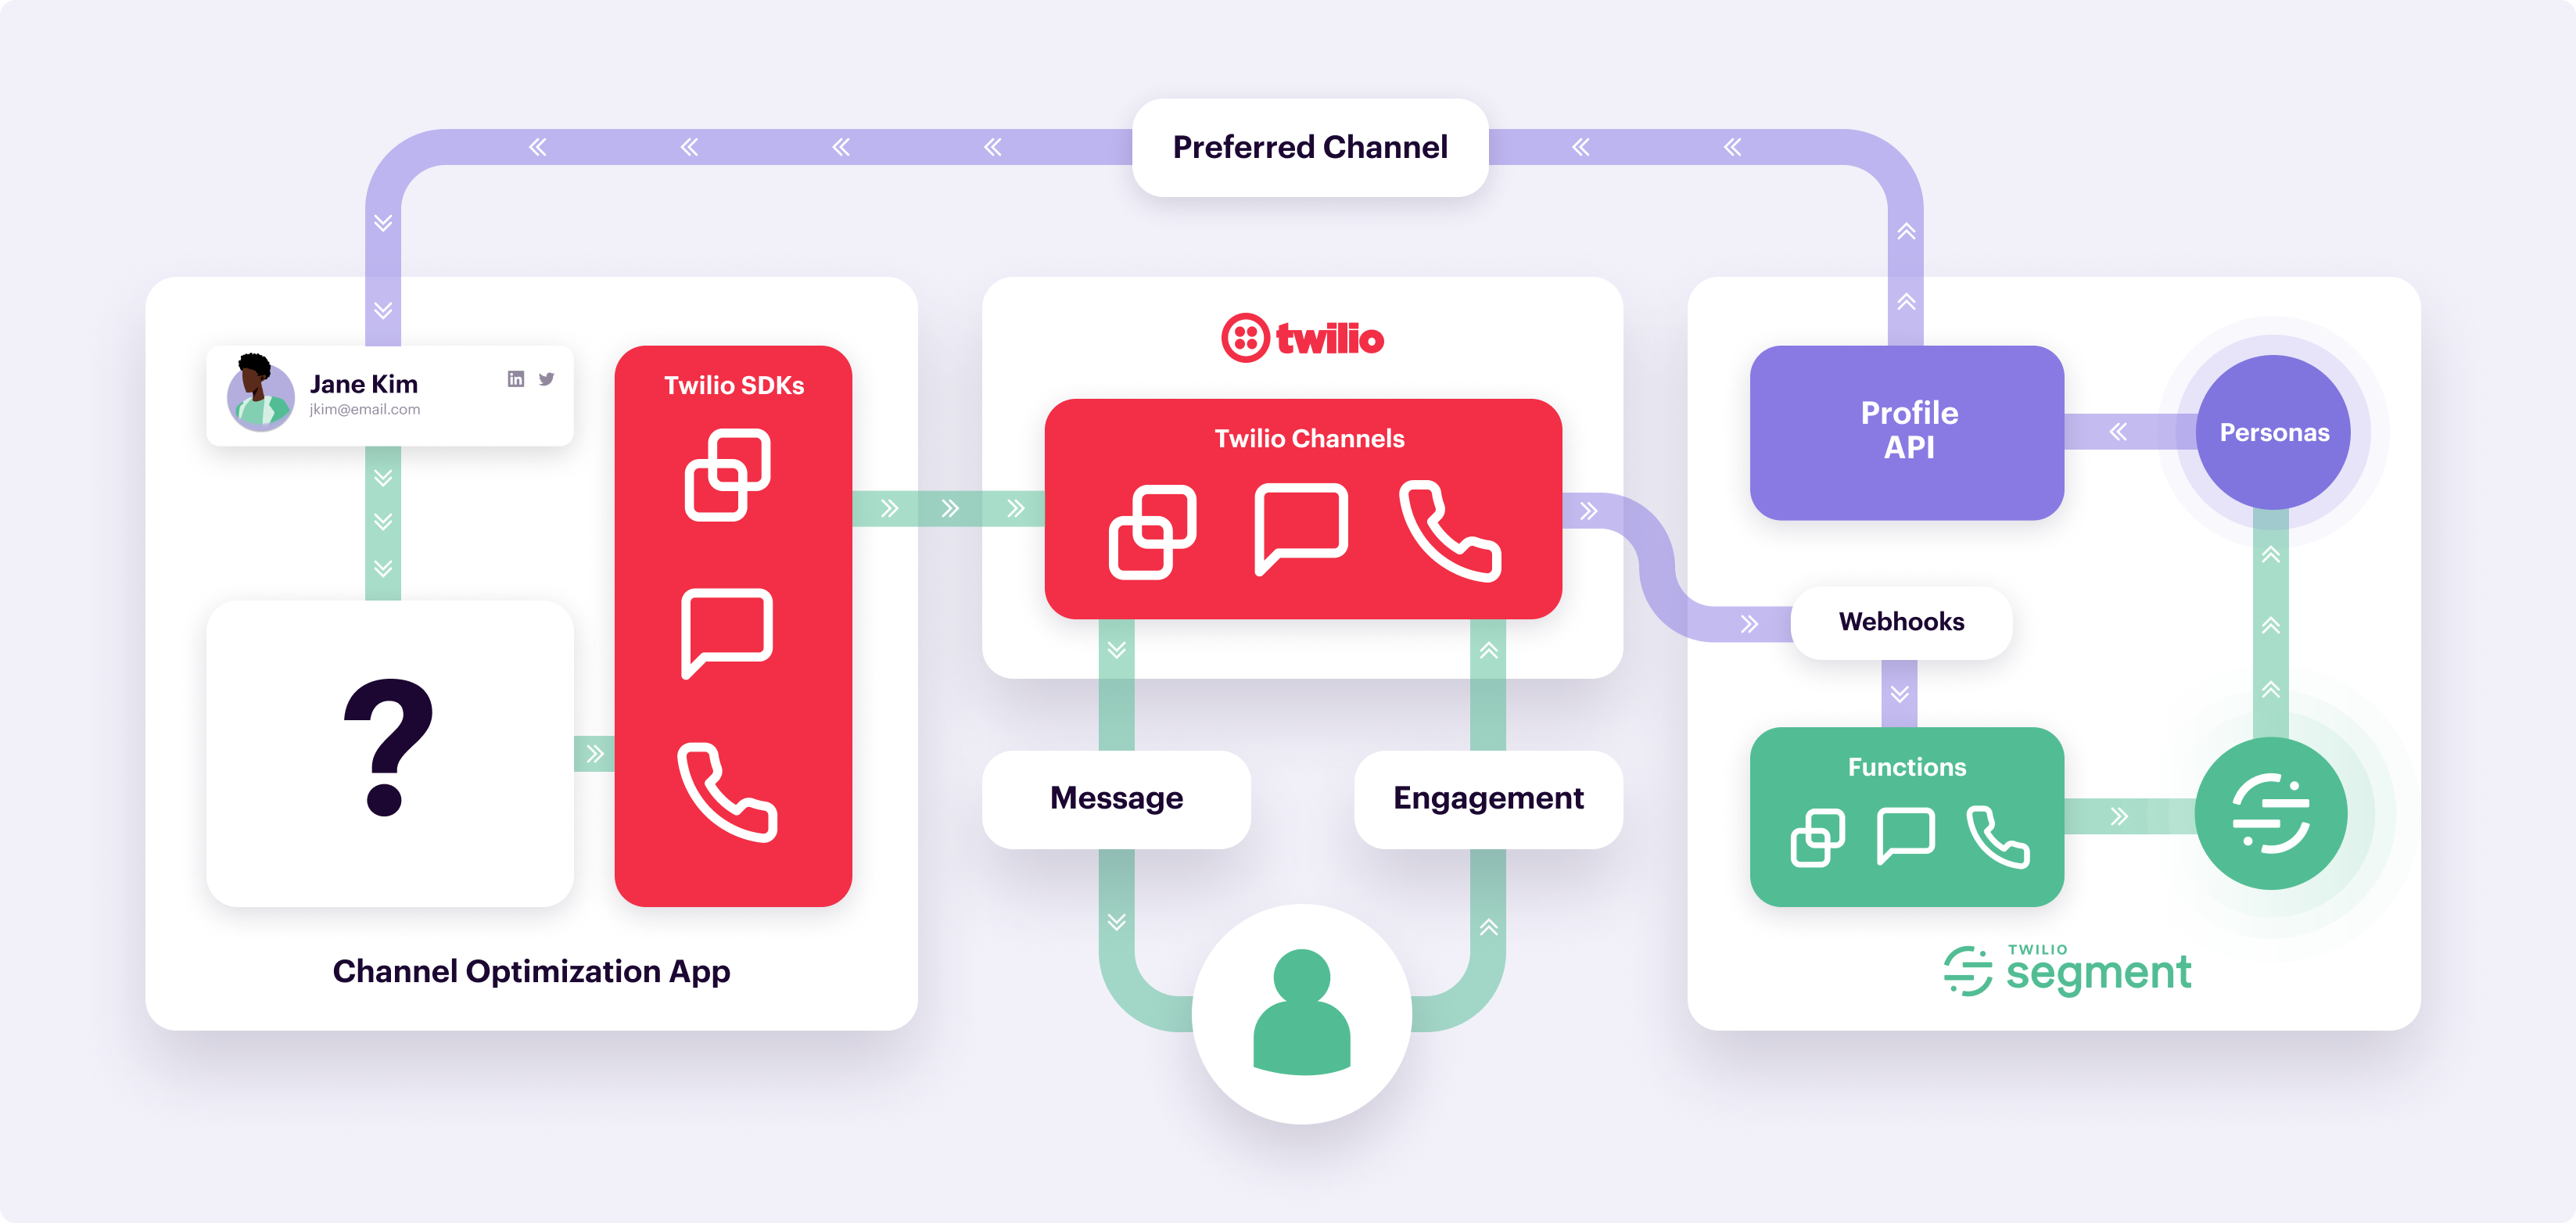
In this blog post you will learn how to send events to Segment with data on whether someone opened a Sendgrid email, answered a call sent from Twilio, or responded to a text message sent from Twilio.
With those events captured in Segment using Segment Functions, a Computed Trait will be calculated to show what channel someone engaged with the most and set that as that user’s preferred channel. When sending out future notifications, the app will check the user’s preferred channel to select how they should receive their notification – text, email, or call. If the preferred channel doesn’t exist yet, the notification will be sent on a randomly calculated channel until there are enough engagements to determine it is the user’s preferred channel.
In short, this post will show you how to personalize notifications on your customer’s preferred channel based on their past engagement.
Prerequisites
To complete this tutorial, you will need:
Build personalized messaging on your customer’s preferred channel
Once you have everything set up and you’ve created your accounts, we’re ready to start building. Let’s walk through all of the steps you’ll need.
Solution Overview
Set up your Node server
First, let’s set up the Node server.
Create a new directory using the terminal by navigating to where you want your project and using the command mkdir channel-optimization. Then navigate to the root directory and create two files using the command touch index.js .env. Initiate your Node app with the command npm init. Lastly, install the following libraries using this command: npm install --save express twilio @sendgrid/mail analytics-node dotenv.
Open your channel-optimization folder in your preferred code editor. Open index.js and copy and paste in this code from Github.
The code above checks whether there is a “Preferred Channel” set for a user using the Segment Profile API. If there is a channel set, then the notification will be sent on that channel. If not, it will randomly select the channel where a user should receive their notification between SMS, voice call, or email. Additionally, the code will send that notification as an email, SMS, or call using Twilio’s and Sendgrid’s APIs.
Next, open your .env file and copy and paste the following:
Retrieve your Twilio Account SID and Auth Token from your Twilio console, and add them as the value to the TWILIO_ACCOUNT_SID and TWILIO_AUTH_TOKEN variables. Do the same for Sendgrid and Segment by adding your Sendgrid API key to the SENDGRID_API_KEY variable and your Segment key to the SEGMENT_KEY variable. To retrieve your Segment write key, create a “Node.js” source in Segment, give it a name such as “Channel Optimization”, and once the channel is created Segment will show you the write key. See Segment’s documentation for more details. For the PHONE_NUMBER and EMAIL variables, put the phone number and email address where you would like to receive the Twilio notifications from this demo. Once you purchase a number in your Twilio Console, add that number as the value for the TWILIO_PHONE_NUMBER variable.
Next, add the Sendgrid sender email address to the SGEMAIL variable; this could be your personal email or if you have domain authentication set up, it could be any of your domain addresses.
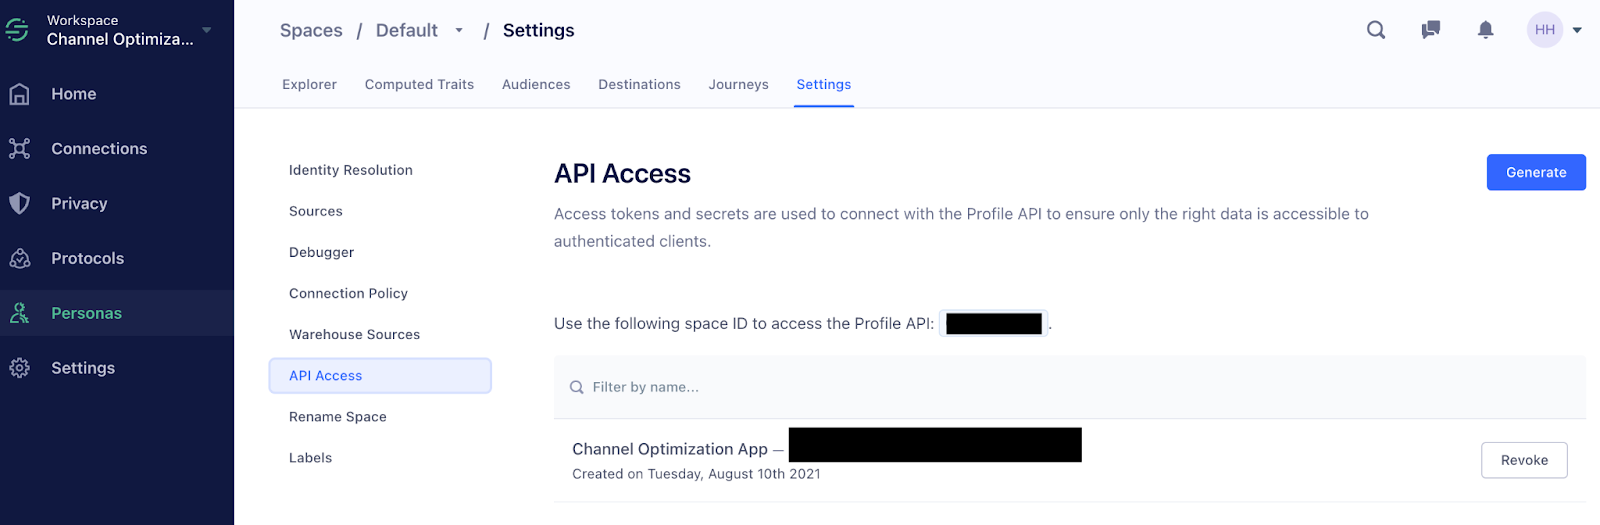
Next, navigate to your Segment dashboard, go to “Personas”, click into “Settings”, and finally into “API Access”. Click “Generate Token” and give it a name such as “Channel Optimization App”.
Copy the token and paste it in your .env file for the SEGMENT_PROFILE_API_TOKEN variable. Back in your Segment dashboard under “API Access” for “Personas”, copy the space ID and paste in your .env file for the SEGMENT_PERSONAS_SPACE_ID variable. See the screenshot below of where to find your Segment space ID.
Leave the SEGMENT_CALL_SOURCE_FUNCTION_URL variable blank, we will come back to it after we set up our Segment work space.
Set up your Segment workspace
For this next section, you will set up your Segment workspace. First, we will set up three Segment Functions to handle incoming engagement events from Twilio such as ‘responded to SMS’ and ‘opened email’.
Navigate to ‘Connections > Sources’ and click ‘Create New Source’. Then click ‘Functions’ at the top of the page, and then click ‘+ New Function’ and make sure ‘Source’ is the Function type selected. Next, delete the boilerplate code in the function and add the following code for handling SMS events:
Click through to ‘Configure’ and give your source the name ‘Twilio SMS’.
Once your Function is saved, click on it in the catalog and select ‘+ Connect Source’. After your Function is connected, you will receive a webhook URL that starts with “https://fn.segmentapis.com/?b=”. Save the full URL in a notepad and remember that this is for your SMS event handler; we will use this later to set up our Webhooks in the Twilio console.
Repeat the same Source Function set up two more times, once for handling Email events and once for handling Voice events. For your Email Source Function use this code:
For your Voice Source Function use this code:
Remember to name these functions “Twilio Email” and “Twilio Voice” so you can distinguish them in the catalog – and don’t forget to save the URL you receive after setup.
For more information and additional screenshots on how Segment Source Functions work, refer to this documentation. The code we’re adding for each Source Function will ensure that once Twilio or Sendgrid receives a webhook event, it will be pushed to Segment which will track a “Notification Engaged” event which will then record what channel a user engaged with.
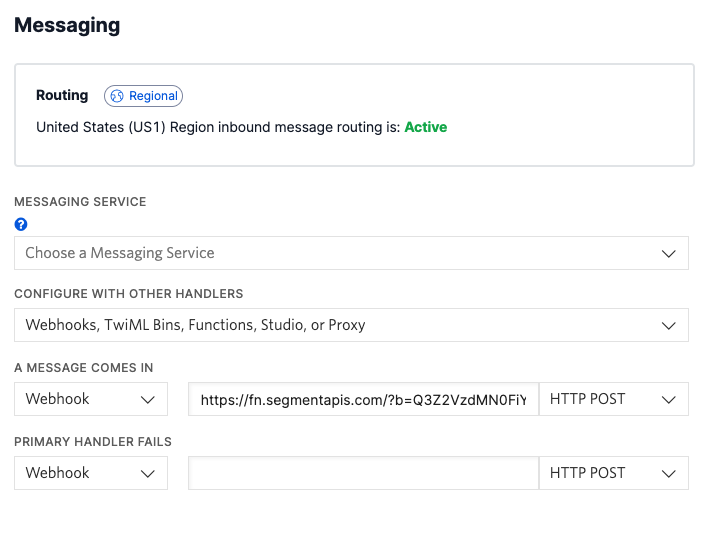
Navigate to the Twilio console, and navigate to your Numbers. Select the number you used earlier in your .env file and copy the number. Then paste your Segment SMS Source Function URL in the incoming message webhook; this will ensure that when someone responds to your SMS notification, Twilio will send that webhook event to Segment to be tracked as a Segment event.
To set up the Voice Call answered event, go back to your Node application, navigate to your .env file, and paste the Voice Segment Source Function URL as the value for the variable SEGMENT_SOURCE_FUNCTION_URL. Here we are using the Programmable Voice API’s status callback events to send an event called ‘Notification Engaged’ to Segment when a user answers a call sent from your Node app.
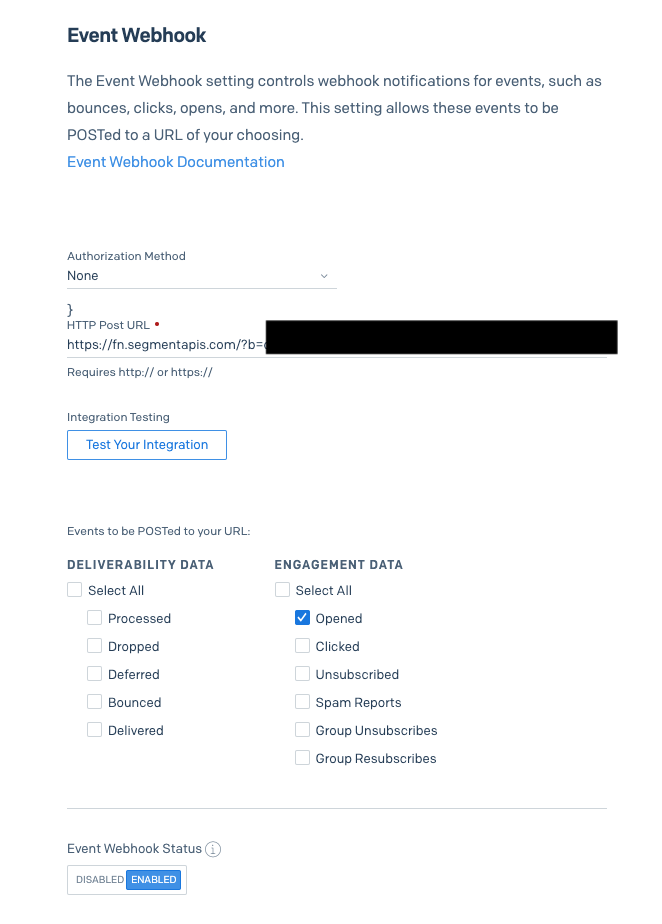
Open up your Sendgrid dashboard, navigate to “Settings > Mail Settings”, and then click on “Event Webhook”. Paste your Segment Email Source Function URL under the HTTP Post URL and only select ‘Opened’ under Engagement data. This will ensure that when a user opens an email, an event called ‘Notification Engaged’ will be sent to Segment.
Create Segment Personas Computed Traits
Once your engagement metrics can be sent from Twilio and Sendgrid to Segment by setting up the webhooks described above, these events can be used to create Personas Computed Traits in Segment. Computed Traits are how you will be able to set a “preferred channel” for a user once the user has engaged with that channel most frequently.
Before we can create a Computed Trait in Segment, you will need to send some events to Segment. Get started by running your Node application with the terminal command node index.js in the root directory of your application.
You should see a text, email, or call come into the number or email address you set in your .env file. Answer the call, open the email, or send a confirmation text back to see events come into your Segment account in the debugger. While all the events have the name “Notification Engaged”, they are separated by their Source Function which will inform the Computed Trait the user’s engagement channel.
Restart your server a few times to send more events to Segment – do this at least five times. Once you’ve done that, navigate to your Segment dashboard, then navigate to “Personas”. Select “Settings” from the top menu bar, and then “Sources” from the side menu bar. Connect the Email, Voice, and SMS sources we made earlier along with the Node app source we created earlier. See below for a screenshot of what this setup should look like.

Next, select “Computed Traits” from the top menu, and click “New Computed Trait”. Select “Most Frequent”, and then for the “Event Name” select “Notification Engaged” with the “Minimum Frequency” set to 3.
You can change the number, but for the purposes of this demonstration let’s use 3 “Notification Engaged” events at minimum before calculating which channel—email, SMS, or call—is a user’s most frequent.
Once a user has a Preferred Channel Computed Trait assigned to them, they will receive notifications on that channel exclusively in the future. For example, if the user’s preferred channel is “email”, then your Node application will check Segment using the Personas Profile API and set the channel to “email” rather than allowing the channel to be picked randomly. Additionally, you can see what a user’s Computed Trait is on the Personas dashboard within your Segment account.
Testing & troubleshooting your preferred customer notification channel computations
Nice work – you’ve hopefully now got a working app which computes your users’ preferred notification channels. Let’s look at a few more things you can try, and cover some of the problems you might hit.
For more interesting results:
Restart your Node app server a few times until you get a Computed Trait, then try changing the user’s name and user id in your Node app to create additional users.
Troubleshooting not seeing events in Segment:
Make sure your Source Functions are set up correctly, and that the Call Source Function URL is added to your .env file. Make sure the Email Source Function URL is added to your Sendgrid dashboard as the event webhook and the SMS Source Function URL is added to your number as the incoming message webhook in your Twilio dashboard.
You can double check whether these events are coming in by checking the Source Function debugger in your Segment dashboard.
Troubleshooting not getting an SMS, email, or call:
- Make sure your Twilio number and Sendgrid sender email are added to your
.envfile. - Make sure your number and email are in your
.envfile.
Take it to the next level:
- Create a Twilio Flex instance and create a plugin to read a user’s preferred channel so agents can send notifications on that channel.
- Set up an analytics Destination in Segment to send conversion events to your analytics tool and measure what channel performs best across all of your users.
Delivering notifications on a users’ computed preferred channel
Congratulations on connecting Segment, Twilio and Sendgrid! With this demo app, you can automatically select a user’s preferred channel by tracking what they engage with and assigning a Segment Computed Trait. This is a powerful way to personalize your communications with your users and customers on a one to one level.
Once you have this under your belt, explore what other Segment Computed Traits you can use to power a Twilio and Sendgrid communication. We can’t wait to see what you build!
Heather is a Senior Solutions Engineer at Twilio, who loves helping people and product teams optimize what they are building through A/B testing and personalization. She can be reached at hhargreaves [at] twilio.com.
Evan is a Solutions Engineer with a breadth of experience in B2B SaaS. Evan got his start in the analytics space as a founding Sales Engineer at Mixpanel. At Optimizely, he served as part of a two-person market entry team to establish a Tokyo branch office. After returning from Japan, Evan moved into product management, working on analytics products at Optimizely, and hosted payments interfaces at Stripe. Evan is thrilled to share his learnings as a product manager with Segment's customers and prospects.
Related Resources
Twilio Docs
From APIs to SDKs to sample apps
API reference documentation, SDKs, helper libraries, quickstarts, and tutorials for your language and platform.
Resource Center
The latest ebooks, industry reports, and webinars
Learn from customer engagement experts to improve your own communication.
Ahoy
Twilio's developer community hub
Best practices, code samples, and inspiration to build communications and digital engagement experiences.