Porting a Twilio MMS app to .NET Core with Visual Studio Code
Time to read:
August 02, 2017
Written by
This post is part of Twilio’s archive and may contain outdated information. We’re always building something new, so be sure to check out our latest posts for the most up-to-date insights.

What are We Doing
I’ve been a huge .NET fan since the days of .NET Framework 1.1. A number of years and upgrades later, Microsoft turned things up by introducing .NET Core and Visual Studio Code, allowing developers to write and run code from wherever we want without sacrificing productivity, security, or performance. If you’re asking the question, “Well, what does .NET Core do for me?”, then check this out. In a previous blog post, we built an API that shares photos via MMS backed by Dropbox cloud storage using C# and the .NET Framework 4.5. Let’s convert that API from targeting the .NET Framework to .NET Core.
How are We Doing This
To do this, we need to
- Install .NET Core (and any prerequisites), Visual Studio Code, and the C# Extension
- Create a new project using the .NET Core command line interface (CLI)
- Copy our existing code over and fix conversion issues
- Run our app and unlock achievements!

If you haven’t read the original blog, create a Twilio account, a Dropbox developer account, and a Dropbox app with an App Folder as we’ll need those later on.
Step 1: Install Stuff
Grab .NET Core and Visual Studio Code first. If you’re already a .NET developer who uses Visual Studio, you are probably thinking, “wait can’t I use Visual Studio for this?” You absolutely can, but for this blog, let’s test drive Visual Studio Code.
After getting those things installed, fire up Visual Studio Code, hit ⌘ + P on your keyboard (Ctrl + P if using Windows) and type the command ext install csharp.
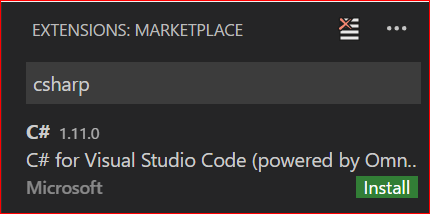
This should open the Extensions pane, and search for the C# extension. When the results come back, install the C# extension authored by Microsoft. You want the one that looks like the picture to the right. After clicking the Install and Reload buttons, we should be well on our way.
Step 2: Create Stuff
Working in Visual Studio Code is all about using folders and interacting with the command line. If you’re coming from Visual Studio you are probably feeling like I was after reading that last line. So let’s stop and acknowledge the feeling:

Now that we’ve got that out of the way, never fear! I promise you this is going to be easy and fast! So let’s start up the terminal in Mac (or Command Prompt in Windows). In that window, navigate to the directory where you’ll want to save this project and run the following commands:
mkdir CoreApi
cd CoreApi

dotnet new webapi
These commands create an ASP.NET Web API project in the folder CoreApi. Next let’s restore some Nuget packages that we used in our original project. To do that, go back to the terminal and type the following commands:
dotnet add package Twilio
dotnet add package Newtonsoft.JSON

dotnet restore
Since our project has been created, let’s open up Visual Studio Code by typing
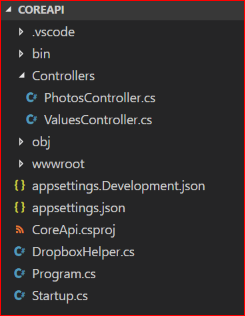
code . in the terminal. If you see a toolbar pop up in Visual Studio Code which says “Required assets to build and debug are missing from ‘CoreApi’’’, click on the Yes button. Doing this creates a .vscode folder that contains two files that VS Code uses to launch and debug our application. We’ll finally create the files we need by typing the commands below in our terminal:
code DropboxHelper.cs
code Controllers/PhotosController.cs
Then go to File > Save All to save our files and the photo to the right shows our completed setup.
Step 3: Modify Stuff
Now we typed up a bunch of commands and no code. Are you sad yet?

Hopefully not because it’s time to write some code. 😀
DropboxHelper.cs File
Head over to the original project’s DropboxHelper.cs file. Copy the code from there and paste it into the Helper.cs file in Visual Studio Code.
After copying the code over, PostAsJsonAsync will contain some errors because there is no .NET Core implementation for that method. To fix this, let’s make the following changes:
- Add the following right underneath our using statements at the top of the file:
- In our DropboxHelper constructor, add this line right underneath the Authorization header setting in line 21:
- Replace the lines that call PostAsJsonAsync with the following:
These changes add support for JSON parsing in our application. With that, our helper file updates are complete. If you want to run this, generate an access token from the Dropbox app you created and replace the “UPDATE_YOUR_ACCESS_TOKEN_HERE” string with it. You’ll also want to upload a photo to that app folder you created.
PhotosController.cs File
Next head over to the original project’s PhotosController.cs file. Copy the code from there and paste it into the PhotosController.cs file in Visual Studio Code
Let make some updates:
- Replace
using System.Web.Http;withusing Microsoft.AspNetCore.Mvc; - Replace
namespace BabyApi.ControllerswithnamespaceCoreApi.Controllers - Add the following on top of our class declaration:
[Route("api/[controller]")] - Replace
public class PhotosController:ApiControllerwithpublic class PhotosController:Controller - Replace
public async Task Get()withpublic async Task Get() - Replace the return statement in the Get method with this:
return Content(response.ToString(), "application/xml");
Code update complete! Let’s join the minions in a round of applause.

Step 4: SUCCESS
And now the moment of truth! Remember we wanted to see this when we ran our original project:

After uploading a photo to your Dropbox app folder and updating the Dropbox Access token in the DropboxHelper.cs file, type dotnet run in your terminal and then browse to http://localhost:5000/api/photos (which is based on the default URL used in .NET Core). If you don’t see a url with the dropboxusercontent hostname, don’t fret. Double check that your picture is uploaded to the same app folder that Dropbox created for you to run this app. If your browser looks similar to the above, it is now time to dance!

If you’d like to connect this code up to Twilio, check out the Connect Our Code to Twilio section of the original blog post. With this complete, we can write .NET code on any OS that Visual Studio Code supports and run our .NET API on any OS that .NET Core supports. Cross-platform here we come!
If you’d like to download the completed code, grab it from Github. Drop a comment below, or hit me up on Twitter at @CoreyLWeathers if you run into issues. I can’t wait to see what you build.


Related Resources
Twilio Docs
From APIs to SDKs to sample apps
API reference documentation, SDKs, helper libraries, quickstarts, and tutorials for your language and platform.
Resource Center
The latest ebooks, industry reports, and webinars
Learn from customer engagement experts to improve your own communication.
Ahoy
Twilio's developer community hub
Best practices, code samples, and inspiration to build communications and digital engagement experiences.