Progressive Website App Notifications with Laravel, Vue.js, and Twilio Notify

April 21, 2020
Written by
Michael Okoko
Contributor
Opinions expressed by Twilio contributors are their own
Reviewed by

Progressive Website App Notifications with Laravel, Vue.js, and Twilio Notify

As of October 24, 2022, the Twilio Notify API is no longer for sale. Please refer to our Help Center Article for more information. 

Progressive Web Applications (PWAs) are installable websites that provide an app-like experience for your users. They are made possible through technologies like Service Workers and responsive designs, which enable them to provide nearly the same user experience as native applications.

The Twilio Notify API enables you to send notifications to your users across different channels - Web, SMS, Android, and iOS - using a single API.

In this article, we will be building a recipe PWA with Laravel and Vue.js, with the ability to notify our users when a new post is available using the Twilio Notify API.

Prerequisites

To get started with this tutorial you will need the following dependencies:

Getting Started with the Sample Application

To get started, run the following command to create a new Laravel application and change into the directory:

$ laravel new recipe-pwa && cd recipe-pwa

User Model and Migration

Our recipe app requires two models - User (which will help us tailor notifications to the user’s preferred channel) and Recipe. Since Laravel already generated the User model for us, we only need to modify it to suit our application needs. Open the User migration file in the database/migrations directory and update the up method as shown below.

public function up()
{
   Schema::create('users', function (Blueprint $table) {
           $table->bigIncrements('id');
          $table->string('name');
          $table->string('email')->unique();
             $table->string('password');
             // Twilio Notify identity for this user
             $table->string('notification_id')->nullable();
             $table->rememberToken();
             $table->timestamps();
   });
}

Also, update the $fillable attribute of the User model class in the app directory as shown.

protected $fillable = [
'name', 'email', 'password', 'notification_id'
];

Recipe Model and Migration

Create the Recipe model with its corresponding migration file using the -m flag.

$ php artisan make:model Recipe -m

Next, open the newly created Recipe model class file and replace the contents with the following.

<?php

namespace App;

use Illuminate\Database\Eloquent\Model;
use Illuminate\Notifications\Notifiable;
use League\CommonMark\CommonMarkConverter;

class Recipe extends Model
{
        use Notifiable;

        protected $fillable = ['title', 'body'];

        public static function getBodyAttribute($value) {
            $converter = new CommonMarkConverter([
                'html_input' => 'strip',
                'allow_unsafe_links' => false
            ]);
            return $converter->convertToHtml($value);
        }

        protected $dispatchesEvents = [
            'saved' => \App\Events\RecipeEvent::class
        ];
}

Our recipes need to contain formatted texts, such as lists and headers. We achieve this using Mutators in the getBodyAttribute method above. Essentially, the body string is stored in markdown and transformed into HTML using the CommonMarkConverter package which comes bundled with Laravel.

Next, update the recipes migration file located in the database/migrations folder:.

<?php

use Illuminate\Database\Migrations\Migration;
use Illuminate\Database\Schema\Blueprint;
use Illuminate\Support\Facades\Schema;

class CreateRecipesTable extends Migration
{
        public function up()
        {
            Schema::create('recipes', function (Blueprint $table) {
                $table->bigIncrements('id');
                $table->string('title');
                $table->text('body');
                $table->timestamps();
            });
        }

        public function down()
        {
            Schema::dropIfExists('recipes');
        }
}

Databases and Running our Migrations

Next, we will set up the application database. Open your .env file and update the database credentials as followed.

DB_CONNECTION=mysql
DB_HOST=127.0.0.1
DB_PORT=3306
DB_DATABASE=recipe_pwa
DB_USERNAME=YOUR_MYSQL_USERNAME
DB_PASSWORD=YOUR_MYSQL_PASSWORD

Persist the changes to our database by executing the migrations.

$ php artisan migrate

Seeding the Application Database

We need to add some dummy data to the tables we just created to help us focus on building out the other parts of our application. Generate the needed seeders with the command below:

$ php artisan make:seeder UsersTableSeeder
$ php artisan make:seeder RecipesTableSeeder

Open the UsersTableSeeder file (database/seeds/UsersTableSeeder.php) and replace the content with the following:

<?php

use Illuminate\Database\Seeder;

class UsersTableSeeder extends Seeder
{
        public function run()
        {
            \App\User::insert([
                [
                    'name' => "Akande Salami",
                    'email' => "test@example.com",
                    'password' => "super_secret",
                    'created_at' => \Carbon\Carbon::now(),
                    'updated_at' => \Carbon\Carbon::now()
                ],
                [
                    'name' => "Jeff Doe",
                    'email' => "jdoe@example.com",
                    'password' => "super_secret",
                    'created_at' => \Carbon\Carbon::now(),
                    'updated_at' => \Carbon\Carbon::now()
                ]
            ]);
        }
}

Then replace the content of the RecipesTableSeeder file with the following:

<?php

use Illuminate\Database\Seeder;

class RecipesTableSeeder extends Seeder
{
        public function run()
        {
            \App\Recipe::insert([
                [
                    'title' => "Nigerian Jollof Rice with Chicken",
                    'body' => "Test Recipe. Chicken is first sauteed on the stove top to produce a wonderful aromatic base for the rice.",
                    'created_at' => \Carbon\Carbon::now(),
                    'updated_at' => \Carbon\Carbon::now()
                ],
                [
                    'title' => "Chicken Suya Salad",
                    'body' => "- Cut the yam tuber into 1 inch slices. - Peel and cut the slices into half moons.
                            - Wash the slices, place in a pot and pour water to cover the contents.
                            - Boil till the yam is soft.",
                    'created_at' => \Carbon\Carbon::now(),
                    'updated_at' => \Carbon\Carbon::now()
                ]
            ]);
        }
}

To make our seeders discoverable to Laravel, open the database/seeds/DatabaseSeeder.php file and update it’s run method to the code below:

public function run()
{
            $this->call(UsersTableSeeder::class);
            $this->call(RecipesTableSeeder::class);
}

Next, apply the seeders by running the command below in your terminal.

$ php artisan db:seed

Creating our Controllers

Our application needs three controllers:

  • RecipeController: responsible for managing the recipe-related routes
  • SPAController: to load and render our app shell before handing over to Vue Router and
  • NotificationController: which will handle our notification-related actions.

Create the controllers with the following commands:

$ php artisan make:controller RecipeController
$ php artisan make:controller NotificationController
$ php artisan make:controller SPAController

Next, open the newly generated RecipeController (app/Http/Controllers/RecipeController.php) and add the following:

<?php

namespace App\Http\Controllers;

use App\Recipe;
use Illuminate\Http\Request;

class RecipeController extends Controller
{
        public function index() {
            return response()->json(Recipe::all());
        }

        public function store(Request $request)  {
            $recipe = Recipe::create([
                'title' => $request->get('title'),
                'body' => $request->get('body')
            ]);
            $data = [
                'status' => (bool) $recipe,
                'message' => $recipe ? "Recipe created" : "Error creating recipe",
                'data' => $recipe
            ];
            return response()->json($data);
        }

        public function getRecipe($id) {
            return response()->json(Recipe::find($id));
        }
}

Next, we register the methods in the RecipeController with our API route. Open routes/api.php and add the following routes:

Route::group(['prefix' => 'recipes'], function() {
    Route::get('/{id}', 'RecipeController@getRecipe');
    Route::get('/', 'RecipeController@index');
    Route::post('/', 'RecipeController@store');
});

NOTE: You can read more about route groups and the prefix key above here in the Laravel documentation.

Testing Endpoints with cURL

We will be testing our API endpoints with cURL, even though the requests can be easily replicated with Postman. These tests help ensure that requests to our application are properly handled and we get the expected responses before using them in the user-facing front-end. Ensure your Laravel server is already running (you can start it with php artisan serve) before running the commands below.

Creating a new Recipe

Run the command below to create a new Recipe via cURL.

$ curl -X POST -d '{"title": "Demerara Brownies", "body": "Test Recipe. Preheat oven to 325 degrees F (165 degrees C)"}' -H 'Content-type: application/json' -H 'Accept: application/json' http://localhost:8000/api/recipes

You should get a response similar to the one below. The recipe body is also transformed into HTML due to the Eloquent mutators we implemented earlier.

{"status":true,"message":"Recipe created","data":{"title":"Demerara Brownies","body":"<p>Test Recipe. Preheat oven to 325 degrees F (165 degrees C)<\/p>\n","updated_at":"2020-02-25 06:14:33","created_at":"2020-02-25 06:14:33","id":3}}

Fetching all Recipes

To retrieve a JSON array of all our recipes (which corresponds to our index route), run the following command in your terminal:

$ curl http://localhost:8000/api/recipes

Your response output should be similar to:

{"id":1

Fetching a single Recipe

Next, we retrieve a single recipe instance by its ID like so:

$ curl http://localhost:8000/api/recipes/1

And we should get a result similar to the one below

{"id":1,"title":"Nigerian Jollof Rice with Chicken","body":"<p>Test Recipe. Chicken is first sauteed on the stove top to produce a wonderful aromatic base for the rice.<\/p>\n","created_at":"2020-02-25 05:59:56","updated_at":"2020-02-25 05:59:56"}

Leveraging Vue-Laravel Integration

Now that we have a working API, let’s build out our application front-end using Vue.js. Laravel makes it easy to work with Vue.js and all the accompanying build tools out-of-the-box. To install the Vue scaffold, run the preset Artisan and install the updated dependencies with:

$ composer require laravel/ui --dev
$ php artisan ui vue && npm install

Because our Vue app is coupled to the Laravel backend, we will use a Laravel web route to load the app shell, and the Vue router will handle the remaining parts. Open routes/web.php and replace the contents with the following:

<?php
Route::get('/{any}', 'SPAController@index')->where('any', '.*');

Next, open the SPAController class file we created earlier and add the implementation of the index method we referenced in the route above.

<?php
namespace App\Http\Controllers;

class SPAController extends Controller
{

        public function index() {
            return view('welcome');
        }
}

Note that we are re-using the default Laravel welcome blade template here. Open the template file (at resources/views/welcome.blade.php) and replace it with the code below:

<!DOCTYPE html>
<html>
<head>
        <meta charset="utf-8">
        <meta name="viewport" content="width=device-width, initial-scale=1">

        <title>Recipe PWA</title>
        <link rel="stylesheet" href="https://maxcdn.bootstrapcdn.com/bootstrap/4.0.0/css/bootstrap.min.css" integrity="sha384-Gn5384xqQ1aoWXA+058RXPxPg6fy4IWvTNh0E263XmFcJlSAwiGgFAW/dAiS6JXm" crossorigin="anonymous">
        <link href="https://fonts.googleapis.com/css?family=Nunito:200,600" rel="stylesheet">
</head>
<body>
<div id="app">
        <app></app>
</div>
<script src="{{mix('js/app.js')}}"></script>
</body>
</html>

We also need to set up Vue outer to handle our in-app navigation on the front-end. Install the vue-router package with npm install vue-router and update the resources/js/app.js file to the code below:

require('./bootstrap');

window.Vue = require('vue');

import VueRouter from 'vue-router';

import App from './components/App'
import Home from "./components/Home";
import Recipe from './components/Recipe'

Vue.use(VueRouter);

const router = new VueRouter({
        mode: 'history',
        routes: [
            {
                path: '/',
                name: 'home',
                component: Home
            },
            {
                path: '/recipes/:recipeId',
                name: 'recipe',
                component: Recipe
            }
        ]
});

const app = new Vue({
        el: '#app',
        components: {App},
        router
});

Next, let’s create the components we will be needing. App.vue will serve as a container for all the other components, Home.vue will be responsible for displaying the recipe list, and Recipe.vue will render a single recipe.

Create the file resources/js/components/App.vue and add the following.

<template>
        <div>
            <div class="sticky-top alert alert-primary" v-if="requestPermission"
                 v-on:click="enableNotifications">
                Want to know when we publish a new recipe?
                <button class="btn btn-sm btn-dark">Enable Notifications</button>
            </div>
            <nav class="navbar navbar-expand-md navbar-light navbar-laravel">
                <div class="container">
                    <router-link :to="{name: 'home'}" class="navbar-brand">Recipe PWA</router-link>
                    <button
                        class="navbar-toggler"
                        type="button"
                        data-toggle="collapse"
                        data-target="#navbarSupportedContent"
                        aria-controls="navbarSupportedContent"
                        aria-expanded="false"
                    >
                        <span class="navbar-toggler-icon"></span>
                    </button>
                    <div class="collapse navbar-collapse" id="navbarSupportedContent">
                        <ul class="navbar-nav ml-auto">
                            <li>
                                <router-link :to="{name: 'home'}" class="nav-link">Recipes</router-link>
                            </li>
                        </ul>
                    </div>
                </div>
            </nav>

            <div class="py-4">
                <router-view></router-view>
            </div>
        </div>
</template>

Similarly, create the Home component file at resources/js/components/Home.vue and add the code below to it.

<template>
        <div class="container">
            <div class="row justify-content-center">
                <div class="col-md-8" v-for="recipe,index in recipes" :key="recipe.id">
                    <div class="my-4">
                        <h5>
                            <router-link :to="{ name: 'recipe', params: {recipeId: recipe.id}}">
                                {{recipe.title}}
                            </router-link>
                        </h5>
                        <small class="text-muted">Posted on: {{recipe.created_at}}</small>
                    </div>
                </div>
            </div>
        </div>
</template>

<script>
        import axios from 'axios';
        export default {
            data(){
                return {
                  recipes: []
                }
            },

            mounted() {
                axios.defaults.headers.common['Content-type'] = "application/json";
                axios.defaults.headers.common['Accept'] = "application/json";

                axios.get('api/recipes').then(response => {
                    response.data.forEach((data) => {
                        this.recipes.push({
                            id: data.id,
                            body: data.body.slice(0, 100) + '...',
                            created_at: data.created_at,
                            title: data.title
                        })
                    });
                })
            }
        }
</script>

Next, create the Recipe component to show a single recipe at  resources/js/components/Recipe.vue and add the code block below in it.

<template>
        <div class="container">
            <div class="row justify-content-center">
                <div class="col-md-8">
                    <div class="my-4">
                        <h4>{{ recipe.title }}</h4>
                        <div v-html="recipe.body"></div>
                    </div>
                </div>
            </div>
        </div>
</template>
<script>
import axios from 'axios';

export default {
        data() {
            return {
                recipe: {}
            }
        },

        mounted() {
            axios.defaults.headers.common['Content-type'] = "application/json";

            axios.defaults.headers.common['Accept'] = "application/json";
            let recipeUrl = `/api/recipes/${this.$route.params.recipeId}`;
            axios.get(recipeUrl).then(response => {
                this.recipe = response.data;
            })
        }
}
</script>

Run npm run watch in the project root folder to compile the front-end assets, and listen for modifications to those files. In a separate terminal, start the PHP server with php artisan serve. You can now access the app at http://localhost:8000 to see what we have accomplished thus far.

Converting our Vue.js App to a PWA

Progressive Web Applications (or PWAs for short) are powered by three major components:

  • A JSON-structured web app manifest file (usually named manifest.json or manifest.webmanifest) that tells the browser that our website is indeed, a PWA and installable. It also specifies application metadata and configurations such as display that tells our app how to behave after installation.
  • Service Workers which are actually background scripts responsible for running services that do not require interaction from our users. Some of such services are background synchronization and listening for push notifications.
  • A caching strategy that helps us specify how we want our service workers to handle resources after fetching them. Such strategies include Cache-first, Cache-only, Network-first, etc. You can find more details about the different strategies in Google’s Offline Cookbook.

To inform browsers of our PWA, create a manifest.json file in Laravel’s public directory and add the following.

{
        "name": "Recipe PWA",
        "short_name": "Recipe PWA",
        "icons": [
            {
                  "src": "/recipe-book.png",
                  "sizes": "192x192",
                  "type": "image/png"
                }
        ],
        "start_url": "/",
        "scope": ".",
        "display": "standalone",
        "background_color": "#fff",
        "theme_color": "#000",
        "description": "You favorite recipe app",
        "dir": "ltr",
        "lang": "en-US"
}

NOTE: Remember to download the app icon from here or update the icon name if you are using a custom one.

With our web app manifest in place, let’s reference it from the welcome.blade.php. Add the following to the head section of the template file.

…
<link rel="manifest" href="manifest.json" />
...

Setting up the Service Worker

We will use Workbox to help us automate the process of managing our service worker. Install the workbox-cli globally with:

$ npm install -g workbox-cli

Once installed, launch the Workbox wizard in the project root with the command below and select the public folder as your web root since it is the folder exposed by Laravel.

$ workbox wizard

Configuring Workbox with the Workbox wizard

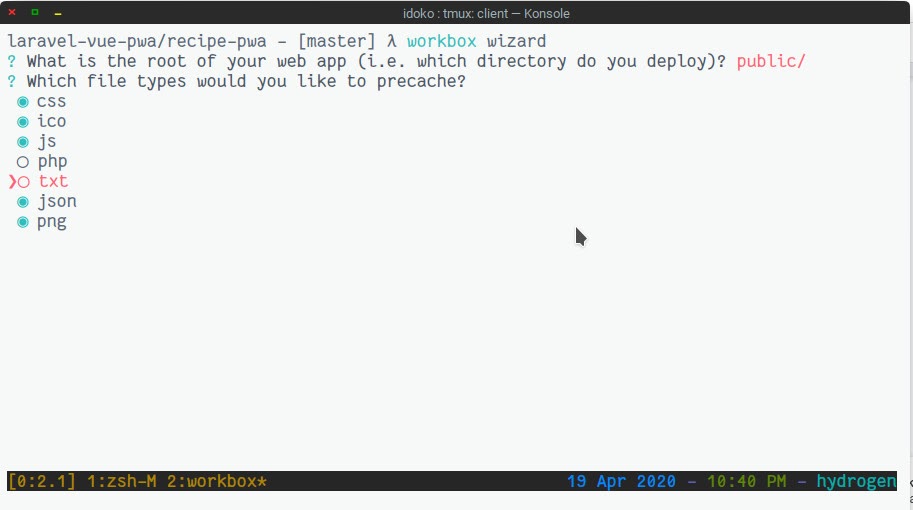
The command will generate a configuration file containing your preferred service worker file location and the files that should be cached based on your answers to the prompt.

Generate the final service worker file at public/sw.js with the command below:

$ workbox generateSW

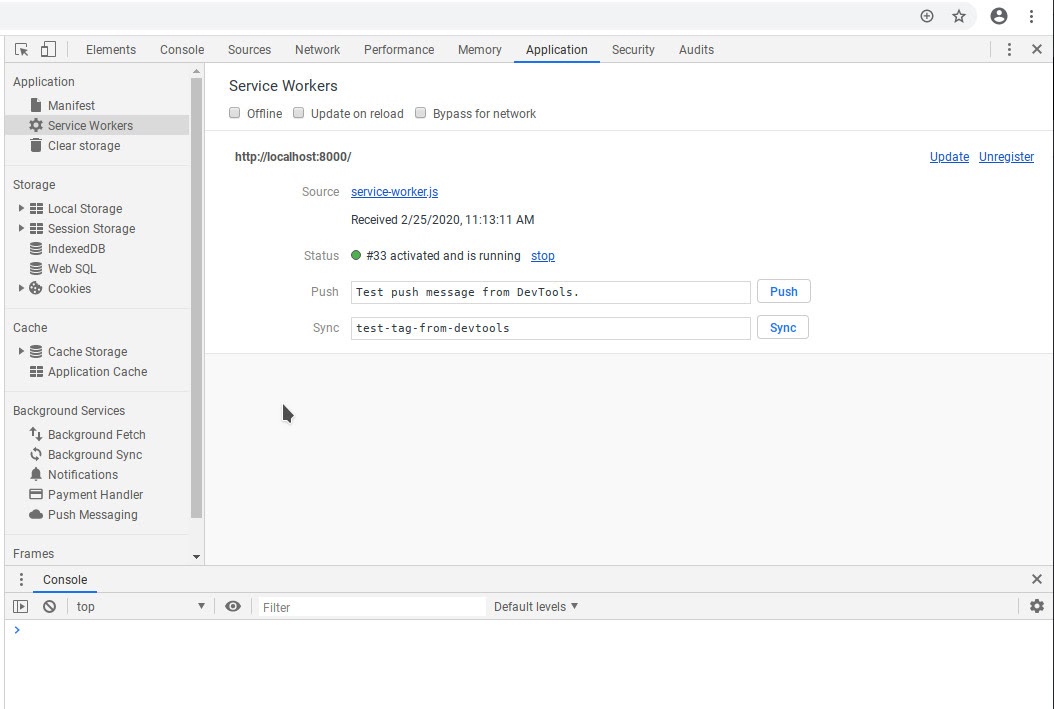
Next, we register the service worker in the welcome.blade.php file. Add the code below in the template file just after the closing </div> tag and right before the script tag that loads app.js

...
if ('serviceWorker' in navigator) {
            window.addEventListener('load', () => {
                navigator.serviceWorker.register('/sw.js');
            });
        }

Our app should register the service worker when we visit http://localhost:8000 in the browser, though you might need to force refresh to fetch the updated asset files.

Worker example

Configuring Firebase and Twilio Notify

Twilio Notify uses Firebase Cloud Messaging (FCM) as the base for its web push notifications hence, we need to create a new Firebase project on the Firebase console (or use an existing one). Copy the app credentials (Firebase Sender ID and Server Key) from your console (i.e Project Overview > Project Settings > Cloud Messaging) and add the Server Key as a Push Credential on your Twilio console’s Add a Credential Page. Set the Credential Type to FCM and paste the server key in the “FCM Secret” text box.

Also, create a new Notify service on the Twilio Console and select the push credential you just created as the FCM Credential SID. Take note of the generated Service SID as we will be using it shortly.

Next, update your project .env file with them as in the code block below:

# Your Twilio API Key
TWILIO_API_KEY="SKXXXXXXXXXXXXXXXXXXXXXXX"
# Your Twilio API Secret
TWILIO_API_SECRET="XXXXXXXXXXXXXXXXXXXXXXXXX"
# Your Twilio account SID
TWILIO_ACCOUNT_SID="ACXXXXXXXXXXXXXXXXXXXXXXX"
# The service SID for the Notify service we just created
TWILIO_NOTIFY_SERVICE_SID="ISXXXXXXXXXXXXXXXXXX"

NOTE: The sample Firebase configuration accessible from the “Your apps” section in Project Overview > Settings > General, as it includes the credentials we will be using to use the API.

Firebase provides an NPM package that makes it easier to use all of its features in your code. Install the package with npm install firebase@^7.8.2 to ensure the version matches the one we will specify in the service worker file (i.e firebase-messaging-sw.js). Next we will update the App component to:

  • Request for Notification permission (after the clicks the “Enable Notifications” button)
  • Save the permission in Local Storage so we don’t ask again.
  • Setup firebase messaging to handle notifications when our web app is in the foreground.

We achieve that by appending the code block below to App.vue, right after the closing </template> tag.

<script>
        import firebase from "firebase/app";
        import axios from "axios";
        import "firebase/messaging";

        export default {
            data() {
                return {
                    // use a getter and setter to watch the user's notification preference in local storage
                    get requestPermission() {
                        return (localStorage.getItem("notificationPref") === null)
                    },
                    set requestPermission(value) {
                        localStorage.setItem("notificationPref", value)
                    }
                }
            }
            ,
            methods: {
                registerToken(token) {
                    axios.post(
                        "/api/register-token",
                        {
                            token: token
                        },
                        {
                            headers: {
                                "Content-type": "application/json",
                                Accept: "application/json"
                            }
                        }
                    ).then(response => {
                        console.log(response)
                    });
                },

                enableNotifications() {
                    if (!("Notification" in window)) {
                        alert("Notifications are not supported");
                    } else if (Notification.permission === "granted") {
                        this.initializeFirebase();
                    } else if (Notification.permission !== "denied") {
                        Notification.requestPermission().then((permission) => {
                            if (permission === "granted") {
                                this.initializeFirebase();
                            }
                        })
                    } else {
                        alert("No permission to send notification")
                    }
                    this.requestPermission = Notification.permission;
                },

                initializeFirebase() {
                    if (firebase.messaging.isSupported()) {
                        let config = {
                            apiKey: "FIREBASE_API_KEY",
                            authDomain: "FIREBASE_AUTH_DOMAIN",
                            projectId: "FIREBASE_PROJECT_ID",
                            messagingSenderId: "FIREBASE_MESSENGER_ID",
                            appId: "FIREBASE_APP_ID",
                        };
                        firebase.initializeApp(config);
                        const messaging = firebase.messaging();

                        messaging.getToken()
                            .then((token) => {
                                console.log(token);
                                this.registerToken(token)
                            })
                            .catch((err) => {
                                console.log('An error occurred while retrieving token. ', err);
                            });

                        messaging.onMessage(function (payload) {
                            console.log("Message received", payload);
                            let n = new Notification("New Recipe alert!")
                        });
                    }
                }
            }
        };
</script>

On initialization, Firebase looks for a publicly-accessible firebase-messaging-sw.js file which houses the service worker as well as handles notifications when our app is in the background. Create this file in Laravel’s public folder and add the following:

importScripts("https://www.gstatic.com/firebasejs/7.8.2/firebase-app.js");
importScripts("https://www.gstatic.com/firebasejs/7.8.2/firebase-messaging.js");

let config = {
        apiKey: "FIREBASE_API_KEY",
        authDomain: "FIREBASE_AUTH_DOMAIN",
        projectId: "FIREBASE_PROJECT_ID",
        messagingSenderId: "FIREBASE_MESSENGER_ID",
        appId: "FIREBASE_APP_ID",
};
firebase.initializeApp(config);
const messaging = firebase.messaging();
messaging.setBackgroundMessageHandler(function (payload) {
        console.log(' Received background message ', payload);
        let title = 'Recipe PWA',
            options = {
                body: "New Recipe Alert",
                icon: "https://raw.githubusercontent.com/idoqo/laravel-vue-recipe-pwa/master/public/recipe-book.png"
            };
        return self.registration.showNotification(
            title,
            options
        );
});

Creating Device Bindings

The Twilio PHP SDK provides a wrapper that helps us communicate with the Twilio API. In this article, that communication includes registering the user’s browser with Twilio Notify (i.e creating a device binding), as well as telling Notify when it’s time to send out notifications.

Install the SDK as a composer dependency with:

$ composer require twilio/sdk

Next, we will add a public method to the NotificationsController that accepts the user’s device token generated by Firebase and register it with our notification service on Twilio using the SDK. See how below:

<?php
namespace App\Http\Controllers;

use App\User;
use Illuminate\Http\Request;
use Illuminate\Support\Facades\Log;
use PHPUnit\Exception;
use Twilio\Rest\Client;

class NotificationsController extends Controller
{
        public function createBinding(Request $request) {
            $client = new Client(getenv('TWILIO_API_KEY'), getenv('TWILIO_API_SECRET'),
                getenv('TWILIO_ACCOUNT_SID'));
            $service = $client->notify->v1->services(getenv('TWILIO_NOTIFY_SERVICE_SID'));

            $request->validate([
                'token' => 'string|required'
            ]);
            $address = $request->get('token');

            // we are just picking the user with id = 1,
            // ideally, it should be the authenticated user's id e.g $userId = auth()->user()->id
            $user = User::find(1);
            $identity = sprintf("%05d", $user->id);
            // attach the identity to this user's record
            $user->update(['notification_id' => $identity]);
            try {
// the fcm type is for firebase messaging, view other binding types at https://www.twilio.com/docs/notify/api/notification-resource
                $binding = $service->bindings->create(
                    $identity,
                    'fcm',
                    $address
                );
                Log::info($binding);
                return response()->json(['message' => 'binding created']);
            } catch (Exception $e) {
                Log::error($e);
                return response()->json(['message' => 'could not create binding'], 500);
            }
        }
}

NOTE: In the code above, we are using a dummy user instance. Ideally, you would want to bind the token to an authenticated user instead. If you are looking to support authentication in your Laravel/Lumen API, the Laravel Passport Docs and the Twilio Authy API are good places to start.

Broadcast new Recipes with Laravel Events

Laravel Events provide a way for us to listen for events that occur within our application. Such events include model creation, updates, and deletions. In this article, we will be using Events to send out notifications to our users when a new recipe is posted. Create the new event withphp artisan make:event RecipeEvent and add the following code:

<?php

namespace App\Events;

use App\Recipe;
use Illuminate\Broadcasting\InteractsWithSockets;
use Illuminate\Foundation\Events\Dispatchable;
use Illuminate\Queue\SerializesModels;

class RecipeEvent
{
        use Dispatchable, InteractsWithSockets, SerializesModels;

        public $recipe;

        public function __construct(Recipe $recipe) {
                    $this->recipe = $recipe;
        }

        public function broadcastOn() {
                    return [];
        }
}

Register the RecipeEvent in the EventServiceProvider class provided by Laravel, by opening the file app/Providers/EventServiceProvider and changing its $listen attribute to the code below:

…
protected $listen = [
    'App\Events\RecipeEvent' => [
             'App\Listeners\RecipeEventListener'
   ],
];
...

Next, generate the listener specified above by running:

$ php artisan event:generate

The command should create a RecipeEventListener.php file in the app/Listeners directory. Open up the file and implement our event listener logic as shown below.

<?php

namespace App\Listeners;

use App\Events\RecipeEvent;
use App\User;
use Illuminate\Contracts\Queue\ShouldQueue;
use Illuminate\Queue\InteractsWithQueue;
use Illuminate\Support\Facades\Log;
use Twilio\Exceptions\TwilioException;
use Twilio\Rest\Client;

class RecipeEventListener
{
        public function __construct()
        {
        }

        public function handle(RecipeEvent $event)
        {
            $recipe = $event->recipe;
            $users = User::where('notification_id', '!=', null);
            $identities = $users->pluck('notification_id')->toArray();
            $client = new Client(getenv('TWILIO_API_KEY'), getenv('TWILIO_API_SECRET'),
                getenv('TWILIO_ACCOUNT_SID'));
            try {
                $n = $client->notify->v1->services(getenv('TWILIO_NOTIFY_SERVICE_SID'))
                    ->notifications
                    ->create([
                        'title' => "New recipe alert",
                        'body' => $recipe->title,
                        'identity' => $identities
                    ]);
                Log::info($n->sid);
            } catch (TwilioException $e) {
                Log::error($e);
            }
        }
}

In the handle method above, we are sending out the notification to all the users who have a notification_id set, i.e users who have granted notification permissions to the app and as such, already have an identity bound to them in our Twilio Notify service.

Build the JS files with npm run prod and start the PHP server if it is not already running with php artisan serve. Proceed to create a new recipe via cURL with the command below:

$ curl -X POST -d '{"title": "Creamy Chicken Masala", "body": "Yet another test recipe. -In a shallow bowl, season flour with salt and pepper. Dredge chicken in flour."}' -H 'Content-type: application/json' -H 'Accept: application/json' http://localhost:8000/api/recipes

You should get notified on the registered device and the notification should be logged on your Twilio Notify service console.

NOTE: Because PWAs require https to work properly, you’ll have to start up an ngrok tunnel on port 8000 to be able to access the app from a device separate from your development machine (i.e to make it accessible from somewhere other than localhost).

Conclusion

The Twilio Notify API helps us send notifications to our users on different platforms and in this article, we have seen how it can be used with PWAs. You can find the complete source code for this tutorial on Github and if you have an issue or question, please feel free to create a new issue on the repository.

Michael Okoko is a student currently pursuing a degree in Computer Science and Mathematics at Obafemi Awolowo University, Nigeria. He loves open source and is mostly interested in Linux, Golang, PHP, and fantasy novels! You can reach him via: