PSD2 Compliant Authorization: Verifying Sensitive Actions with Python, Flask and Authy
Time to read: 7 minutes
February 08, 2019
Written by

Adding two-factor authentication (2FA) to your login process increases the security of your user's data. We can extend that to validate sensitive actions like sending money from your account, changing your shipping address, or confirming a medical appointment. Even though the user should be already logged in with a username and password, we want to make sure that they authorize every payment. This blog post will show you how to secure payment actions using Python, Flask, a bit of Javascript, and the Authy API.
PSD2 & SCA
The European Payment Services Directive (PSD2) regulation requires Strong Customer Authentication (SCA) for all transactions over €30 by September 2019. This post will show you how to implement a compliant solution for your application. For more detail on PSD2, SCA, and dynamic linking, check out this post.
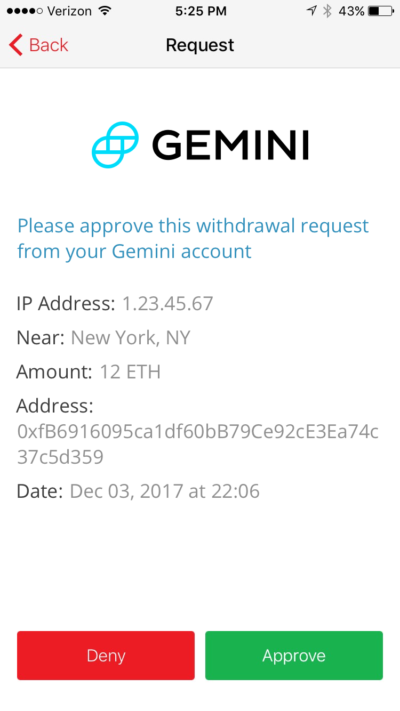
The solution in this post is useful regardless of regulatory requirements. For example, Gemini uses push authorizations to validate cryptocurrency withdrawals.
What you'll need
To code along with this post, you’ll need:
- A Twilio account
- An Authy Application which you can create in the Twilio console
- Python (I’m using Python 3.6.4)
- Pip for installing dependencies
- Virtualenv
- The Authy App on your smartphone (available for iOS and Android)
Setting Up
Start by downloading or cloning the starter application from Github.
If you haven't already, now is the time to sign up for Twilio and create an Authy Application. Navigate to the Twilio Console and grab your Authy App API Key under Settings.
Copy .env.example to .env. Once we have an Authy API key, we can store it in our .env file, which helps us set the environment variables for our app. Update your .env file:
Installing dependencies
Next, install the necessary dependencies.
On Mac/Linux:
python3 -m venv venv. venv/bin/activate
Or on Windows cmd:
py -3 -m venv venvvenv\Scripts\activate.bat
Install Requirements:
pip install -r requirements.txt
Now we're ready to run and test our starter application.
Run the application
On Mac OS or Linux operating systems run:
export FLASK_APP=payfriendexport FLASK_ENV=developmentflask run
Or on Windows cmd:
set FLASK_APP=payfriendset FLASK_ENV=developmentflask run
Navigate to http://127.0.0.1:5000/auth/register and register yourself as a new user with your real phone number. The application already has phone verification with the Twilio Verify API, which allows us to use the user's trusted phone number for subsequent authorizations.
Phone verification is an important part of PSD2 compliance; we need to trust the device before we can start using it for payment authorizations.
After you've registered you'll end up on a page like this:
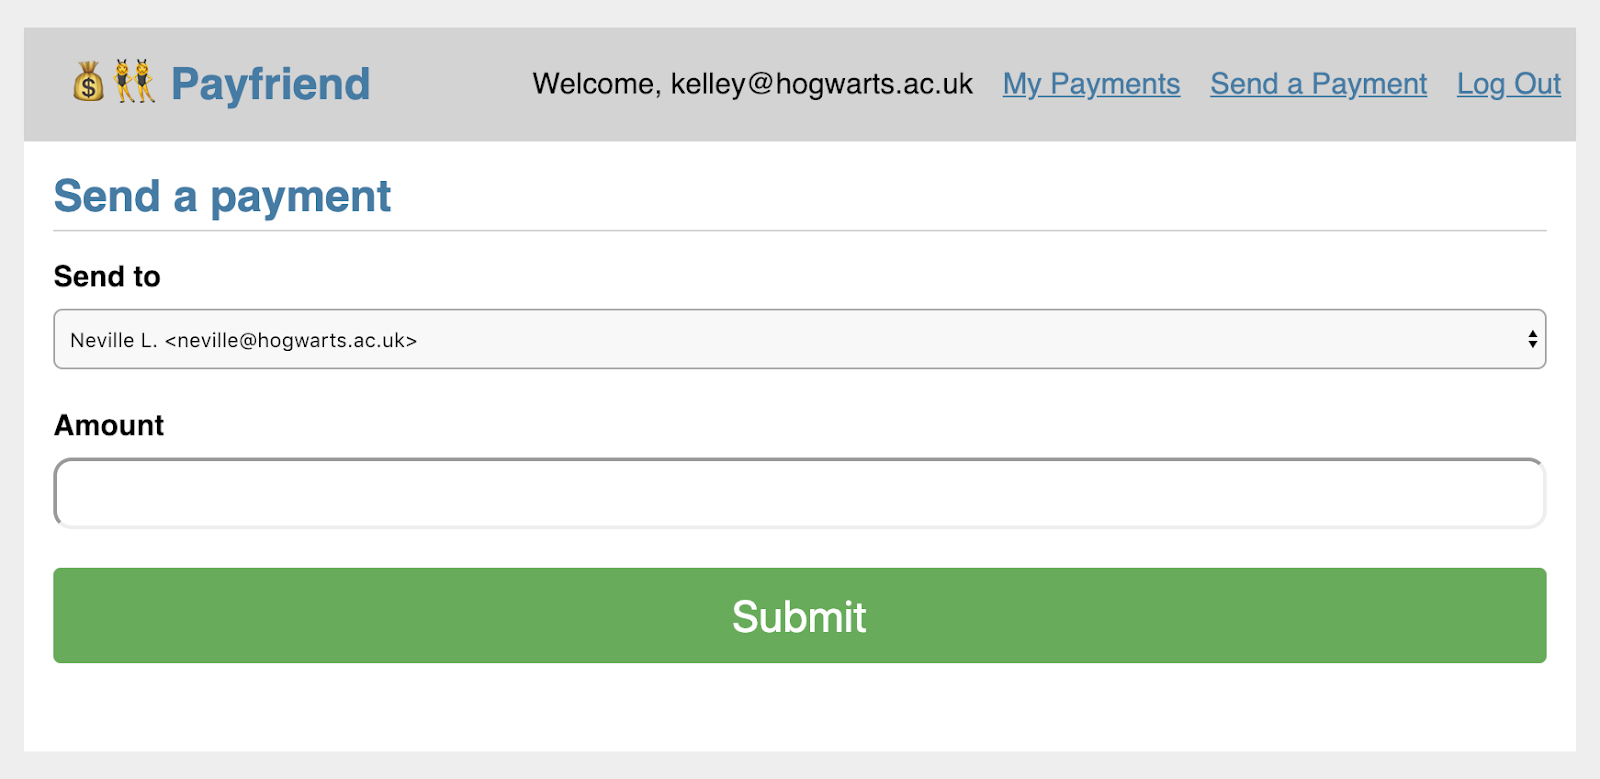
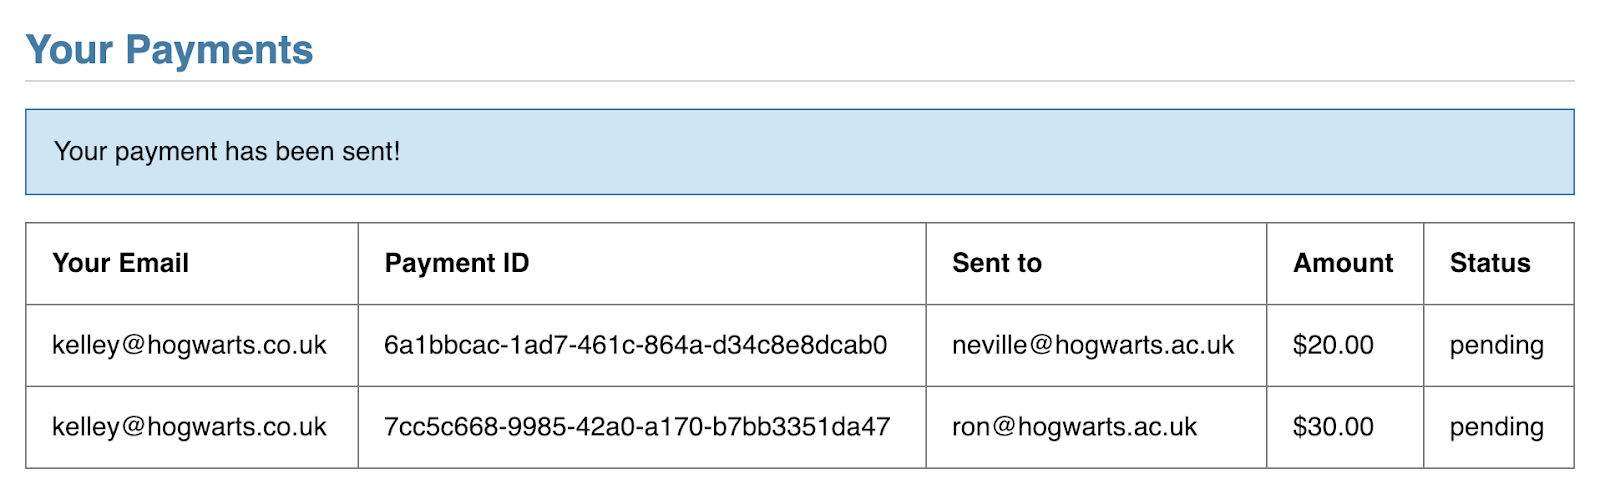
At this point, you can send a payment of any amount to one of your friends. So if I send $20 to my friend Neville, I'll see that reflected in My Payments:
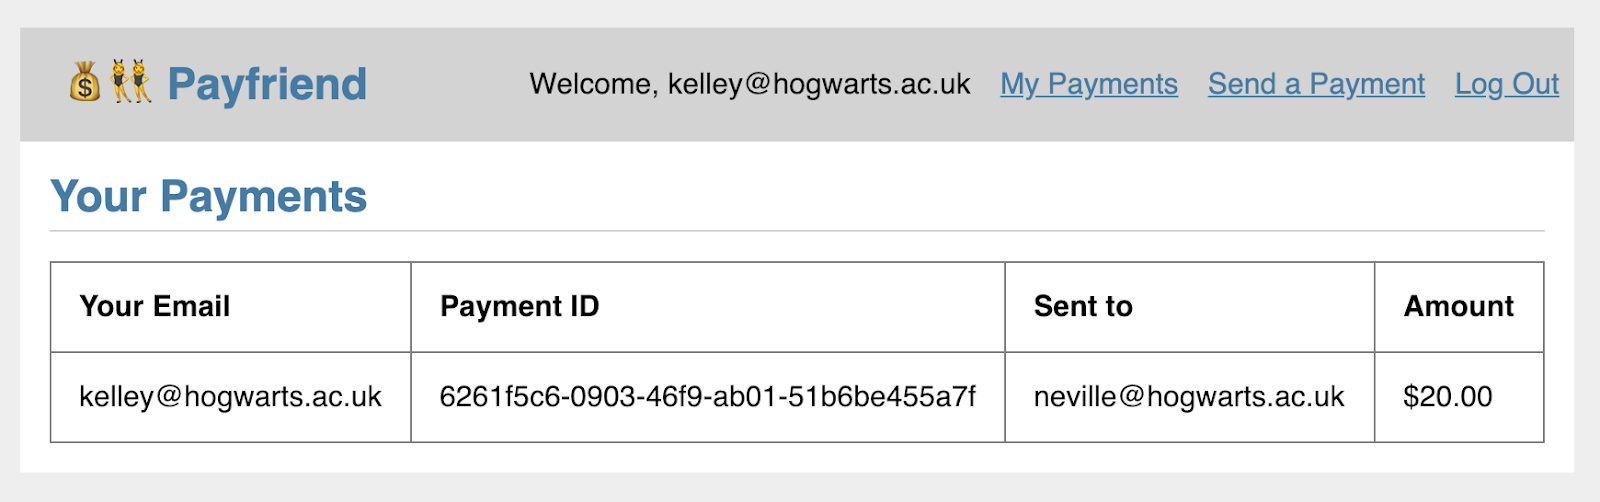
What if we wanted additional safeguards to make sure I approved sending that money to Neville?
Registering a User with Authy
When a new user signs up for our website we store them in the database and register the user with Authy. This code is already in the starter project and you can learn more about that process in the Authy API documentation.
Once we register the user with Authy we get the user's Authy ID from the response. This is very important — it's how we will verify the identity of our user with Authy and send subsequent authorizations from our application.
How to Add PSD2 compliant 2FA for Payment Transactions
For this transaction, we will validate that the user has their mobile phone by either:
- Sending a push notification to their mobile Authy app or
- Sending a one-time token in a text message sent with the Authy API.
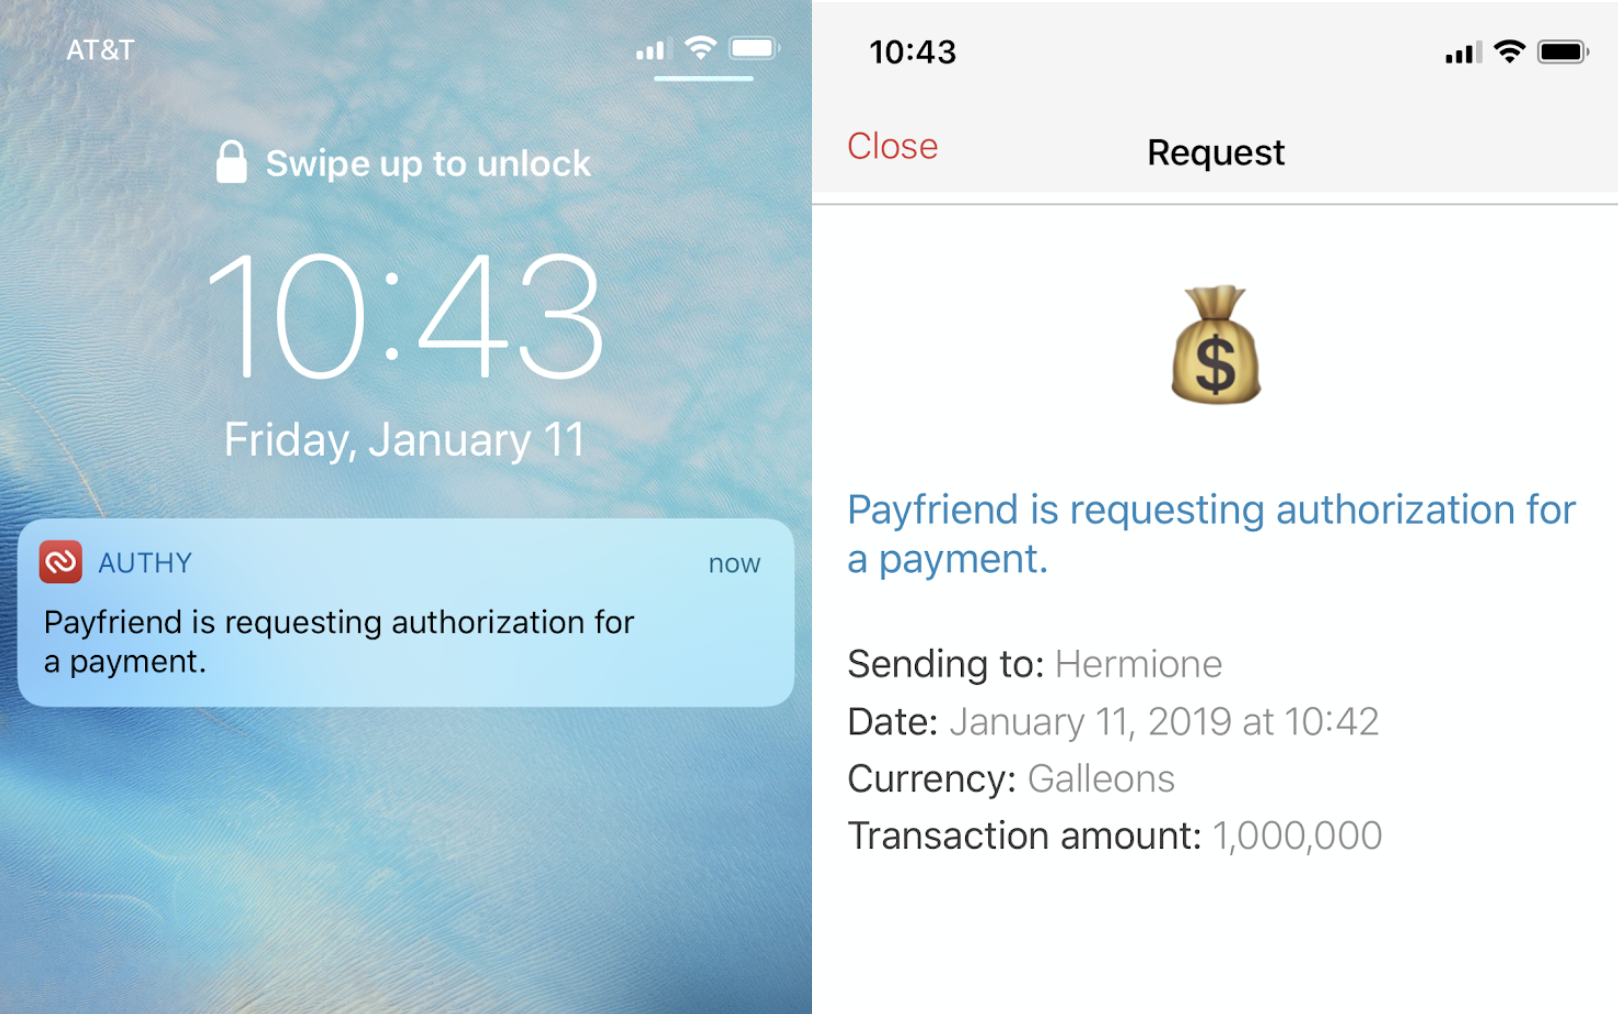
When a user attempts to "Send a Payment" on our website, we will ask them for an additional authorization. Let's take a look at push authorization first.
- We attempt to send a push approval request to the user
- If the user has push authentication enabled, we will get a success message back
- The user hits Approve in their Authy app
- Authy makes a POST request to our app with an approved status
- We move forward with sending the payment
Send the Push Request
When our user sends a payment we immediately attempt to verify their identity with a push authorization. We can fall back gracefully if they don't have a smartphone with the Authy app, but we don't know until we try.
Authy lets us pass extra details with our push request including a message, a logo, and any other details we want to send. We could easily send any number of details by adding additional key-value pairs to our details dict. For our scenario this could look like:
Details will show up in the app. Hidden details can also be included for tracking information about the request (like origin IP address) that you may not need or want to display in the app.
Let's write the code for sending a push authorization. Head over to payfriend/utils.py and add the following function.
This function constructs our push authorization request. We add necessary details about the request like the transaction amount and the payee. We also define the logo that will show up in the request. If the request is successful, resp.ok() will return True and we can grab the authorization uuid from the response. Otherwise we'll return the relevant errors.
Next, head over to payfriend/payment.py and add the code to call our new function. In def send() we only want to add the Payment to the database once we have sent the push authorization. To do that, we'll add a conditional statement after we try to send the push authorization. Replace lines 76-79 (starting with payment =) in the starter project with the highlighted code below.
Once we send the request we update the payment status based on the response. Let's update our payments view to show the status. Open payfriend/templates/payments/list.html and add a column for the status:
Make sure you have the Authy app installed on your phone and that you're registered for Authy with the same phone number that you used to register for Payfriend. Restart the Flask application and send a payment. We're not updating the status yet but this time you'll get an authorization request in the Authy app and see a 'pending' status attached to that new payment ID.
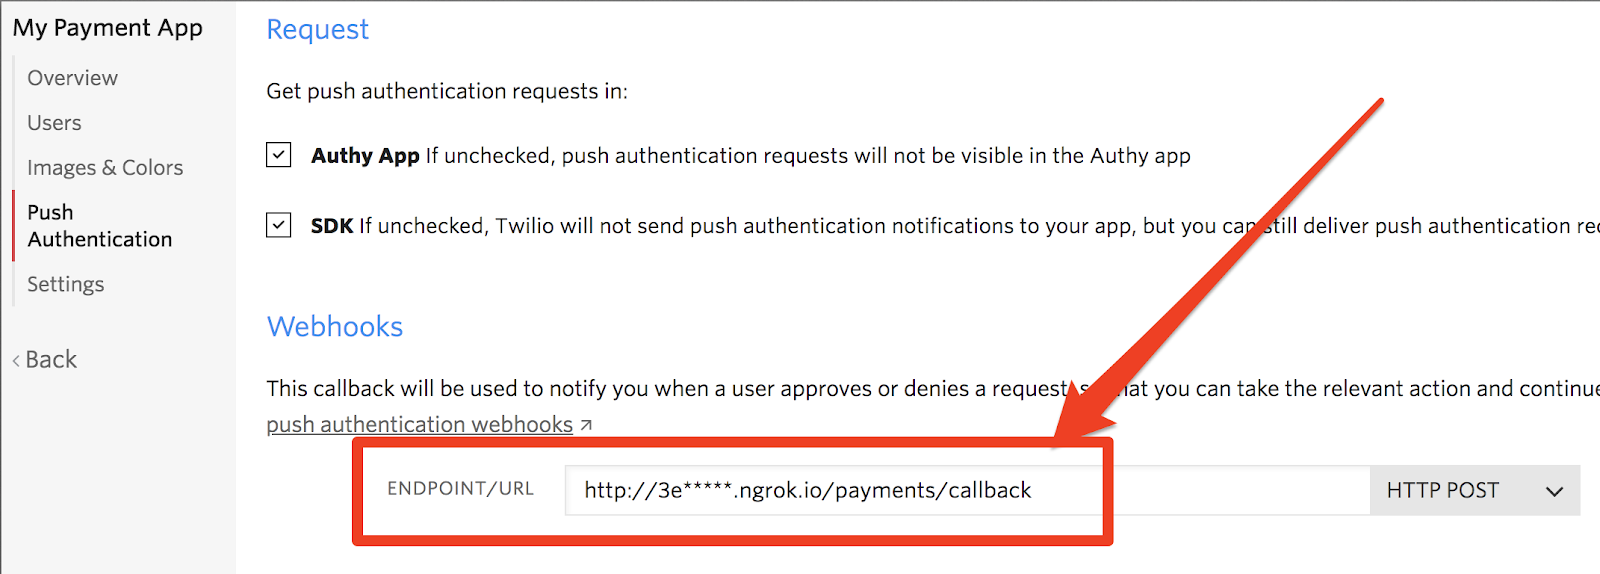
Configure the push authorization callback
In order for our app to know what the user did after we sent the authorization request, we need to register a callback endpoint with Authy.
In payment.py add a new route for the callback. Here we look up the payment using the uuid sent with the Authy POST request.
We need one more endpoint that our client side code can query to check the payment status and update our view accordingly. Add this to payment.py:
Let's take a look at that client-side code now.
Handle Two-Factor Asynchronously
We want to handle our authorization asynchronously so the user doesn't even know it's happening.
We've already taken a look at what's happening on the server side, so let's step in front of the cameras now and see how our JavaScript is interacting with those server endpoints.
First, we hijack the payment form submit and pass the data to our controller using Ajax. If we expect a push authorization response, we then begin polling /payment/status every 3 seconds until we see the request was either approved or denied. Our callback will update /payment/status so we will know when an authorization has been approved or denied.
In auth.js update the sendPayment function to check for the payment authorization status before redirecting the user.
You'll need a publicly accessible route that Authy can access in order to handle the callback and for that we will use ngrok. Note that in this tutorial only the HTTP address from ngrok will work, so you should start it using this command:
Copy the Forwarding url:

Head back to Authy Console and update your application's Push Authentication callback URL with /payments/callback appended.
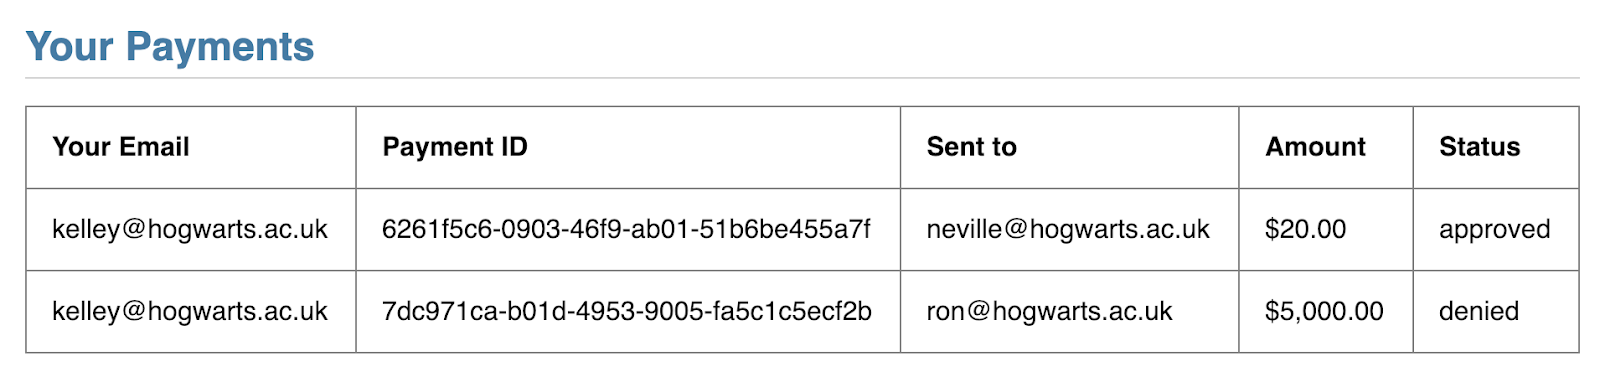
Leave ngrok running in the background and try sending a new payment. Now when you approve or deny the request your application will update the payment status and you can see it reflected in your list of payments.
Now let's see how to handle the case where a user doesn't have the Authy app installed.
Fallback to SMS
There are reasons that you could include SMS as a verification option: like being able to reach users without smartphones and onboard users seamlessly (no app install required).
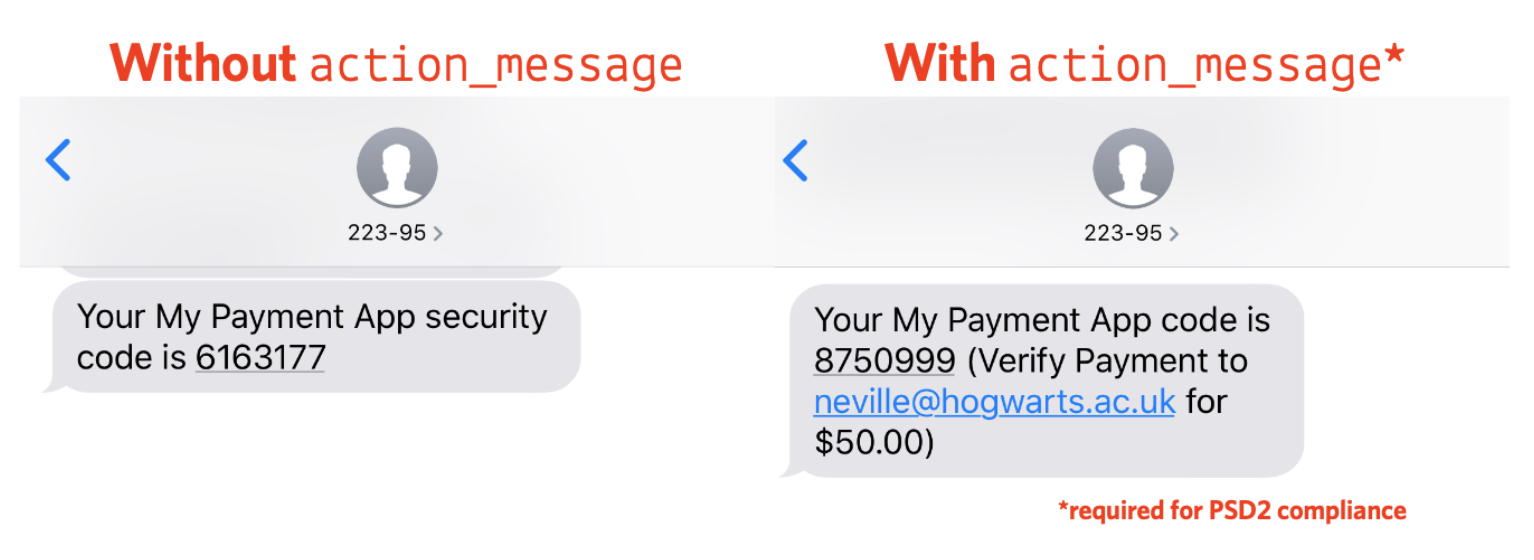
In utils.py add the code to send and validate an authorization token via SMS. One important feature we're taking advantage of here is the action and action_message parameters. The action will tie the SMS authorization to the specific transaction, a requirement for PSD2. The action message will add important details to the SMS message body about the payee and amount of the transaction, other requirements for PSD2 and a helpful message to the user regardless of regulation.
Note that you must include the same action parameter when sending and checking the token. We're using the payment_id for that.
Next, add a new route for starting the SMS authorization in payments.py and a wrapper function for our validation utility:
Finally we can take advantage of the existing token verification route we used for phone verification in auth.py with a few small changes.
Add an import for our new check_sms_auth function in auth.py:
Then update the /verify route to check based on the type of verification. Right now this route only handles phone verification on signup before we've created the Authy user. Therefore we can assume that if the global user has an Authy ID then we can check the SMS authorization instead of the phone verification.
The new /verify route will look like this:
Finally, we need to update the client code to allow for SMS authorization. You can handle this many ways, but let's make the Send SMS button appear after 15 seconds if the user hasn't approved the push authorization in auth.js:
Nice! Now you have a PSD2 compliant application with two different options for authorization.
Where to next?
The full code is available on my Github. Take a look at this diff to compare the finished solution with the starter solution.
For more details on PSD2 compliance, you can read our explainer on dynamic linking.
If you're a Python developer concerned about security, you might enjoy these other tutorials:
- Identify Unknown Phone Numbers with Python 3, AWS Lambda, Twilio Lookup and SMS
- Build Simple SMS Phone Verification with Twilio Verify and Python
Check out more things you can do with Authy in the API documentation.

Related Resources
Twilio Docs
From APIs to SDKs to sample apps
API reference documentation, SDKs, helper libraries, quickstarts, and tutorials for your language and platform.
Resource Center
The latest ebooks, industry reports, and webinars
Learn from customer engagement experts to improve your own communication.
Ahoy
Twilio's developer community hub
Best practices, code samples, and inspiration to build communications and digital engagement experiences.