Routing Customer Service Calls to Agents in PHP with Twilio Programmable Voice and Laravel
Time to read:
March 17, 2020
Written by
This post is part of Twilio’s archive and may contain outdated information. We’re always building something new, so be sure to check out our latest posts for the most up-to-date insights.

Oftentimes when running a business, you might have different departments handling specific cases for customer service. These departments can't always have a dedicated support line that is accessible directly to the public, as various automated troubleshooting options might be in place to assist your customers and reduce spamming. However, most of the time your customers might need to speak directly with a human agent and there's no better way to do this than easily linking the customer directly to an available agent while their call is still active.
In this tutorial, you will learn how to make use of Twilio Programmable Voice to route calls to third party phone numbers during an active call.
Prerequisites
To follow through with this tutorial, you will need the following:
- Basic knowledge of Laravel
- Laravel Installed on your local machine
- Composer globally installed
- Twilio Account
Project Setup
Laravel will be used as the application for this tutorial to expedite our work. To start a new Laravel project using the Laravel installer, open up your terminal and run the following command:
The above commands will generate a new Laravel project and also point your terminal to the project directory using the cd command.
Next, to enable you to communicate with the Twilio API more effectively, you will need the Twilio PHP SDK. Run the following command to have it installed via Composer:
Handling Incoming Call Requests
Whenever a new incoming call request is made to your Twilio number, Twilio makes a GET or POST request to a webhook specified by you for the phone number. This webhook is what Twilio uses to carry out actions whenever a call is made to your Twilio number. Using TwiML you can specify different actions you want to happen whenever a call comes in like playing an MP3 message or doing more complex activities like gathering the user input.
For this tutorial, we will make use of the Gather and Dial verbs. The Gather verb is used for getting the user input during an ongoing call while the Dial verb is used to place a call to a third party during an ongoing call.
Normally, TwiML is written directly in XML, but thanks to the Twilio/SDK package, you can make use of more fluent methods to generate the needed XML without actually writing raw XML yourself. This efficiency really makes working with Twilio Programmable Voice even easier!
To get started writing out the application logic, first, you will need to generate a controller that will house the handler methods. To do this, open up a terminal in the project directory and run the following command:
Next, open the newly created file (app/Http/Controllers/CallController.php) and make the following changes:
Let's take a closer look at the code above. Two methods have been added to the class, each with a specific use case. The handleIncomingCall() method makes use of the VoiceResponse() class from the Twilio SDK to construct the TwiML response when a call comes in. The gather() method from the VoiceResponse instance is used to construct a Gather verb. It takes in an optional argument of an associative array containing several possible attributes which will modify how the Gather verb will behave:
In this case, the action and numDigits attributes are passed in as elements in the array. The action value should be a valid URL which will be called by Twilio after a user finishes inputting a value while the numDigits attribute takes in a number to indicate the maximum number of characters to accept before the URL set in the action attribute gets called.
NOTE:
- The Laravel
secure_url()helper method is used to generate the full URL for the pathapi/actionwhich will be created in the latter part of the tutorial. - If the
actionis not present in the options array, Twilio will make use of the current URL path as the default value.
Next, a Say verb is nested in the Gather verb which reads out the allowed digits and their respective actions to the caller:
Next, a Redirect verb is used as a fallback loop to prevent the call from hanging up if the user fails to input a value within 5 seconds of silence which is the waiting period where the Gather verb expects input from the user:
NOTE:
- The
redirect()method takes in the complete URL. In this case, the URL to this method is passed in. - This line of code will not be executed if the user enters a value within the 5 seconds wait period as the value entered by the user will be sent via an HTTP call made by Twilio to the
actionURL provided as an attribute in thegather()method. - The Redirect verb can not be nested hence it is added to the main
$responseobject.
After successfully using the VoiceResponse instance from the Twilio SDK to construct the TwiML response ($response), the generated XML which will be returned to Twilio will look like this:
Finally, the $response object is returned as a response to the client - in this case Twilio.
The handleUserInput() method takes in a Request instance which is injected by the Laravel service container. First, a new VoiceResponse() is instantiated - $response. Next the value typed in by the user, is retrieved from the request body as the Digits property which is sent by Twilio when the action URL is called:
Next, check if the $userInput is not null or undefined before proceeding to take action depending on the value gotten:
The dial() method which is used to construct a Dial verb takes in the phone number of the third party you want to link the current caller to.
NOTE:
- Any further instruction below the Dial verb will only get executed after either side hangs up.
- If any error occurs when trying to place a call to the phone number provided the new call will end instantly and flow will be returned to your application.
Next, when the case equals to 2, a Say verb is used to read out an inspirational message to the caller. The inspirational message is received from the Illuminate\Foundation\Inspiring class which is also used for the built-in artisan inspire command. This is followed by a conclusion message before the call is ended:
And lastly, if the value entered by the user doesn't equal either of the allowed values, a default case is used to handle the situation:
The user is told about their input being invalid and then using the Redirect verb the user is taken back to the initial starting point of the call so they can re-enter their selection.
Just like, before the constructed $response object is returned as a response to the client.
Registering Routes
Now that the application logic has been written out, you have to create routes that will be used to access the method in the CallController. Open up routes/api.php and replace the content with the following:
NOTE: routes added to this routes/api.php class will be prefixed with /api
Updating Webhooks Settings
Next, to allow Twilio to gain access to your application, you need to update your active phone number webhook settings from your Twilio dashboard. But before you can do that, your application needs to be accessible from the web. Fortunately, ngrok allows us to do just that.
Exposing the application
First, start by running your Laravel application. Open up your terminal and run the following commands to start your Laravel application:
This will get your Laravel application running on your local machine on a specific port which will be printed out to the terminal after successfully executing the command. Next, open up another instance of your terminal and run this command to make your application publicly accessible:
NOTE:
- If you don’t have ngrok set up on your computer, you can see how to do so by following the instructions on their official download page.
- Replace
8000with the port your application is running on.
After successful execution of the above command, you should see a screen like this:
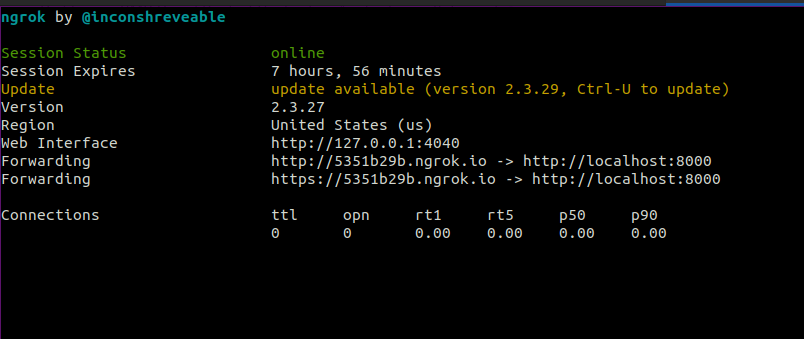
Take note of the forwarding URL as we will be making use of it next.
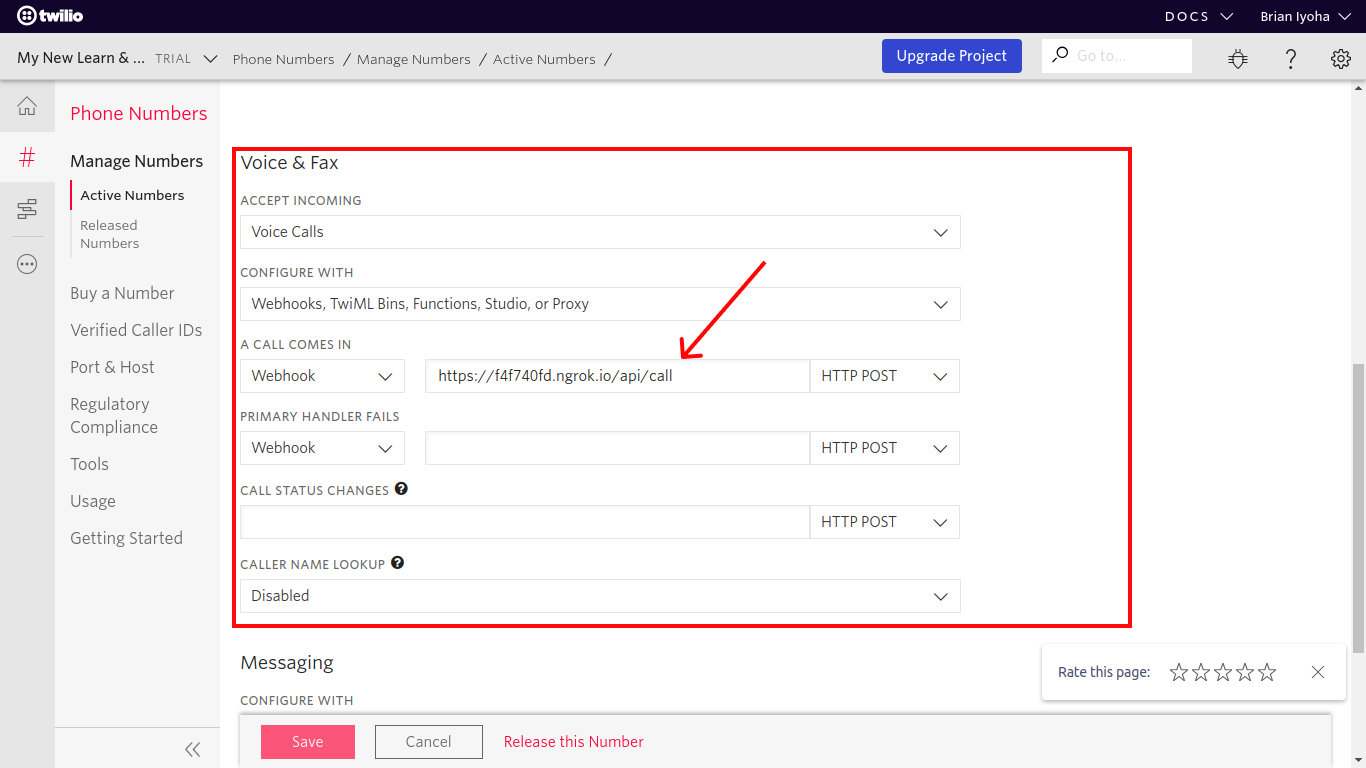
Updating phone number webhook
Now head over to the active phone number section on your Twilio console and select your active phone number from the list which will be used as the phone number for receiving incoming calls. Scroll down to the Voice & Fax section and update the webhook URL with {forwarding url}/api/call for the field labeled “A call comes in” as shown below:
Testing
Awesome! Now that you have both your application running and exposed to the web, you can proceed to test your application. To do this, place a call to your Twilio phone number and you should be greeted with the steps included in the handleIncomingCall() method. You can either input 1 to test how your call gets redirected to a third party or 2 to hear an inspirational message to get you through the day.
Conclusion
At this point, you should have learned how to respond to incoming calls to your Twilio phone number. And with that, you have also learned how to route a call to the appropriate party using Twilio Voice in a Laravel application. Lastly, you have learned how to expose your local server using ngrok. If you would like to take a look at the complete source code for this tutorial, you can find it on Github.
I’d love to answer any question(s) you might have concerning this tutorial. You can reach me via:
- Email: brian.iyoha@gmail.com
- Twitter: thecodearcher
- GitHub: thecodearcher
Related Posts


Related Resources
Twilio Docs
From APIs to SDKs to sample apps
API reference documentation, SDKs, helper libraries, quickstarts, and tutorials for your language and platform.
Resource Center
The latest ebooks, industry reports, and webinars
Learn from customer engagement experts to improve your own communication.
Ahoy
Twilio's developer community hub
Best practices, code samples, and inspiration to build communications and digital engagement experiences.