How to Send a vCard using PHP and WhatsApp
Time to read:
March 13, 2023
Written by
Reviewed by
If you've worked for a medium or large corporation or organisation, when you needed someone's contact details, you likely searched a central contacts database, such as Microsoft Exchange, Zoho, or Salesforce, to find someone's contact details.
But who's going to set up one of these services just for their friends and family? They're far too time-intense – not to mention expensive. So if you need to share someone's details with a friend, how do you do it quickly and easily?
How do you avoid copying their details from your phone into a WhatsApp or email message, and also save your friend from copying those details one at a time into a new contact on their phone or tablet? Gladly, you don't have to, as you can just send them a vCard instead.
In this tutorial, you're going to learn how to create one with PHP and then send it to a contact using a Twilio-powered WhatsApp message.
What is a vCard?
If you're not familiar with them, vCards are, effectively, an electronic form of a business card. They can contain all of the contact details (or properties) that you'd likely expect, such as first and last names, postal and email addresses, phone numbers, URLs — plus so much more!
Prerequisites
To follow along with this tutorial, you will need the following:
- Composer, installed globally
- PHP version 8.4 or above
- A Twilio account (free or paid). If you are new to Twilio, click here to create a free account
- WhatsApp installed on your mobile/cell phone, or accessible via WhatsApp Web in your browser of choice
- ngrok and an ngrok account
- Your preferred text editor or IDE (I recommend PhpStorm)
Create the project directory structure
The first thing to do is to create the project's directory structure and change into the new directory. So, where you store your projects, run the following commands to do so.
If you're using Microsoft Windows, run the following commands instead.
The project directory contains a directory named public, where the sole PHP file will be created. In that directory, is another directory called assets. This directory is where the vCard will be written to, when created.
Install the required dependencies
Now, you need to install the 3 required dependencies; these are:
- sabre/vobject: This package simplifies creating vCard files.
- Twilio's PHP Helper Library: This package simplifies interacting with Twilio's APIs, making it pretty trivial to send a WhatsApp message.
- PHP dotenv: This package helps us keep environment variables and other secure credentials out of code, yet still be simple enough to work with.
To install them, run the following command.
Set the required environment variables
Now, you have to set several environment variables. These are:
- Your Twilio Account SID and Auth Token: required to make authenticated requests to Twilio's APIs.
- Your Twilio WhatsApp sandbox's phone number: so that the correct account can send the message.
- The ngrok Forwarding URL: This is the public-facing URL of the PHP application. It needs to be publicly available so Twilio can retrieve the generated vCard.
- Your phone number: So that the application knows where to send the WhatsApp message.
These will be stored in a new file named .env, in the project's top-level directory. Create the file with your preferred text editor or IDE and then paste the configuration below into the file.
Paste whatsapp: plus your E.164-formatted phone number in place of the placeholder for YOUR_NUMBER, e.g., "whatsapp:+4912356781011".
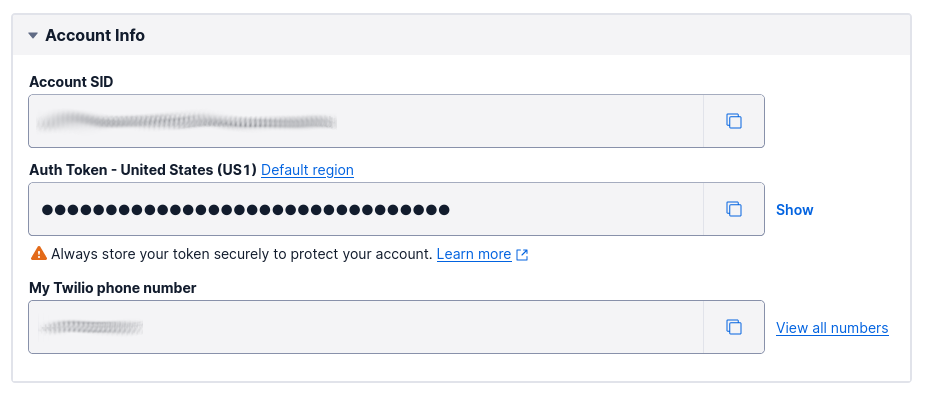
Then, open the Twilio Console in your preferred browser, and from the dashboard's Account Info panel, copy your Account SID and Auth Token and paste them into .env in place of the placeholders for TWILIO_ACCOUNT_SID and TWILIO_AUTH_TOKEN respectively.
Next, starting in the left-hand side navigation panel, click Explore Products > Messaging > Try it out > Send a WhatsApp message. This will open the Try WhatsApp page. Follow the instructions in the Connect to WhatsApp Sandbox section to connect WhatsApp on your phone or tablet, or your browser to the WhatsApp Sandbox.
This is only required during testing, and won't be necessary for production.
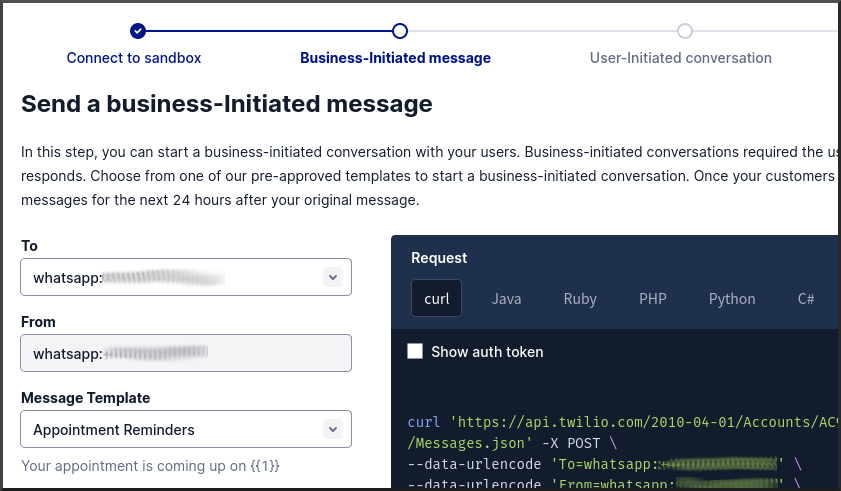
After you've successfully connected, copy the value of From field (e.g., "whatsapp:+11100288888") and paste it into .env in place of the placeholder for TWILIO_NUMBER.
The NGROK_URL placeholder will be replaced toward the end of the tutorial.
Write the PHP code
Now, it's time to write the code. In public, create a new file named index.php. Then, paste the code below into it.
The code starts off by loading the environment variables defined in .env into PHP's $_ENV and $_SERVER superglobals. The call to $dotenv->required() ensures that the environment variables listed in the array are defined and have a value.
After that, a new vCard object ($vcard) is initialised. The vCard specification lists quite a number of properties, but the code sets just five:
- FN: The contact's full name
- ORG: The name of the organisation that the contact works for
- TEL: The contact's telephone number
- TITLE: The contact's title or identifier
- URL: A URL
- BDAY: The contact's birthday
Using PHP's file_put_contents() function, a vCard file is created from $vcard in public/assets, named twilio.vcf.
Then, a Twilio Client object ($twilio) is initialised with your Twilio Account SID and Auth Token. After that, the call to $twilio->messages->create() sends a WhatsApp message to the number stored in $_ENV['TWILIO_NUMBER']. As part of this process, Twilio will retrieve the vCard file from the application and attach it to the message.
Test the application
With the code written, it's time to test that the application works. To do that, first start the application, by running the command below.
Then, start ngrok running to provide a publicly facing URL to the application, by running the following command.
From the terminal output, copy the Forwarding URL and paste it into .env in place of the placeholder for NGROK_URL.
Then, run the command below, after replacing the placeholder with the ngrok Forwarding URL.
You should see the following output in the terminal.
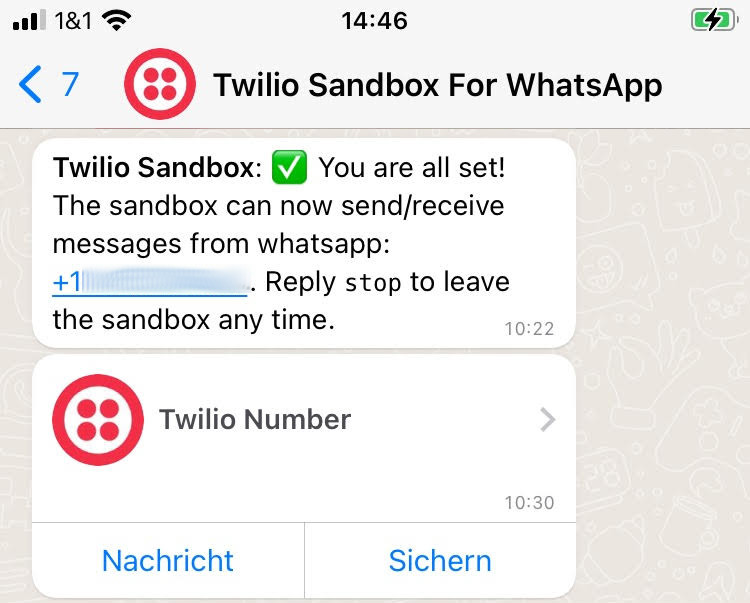
Shortly after that, you should receive a WhatsApp message with the vCard attached, similar to the screenshot below.
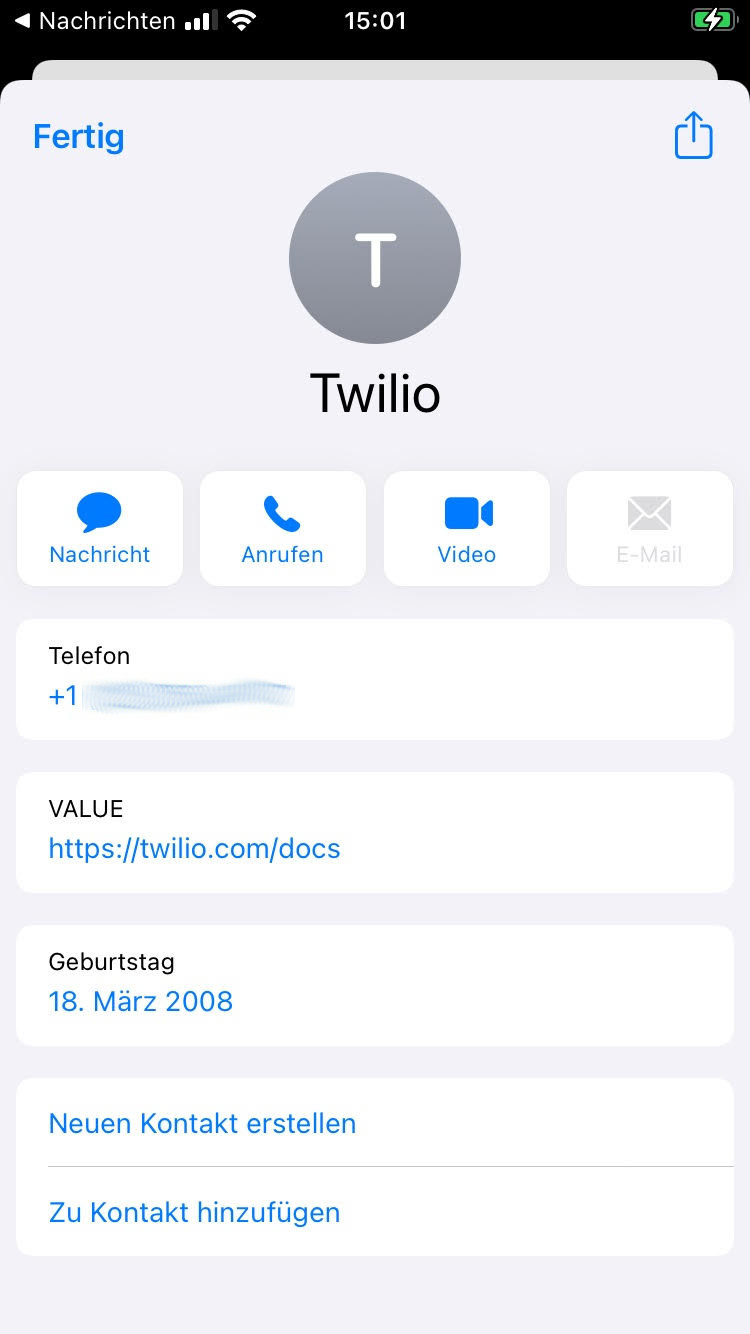
Click on it, and it will open in your phone's contacts application, similar to the screenshot below.
If you're curious about what the vCard file looks like, open it in your text editor or IDE, where you should see something similar to the following.
That's how to send a vCard with Twilio WhatsApp and PHP
Now if your users need to send contacts to other people, they can now send a vCard quickly and easily. No longer do they need to copy and paste details into a WhatsApp message or email by hand.
Do you see yourself using them in your PHP applications (or when sharing contacts with friends and family)?
You can find the entire code for this tutorial in the accompanying GitHub repository if you're interested.
Matthew Setter is a PHP and Go editor in the Twilio Voices team, and a PHP and Go developer. He’s also the author of Mezzio Essentials and Deploy With Docker Compose. You can find him at msetter[at]twilio.com. He's also on LinkedIn and GitHub.
Related Posts


Related Resources
Twilio Docs
From APIs to SDKs to sample apps
API reference documentation, SDKs, helper libraries, quickstarts, and tutorials for your language and platform.
Resource Center
The latest ebooks, industry reports, and webinars
Learn from customer engagement experts to improve your own communication.
Ahoy
Twilio's developer community hub
Best practices, code samples, and inspiration to build communications and digital engagement experiences.