How to Host a Social Media Giveaway Using Twilio WhatsApp API, Python, and SQLite3
Time to read:
November 06, 2020
Written by
Reviewed by
This post is part of Twilio’s archive and may contain outdated information. We’re always building something new, so be sure to check out our latest posts for the most up-to-date insights.

November and December can be a fun time, especially when it comes to giving thanks and giving to others. If you are an Instagram influencer or follow someone that has a big brand name and social media presence, then you'll know that people will often try to interact with their audience or gain more followers by hosting a giveaway. This is often a great tactic to gaining sponsorships from other brands through promoting giveaways.
Now I don't know what it's like to host a giveaway to thousands of people, make sure that each person is qualified to enter, and then select a winner, because that's too much for one person to handle. So I thought, what if Twilio can help get the job done?
In this tutorial, you will learn how to host a social media giveaway and generate a winner within one second with the help of Python, SQLite3, and the Twilio API for WhatsApp. This project will also help you keep track of loyal followers who are interested in your brand and potentially future giveaways within a SQLite database.
Tutorial Requirements
In order to build this project, you will need to have the following items ready:
- Python 3.6 or newer. If your operating system does not provide a Python interpreter, you can go to python.org to download an installer.
- ngrok. We will use this handy utility to connect the development version of our Python application running on your system to a public URL that Twilio can connect to. This is necessary for the development version of the application because your computer is likely behind a router or firewall, so it isn’t directly reachable on the Internet. If you don’t have ngrok installed, you can download a copy for Windows, MacOS or Linux.
- A free or paid Twilio account. If you are new to Twilio get your free account now! (If you sign up through this link will give you $10 credit when you upgrade.)
- SQLite3 in order to open the SQLite shell and make executable scripts.
- Some prior knowledge in SQL logic or a willingness to learn.
Configuration
We’ll start off by creating a directory to store our project files. Inside your favorite terminal, enter:
Since we will be installing some Python packages for this specific project, we need to create a virtual environment.
If you are using a Unix or MacOS system, open a terminal and enter the following commands:
NOTE: Depending on what version of Python you are on, you might have to specify python instead of python3.
If you are on a Windows machine, enter the following commands in a prompt window:
If you are curious to learn more about the packages, you can check them out here:
- The Flask framework, to create the web application that will receive message notifications from Twilio
- The twilio package, to send messages through the Twilio service
- The python-dotenv package, to read a configuration file
Configure Twilio WhatsApp
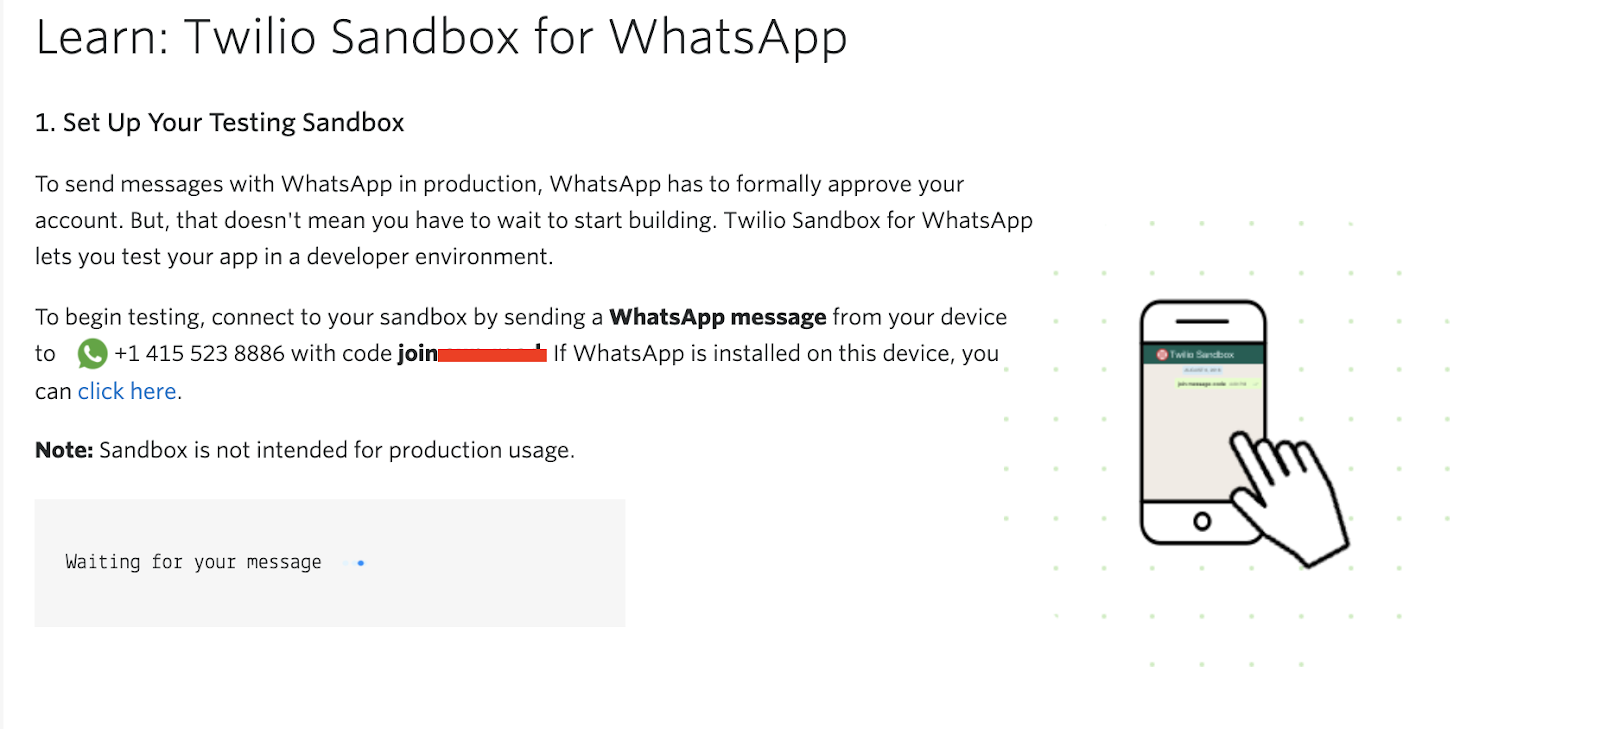
We'll be setting up a webhook to the Twilio WhatsApp Sandbox as we go through the tutorial in order to see if the WhatsApp message data makes it into the database. If you haven't already, log onto the Twilio Dashboard to view your Programmable Messaging dashboard. There is a section on the page that says "Building with WhatsApp? Get started here". Click on the link to learn how to set up your sandbox.
The sandbox is provided by Twilio, however, once you complete your application, you can request production access for your Twilio phone number.
Use your smartphone to send a WhatsApp message with the requested phrase to your assigned WhatsApp number. If you are successful, you should receive a reply as shown below.
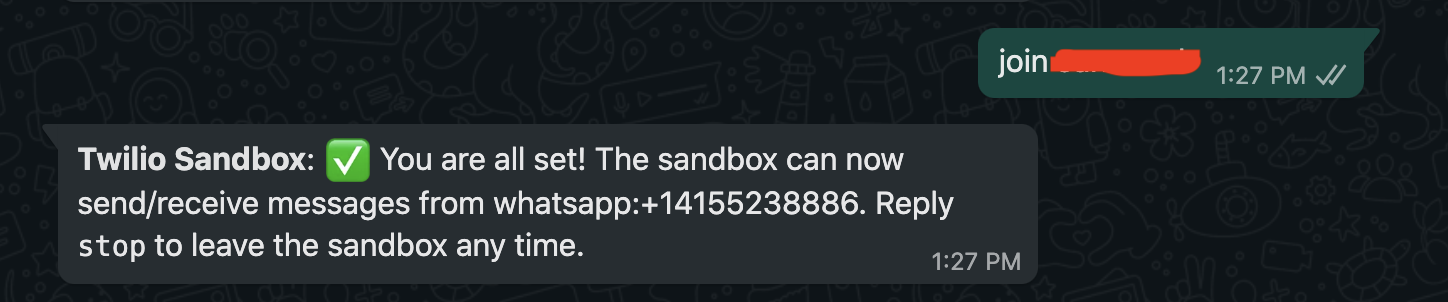
These are important steps as your giveaway participants will need to join the sandbox successfully in order to have their entry counted unless your project is approved for production access. You can learn more about WhatsApp Twilio Number for your giveaway here, otherwise, this article will cover the process of testing and conducting the giveaway within the Twilio sandbox.
Set up a development Flask server
Make sure that you are currently in the virtual environment of your project directory. Since we will be utilizing Flask throughout the project, we will need to set up the development server. Add a .flaskenv file (make sure you have the leading dot) to your project with the following lines:
These incredibly helpful lines will save you time when it comes to testing and debugging your project.
FLASK_APPtells the Flask framework where our application is locatedFLASK_ENVconfigures Flask to run in debug mode
These lines are convenient because every time you save the source file, the server will reload and reflect the changes.
Then, type flask run in your terminal to start the Flask framework.
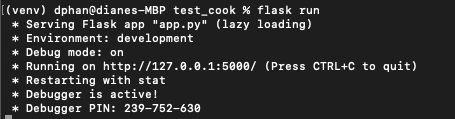
The screenshot above displays what your console will look like after running the command flask run. The service is running privately on your computer’s port 5000 and will wait for incoming connections there. You will also notice that debugging mode is active. When in this mode, the Flask server will automatically restart to incorporate any further changes you make to the source code.
Set up a webhook with Twilio
Open up another terminal window and navigate to the "giveaway_twilio" project directory if you are not already there. While flask is running in one terminal window, start ngrok with the following command to temporarily enable the Flask service publicly over the Internet:
Ngrok is a great tool because it allows you to create a temporary public domain that redirects HTTP requests to our local port 5000.
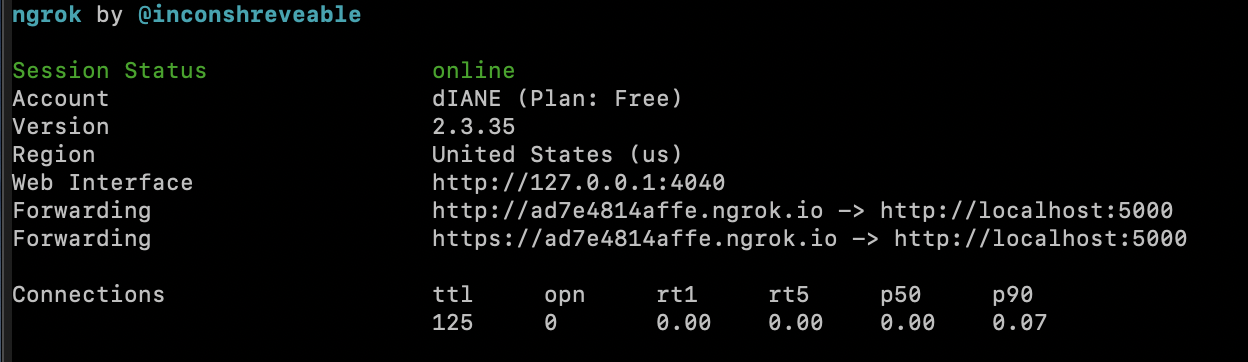
Your ngrok terminal will now look like the picture above. As you can see, there are URLs in the “Forwarding” section. These are public URLs that ngrok uses to redirect requests into our Flask server.
Copy the URL starting with https:// to the clipboard and then return to the Twilio Console. Navigate to the Programmable Messaging dashboard and look at the sidebar for Programmable Messaging to find WhatsApp Sandbox Settings under the Settings option. This is where we tell Twilio to send incoming message notifications to this URL.
Paste the URL copied from the ngrok session into the “WHEN A MESSAGE COMES IN” field and append /webhook, since that is going to be the endpoint that we will write later in the Python application. Here is my example for reference:
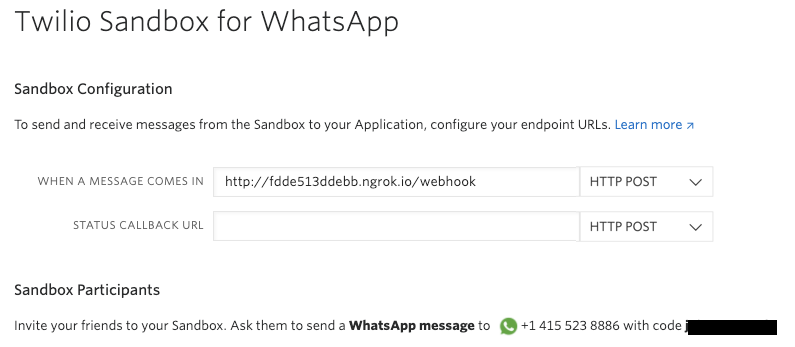
The URL from ngrok in my example is “https://ad7e4814affe.ngrok.io/webhook” but again, yours will be different.
Before you click on the “Save” button at the very bottom of the page, make sure that the request method is set to HTTP POST.
Awesome! It's time to build out the SQLite database and test along the way.
Set up your database
If you have a brand account and want to build up your audience and fanbase, it's a great idea to store their data in a safe database. In this case, we'll set up SQLite3, which is serverless and portable because the database is stored in a file, making it a nifty choice that's easy to get started with. Plus, there is no complex setup for Python developers because support for SQLite3 is built into the interpreter. If you decide to change your database to MySQL or PostgreSQL in the future, then transitioning from SQLite will make the process very familiar to you. You can also learn more about connecting a Twilio WhatsApp Python Project to SQLite3 in this article.
Make sure that you have SQLite3 installed on your machine. Start up the SQLite3 prompt on your terminal by entering the command sqlite3 app.db. This will create a database file named app.db where you can define the tables for your data to be stored.
This database will be simple and only store the texter's phone number as well as their social media username, which is their Instagram account in this case. Copy and paste the following code into the SQLite3 prompt:
Technically, you don't need to make two tables to store the participant's information. But some giveaway platforms allow participants to enter the contest with more than one social media platform. So in the case that you want to expand this project and ask for more information such as their email address, Twitter username, or any other social media, this is where you can store the data. You can also view other keys in the JSON API Response on the Twilio Docs and include more columns depending on what else you would like to see in your SQLite3 file.
Notice that the app.db file was added to your project directory, but don't expect to see the contents of the file since it's written in binary.
Manage the database from Python
Now that the SQLite database has been initialized, the Python app needs to be able to use CRUD (Create, Read, Update, Delete) operations on the database. In order to do so, the Python app must establish a connection to the app.db file.
Create a file named app.py and copy the following code into the Python file:
So what's happening above is that @app.route is a decorator from our Flask framework, which is used to get developers like ourselves to start API projects quickly. This decorator will work with our enter_giveaway() function that will be included in a URL so that we can receive incoming WhatsApp messages from any user.
We also created a sender_phone_number variable which receives a value from Flask’s request.form function. When we look at the From field, Flask is able to parse the phone number of the sender in the format of a E.164 phone number representation, which we store in the users table of the database. The instagram_response is parsed from the WhatsApp text messages as well to populate the database.
A conn object is created to use the connect() function from the sqlite3 module and print "Successful connection!" if it worked. This conn object also provides the Connection object that represents the app.db database. The connection exists so that you can interact with the database using CRUD operations throughout the project. This connection will close at the end of the session, but if it failed to connect in the first place, the program will print an error and return a message at the end saying "Your message was received.".
In addition, the Twilio Helper Library for Python allows us to generate TwiML responses using classes and objects. TwiML is short for Twilio Markup Language, an XML-based syntax that the webhook can use to tell Twilio how to handle the message. It's a neat and convenient way for Twilio to handle your incoming messages.
For our project, we will utilize best programming practices by writing the definition for a respond() function. This is called throughout our project to generate a response that is sent back to the sender using TwiML's MessagingResponse function.
Make sure the Flask application is still running in your first terminal window, and that it has reloaded to incorporate the changes to the app.py file. Then go ahead and use your WhatsApp enabled device to send a message to the Twilio sandbox number and see if you had a successful connection.
Let's change it up so that the database can accept entries from those people who are interested in the giveaway.
Record the participant's entry to the giveaway
At this point, we have established a connection with the SQLite3 database which will soon be populated after some functions are defined. Let's discuss the specs of this application really quick.
In this giveaway app, each individual Instagram account can enter only once and their account name is tied to their WhatsApp phone number. Once they text in their username, they should not text in again unless they need to overwrite their previous entry with a new Instagram account username.
By setting up the database so that it stores people's phone numbers as unique keys, we are able to prevent one person from having an unfair advantage and trying to increase their chances of winning in the giveaway by texting multiple times.
However of course, we can't prevent people from entering the contest from a different phone number, so make sure you have a policy that handles these edge cases such as implementing a checker to see if there are duplicate social media usernames being entered.
Replace the entire enter_giveaway() function in the webhook with the following code below:
There are two conditions in the enter_giveaway() function. First, if the user does not exist, an insert_users query is executed with the sender's phone number so that they can be added to the database. The query INSERT INTO users(phone_number) VALUES(?) means that the code will insert the sender_phone_number to the ? placeholder so that a new entry can be added to the users table. In fact, the substitution of ?s with a variable is actually a security feature that prevents SQL injection attacks such as this one.
In addition to adding a row to the users table, a row needs to be added to the socialmedia table and this only works if the foreign key user_id is known. This foreign key defined earlier in the article is crucial to connecting the two tables together. The recent_userid variable is set using the result of lastrowid which conveniently accesses the cursor's last modified row. This id can now be used in the next step.
After retrieving the recent_userid, a query is executed to INSERT INTO socialmedia (user_id, instagram) VALUES(?, ?) where recent_userid maps to the first placeholder and the instagram_response parsed from the body of the message sent by the user is in the second placeholder.
The second condition checks if the user already exists in the database, so they already entered the giveaway. In this project, we're writing code that says that the person who tries to text again can only change their Instagram username. This is helpful especially in the case that the person accidentally made a typo on their entry.
A user_id is extracted from the tuple result in the look_up_user_query to make sure the user already exists. Since we only want to UPDATE socialmedia table with the new instagram string, we will write SET instagram = ? where the ? placeholder will stand for the instagram variable parsed by Flask. Then, the SQL command ends by specifying which row or user_id should be updated.
After the end of each query shown in the scenarios, a cursor object is created, represented as the cur variable connecting to the conn object. This cursor is important because it allows Python to execute SQL commands in the session, followed by the cur.execute() function which executes the SQL query with the appropriate data that's used to either be inserted into the table or to update a row in the table. The commit() function is called at the end in order to commit the transaction to the connection in the database.
Generate the winner of the social media giveaway
Some giveaway hosts will use online number generators or make up their own method to randomly select a winner as truthfully as they can. In this project, we’ll be implementing our own random number generator so that we don’t have to rely on other sites to choose the lucky winner.
In the same app.py file, we will define another route in the Flask app. Within this route, a definition for generate_winner is created. Copy and paste the following code below all of the code for /webhook:
To generate a winner, another SQL query is executed so that the app can count how many phone numbers participated in the giveaway. Once that number has been retrieved and set to the total_entries variable, the Python random library that was imported earlier is called to help generate a random number between the first entry and the total amount of entries. The result is stored in a generated_number variable which is executed in another query - look_up_winner_query - to return all the information associated with that entry from the database.
The winner_entry can be viewed on the terminal, but we can also create an easy and user friendly way to view the winning result by rendering an HTML page instead. Create a folder named templates in this project directory. Add a file named success.html and paste the following code:
Great! Once you are done conducting the giveaway, you will be able to view the winning entry by accessing the HTML page. If you have extra conditions that a participant must meet before declaring them a winner, this is the time to check. If for some reason, the first winner generated is ineligible because they do not have a legitimate account or they are not following your brand account on Instagram, then you can refresh the page and the random number generator will display the information for another potential winner.
Here's an example of what you will see when you go to the /winner endpoint on your ngrok URL:
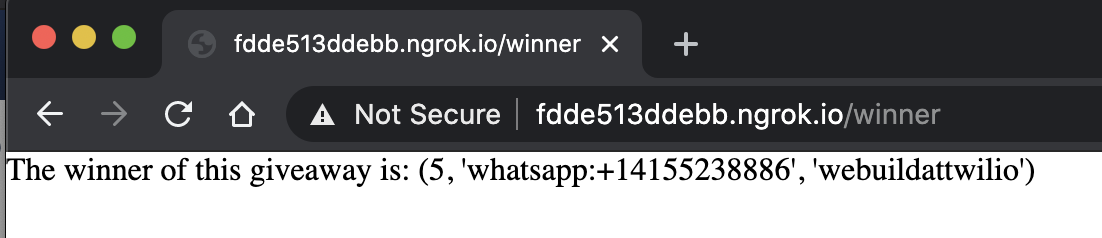
Congratulations to Instagram username "'webuildattwilio"!
Be careful because once you leave the page, the information of that winner will disappear unless you happen to generate their entry again.
Run the social media giveaway application
Now that all the code is complete, let's put this giveaway app to action! Make sure you have one tab running Flask and one tab running ngrok. If you closed it for any reason, start it again now with the following commands in their respective tabs.
For testing purposes, you can manually insert dud data into the SQLite3 database. Insert at least 2-3 entries using the SQLite3 client. You can make up the phone numbers as long as they're unique and map them to a random Instagram username.
Or, you can start inviting people to join your giveaway. Tell your friends or social media following to text your WhatsApp Twilio number and to make sure they joined the WhatsApp sandbox correctly. Then, let them know how to enter the giveaway properly. For example, you might put your instructions into a graphic like this with an example caption:

"Enter my giveaway to win a holiday gift card! Download WhatsApp, enter the Twilio sandbox with my unique code "join xxx-xxxx", and text your Instagram username to the number "+1 (415) 523-8886". You must be following my account and like this picture to be eligible for the giveaway. This giveaway will end in 24 hours and the winner will be contacted through Direct Messages."
Perfect! Once 24 hours have passed, or when you're ready to generate a winner for the giveaway, paste your unique ngrok URL and append the /winner webhook to the end of the URL to your browser and you'll see the winning entry show up on the page.
NOTE: If the giveaway lasts for more than 24 hours, the user may have to join the Twilio sandbox again if production access was not approved. The WhatsApp session is valid for 24 hours after the most recent message so the participant may have to enter the sandbox with the unique phrase again to update their entry if they would like to.
Usually, giveaway hosts will want to check that the participant is following them on Instagram, so having their contact information and Instagram name ready is convenient for them to do the manual checks to make sure that the participant is not a bot or someone creating a fake account. The terms and conditions are up to you to decide, just be sure to communicate it with the participants.
What's next for social media giveaway apps?
Congratulations on hosting your first giveaway and for using Twilio to help your brand and social media following grow! Now that you have a database of participants, you can also keep track of your loyal followers or identify your new ones in case you want to reach back out to them for future giveaways or online events. Of course, please make sure to inform each participant that you have their information on hand. For example, you might want to look into General Data Protection Regulation if you have participants outside of the US.
Looking for ways to expand on this project? You can try to make the project stronger by finding a way to check how many times the username was entered in the database. This will prevent the same user from entering the giveaway multiple times on different devices. You can also find a way to verify the social media accounts before they are entered in the database. You can also make the giveaway more interactive by asking participants to send in a picture in which you can add an image recognition API to check pictures sent over WhatsApp.
Let me know what you have been building by reaching out to me over email!
Diane Phan is a developer on the Developer Voices team. She loves to help programmers tackle difficult challenges that might prevent them from bringing their projects to life. She can be reached at dphan [at] twilio.com or LinkedIn.

Related Resources
Twilio Docs
From APIs to SDKs to sample apps
API reference documentation, SDKs, helper libraries, quickstarts, and tutorials for your language and platform.
Resource Center
The latest ebooks, industry reports, and webinars
Learn from customer engagement experts to improve your own communication.
Ahoy
Twilio's developer community hub
Best practices, code samples, and inspiration to build communications and digital engagement experiences.