How to Connect a Twilio WhatsApp Python Project to SQLite3
Time to read:
September 24, 2020
Written by
Reviewed by

Once you get started with the Twilio WhatsApp API, you'll realize that it's really fun and easy to get carried away coming up with ideas for new projects. But what happens when one of your projects takes off and you want to scale up?
If your project requires storing message data, then building a database might be one of the first steps in expanding your project.
In this tutorial, you will learn how to store Twilio WhatsApp data in a secure database that allows you to insert, update, and delete data as you please.
Tutorial requirements
- Python 3.6 or newer. If your operating system does not provide a Python interpreter, you can go to python.org to download an installer.
- SQLite3 in order to open the SQLite shell and make executable scripts.
- Some prior knowledge in SQL logic or a willingness to learn.
Choose a database
If this is your first time setting up your own database, this might be one of the most difficult questions because there are so many choices.
SQLite3 is serverless and portable because the database is stored in a .db file, making it a nifty choice that's easy to get started with. Plus, there is no complex setup, especially for Python developers. If you decide to change your database to MySQL or PostgreSQL in the future, then transitioning from SQLite will make the process very familiar to you.
If you have prior knowledge regarding relational databases, then using SQLite3 in your projects may seem familiar to you, but even if it's your first time working with databases, SQLite is open source and widely used in industries so there's always great documentation and resources on the Internet, like this article!
Set up the environment
Create a project directory in your terminal called “sqlite3-intro” to follow along.
If you are on a Windows machine, enter the following commands in a prompt window:
NOTE: Depending on what distribution of Python you are on, you might have to specify python3.
If you are curious to learn more about the packages, you can check them out here:
- The Flask framework, to create the web application that will receive message notifications from Twilio
- The python-twilio package, to send messages through the Twilio service
If you haven't done so already, make sure that SQLite3 is installed. SQLite should already be installed on macOS but if there's trouble, you can refer to the SQLite Installation docs to download the appropriate zip files to extract the SQLite executable.
Configure Twilio WhatsApp
We'll be setting up a webhook to the Twilio WhatsApp Sandbox as we go through the tutorial in order to see if the WhatsApp message data makes it into the database. If you haven't already, log onto the Twilio Dashboard to view your Programmable Messaging dashboard. There is a section on the page that says "Building with WhatsApp? Get started here". Click on the link to learn how to set up your sandbox.
The sandbox is provided by Twilio, however, once you complete your app, you can request production access for your Twilio phone number.
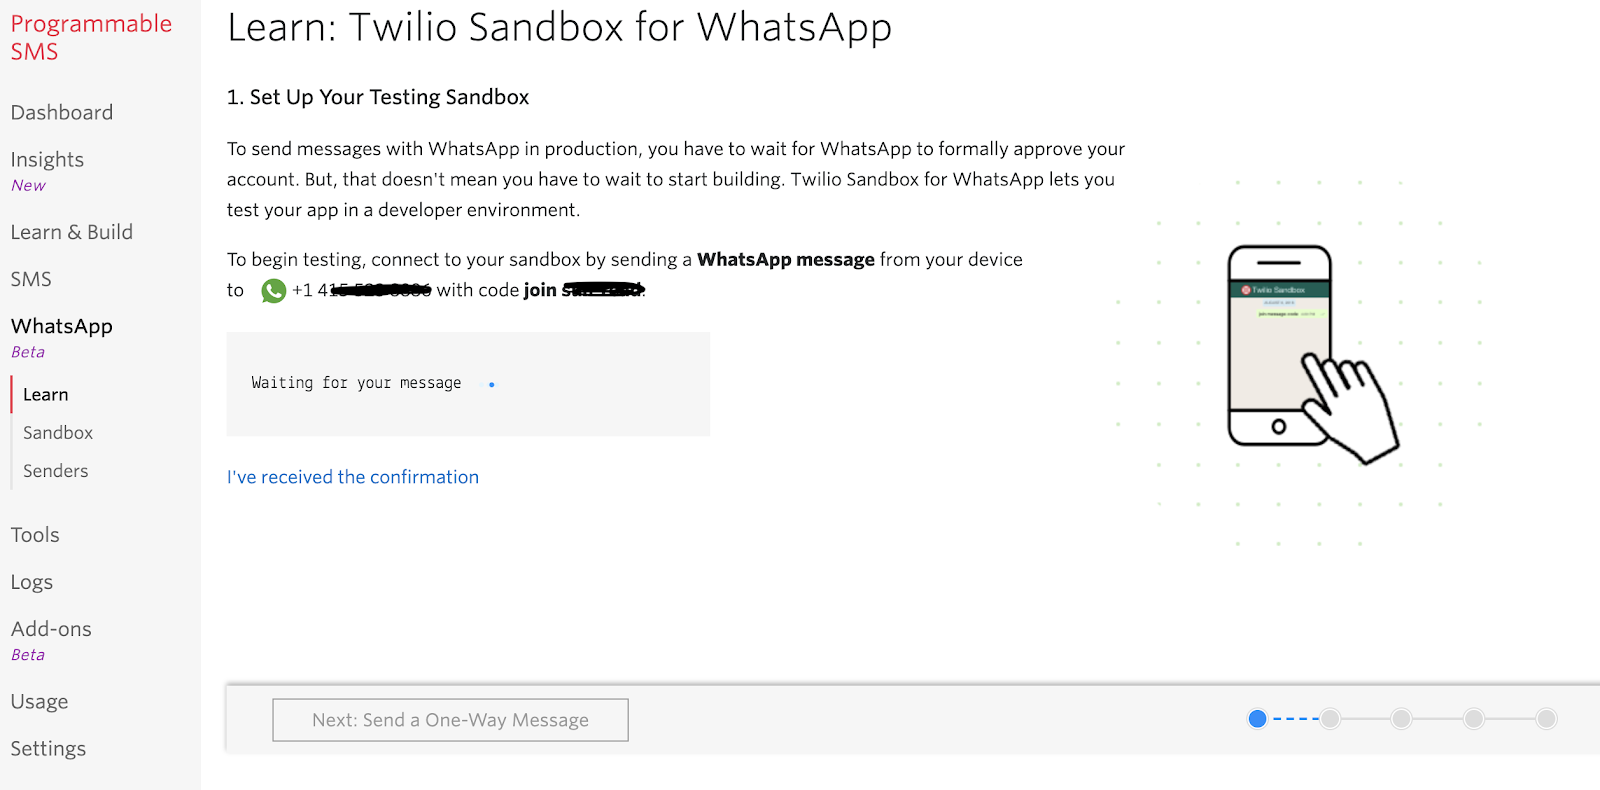
Use your smartphone to send a WhatsApp message of the phrase to your assigned WhatsApp number. If you are successful, you should receive a message as shown below.

Set up a webhook with Twilio
Open your terminal window and navigate to the "sqlite3-intro" project directory if you are not already there. Start ngrok with the following command to enable the Flask service publicly over the Internet:
Ngrok is a great tool because it allows you to create a temporary public domain that redirects HTTP requests to our local port 5000.
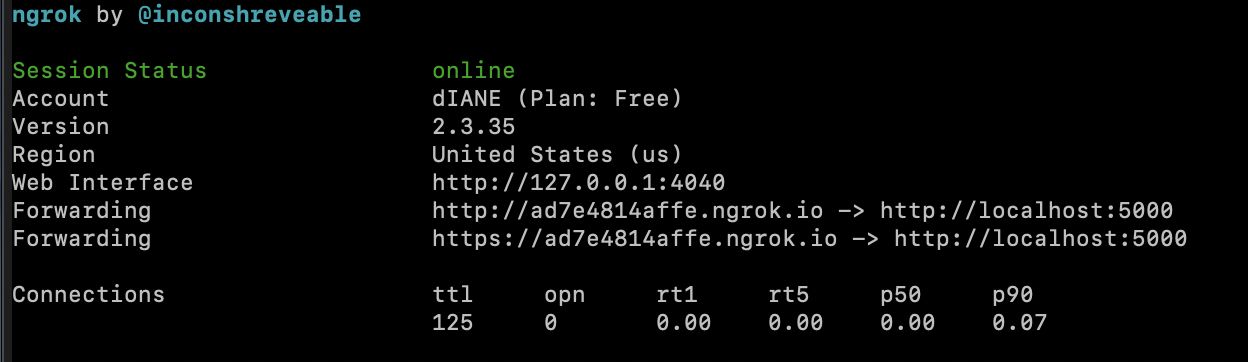
Your ngrok terminal will now look like the picture above. As you can see, there are URLs in the “Forwarding” section. These are public URLs that ngrok uses to redirect requests into our flask server.
Copy the URL starting with https:// and return to the Twilio Console and navigate to the Programmable Messaging dashboard. Look at the sidebar for Programmable Messaging to find WhatsApp Sandbox Settings under the Settings option. This is where we tell Twilio to send incoming message notifications to this URL.
Paste the URL copied from the ngrok session into the “WHEN A MESSAGE COMES IN” field and append /webhook, since that is our endpoint that will be written later in the Python app. Here is my example for reference:
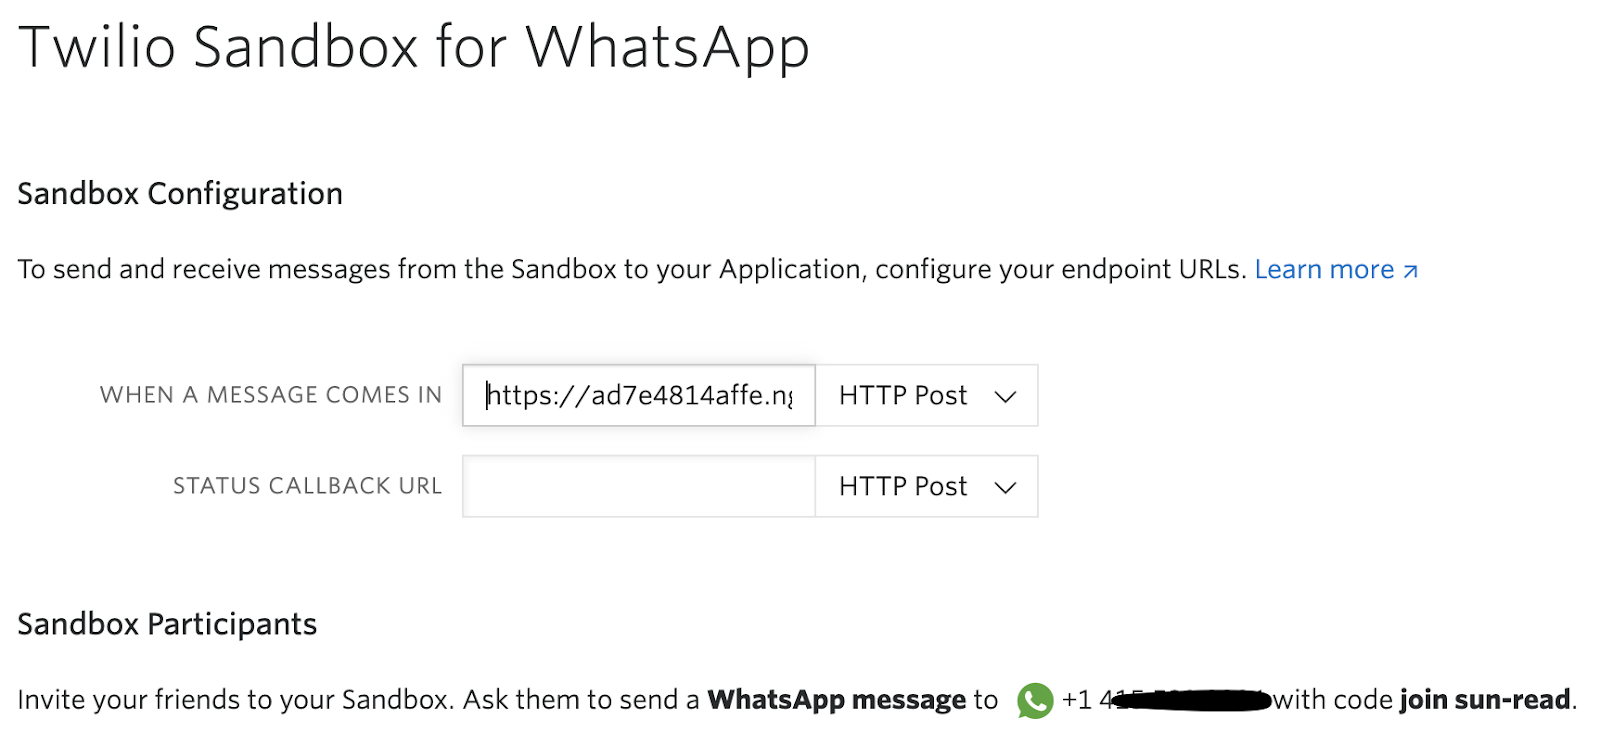
The URL from ngrok in my example is “https://ad7e4814affe.ngrok.io/webhook” but again, yours will be different.
Before you click on the “Save” button at the very bottom of the page, make sure that the request method is set to HTTP POST.
Awesome! It's time to build out the SQLite database and test along the way.
Set up your first database
There are plenty of ways to set up the SQLite3 database, but if you're new to working with SQL tables or have basic knowledge of SQL, then creating the database programmatically might be the best choice.
Create a file in the sqlite3-intro directory named script.sql. Since SQLite3 requires the data to be stored in tables, this script will store definitions of the table that you want to make. For the purpose of this tutorial, I'll be using some fun keys that the Twilio WhatsApp API has available so that anyone who texts my WhatsApp app can send in their location data and a picture from their device.
Copy and paste the following code snippet inside of script.sql:
When the user enables their location services and texts their current location, the Longitude and Latitude coordinates are available in the Twilio WhatsApp MMS payload.
You can view other keys in the JSON API Response on the Twilio Docs and include more columns depending on what else you would like to see in your SQLite3 file.
Initialize the database with some data
Let's take it a step further and add some fake data for testing purposes. Add the following lines to script.sql below the table creations. We'll be inserting a random WhatsApp number into the users table, as well as random coordinates to the photos table.
Save the script.sql and create a new file in the project directory named setup.sh. This SH file is executed within the terminal.
However, if you are using a Windows machine, it might be easier to skip the steps to make an executable file and write the SQL commands directly into the SQLite3 prompt. Otherwise, you would make a setup.cmd file to execute inside of the CMD shell.
Copy and paste the following line into setup.sh so that SQLite3 can create a file named app.db based off of the instructions from the script.sql file.
For Unix or Mac OS systems, run sh setup.sh to execute the file.
Notice that the app.db file was added to your project directory, but don't expect to see the contents of the file since it's written in binary.
View the database
Type sqlite3 app.db in the terminal to start working with SQLite. In order to view the database with the column names, type the following commands and notice the output:
Great! Now we know our tables were initialized correctly and that the data was inserted into the table properly.
In order to view the output of both tables, type the following SELECT command that uses a JOIN to combine the data of two tables together.
To exit the SQLite3 shell, type .quit.
Connect to the database in the Python app
Now that the SQLite database has been initialized, the Python app needs to be able to use CRUD (Create, Read, Update, Delete) operations on the database. In order to do so, the Python app must establish a connection to the app.db file.
Create a file named app.py and copy the following code into the Python file:
Copy the full path of the app.db file, which may look similar to /Users/diane/Documents/projects/sqlite3-intro/app.db and use it to replace <PATH_TO_DB> in the code above.
So what's happening above is that @app.route is a decorator from our Flask framework, which is used to get developers like ourselves to start API projects quickly. This decorator will work with our webhook() function that will be included in a URL so that we can receive incoming WhatsApp messages from any user.
We also created a sender_phone_number variable which receives a value from Flask’s request.form function. When we look at the From, Flask is able to parse the phone number of the sender in the format of a E.164 phone number representation which will be stored in the users table of the database. Other variables are parsed from the WhatsApp text messages as well to populate the database.
A conn object is created to use the connect() function from the SQLite3 module and print "Successful connection!" if it worked. This conn object also provides the Connection object that represents the app.db database. The connection exists so that you can interact with the database using CRUD operations throughout the project. The connection will close at the end of the session, but if it failed to connect in the first place, the program will print an error and return a message at the end saying "Uh-oh".
In addition, the Twilio Helper Library for Python allows us to generate TwiML responses using classes and objects. For our project, we will utilize best programming practices by writing the definition for a respond() function so that we can call it throughout our project to generate a response that is sent back to the sender.
Insert into the database
It's time to insert the WhatsApp text message data directly into the database without writing a bunch more INSERT INTO statements. But first, we need to discuss how the app will work. Some if statements are implemented so that the program will know how to handle each of the following cases:
- The user will be added to the database once they send in their current location
- The user will be able to send in a picture IF they exist in the database already
- The user texts a message out of order, so the app will put the user in the right direction by telling them what to do
With that said, in order to insert anything, there must be a checker to see if the user's phone number already exists in the database.
Execute a SQL query that will check if the user already exists in the app.db file by copying and pasting the following code below the line that assigns a database a connection to the conn object:
The value from the user_exists variable, along with information about the user's WhatsApp message, will be used throughout the program to determine the logic of what should happen next with the user's data.
Paste the following code below the query that checks the user's existence:
So let's discuss the case where the user doesn't exist in the database yet, but they used WhatsApp to send in their live location. The query INSERT INTO users(phone_number) VALUES(?) means that the code will insert the sender_phone_number to the ? placeholder so that a new entry can be added to the users table. In fact, the substitution of ?s with a variable is actually a security feature that prevents SQL injection attacks such as this one.
In order to do so, a cursor object is created, represented as the cur variable connecting to the conn object. This cursor is important because it allows Python to execute SQL commands in the session, followed by the cur.execute() function which executes the SQL query with the sender_phone_number that will be inserted into the table. The commit() function is called at the end in order to commit the transaction to the connection in the database.
The photos table only works if the foreign key user_id is known. This foreign key defined earlier in the article is crucial to connecting the two tables together. Thus, look_up_user_query executes a SQL command that looks up the sender's unique WhatsApp phone number and returns the id, otherwise known as the primary key of the users table. The cursor fetches the output and stores the information in a tuple, which can be parsed out into the user_id variable to be used in the next step.
To complete the insertion steps of the app, another SQL query named insert_photos is called to insert data about the latitude and longitude into the user's user_id. According to the Twilio Docs for WhatsApp MMS, sending in an image from your device does not have a location attached. Thus, we have to set a random string to set the placeholder ? when inserting into the photos table. In the next section, we'll learn how to update the entries in the table with a proper image from the user.
Add your information to the database
By this point, your Twilio Console for WhatsApp Sandbox Settings should have your /webhook appended to the ngrok URL. This enables you to receive incoming WhatsApp messages from any user and for this case, insert your information to the database.
Take your WhatsApp enabled device and text the generated phrase such as "join sun-read" from the Twilio WhatsApp console to join the WhatsApp sandbox session. Since we haven't written the code to handle images yet, sending a picture to the sandbox will result in an "Uh-oh" message. Be sure to not do that yet, unless you want to see the error.
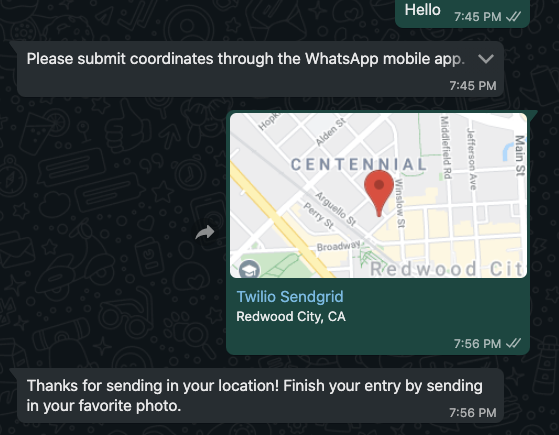
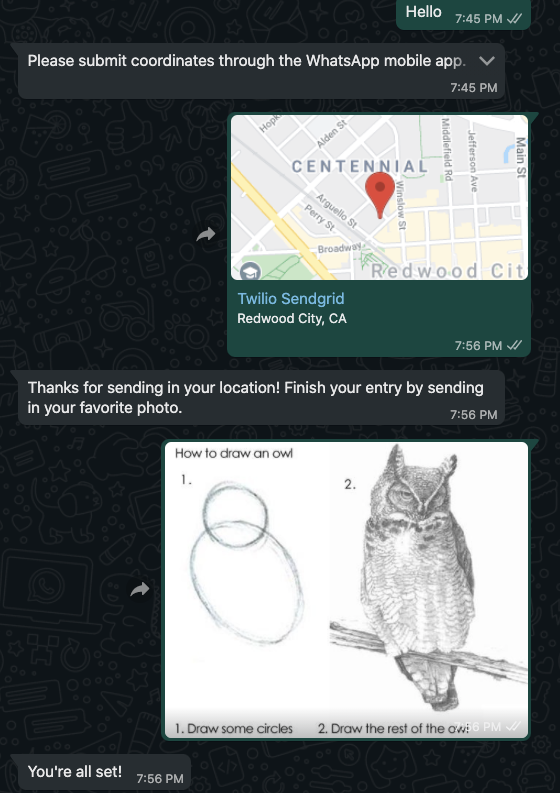
Enable WhatsApp location services so that you can send in your current location. Wait until you receive a response from WhatsApp saying "Thanks for sending in your location! Finish your entry by sending in your favorite photo."
Your conversation should look similar to this when testing out the application:
Update the database
As mentioned, the Twilio WhatsApp API doesn't store any latitude and longitude data from a text message unless the user explicitly shares the live location. Since the photos table has a slot for image data, we will have to update that column separately in this section.
Copy and paste the following elif statement into app.py:
Similar to the process of inserting data into the respective tables, a user_id is extracted from the tuple result in the look_up_user_query. However, the syntax for updating the tables is a bit different here since it's not necessary to update all of the variables for the photos table.
Since we only want to UPDATE photos table with the new picture_url, we will write SET picture_url = ? where the ? placeholder will stand for the pic_url variable parsed by Flask. The MMS images texted in are represented with a URL and only exist if the user sends in a picture. Then, the SQL command ends by specifying which row or user_id was sent in the MMS image.
If your table is bigger and you need to update multiple columns, then you would set more ? placeholders to specific column names within the same UPDATE SQL command. Now that you know how to UPDATE the table, you might even want to write some more code to handle the edge case where a user might need to update their coordinates.
Delete data from the database
In this particular app, we don't want to give users the option to delete anyone's individual data so we will not be writing a DELETE statement.
However, if you need to delete the entire database, for example, to create new tables, columns, and assign new primary and foreign keys, you can simply delete the app.db file and make the new changes to the script.sql file and run the setup executable again.
Be absolutely sure that you want to delete the database before deleting the app.db file or even typing the DROP TABLE IF EXISTS <table_name> command in SQLite3.
With that said, feel free to delete app.db and restart it to get rid of the fake tester data from the beginning. It's worth noting that deleting a row such as a specific id from one table will leave an orphaned row in the related table. This is bad practice for working with relational databases so be sure to know how to properly delete data.
Store WhatsApp messages into the SQLite database
Great! Why don't you tell some of your friends and family to use their WhatsApp device to send the uniquely generated phrase and join the sandbox so that they can text in their location and picture and populate the database! Your conversation should look something like this:
In addition, working with ngrok allows you to view all of the incoming requests to your webhook locally, which makes it easier for you to view the texter’s data and help with debugging in case you expand on this project.
Conclusion: Connect a Twilio MMS App to SQLite3
Congratulations on building your first SQLite database file! Data is important and can be very powerful and dangerous, so be sure that you let users that text a message to your WhatsApp sandbox know what's happening to their data.
This article introduces you to how to set up and build a basic database to securely store information from your MMS application, but you can definitely expand it by building more tables or altering the existing ones.
What’s next for storing Twilio MMS data in SQLite3?
Looking for ways to expand on this project? Try these:
- Implement a database storage for Twilio SMS or WhatsApp chat
- Use the SQLite3 database to populate a Google Map and visualize Twilio WhatsApp data
- Add an image recognition API to check pictures sent over WhatsApp
- Store WhatsApp pictures in DropBox Using Python, Flask, and Twilio
Let me know what you have been building by reaching out to me over email!
Diane Phan is a Developer Network editor on the Developer Voices team. She loves to help programmers tackle difficult challenges that might prevent them from bringing their projects to life. She can be reached at dphan [at] twilio.com or LinkedIn.


Related Resources
Twilio Docs
From APIs to SDKs to sample apps
API reference documentation, SDKs, helper libraries, quickstarts, and tutorials for your language and platform.
Resource Center
The latest ebooks, industry reports, and webinars
Learn from customer engagement experts to improve your own communication.
Ahoy
Twilio's developer community hub
Best practices, code samples, and inspiration to build communications and digital engagement experiences.