Add Text Chat To Your Video Calls With The Twilio Conversations API
Time to read:
November 19, 2020
Written by
Reviewed by
If you implemented a video calling application using the Twilio Programmable Video API, you may find that during a call you want to share textual information with the other participants. This could be a link to a document, or even a reaction emoji. In this article you are going to learn how to take your video application to the next level by adding a chat room with the Conversations (classic) API.
Tutorial requirements
This is the third article in my series of Programmable Video tutorials, so we are going to take advantage of the video chat application built in the previous two installments and add the chat room feature to it. This application uses a vanilla JavaScript front end and a Python back end. To run this application on your computer you need the following requirements:
- Python 3.6 or newer. If your operating system does not provide a Python interpreter, you can go to python.org to download an installer.
- A free or paid Twilio account. If you are new to Twilio, get your free account now! This link will give you $10 of Twilio credit when you upgrade.
- A web browser that is compatible with the Twilio Programmable Video JavaScript library (see below for a list of them). Note that this requirement also applies to the users of the application.
If you haven’t seen the video chat application yet and would like to learn how to build it step by step, then you can follow the two previous tutorials in this series before continuing with this one:
- Build a Video Chat Application with Python, JavaScript and Twilio Programmable Video
- Screen Sharing with JavaScript and Twilio Programmable Video
Supported web browsers
Since the core video and audio functionality of this project is provided by Twilio Programmable Video, we'll need to use one of the supported web browsers listed below:
- Android: Chrome and Firefox.
- iOS: Safari.
- Linux: Chrome and Firefox.
- MacOS: Chrome, Firefox, Safari and Edge.
- Windows: Chrome, Firefox and Edge.
Installing and running the tutorial application
Let’s begin by setting up the example application. This application is available on GitHub. If you have the git client installed, you can download it as follows:
The master branch in this repository already includes all the code to support the chat room feature. If you plan on coding along with this tutorial, then switch to the without-chat branch using the following command:
If you don’t have the git client installed you can also download the complete application as a zip file. Or if you are intending to code along with the tutorial, then just the video calling portion.
Creating a Python virtual environment
Once you have downloaded and set up the code, we will create a virtual environment where we can install our Python dependencies.
If you are using a Unix or MacOS system, open a terminal, change to the project directory and enter the following commands:
For those of you following the tutorial on Windows, enter the following commands in a command prompt window:
The last command uses pip, the Python package installer, to install the Python packages used by this application. These packages are:
- The Twilio Python Helper library, to work with the Twilio APIs
- The Flask framework, to create the web application
- Python-dotenv, to import the contents of our .env file as environment variables
- Pyngrok, a Python wrapper for ngrok, which will let us expose the development version of our application temporarily on the Internet
Setting up your Twilio account
This application needs to authenticate against the Twilio service using credentials associated with your account. In particular, you will need your “Account SID”, an “API Key SID” and its corresponding “API Key Secret”. If you are not familiar with how to obtain these credentials, I suggest you review the instructions in the “Setting up your Twilio account” section of the video calling tutorial.
The application includes a file named .env.template which includes the three configuration variables needed. Make a copy of this file, change the name to .env (dot env), and edit it as follows:
Running the application
The application should now be ready to run. Make sure the virtual environment is activated, and then use the following command to start the web server:
The application is now running, but it is only able to receive local connections originating from the same computer. To assign a temporary public URL, enabling us to connect from a phone or another computer, we will use ngrok, which is already installed as part of the Python virtual environment. To start ngrok, open a second terminal window, activate the virtual environment (either source venv/bin/activate or venv\Scripts\activate depending on your operating system) and then enter the following command:
The second terminal will now show something similar to this screen:
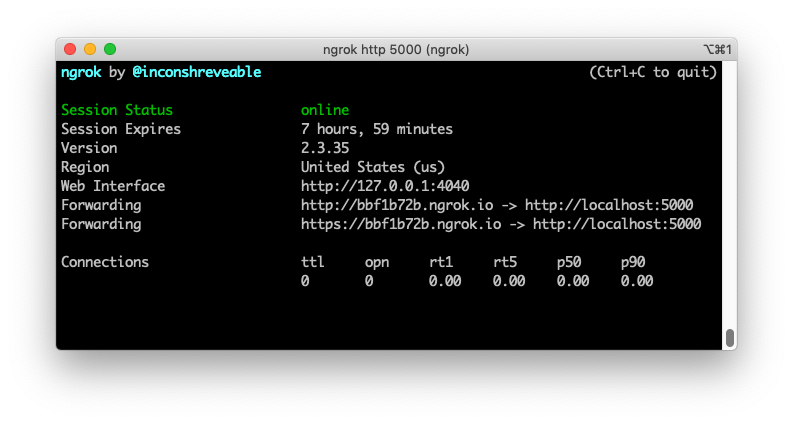
Ngrok will assign a public URL to your server. Find the values listed against the "Forwarding" keys to see what it is. We'll want to use the URL that starts with https://, since many browsers do not allow unencrypted sites to access the camera and the microphone. In the example above, the public URL is https://bbf1b72b.ngrok.io. Yours is going to be similar, but the first component of the domain is going to be different every time you run ngrok.
With both the Flask server and ngrok running on your computer, you can now use the public https:// URL from ngrok to connect to your server from an external source such as another computer or smartphone.
For convenience, it is a good idea that you keep the Flask server and ngrok running while you work on the code. The Flask server has the reloader enabled, so every time you save a file the server will detect the change and restart.
If there are any aspects of this application that you would like to understand better, the first and second parts of this tutorial will give you all the answers that you need.
Creating a chat room
In this section we are going to expand the Python back end to create a chat room for the video call participants using the Conversations (classic) API.
Up until this point, the Python back end was only used to generate access tokens for the JavaScript client, so this is the first time we need to send requests to the Twilio API from Python. To do this we will instantiate a Client class. In the app.py file, add the twilio_client right after the authentication credentials are loaded from the environment:
With this client we can code a short auxiliary function that returns a conversation resource, which the documentation describes as a “unique thread of a conversation”.
The function get_chatroom() takes a chat room name and checks if a conversation resource with that name already exists. If one does not exist, then it creates it. It returns the conversation resource to the caller. To implement this function, add the following code to the app.py file.
Previously, the /login route was only used to generate an access token that the JavaScript client could use to access the Programmable Video API. But now we’ll add some logic to this route to also create a chat room (if it does not exist yet), add the participant to it, and include the chat room in the response along with the token. Below is the updated version of the login route, with the lines that changed highlighted:
In this updated /login endpoint we use the get_chatroom() auxiliary function defined above to get a chat room with the name “My Room”, which is also the name that we are using for the video room. In a more advanced application with support for multiple video rooms, you could also create multiple chat rooms to match.
The conversation.participants.create() method is used to add the user to the chat room. For identification purposes we are using the username as the identity value, exactly as we are doing for the video.
The access token is also expanded with a second grant, that gives the client access to the Twilio Conversations (classic) service.
Finally, the response from the login endpoint adds the unique identifier for the chat room, in addition to the token.
Page layout updates
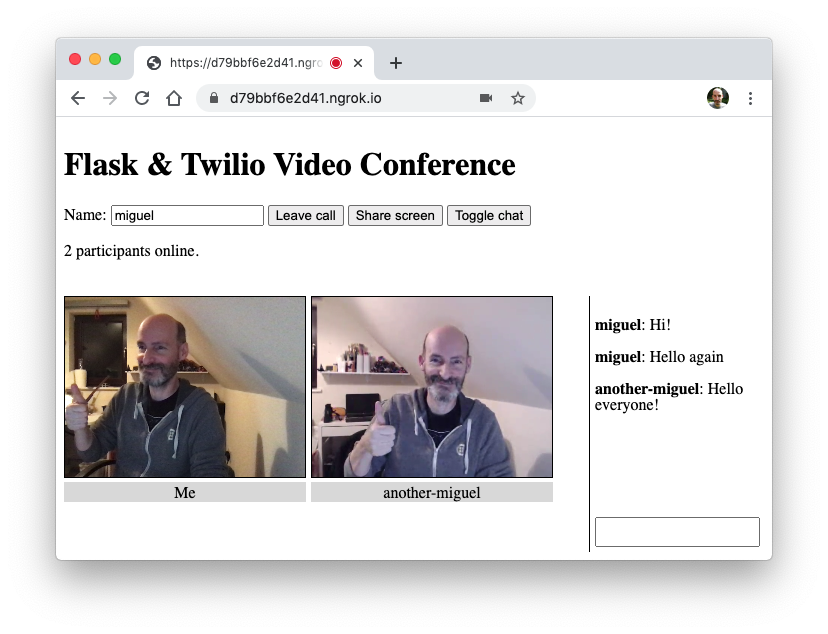
The HTML and CSS files need to be updated to incorporate a chat panel. In the header area we’ll add a button that will toggle the chat content on and off, and when chat is enabled, we’ll add a sidebar on the right side of the page:

The complete HTML page that includes these changes is shown below. Replace the contents of the templates/index.html file with the following code:
In addition to the chat toggle button and the chat panel, we are adding the Twilio Conversations SDK for JavaScript, which we will use to access the Conversations API.
The CSS styles that go with the above page are shown below. Replace your static/styles.css file with this updated version:
Using the Conversations JavaScript SDK
What’s left to do now is to use the Conversations JavaScript SDK to connect the user with the chat room from the browser. At the top of the static/app.js file, we need to update the global definitions to incorporate the new elements and changes in the page layout. Edit this file to reflect the changes highlighted below:
Connecting the chat room
In addition to the connection to the video room, we must also add a second connection to the chat room. The connectChat() function below accomplishes this by using the access token (which as you recall now contains grants for both video and chat) and the sid identifier for the conversation to make a connection to the Conversations service. Add this function to the bottom of static/app.js:
The function starts by creating an instance of the Conversations client using the token as authentication, and storing this instance in the chat global variable. With the client, it then retrieves the conversation object represented by the conversationSid argument. Recall that the Flask server’s /login route is now returning this value along with the token.
The conversation object is saved in the conv global variable so that it can be used later when posting messages. Before returning, the function adds an event handler for the messageAdded event, which will fire whenever a participant posts a message. It also calls the getMessages() method to get a list of past messages for the room, which are then added to the chat panel with the addMessageToChat() auxiliary function. We will write this addMessageToChat() function in the next section. Note that getMessages() returns a single page with the most recent messages.
The connectChat() function can be invoked as part of the overall connection process, so it can be called from the connect() function that runs when the user clicks the connection button. Below is the updated version of this function, with the changes highlighted:
Note how we are calling connectChat() but we do not have a handler for when this function completes. The idea is that as long as we have a video connection we are going to proceed. The connection to the chat room is going to run in the background and will enable the “Toggle Chat” button when it succeeds. If the connection were to fail, then the chat button will remain disabled, but the video call will proceed normally.
Displaying chat messages
As described above, each time there is a new message posted on the chat, we’ll use the addMessageToChat() function to add it to the chat panel. Add this function to static/app.js:
In this implementation we append a new <p> element with the new message at the end of the chat log. The data is formatted with the username in bold, followed by the message in normal font. Since the chat log can get long, every time we append a new element we automatically scroll the container <div> element to the bottom.
Toggling the chat view
Once a connection to the Conversations service and the chat room is made, the “Toggle Chat” button is enabled, and the user can toggle between showing and hiding the chat panel. The logic to show and hide the chat is handled mostly through CSS, so the JavaScript part is reduced to adding or removing the withChat CSS class. Add this function to static/app.js:
Submitting chat messages
At the bottom of the chat panel there is a text field where the user can type messages. When the Enter key is pressed on this field, we want to capture the value of the text field and send it to the chat room. Add this function to static/app.js:
The submission is handled by attaching a keyup event handler on the input field, and checking if it was the Enter key that was pressed. Earlier, when the connection was established we stored the conversation object in the conv global object. Now we can call the conv.sendMessage() method to submit the message. The Twilio Conversations client will automatically fire a messageAdded event in all active clients (including the one sending the message), so the message will immediately appear in the chat log for all the participants.
Disconnection
When the user clicks the “Leave Call” button the connection with the Programmable Video service is ended. At this point we need to also disconnect the Conversations service. The following is an updated version of the disconnect() function, with the changes to disconnect from Conversations highlighted:
Conclusion
I hope this article and my previous Programmable Video blog posts help you learn how to build a professional grade video calling application.
The complete code for this application is in the flask-twilio-video repository on GitHub.
I can’t wait to see what video calling applications you build with Twilio!
Miguel Grinberg is a Python Developer for Technical Content at Twilio. Reach out to him at mgrinberg [at] twilio [dot] com if you have a cool Python project you’d like to share on this blog!
Related Posts

Related Resources
Twilio Docs
From APIs to SDKs to sample apps
API reference documentation, SDKs, helper libraries, quickstarts, and tutorials for your language and platform.
Resource Center
The latest ebooks, industry reports, and webinars
Learn from customer engagement experts to improve your own communication.
Ahoy
Twilio's developer community hub
Best practices, code samples, and inspiration to build communications and digital engagement experiences.