Transcribe phone calls in real time with Twilio, Vosk, and ASP.NET Core
Time to read: 10 minutes
May 15, 2023
Written by
Reviewed by

In this tutorial, you are going to learn how to implement live transcription of phone calls to text. The phone calls will be routed through a Twilio phone number, and you will use the Media Streams API to stream the incoming audio to a small WebSocket server built using ASP.NET Core. You’ll use the open source NAudio .NET library for audio format conversion, and the transcription will be performed by Vosk, a lightweight open-source speech recognition engine with support for over 20 natural languages. Vosk runs locally on your computer, and offers bindings for several programming languages, including C#.
Prerequisites
To work on this tutorial, you will need:
- .NET 7 SDK or newer. If you don’t already have this installed, you can download the latest .NET SDK from Microsoft.
- A Twilio account (try out Twilio for free)
This tutorial will also make use of ngrok to expose your locally running server to the internet.
Add a Twilio phone number
Your first task is to add a phone number to your Twilio account. This is the number that will receive the phone calls to transcribe.
Log in to the Twilio Console, select “Phone Numbers”, and then click on the “Buy a number” button to buy a Twilio number. Note that if you have a free account, you will be using your trial credit for this purchase.
On the “Buy a Number” page, select your country and check “Voice” in the “Capabilities” field. If you’d like to request a number from your region, you can enter your area code prefix in the “Number” field.
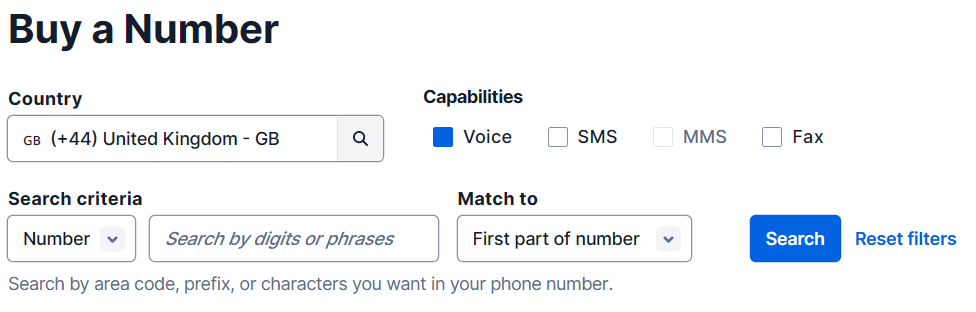
Click the “Search” button to see what numbers are available, and then click “Buy” for the number you like from the results. After you confirm your purchase, write down your new phone number and click the “Close” button.
Create the ASP.NET Core project
Your next task is to create an ASP.NET Core project to act as your web server. Create a new folder, then use the dotnet new command from the .NET SDK to create a minimal ASP.NET Core project, and lastly, change directories into the new project folder.
The first two lines of the Program.cs file set up a default configuration for your web application.
You will need to make a few modifications to enable forwarded headers and WebSockets, so replace those two initial lines in Program.cs with the following code:
Create the Voice endpoint
It is possible to configure your Twilio phone number to send webhook requests to your server whenever someone calls it, using the Incoming Voice Call webhook. Twilio expects you to respond to their webhook with instructions in TwiML format. Twilio will execute these TwiML instructions on your behalf. Using the Connect-verb and Stream-noun, you can request that the audio of the call be streamed to you over a WebSocket, and you can also stream audio back if you'd like. In this step, you will create a new endpoint (/voice) designed to receive the Incoming Voice Call webhook.
The dotnet new web command that you used to create the project will have already created a single endpoint, which responds to a HTTP GET request with the phrase “Hello World”.
You can delete this if you want, although it might actually be useful to test the ngrok tunnel you’re going to use later, so I left it in my sample code.
Add another endpoint to your Program.cs file, just before the call to app.Run. This one will respond to a HTTP POST method, so use the MapPost method, and the path will be /voice.
The /voice endpoint will make use of the Twilio SDK and the Twilio helper library for ASP.NET Core, so add references to the Twilio and Twilio.AspNet.Core NuGet packages with the following commands:
Now you can use the VoiceResponse class along with an extension to format the webhook response to generate a response that tells Twilio to stream the audio to a WebSocket endpoint, which will be at the /stream endpoint (you’ll create that soon).
First, add the following two using namespace statements at the top of Program.cs:
Then, to configure details of where the connected audio should be sent, you can use the Connect class. Here’s the full code for the /voice endpoint.
Create the Stream endpoint
Next you need to create the /stream endpoint. You do this by using the MapGet method, and then ensuring that the incoming request is a WebSocket request. If it is, you can then use AcceptWebSocketAsync to accept the WebSocket connection. After accepting the WebSocket, you'll use a method Echo which will handle all incoming data. Pass the websocket to Echo and also the context.RequestServices. The context.RequestServices is a scoped IServiceProvider which you'll use to retrieve services from the DI container.
Here’s the code for the stream endpoint:
Receive data from the WebSocket
In the previous step you passed the WebSocket on to a function called Echo. This is where you will ultimately receive the audio and pass it on to Vosk. But first you need to actually receive and interpret the data coming in from the WebSocket.
The first step is to receive incoming data on the WebSocket with the ReceiveAsync method. In the example below, a buffer size of 4KB is used. Then, so long as the connection is not being closed, you can parse the incoming buffer as JSON with the JsonDocument.Parse method.
The JSON should have a property called “event”, and this can have the value “connected”, “start”, “media”, or “stop”. For now, in the example shown below, a simple console message is logged for each of those events.
Having processed the events, you then call ReceiveAsync again to get the next message from the WebSocket.
You should also clean up connections properly, so after the while loop in the Echo method, call CloseAsync if the web-socket has been disconnected, or the host application is stopping.
In order for the code you’ve written so far to compile, you will need to ensure that you’ve added the following using statements at the top of your Program.cs file.
Handle the events
There are four events that the Echo method you created earlier is listening for. These are “connected”, “start”, “media”, and “stop”. Fortunately, for this demo you don’t really need to do anything in the “connected”, “start” and “stop” methods - the demo app just logs these events to the console.
If you need to access a stream identifier for the incoming audio stream, then you can get at one with the “streamSid” property on the JSON as shown here.
The most important event for transcription is the “media” event. The JSON payload for this event includes the actual audio, encoded as a Base64 string.
This means that in the Echo function, you can update the handler for the “media” event with the following code to extract the audio from the JSON and decode it into a byte array.
Convert audio format
At this point you have the incoming audio in a byte array, but unfortunately it is not in the correct format to pass directly to Vosk. That’s because the incoming audio from Twilio is encoded at an 8kHz sample rate using the “mu-law” algorithm, which stores each audio “sample” as a single byte. Vosk is expecting the audio at a 16kHz sample rate and with each sample encoded as a linear PCM 16 bit integers (a “short” in C# terminology).
This means that two conversions are required - first to decode the mu-law samples into 16 bit integers, and then to “resample” the audio from 8kHz to 16kHz.
You can perform both conversions using the NAudio open source library (which I happen to be the author of!). Start by adding the NAudio.Core NuGet package with the following command:
To create a suitable audio converter that performs both tasks, paste the following code into a new C# file called AudioConverter.cs.
To explain briefly what’s happening, an audio “pipeline” has been created in the constructor to perform sample rate conversion (which happens using 32 bit floating point audio samples) and then get the audio back into the 16 bit samples that Vosk is expecting.
Then in the ConvertBuffer method, the incoming audio is decoded from mu-law using the MuLawDecoder, and passed into the start of the pipeline by adding it to the BufferedWaveProvider. Then the audio is read out of the end of the pipeline, with the WaveBuffer NAudio helper class simplifying the task of re-interpreting a byte array as an array of 16-bit integers.
In your Program.cs file, add the AudioConverter as a scoped service to the DI container, after where you added the ForwardedHeadersOptions to the DI container:
Then retrieve an AudioConverter in the Echo method.
Now that you have an audio format converter, convert the audio in the "media" switch case:
Configure the Vosk recognizer
Next, you need to add support for using Vosk. First, add a reference to the Vosk NuGet package:
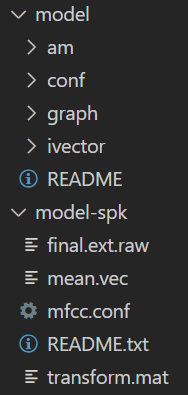
You will also need to provide some models for speech recognition. There are several models available to download and for this demo I selected vosk-model-small-en-us-0.15 due to its small size. The demo project also configures a model for speaker identification, for which I chose vosk-model-spk-0.4.
After downloading the models, you need to unpack them into a folder in the root of your project directory. Here you can see the contents of my model folder (for the main model) and my model-spk folder (which is the speaker identification model). Make sure your folders are named the same.
Next, add the following using import for Vosk:
Now you are ready to create a VoskRecognizer. You'll add the VoskRecognizer to the DI container as a scoped service, so you can later retrieve a new instance for every WebSocket. Do this in the Program.cs file, just after adding the AudioConverter. The code snippet below creates a Vosk Model and SpkModel (pointing to the two folders you just downloaded), and passes the model into the VoskRecognizer. There is also a parameter that tells the VoskRecognizer to expect audio with a sample rate of 16kHz.
The VoskRecognizer is also shown here being configured with a speaker model, as well as setting the logging level and the maximum number of alternative words. If you would like to adjust any of these settings, you can learn more about what they do on the Vosk documentation site.
Then retrieve an VoskRecognizer in the Echo method.
Pass Audio into Vosk
Now that the audio is in the correct format, you can pass it to Vosk.
After converting the audio, make a call to AcceptWaveform on the VoskRecognizer you retrieved earlier. This will return true when Vosk has finished recognizing an entire phrase, and false if it only has a “partial” result so far. The following code will access the result or partial result, deserialize the JSON string to a JsonDocument, and access the part of the JSON containing the recognized text.
Note that partial results only contain the string, and happen very frequently, which is why the Console.WriteLine for the partial result is commented out. This may still be useful to you if you want to live update a display showing the current progress recognizing the phrase.
The full result contains additional useful information such as the timing of each word and the confidence that it has in the transcription of each word. In the example above, the “text” property is written to the console as it contains the full text of the recognized phrase.
After writing all this code, your Program.cs file should look something like:
Test with ngrok
At this point, you can run your web server. However, it will only be running locally on your development machine, and so it is not possible for the Twilio webhook to reach it directly. Of course, you could deploy your web app to a host running in the cloud, but for testing purposes you can use a tunnel service like ngrok which exposes an endpoint on the public internet that will proxy through to your local application.
You can install ngrok by following the instructions on their site.
Having installed ngrok, then you need to find out which port your local ASP.NET web app is listening on. This can be found either by looking in your launchsettings.json file, or simply by observing the port number displayed when you start the application.
Start your application using the .NET CLI and look for the HTTP port number:
In the example shown below, the server is listening on port 5045.

To establish an ngrok tunnel, run the following command, replacing 5045 with your port number.
When ngrok starts up, it will generate a URL that you need to copy. In the example shown below, the URL ends with “.ngrok-free.app”.

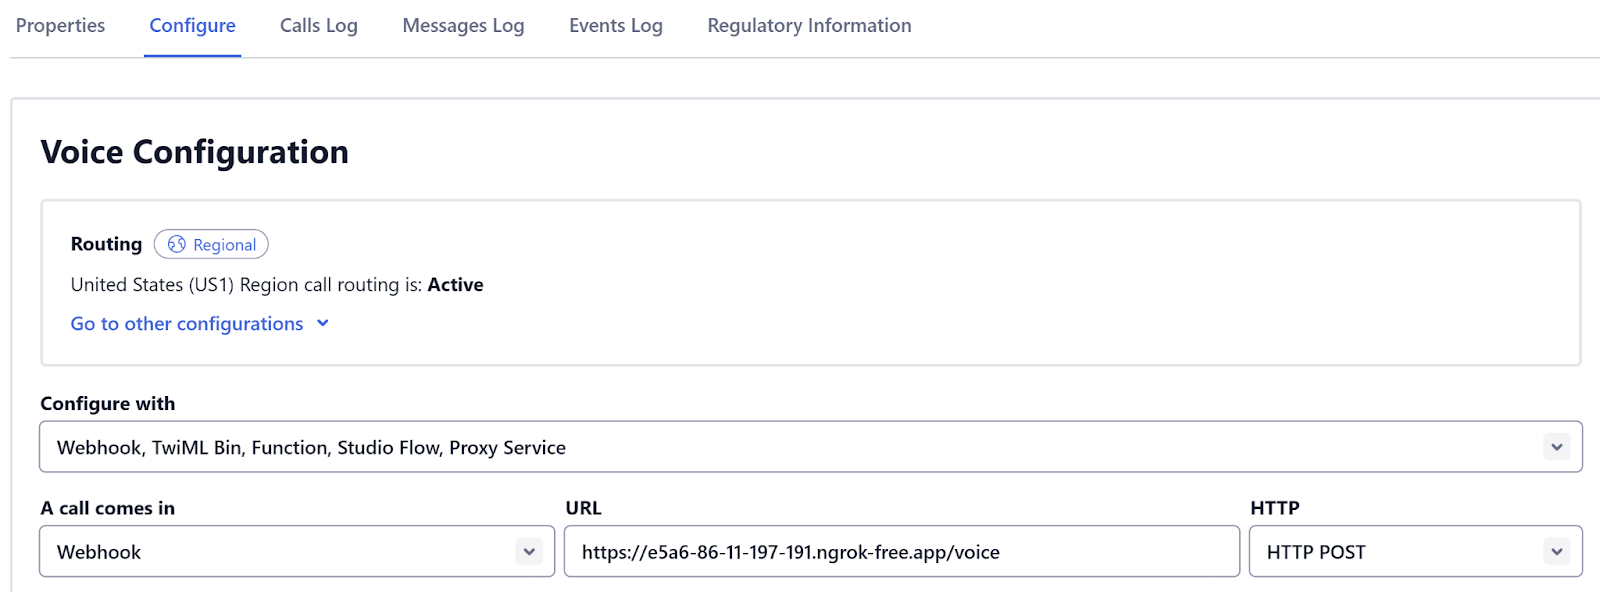
Now you are ready to test the whole application end to end. Make a phone call to the Twilio number you purchased. If you are using a Twilio trial account, you will first hear a message and be required to press a key, but then you can start speaking and the audio will be forwarded via ngrok to your locally running web server.
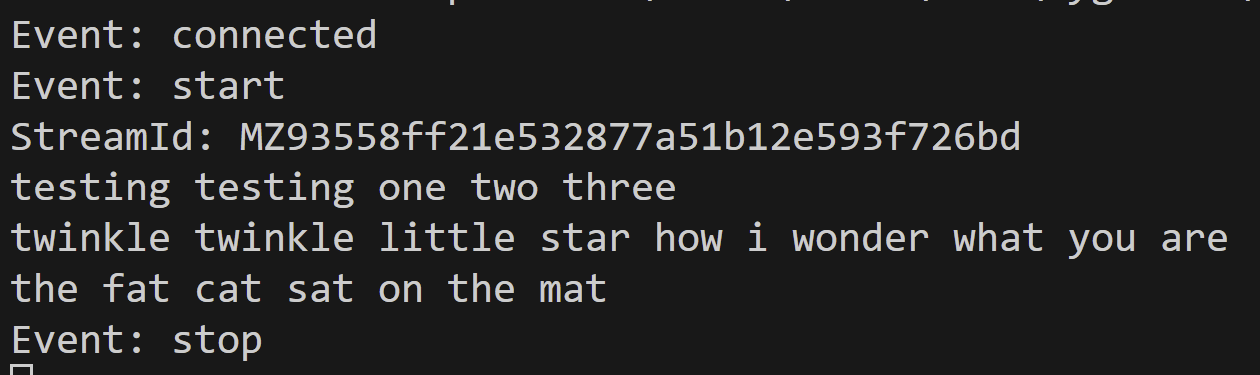
Every time Vosk recognizes a phrase, it will print it out to the console. Even though I selected the smallest Vosk recognition model, the quality of recognition was quite impressive. Below is an example of the output from a test call I made
Conclusion
In this tutorial, you’ve learned how the Twilio media streams API allows you to send the audio from a phone call through to an ASP.NET Core web application. This allows you to do any processing you like with that audio, and in this example we chose to pass it on to the Vosk transcription engine.
The full code for the demo application is available at my transcribe-twilio-vosk GitHub repository, and if you’d like to take this project a bit further, here are a few ideas for you to try out.
- Remove the need for ngrok, by hosting your web app in the cloud. For example, you might use Azure App Service. Make sure the hosting platform you choose supports WebSockets.
- Use the NAudio
WaveFileWriterto save the incoming audio to a WAV file. This could be done before or after converting from mu-law to PCM. - Explore the Twilio Media Streams voice response capability for your application to speak back to the caller. You could even try passing the transcribed text into ChatGPT and speaking the answer back to the caller!
- Explore using other Vosk models for higher quality recognition or to support additional languages.
Finally, I’d like to thank Niels Swimberghe and Miguel Grinberg whose sample code was very useful in building this demo.
Mark Heath is a software architect working for NICE, creating digital evidence management systems in Azure. He is a Microsoft MVP and has created over 20 training courses for Pluralsight. He also enjoys combining his interest in audio and music with programming, and is the creator of the NAudio open source audio library. You can keep up with what Mark is doing via his blog at markheath.net
Related Resources
Twilio Docs
From APIs to SDKs to sample apps
API reference documentation, SDKs, helper libraries, quickstarts, and tutorials for your language and platform.
Resource Center
The latest ebooks, industry reports, and webinars
Learn from customer engagement experts to improve your own communication.
Ahoy
Twilio's developer community hub
Best practices, code samples, and inspiration to build communications and digital engagement experiences.