WhatsApp Media with C#, .NET Core and the Pho.to API
Time to read:
February 19, 2019
Written by

When the WhatsApp API for Twilio launched last year it only supported text.
Not anymore!
The WhatsApp API for Twilio now supports media, including images and files.
If you would like to see a full integration of Twilio APIs in a .NET Core application then checkout this free 5-part video series I created. It's separate from this blog post tutorial but will give you a full run down of many APIs at once.
So let's build an app that receives an image from WhatsApp, processes the image using one of the many options available on the Pho.to API and then returns the processed image.
What we'll need to get started.
- A Twilio account (sign up for a free Twilio account here)
- The .NET Core 2.2 SDK and runtime
- The WhatsApp Sandbox Channel installed in your account (go through this process to activate the sandbox)
- A developer account on the Pho.to API
- Visual Studio Code or similar code editor or IDE
Create a new folder for your project and navigate into it.
Once in your new folder, we can make a new .NET Core WebAPI project using the command below:
This command will create a WebAPI project from the template that comes with the SDK.
Setting up the basics
Open the PhotoFiddler folder in your code editor. The first thing we will do is update the PhotoFiddler.csproj file to include the various nuget packages. We will need to add a GUID from a GUID generator to create a user secrets ID.
If we return to the command line we can fetch and install our newly added packages with the following command.
We will need some API keys from Pho.to which can be generated here. We will create a model to map these keys to. Add a new file called PhotoApiSettings.cs in the root of your project and add the following code to it:
We will add corresponding values to the appsettings.json file. We will be using User Secrets to store the keys to prevent them from ending up in source control. If you are unsure of how to do this then check out this blog post.
In a new secrets.json file, the photo API settings will have the actual keys as values and look like this:
We can map the Pho.to keys to our model,from within the Startup.cs file. inside the ConfigureServices model ensuring it comes before the services.AddMvc() method call:
First, copy the using statement to pull in the PhotoApiSettings into our class and then configure the call to read the settings from appsettings.json, ensuring it comes before the services.AddMvc()`
We can then inject these settings into any class using IOptions<TOptions> and the Options Pattern.
Getting prepped for our processing
The Pho.to API requires us to make an initial API call with a URL to our image. The image will then be taken, added to a task list, and queued for processing. A request ID is given in return. A second API call with the request ID is made to see if the image has been processed.
Sending a URL to our image is not the most foolproof and the Pho.to API is unable to read the Twilio image from the Twilio URL. Therefore, we need to save the incoming image locally and then serve that up to Pho.to. Let's write a service to handle all of these steps.
Create a new folder in the root of the project called Services. We can then add an interface for our service called IPhotoProcessor.cs into this folder and add the following code.
Next, we will create the implementation of this Service. Add a file called PhotoProcessor.cs in the Services folder and add the following code.
Saving the incoming image
The first thing we want to do is save the incoming image URL locally.
We will do this by adding a private method to the service and then calling it in the public method Process. The private method will return the location and file name of the newly stored image and we will call it in the Process method.
We are saving our file to wwwroot folder which is the default location for static files. We will also need to enable our application to serve up static files. Let's do that next.
Open the Startup.cs file and add app.UseStaticFiles(); to the Configure method as shown below:
Whilst we are in the Startup.cs file we will register our service to .NET Core's IoC container from within the ConfigureServices method.
I have chosen to configure my services as Scoped as I want the instance to be around for the lifetime of the request. You can read more on the service registration options on the Microsoft documentation.
Midway Test run
Let's test that we are saving the incoming image.
To do this we need to write and set up a webhook. When we send a WhatsApp message to Twilio, it will trigger the webhook.
The template comes with a ValuesController, we can repurpose this for our use, renaming it to PhotoController. Let's remove some of the extra code and add in some of our own. We can also inject our newly created service into the constructor.
When Twilio calls our webhook, it sends a request body with all the details and contents of the incoming WhatsApp message. We will need two values from the incoming request; MediaUrl0 - this the URL to the photo we receive in, and MessageSid - the unique identifier for the message. We can get these from the Request from within our Post method in PhotoController.cs.
We will also need the host domain to be able to send a URL to Pho.to. We will be using ngrok (find out how to set this up here) so that we don't have to publish our application to a server. I have commented out the code that would get the host domain and hardcoded my ngrok domain for testing purposes.
Once ngrok is installed you can start it off by running the following command in the terminal.
This will return you an ngrok URL that can be used to publicly expose your project without the need to deploy. It will look something like this https://123456.ngrok.io/. Remember to update the host variable with the URL ngrok gives you.
Next, we need to run our application.
I, personally, like to change the launchSettings.json file, found in the Properties folder of the solution. Changing the use of ports 5000 and 5001 and SSL when running locally, as it seems to limit problems with self-signing certificates and the like.
The launchUrl can be updated to reflect the renaming of ValuesController to PhotoController. Here is an example:
You can run your solution with the following command from the CLI
We will need to pass the URL to our webhook, https://<NGROK>.ngrok.io/api/photo into the Twilio API for WhatsApp configuration, under A Message Comes In and save.
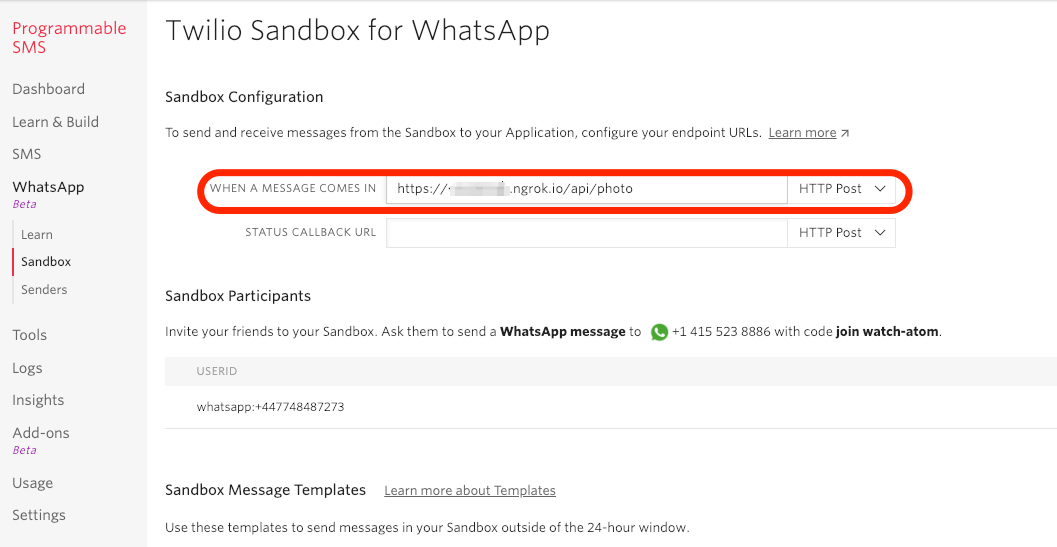
Now take a selfie and WhatsApp it to +1 415 523 8886 (or whichever number you set up with your sandbox).
If it all worked you should receive Ahoy in you WhatsApp inbox and if you go to the wwwroot folder in your project you should now have an images folder with the image you sent inside.
Result!

Processing the image with Pho.to API
Now that our images are saving locally, we can make the call to the Pho.to API.
For this we will need the PhotoAppSettings we mapped earlier. We will inject them directly into the PhotoProcessor constructor in the PhotoProcessor.cs file.
We will add a new private method to the PhotoProcessor class and call it in the Process method.
The Pho.to API also requires us to HMAC encode the private key. So we will add another private method to the PhotoProcessor class that handles that.
We will now create the first API request, which adds our image to the Pho.to task list and gets a request ID in response.
To do this we will create an HTTP client and make a POST to the addtask endpoint.
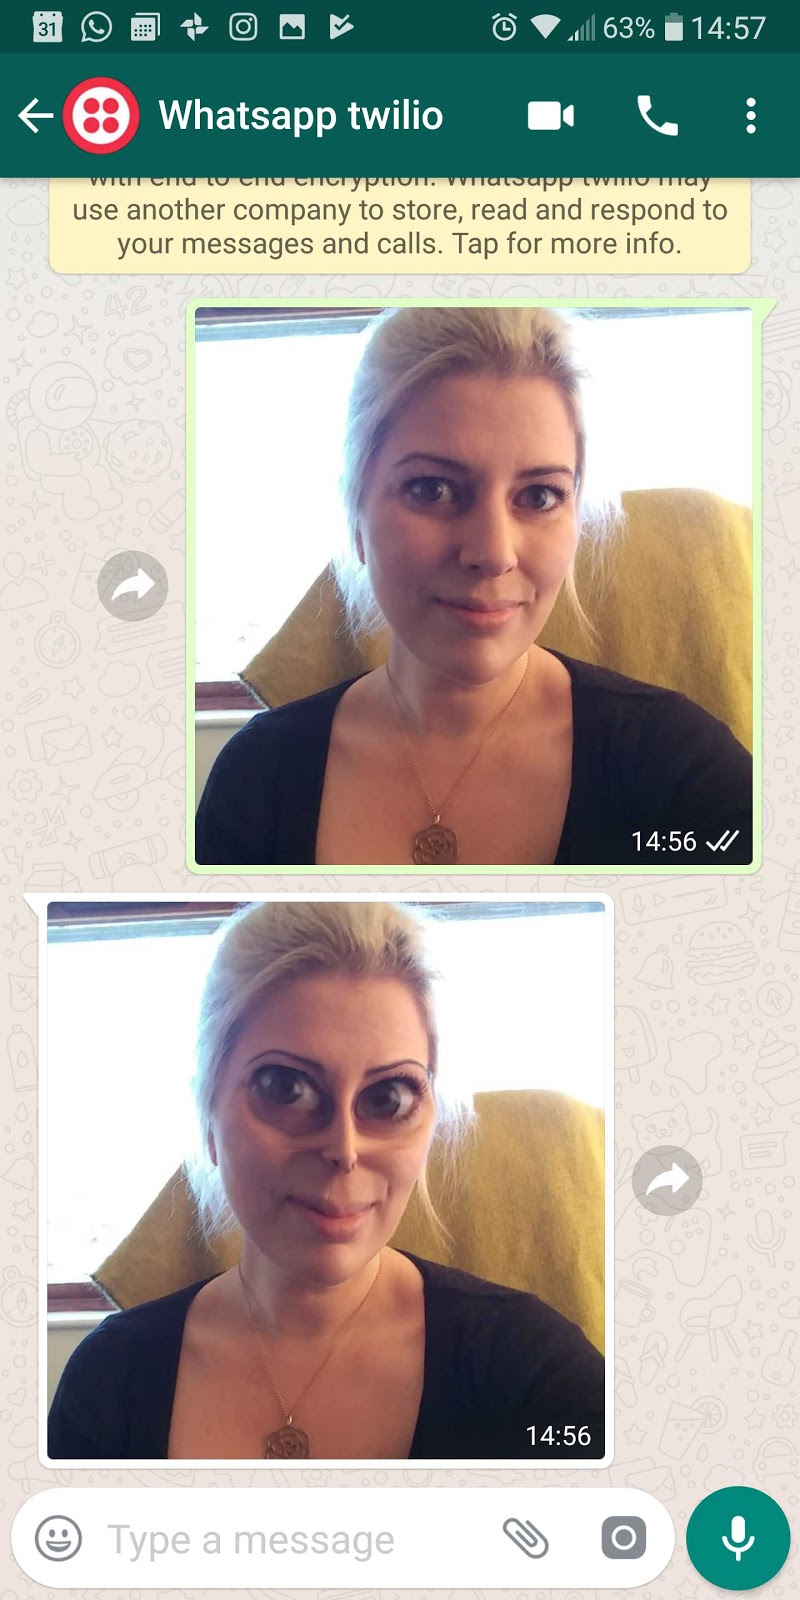
Pho.to is expecting XML in a particular format which includes the URL to the image we want processed. This is also where we can specify how we would like the image to be manipulated. Check out this page for some fun ideas! I have chosen to make the subject of my photos into aliens, Martians to be specific!
When we receive our successful response, we parse the XML to convert it to an XElement object and extract the request_id value which we will need for the second API call.
As we have added our photo to a queue, when we call the second API, we may be told our image isn't ready yet. So let's code a Do while loop to handle this. Add this in immediately after the newly added code above, but before the return statement.
This code will call the API up to ten times on one second intervals whilst the status is set to InProgress. Once the status is OK it will extract the URL of our processed image and we return that.
Sending our processed image
The last piece of our application is to respond to Twilio with the URL to our processed image. We will do this in the webhook endpoint that we set up in PhotoController.cs file using TwiML, Twilio's version of XML.
Testing out our processor
Run your project again, ngrok should still be running. Take a selfie and send it to yourself and see if you'd make a good Martian 👽!
What next?
There are a few differences between MMS and WhatsApp media messages. Media messages can only be sent to WhatsApp users if there is an active messaging ‘session’ established. Messaging sessions are created when a user responds to a template message or the user initiates the conversation. They must also active for 24 hours after the last message they send. WhatsApp media messages also do not support some of the file types that MMS does. For more information on file type support check out the FAQs.
We covered quite a few coding challenges in this post, from implementing a do while loop to parsing XML into an XElement. What we didn't do was write any code that handled what happens when any of these stages goes wrong. So that could be the next step.
The Pho.to API has a lot of uses and many of the processes can be stacked. You could make our Martian a Martian cartoon by changing the XML message we send out from the PhotoProcessor to the following:
If you would like to see my completed code it can be found on my GitHub.
I can't wait to see what you build! Please share them with me on any of my contacts!
- Email: lporter@twilio.com
- Twitter: @LaylaCodesIt
- GitHub: layla-p

Related Resources
Twilio Docs
From APIs to SDKs to sample apps
API reference documentation, SDKs, helper libraries, quickstarts, and tutorials for your language and platform.
Resource Center
The latest ebooks, industry reports, and webinars
Learn from customer engagement experts to improve your own communication.
Ahoy
Twilio's developer community hub
Best practices, code samples, and inspiration to build communications and digital engagement experiences.