How to Send SMS or MMS Messages with an ESP8266 Through Amazon AWS IoT and Lambda
Time to read:
February 27, 2017
Written by
Reviewed by

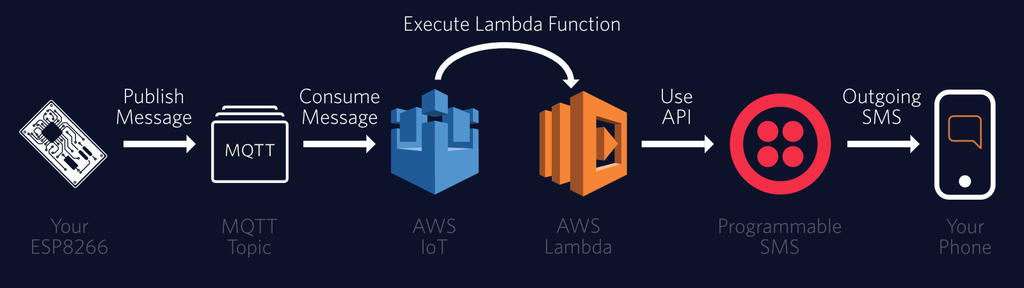
Let's make the Internet of Things a little more outgoing today. We're going to make an Espressif ESP8266 send a SMS or MMS message with Twilio using Amazon AWS IoT and Lambda. We'll demonstrate connecting to AWS IoT with MQTT over Websockets, publishing to an MQTT topic from the ESP8266, and triggering Lambda functions from certain messages published on the MQTT topic.
Sound like a trip? Fall into the newly conversant Internet of Things!
Sign Into - or Sign Up For - a Twilio Account
Either create a new Twilio account (sign up for a free Twilio trial here), or sign into your existing Twilio account. You'll need to enter values from the console in a few places, and you will also need details on a purchased number - so keep a tab handy.
Find or Purchase a SMS (and MMS) Capable Number
For this demo, you'll require a SMS and MMS enabled number you either purchase or already own.
First, enter the Twilio Console. Second, select the hash tag/Phone Numbers ('#') section on the left side, and navigate to your current active numbers.
In 'Capabilities', you'll see the functions available with your current Twilio phone numbers. This guide requires numbers with SMS and optionally MMS capabilities.
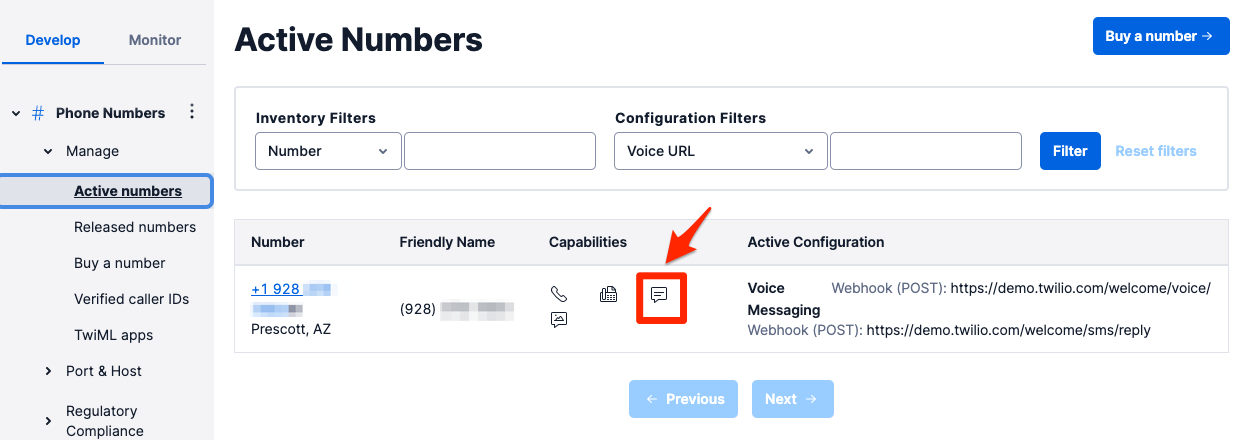
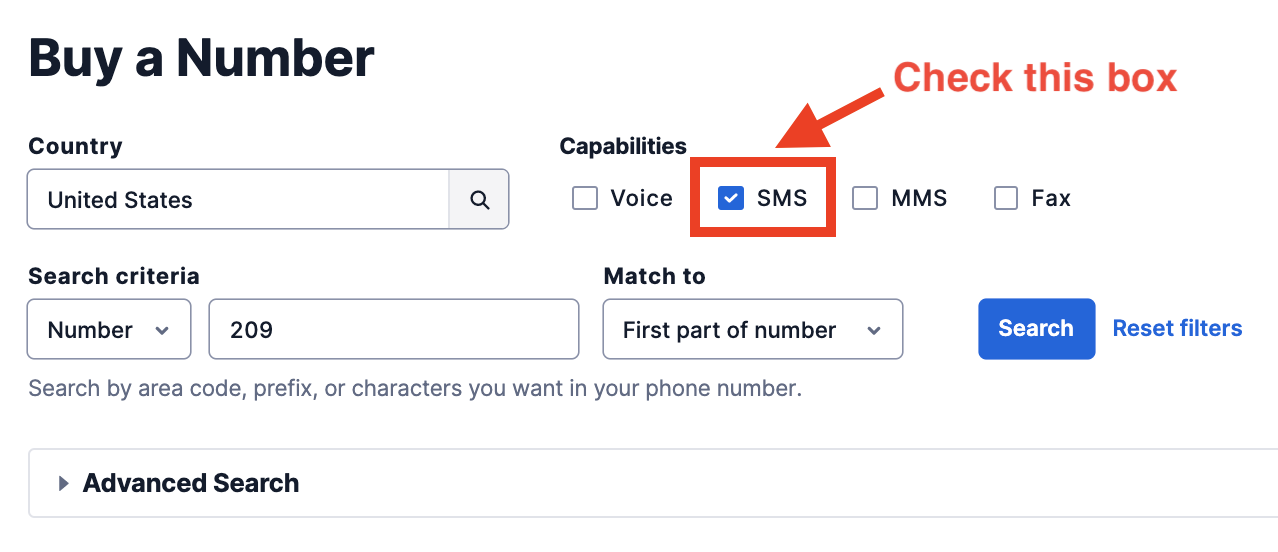
If you don't yet have a number with SMS or MMS capabilities, you'll need to buy one. Navigate to the 'Buy a Number' link and click the SMS - and optionally the MMS - checkbox:
Using Amazon AWS IoT With the ESP8266
Ever worried about how your own personal things-of-the-internet can communicate - and maintain state - with the ephemeral nature of devices in the field? Enter Amazon's AWS IoT, a service which makes it easy to collect and collate all of the data from your various Things.
We're going to revolve our sample application around the lightweight communications protocol MQTT, the Message Queue Telemetry Transport protocol, tunneled over a persistant WebSocket connection from an ESP8266. While MQTT can be used directly on AWS IoT, client credentialling is more difficult for the ESP8266's 64 KiB of RAM, and MQTT over WebSockets is a very usable substitute.
Setting Up AWS IoT
If necessary, login to your Amazon AWS account and navigate to the AWS IoT Console in your choice of Amazon region.
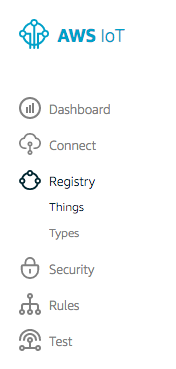
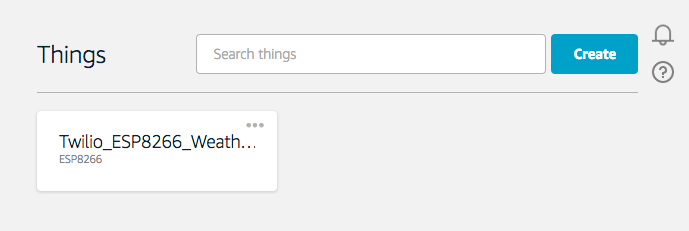
First, we need to add a new Device to IoT. In the left pane of the Dashboard, under 'Registry' select 'Things':
Give a nice name to your thing, and add a new 'Type' as well (you can create Types from the same screen under the advanced options). We named our Thing Type 'ESP8266', for the eventual swarm of WiFi connected ESP-Things we expect to deploy.
Our next stop is to find our new Thing's HTTPS endpoint and shadow update topic. Click the big grey left arrow to go back to the console, then under the same subheading in the left sidebar of the console, select 'Things' again. You should see your new Thing:
Click on your Thing, then click the 'Interact' link in the sidebar. The HTTPS endpoint is at the very top; you'll eventually need it for the ESP8266 steps.
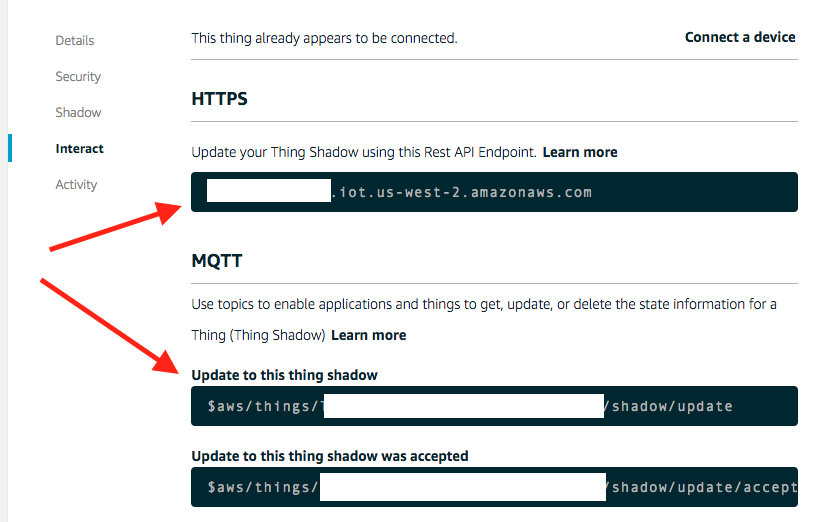
Copy that and keep it in a handy place. Also, copy the 'Update to this thing shadow' MQTT topic, which is at the top of the MQTT section.
Device shadows in AWS IoT are persistant data stores where you can park configuration or other information your thing needs to consume. Although we aren't using the Shadow functionality for this example we've added the reference in the ESP8266 code so you can add it easily. That topic should be pasted directly into the ESP8266 code when we get to the configuration section.
Adding a Policy so Our Thing can PubSub on the 'twilio' MQTT Topic
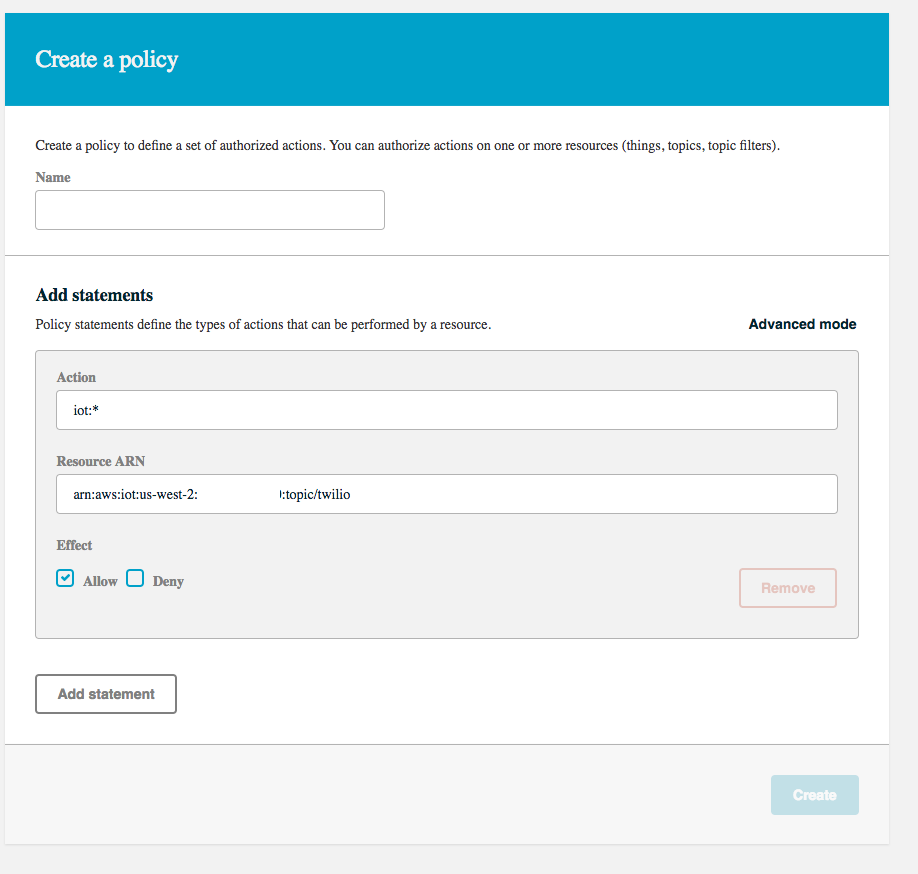
Navigate with the grey arrow again to return to the main console. Click 'Security' then 'Policies', then 'Create a Policy'. Name it something useful, and use an action of 'iot:*' with a Resource ARN replacing the last bit with 'twilio'. This will allow your Thing to publish and subscribe to the 'twilio' channel.
Setting Up a new IAM User
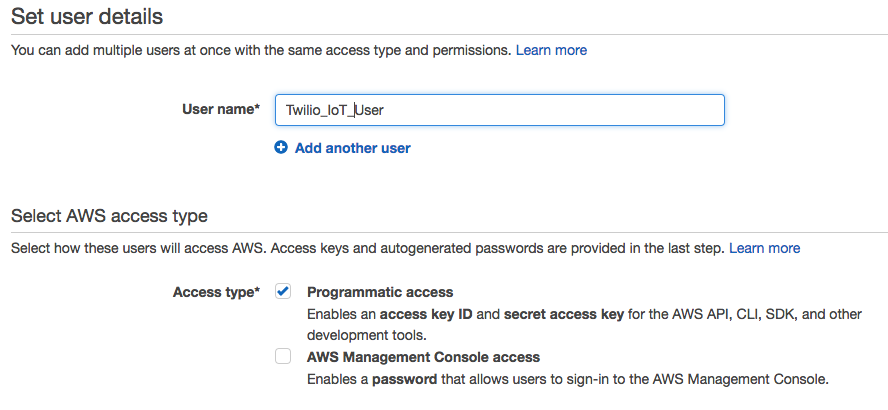
While not strictly necessary (you can use your main AWS account's credentials), it's much safer to set up a new IAM User with IoT permissions for this example. Go to the IAM console and select 'Users' in the left side pane. At the top, click the blue 'Add User' button.
Name your user something like 'Twilio_IoT_User' and click the box to add Programmatic Access:
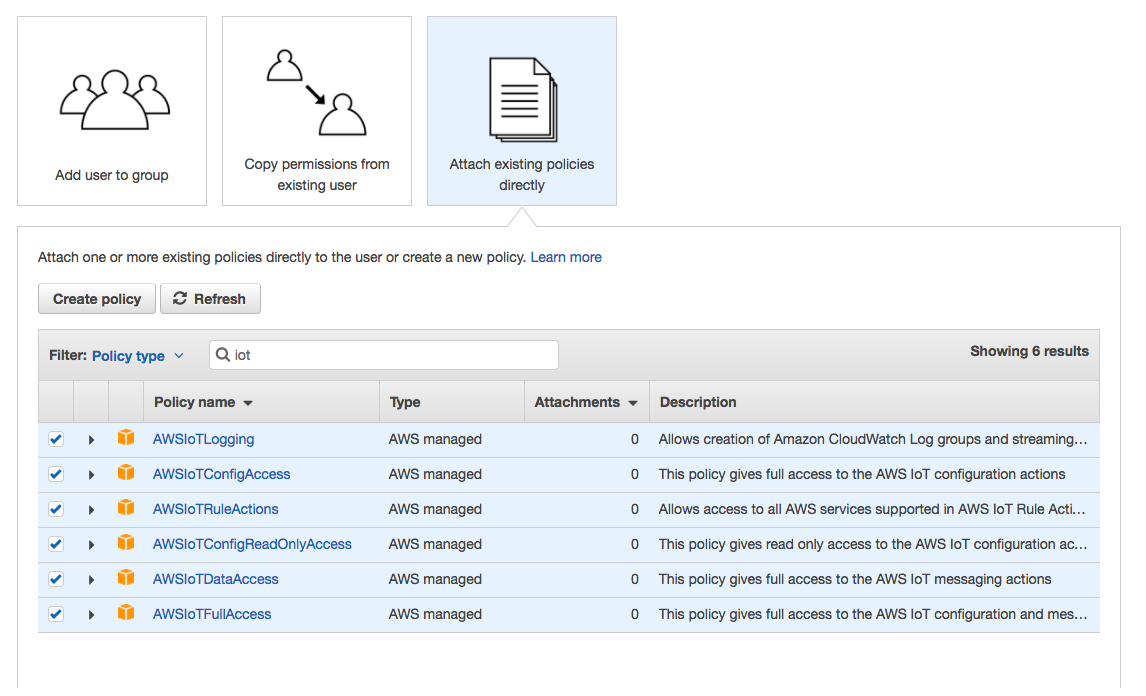
Click through to the 'Permissions' step and select 'Attach Existing Policies Directly'. You can be more discreet; we added every policy related to IoT as seen in the below image:
One more thing - download the CSV with the user credentials from the success screen. We'll eventually use those credentials on our ESP8266 to connect to AWS IoT.
And now you've got an IoT IAM User for your thing to use! Navigate back to the IoT Console.
Subscribing to the 'twilio' MQTT Topic
Back in AWS IoT, click the 'Test' subheading in the left pane. In the 'Subscribe to a Topic' field, enter the topic 'twilio' (lowercase, one word) with a 'Quality of Service' of 0.
You can test subscribing to the topic straight from the test console; try publishing a message now and you should see it appear on the same screen. Of course, it's just an echo chamber - there are no other things to communicate with, so you're alone with the topic right now.
Don't despair, we'll get something to listen soon - but for now let's set up debugging in case something goes wrong with IoT during the next steps. Do not close this browser tab; you'll want it to eventually verify your ESP8266 is subscribed.
Setting Up CloudWatch for Logging
Select the 'Gear' 'Settings' option from the left pane. There, update CloudWatch Logs to turn it on, probably with the '*Log level' of 'Debug (most verbose)'.
It isn't too useful yet, but when we do the plumbing between IoT and Lambda it will come in handy.
And with that, we're ready for the second part - getting the code to run on your ESP8266!
Talking to the AWS IoT Cloud with an ESP8266
Want to skip to the code? You can go directly to the GitHub repository by clicking this link.
As always, note that hardware development can sometimes have more variables than software development. At a minimum, you'll need to purchase an ESP8266 for this guide. Additionally, for the ease of development, this guide targets the Arduino IDE.
The ESP-8266 Arduino tie-in includes the Xtensa gcc toolchain, provides the Arduino libraries, and makes it easy to program the ESP-8266. While we understand that many of you work outside of the Arduino ecosystem, it's the easiest way to get us all on the same footing. Connecting to AWS IoT using a different toolchain or setup is outside the scope of this article. While we are unable to help in other setups, please leave a comment on Stack Overflow and perhaps the community can assist you or learn something new from you.
Board Selection
The repository for Arduino on ESP8266 has a nice list of tested boards. If you haven't yet selected a board for development, it would be best to pick one of the vetted boards. Eliminating another possible variable is best until you get the setup working.
To develop this guide, we used a Sparkfun Thing and Sparkfun's Basic FTDI breakout for programming. The Sparkfun Thing overloads the DTR pin for programming, which causes problems with the hardware serial port when monitoring from inside the Arduino App. We find it easier to use SoftwareSerial for simple text debugging, but have left the choice of serial port (or none) as a setting in the code.
Adding Libraries to Arduino
We're leaning on a few libraries today:
- aws-mqtt-websockets from GitHub user odelot
- Arduino WebSockets from Markus Sattler
- ArduinoJSON from Benoit Blanchon.
- AWS-SDK-Arduino from Sander van de Graaf forked from AWS Labs
- Eclipse Paho Embedded Client (for MQTT)
Two of these libraries can be installed automatically using Arduino's Library Manager, but the others must be added manually. For a complete overview of library management on Arduino, see the official documentation.
Add Through Library Manager by Searching- ArduinoJSON
- WebSockets
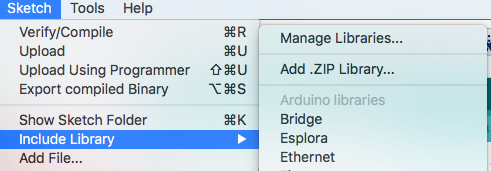
The easiest way to get these libraries into Arduino is to install directly from the zip file once you download.
This can be done directly from the ZIP Library Installer in the Arduino IDE:
'Sketch' Menu -> 'Add .ZIP Library' -> select downloaded .zip file
Download links:
Building the Example ESP8266 Code
Open the .ino file from the GitHub repository. You'll need to change some of the code before you can build for your board, as seen in this snippet.
You'll want to use the HTTPS endpoint and Shadow Update topic from earlier, along with the credentials for your IAM user. And, of course, don't forget to include the Amazon region.
In the Twilio related fields, enter a number you own along with the message you'd like to see. Add your_device_number from a phone you have access to for when it's eventually all wired up.
And with that , you should be able to compile and run.
If not, check a few things:
- Did you install all the packages correctly? If you think you did, can you run their example code?
- Is your board connected properly? Have you selected the proper options?
- Is the serial port correctly showing up on your computer?
With any luck, you'll get it going - and if you carefully monitor the 'twilio' MQTT topic in the AWS IoT Test tab you left open, you should soon see a nice JSON message from the ESP8266. Furthermore, if you are using the serial monitor to debug, you should see some messages approximating my (successful) run:
.
.
Connected to WiFi, IP address: 192.168.1.155
Websocket layer connected.
MQTT layer connected.
MQTT subscribed
MQTT subscribed
If you've got that far, you're actually in very good shape - even if it doesn't look like it yet. If you do have serial monitoring, there is one more test we can perform before moving onto Lambda integration.
Testing the ESP8266 With AWS IoT's MQTT Test Client
Back in the AWS IoT MQTT Client, subscribe to the device shadow topic, the same string you should use for shadow_topic on the board itself. Send a message and you'll hopefully see it pop up in your serial monitor, along with some debugging information on the ESP8266. In a fully featured application, you can use the Device Shadow to persist state across power loss (or very long sleep states!), but for now it's sufficient to see the ESP8266 respond.
Here's a readout of our ESP8266 successfully receiving a message on the 'twilio' topic:
Message #3 arrived: qos 0, retained 0, dup 0, packetid 0
Payload Current Remaining Heap Size: 20096Hello Internet of a Single Thing...
Amazon Lambda: A Brain in the Cloud
Although we have previously demonstrated sending messages with Twilio directly from an ESP8266, today we're going to pass particular messages through our 'twilio' MQTT topic using a rule to call Lambda functions. Since our eventual application will have two way communication - both incoming and outgoing messages - we'll also introduce how to trigger Lambda functions from within AWS IoT.
Triggering Lambda from AWS IoT
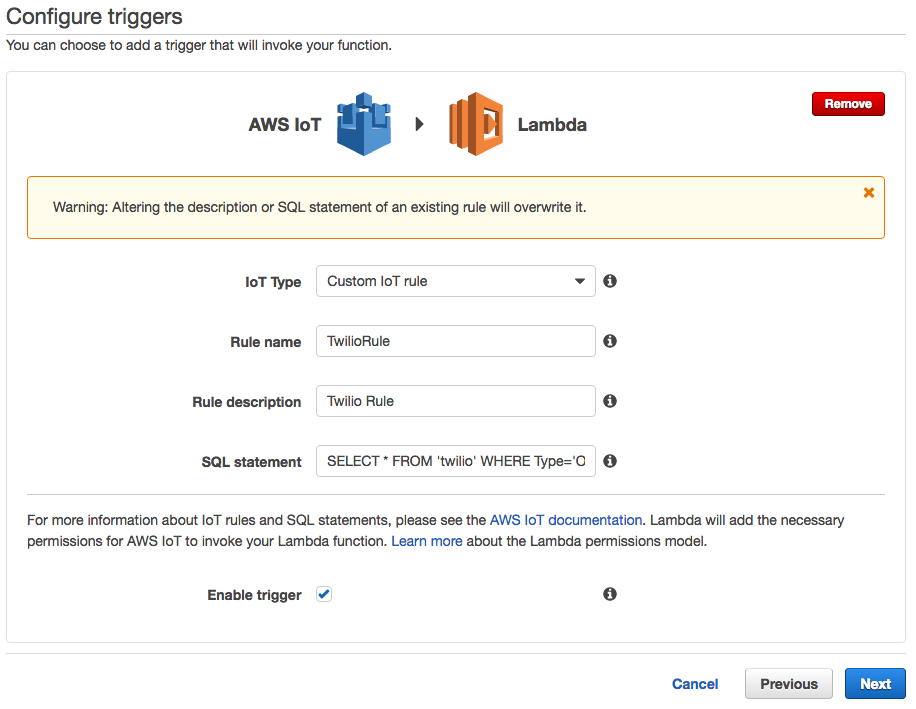
If you'd like a more detailed explanation of how to work with Lambda functions, along with a primer on loading external libraries (and the Twilio Python Helper library), try our guide on receiving and replying to SMS or MMS messages with Amazon Lambda. If not, start by creating a new Lambda function in the same region as you've set up AWS IoT (the blank template is fine), and configure it to use AWS IoT as a trigger. Check the box for 'Enable Trigger' and name it something memorable (with a matching description). The 'IoT Type' should be set to 'Custom IoT Rule'.
The SQL statement is where things get interesting. This statement configures exactly when the Lambda function will react to messages on your MQTT topic. Since your application will undoubtedly be adding additional functionality (such as device to device communication), you can avoid invoking Lambda for most messages.
For this guide, the SQL statement you should use is:
SELECT * FROM 'twilio' WHERE Type='Outgoing'Here's what the statement will do for us:
- Select all properties and types from JSON Objects on the 'twilio' MQTT TOPIC
- ... that have a JSON Object with the property 'Type'
- ... where 'Type' has a value of 'Outgoing'
- ... and pass them to Lambda
Here's what it will look like:
Changing the SQL Version
When our ESP8266 publishes messages to the 'twilio' MQTT topic, it will null terminate the strings. That's incompatible with Amazon's 2016-03-23 SQL version.
Return to the AWS IoT console, and click the 'Rules' link in the left sidepane. You should then see the new rule you've created; click it to see details.
In the 'Rule query statement' section, click the 'Edit' link, and change the 'Using SQL version' to '2015-10-08':
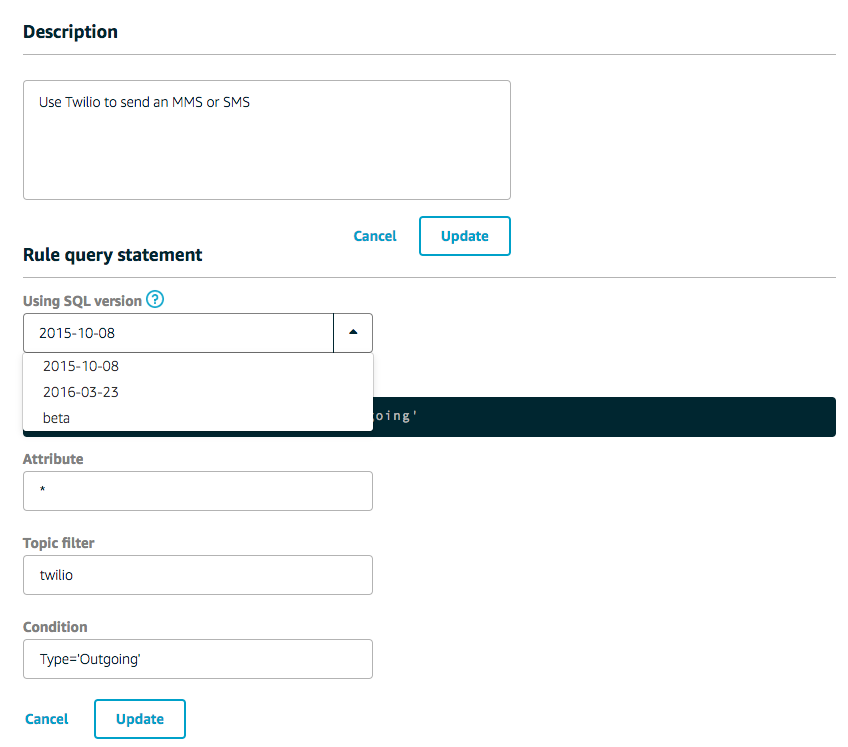
Hit the 'Update' button and your rule should be ready to fire.
Adding some Python Code to Lambda
After creating the function, you're now ready to add some code. On your computer, create a new folder and install the Twilio Python Library manually inside. From the GitHub repository, bring in everything from the 'Lambda Function Send SMS' directory (see our earlier guide for detailed help). Zip the contents of that directory up.
Now, inside Lambda, change to the 'Code' tab, and select 'Upload a .ZIP File' from the 'Code entry type' pulldown. Select the zip file you just created, and upload it. Ensure you are using the Python 2.7 Runtime.
In the 'Configuration' tab, change the 'Handler' to 'twilio_functions.iot_handler'. This is pointing to the twilio_functions.py file you just opened, and telling AWS to call the iot_handler() function.
Last, you need to set two environmental variables inside Lambda. This can be done from the 'Code' tab.
Set the following values, grabbing them from the Twilio Console:
AUTH_TOKEN- (Your Auth Token)ACCOUNT_SID- (Your Account SID, ex: ACXXXXXXXXXXXXXXXXXXXXXX)
And with under 50 lines of code, our plumbing to Twilio's Messaging APIs is complete!
Testing the AWS IoT-Twilio Integration
It may not seem like it, but you've now got the entire application integrated. MQTT messages published the the 'twilio' topic that match our query will be passed to Lambda, which will extract the necessary fields to send a SMS or MMS message.
Since we know that the integration between the ESP8266 and AWS IoT is working, testing is simple: power cycle your ESP8266. If you still have the Test MQTT Client open, you should soon see a message published on the 'twilio' topic from the ESP8266 - and this time, you should shortly receive an MMS from your Lambda function.
Do Big Things with Small Parts
And that's a wrap - your Thing -> AWS IoT -> Lambda code is nicely packaged and ready for your custom modifications. The next part is up to you - what will you do now that your swarm of things can send a text message?
Use your (low) powers for good, and let us know what you've built on Twitter. And if you're ready to push on now, move onto our next article on receiving and replying to messages using the same integration that we've set up today.

Related Resources
Twilio Docs
From APIs to SDKs to sample apps
API reference documentation, SDKs, helper libraries, quickstarts, and tutorials for your language and platform.
Resource Center
The latest ebooks, industry reports, and webinars
Learn from customer engagement experts to improve your own communication.
Ahoy
Twilio's developer community hub
Best practices, code samples, and inspiration to build communications and digital engagement experiences.