Automated Survey with Ruby and Rails
Time to read:
January 10, 2017
Written by
Reviewed by
This post is part of Twilio’s archive and may contain outdated information. We’re always building something new, so be sure to check out our latest posts for the most up-to-date insights.

Have you ever wondered how to create an automated survey that can be answered by phone or SMS?
This tutorial will show how to do it using the Twilio API.
Here's how it works at a high level
- The end user calls or texts the survey's phone number.
- Twilio gets the call or SMS and makes an HTTP request to your application asking for instructions on how to respond.
- Your web application serves up TwiML instructions to
GatherorRecordthe user input over the phone, or prompts for text input withMessage. - After each question, Twilio makes another request to your server with the user's input. Your application stores this input in its database.
- Your application returns a TwiML response to Twilio with instructions to either ask the next question or complete the survey.
Creating a Survey
For your convenience, this application's repository already includes one survey that can be loaded into the database. This survey will be loaded into the database when the app starts as long as the database is configured correctly.
You can modify the survey questions by editing the seeds.rb file located in the root of the repository and re-running the app. You can see more about seeding your database here.
We want users to take our survey, so we need to implement a handler for SMS and calls. First, let's take a moment to understand the flow of a Twilio-powered survey as an interview loop.
The Interview Loop
The user can enter an answer for your survey over the phone using either their phone's keypad or by speaking. After each interaction Twilio will make an HTTP request to your web application with either the string of keys the user pressed or a URL to a recording of their voice input.
It's up to the application to process, store, and respond to the user's input.
Let's dive into this flow to see how it actually works.
Configuring a Twilio Number
To initiate the interview process, we need to configure one of our Twilio numbers to send our web application an HTTP request when we get an incoming call or text.
Click on one of your numbers and configure your Voice and Message URLs to point to your server. In our code, the routes are /surveys/voice and /surveys/sms, respectively.
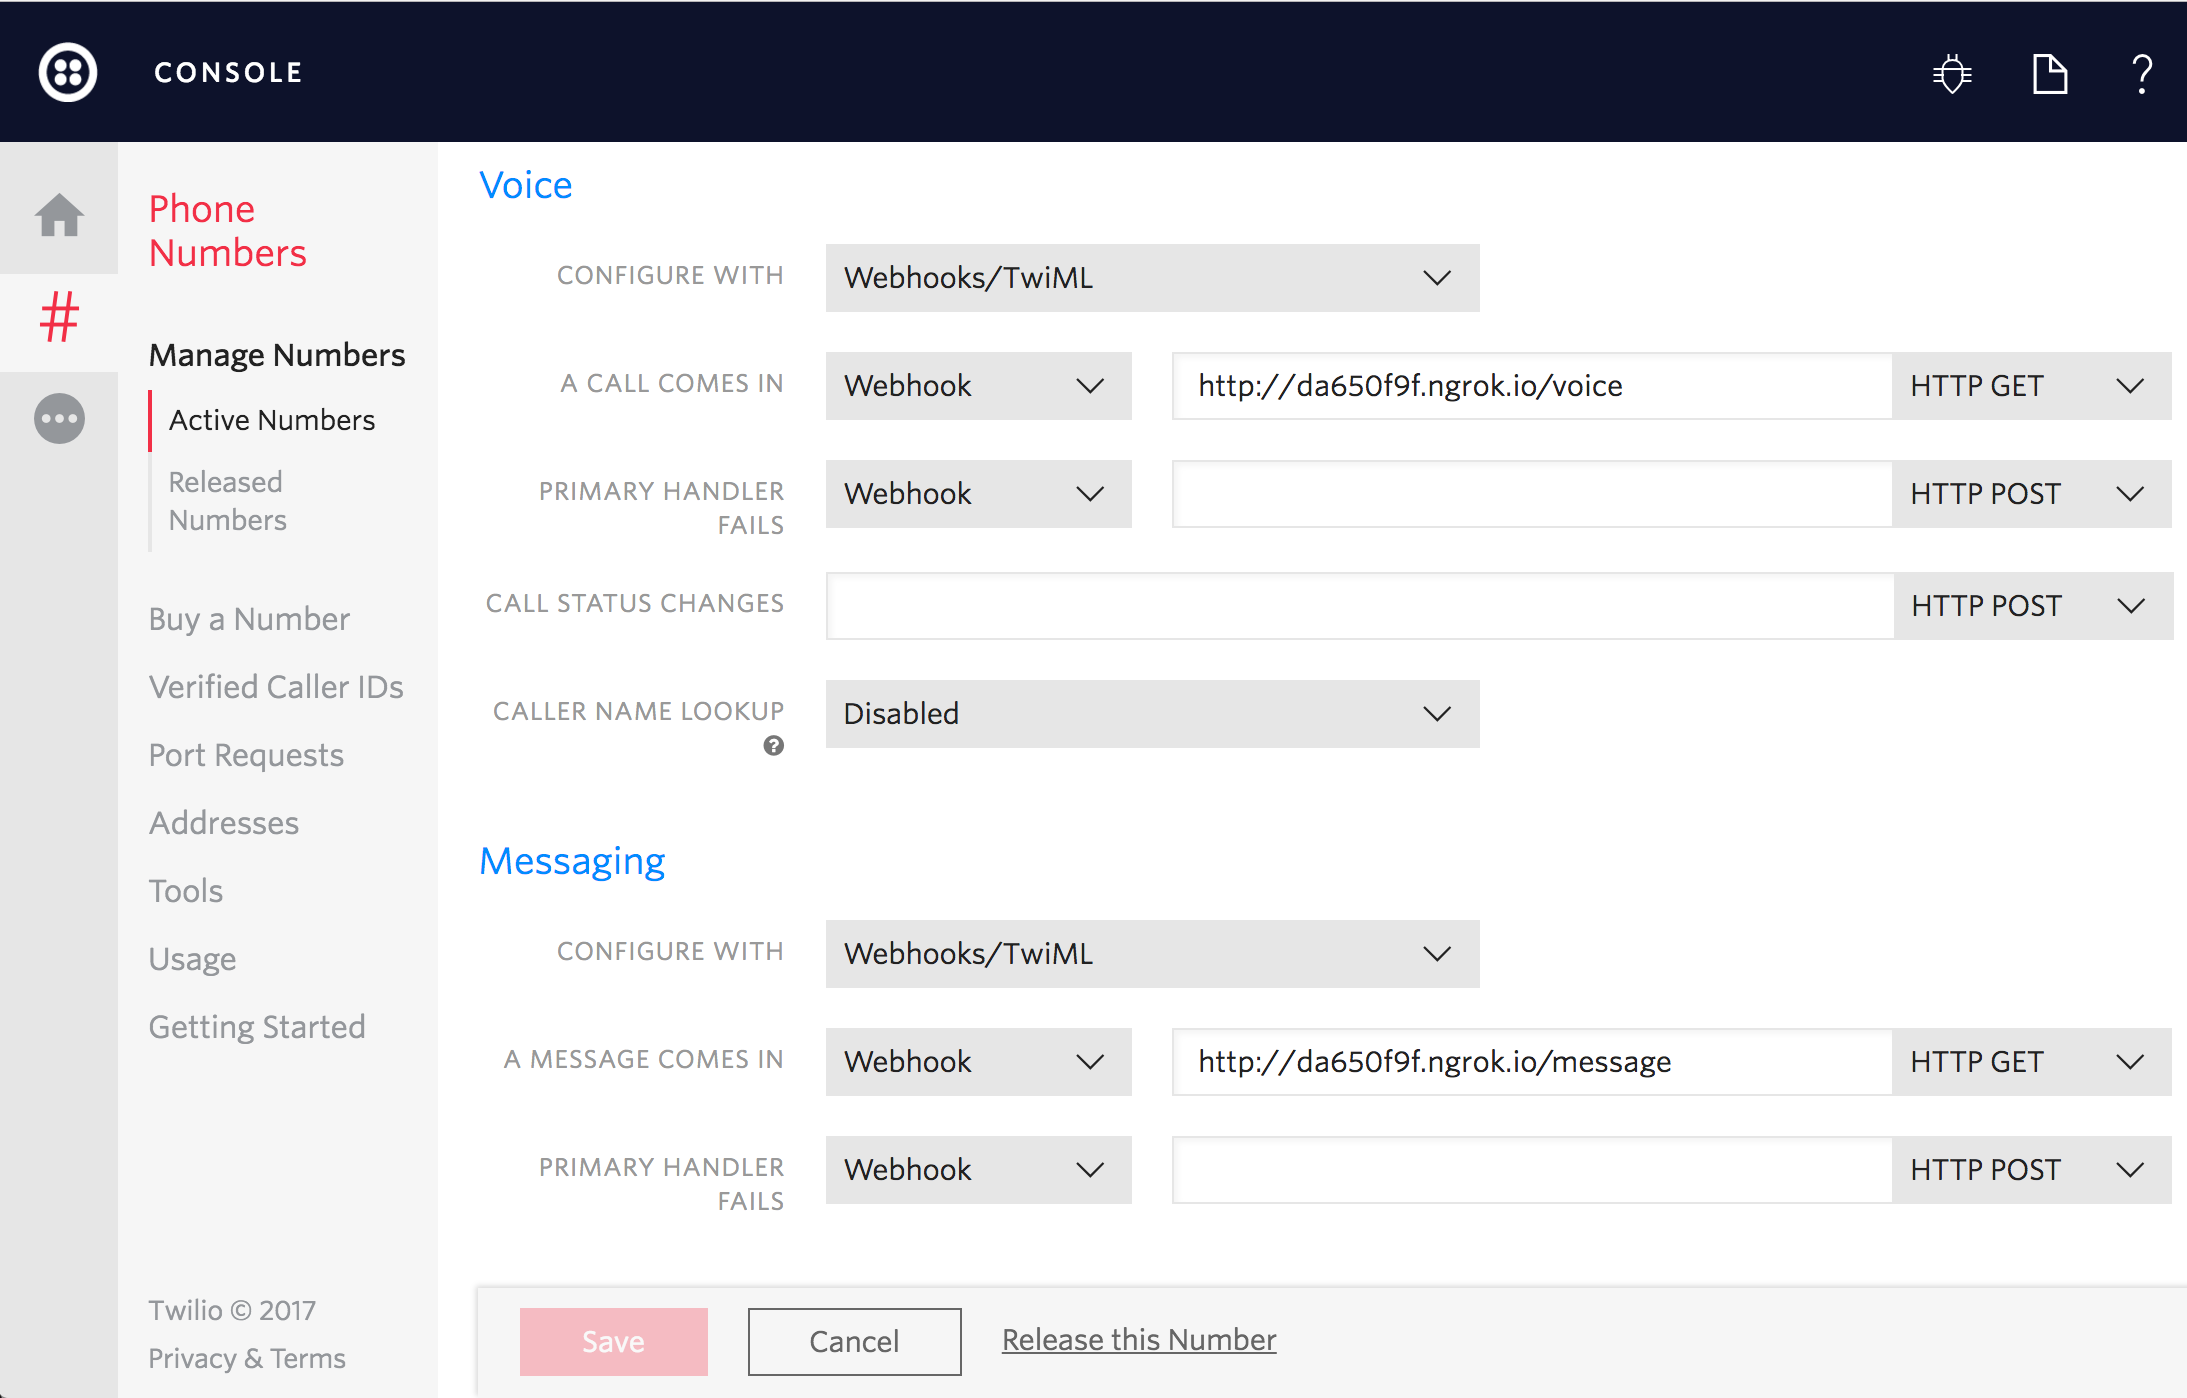
If you don't already have a server configured to use as your webhook, ngrok is a great tool for testing webhooks locally.
Lets see how we'll handle these webhooks.
Responding to the Twilio Request
After receiveing a call or SMS, Twilio will send a request to the URL specified in that phone number's configuration:
/surveys/voicefor calls./surveys/smsfor SMS.
Each of these endpoints will receive the request and will use Twilio::TwiML::Response to return a welcome message to the user. For callers, the constructed message will contain a Say verb. For requests coming from a text we'll respond with a Message which will respond with an SMS.
Our response will also include a Redirect verb to redirect to our question enpoint in order to continue the survey flow.
Now that we know how to handle requests to our webhooks, let's learn how to keep track of the survey's state.
Question Controller
This controller is used for calls only. It produces the TwiML with the questions in our survey.
The sequence of questions is modeled through the action verb attribute.
Let's see how to create the voice response.
Creating the Voice Response
If there is no question (Question::NoQuestion), we'll respond with an exit message.
If the question is "numeric" in nature, then we use the <Gather> verb. However, if we expect voice input from the user, we use the <Record> verb. Both verbs take an action attribute and a method attribute.
Twilio will use both attributes to define our response's endpoint to use as callback. That endpoint will be responsible for receiving and storing the caller's answer.
During the Record verb creation, we also ask Twilio for a Transcription. Twilio will process the voice recording and extract useful text, making a request to our response's endpoint when the transcription is complete.
Now let's see how to handle the response that comes in from our user.
Handling Responses
When the user finishes their response, Twilio sends us a request that tells us what happened and asks for further instructions on how to proceed.
At this point, we need to recover data from Twilio's request parameters using the create method on Answer.
Recovered parameters vary according to what we asked during the survey:
Fromcontains the caller's phone number.RecodingUrlcontains the URL for listening to a recorded message.Digitscontains the keys pressed for a numeric question.CallSidcontains the unique identifier for the call.
Finally we redirect to our question controller, which will ask the next question in the interview loop. This is done via the Voice::CreateResponse.for method.
We're almost done! Now let's find a way to visualize our survey results.
Displaying the Survey Results
For this route, we simply query the database using the Active Record Query Interface.
We display a panel for every question from the survey, and inside every panel, we list the responses from different calls.
You can access this page in the application's root route.
That's it! If you configured one of your Twilio numbers to work with the application built in this tutorial you should be able to take the survey and see the results under the root route of the application. We hope you found this sample application useful.
Where to Next?
If you're a Ruby/Rails developer working with Twilio, you might enjoy these other tutorials:
Automate the process of reaching out to your customers in advance of an upcoming appointment.
Click-to-call enables your company to convert web traffic into phone calls with the click of a button.
Did this help?
Thanks for checking out this tutorial! If you have any feedback to share with us, we'd love to hear it. Reach out to us on Twitter and let us know what you build!
Related Resources
Twilio Docs
From APIs to SDKs to sample apps
API reference documentation, SDKs, helper libraries, quickstarts, and tutorials for your language and platform.
Resource Center
The latest ebooks, industry reports, and webinars
Learn from customer engagement experts to improve your own communication.
Ahoy
Twilio's developer community hub
Best practices, code samples, and inspiration to build communications and digital engagement experiences.