Warm Transfer with Ruby and Rails

January 10, 2017
Written by
Mario Celi
Contributor
Opinions expressed by Twilio contributors are their own
Reviewed by
Paul Kamp
Twilion
Kat King
Twilion

warm-transfer-ruby-rails

Have you ever been disconnected from a support call while being transferred to someone else?  That couldn't have left a great impression on you...

Warm transfer eliminates this problem - it allows your agents to have the ability to dial in another agent in real time.

Today we'll add warm transfer to a Ruby on Rails application so we can engender warm feelings among customers talking to support.

Here's how it works at a high level:

  1. The first agent becomes available by connecting through the web client.
  2. The second agent becomes available by connecting through the web client.
  3. A customer calls our support line.
  4. The client stays on hold while the first agent joins the call.
  5. While the first agent is on the phone with the client, he or she dials the second agent into the call.
  6. Once the second agent is on the call, the first one can disconnect. The client and the second agent stay on the call.

Let's get started!  Clone the sample application from Github.

Set Up The Voice Web Hook

First, let's configure the voice web-hook for the Twilio number that customers will dial when they want to talk to a support agent. 

Twilio Console for Warm Transfer

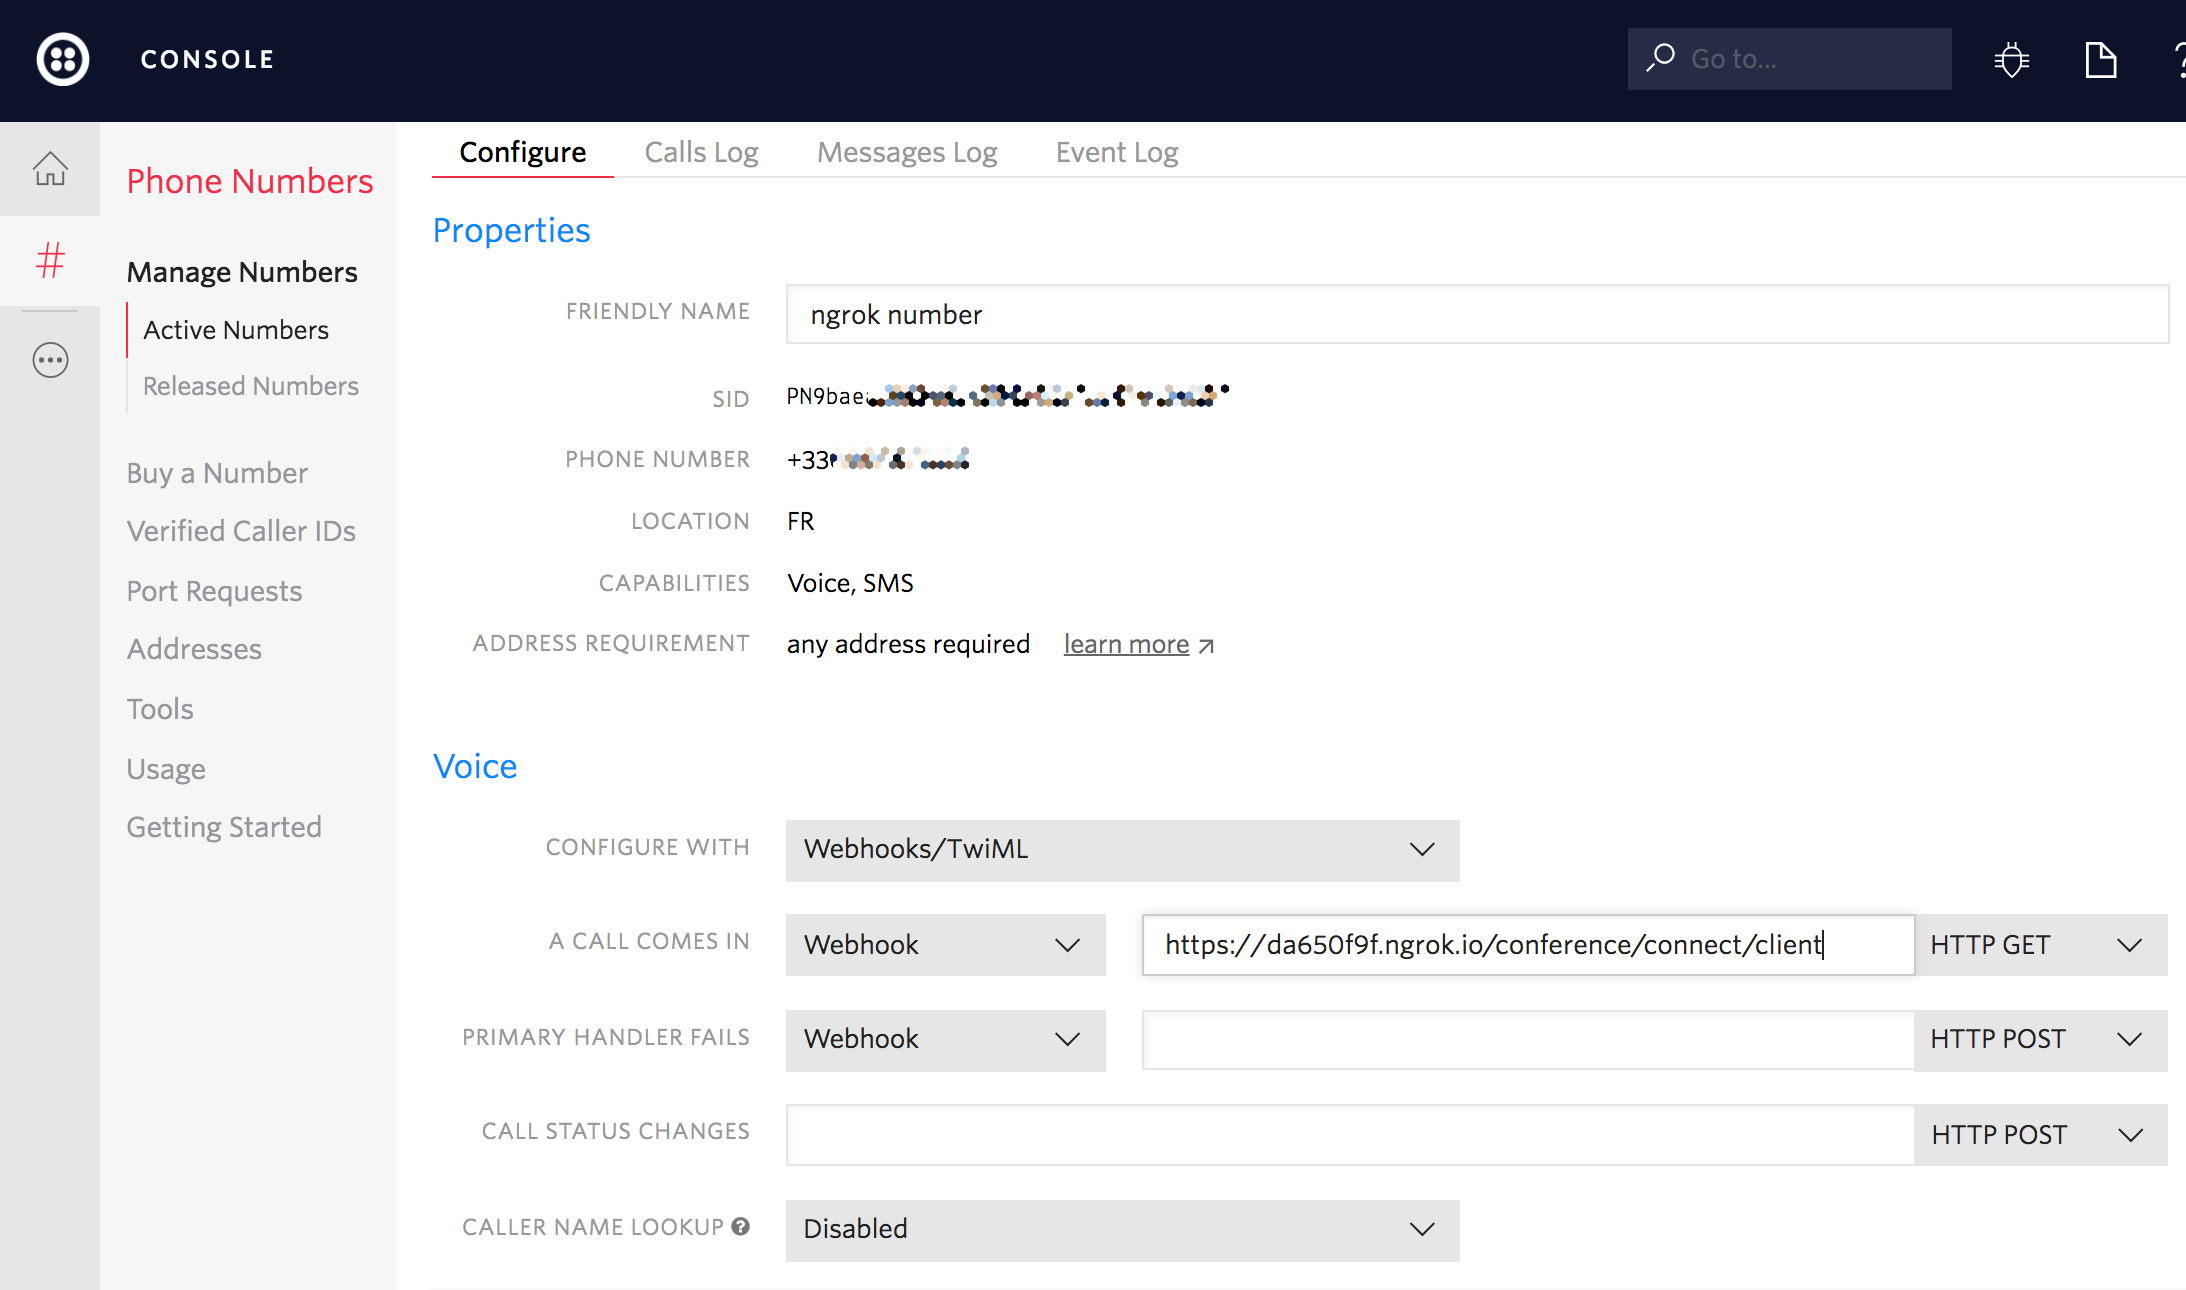
In production, this should be the public-facing URL for your app.

One option to expose a development URL from your local machine is to use ngrok.  Your URL would then be something like:

 https://<your-ngrok-id>.ngrok.io/conference/connect/client

Editor: this is a migrated tutorial. Find the original code at https://github.com/TwilioDevEd/warm-transfer-rails/

Rails.application.routes.draw do
  root 'home#index'

  post 'conference/wait'                           => 'conference#wait'
  post 'conference/connect/client'                 => 'conference#connect_client'
  post 'conference/:conference_id/connect/agent1/' => 'conference#connect_agent1', as: :conference_connect_agent1
  post 'conference/:conference_id/connect/agent2'  => 'conference#connect_agent2', as: :conference_connect_agent2
  post 'conference/:agent_id/call'                 => 'conference#call_agent2',    as: :conference_call_agent2

  post ':agent_id/token'                           => 'token#generate'

end

Nice work!  With a webhook in place we're ready to dive into the code.

Connect an Agent to a Call

Here you can see all front-end code necessary to connect an agent using Twilio's Voice Web Client.

We need three things to have a live web client:

  • A capability token (provided by our Rails app)
  • A unique identifier (string) for each agent
  • Event listeners to handle different Twilio-triggered events
$(function() {
  var currentAgentId;
  var currentConnection;
  var $callStatus = $('#call-status');
  var $connectAgent1Button = $("#connect-agent1-button");
  var $connectAgent2Button = $("#connect-agent2-button");

  var $answerCallButton = $("#answer-call-button");
  var $hangupCallButton = $("#hangup-call-button");
  var $dialAgent2Button = $("#dial-agent2-button");

  $connectAgent1Button.on('click', { agentId: 'agent1' }, agentClickHandler);
  $connectAgent2Button.on('click', { agentId: 'agent2' }, agentClickHandler);
  $hangupCallButton.on('click', hangUp);
  $dialAgent2Button.on('click', dialAgent2);

  function fetchToken(agentId) {
    $.post('/' + agentId + '/token', {}, function(data) {
      currentAgentId = data.agentId;
      connectClient(data.token)
    }, 'json');
  }

  function connectClient(token) {
    Twilio.Device.setup(token);
  }

  Twilio.Device.ready(function (device) {
    updateCallStatus("Ready");
    agentConnectedHandler(device._clientName);
  });

  // Callback for when Twilio Client receives a new incoming call
  Twilio.Device.incoming(function(connection) {
    currentConnection = connection;
    updateCallStatus("Incoming support call");

    // Set a callback to be executed when the connection is accepted
    connection.accept(function() {
      updateCallStatus("In call with customer");
      $answerCallButton.prop('disabled', true);
      $hangupCallButton.prop('disabled', false);
      $dialAgent2Button.prop('disabled', false);
    });

    // Set a callback on the answer button and enable it
    $answerCallButton.click(function() {
      connection.accept();
    });
    $answerCallButton.prop('disabled', false);
  });

  /* Report any errors to the call status display */
  Twilio.Device.error(function (error) {
    updateCallStatus("ERROR: " + error.message);
    disableConnectButtons(false);
  });

  // Callback for when the call finalizes
  Twilio.Device.disconnect(function(connection) {
    callEndedHandler(connection.device._clientName);
  });

  function dialAgent2() {
    $.post('/conference/' + currentAgentId + '/call')
  }

  /* End a call */
  function hangUp() {
    Twilio.Device.disconnectAll();
  }

  function agentClickHandler(e) {
    var agentId = e.data.agentId;
    disableConnectButtons(true);
    fetchToken(agentId);
  }

  function agentConnectedHandler(agentId) {
    $('#connect-agent-row').addClass('hidden');
    $('#connected-agent-row').removeClass('hidden');
    updateCallStatus("Connected as: " + agentId);

    if (agentId === 'agent1') {
      $dialAgent2Button.removeClass('hidden').prop('disabled', true);
    }
    else {
      $dialAgent2Button.addClass('hidden')
    }
  }

  function callEndedHandler(agentId) {
    $dialAgent2Button.prop('disabled', true);
    $hangupCallButton.prop('disabled', true);
    $answerCallButton.prop('disabled', true)
    updateCallStatus("Connected as: " + agentId);
  }

  function disableConnectButtons(disable) {
    $connectAgent1Button.prop('disabled', disable);
    $connectAgent2Button.prop('disabled', disable);
  }

  function updateCallStatus(status) {
    $callStatus.text(status);
  }
});

In the next step we'll take a closer look at capability token generation.

Generate a Capability Token

In order to connect the Twilio Voice Web Client we need a capability token.

To allow incoming connections through the web client an identifier must be provided when generating the token.

module TwilioCapability
  def self.generate(agent_id)
    # To find TWILIO_ACCOUNT_SID, TWILIO_AUTH_TOKEN visit
    # https://www.twilio.com/user/account
    account_sid = ENV['TWILIO_ACCOUNT_SID']
    auth_token  = ENV['TWILIO_AUTH_TOKEN']
    capability = Twilio::JWT::ClientCapability.new(account_sid, auth_token)
    incomingScope = Twilio::JWT::ClientCapability::IncomingClientScope.new agent_id
    capability.add_scope incomingScope

    capability.to_s
  end
end

Next up let's take a look at how to handle incoming calls.

Handle Incoming Support Calls

For this tutorial we used fixed identifier strings like agent1 and agent2 but you can use any unique application generated string for your call center clients. These identifiers will be used to create outbound calls to the specified agent using the Twilio REST API.

When a client makes a call to our Twilio number the application receives a POST request asking for instructions. We'll use TwiML to instruct the client to join a conference room and use the Twilio REST API client to invite (and initiate a call to) the first agent.

When providing instructions to the client, we also provide a waitUrl. This URL is another end point of our application and will return more TwiML to SAY welcome to the user and also PLAY some music while on hold.

We use the client's CallSid as the conference identifier. Since all participants need this identifier to join the conference, we'll need to store it in a database so that we can grab it when we dial the second agent into the conference.

class ConferenceController < ApplicationController
  skip_before_filter :verify_authenticity_token

  AGENT_WAIT_URL = 'http://twimlets.com/holdmusic?Bucket=com.twilio.music.classical'

  def connect_client
    agent_id = 'agent1'
    conference_id = params[:CallSid]
    Caller.call_agent(
      agent_id,
      conference_connect_agent1_url(conference_id: conference_id)
    )

    twiml = TwimlGenerator.generate_connect_conference(
      conference_id,
      conference_wait_url,
      false,
      true
    )

    call = ActiveCall.with_agent_id(agent_id).first_or_create(
      conference_id: conference_id
    )
    call.conference_id = conference_id
    call.save!

    render xml: twiml
  end

  def connect_agent1
    twiml = TwimlGenerator.generate_connect_conference(
      params[:conference_id],
      AGENT_WAIT_URL,
      true,
      false
    )

    render xml: twiml
  end

  def connect_agent2
    twiml = TwimlGenerator.generate_connect_conference(
      params[:conference_id],
      AGENT_WAIT_URL,
      true,
      true
    )

    render xml: twiml
  end

  def call_agent2
    agent_id = params[:agent_id]
    conference_id = ActiveCall.where(agent_id: agent_id).first.conference_id

    Caller.call_agent(
      'agent2',
      conference_connect_agent2_url(conference_id: conference_id)
    )

    render nothing: true
  end

  def wait
    twiml = TwimlGenerator.generate_wait
    render xml: twiml
  end
end

Next up we'll look at the TwiML response to the client support call.

Provide TwiML Instructions For The Client

Here we create a TwiMLResponse that will contain a DIAL verb with a CONFERENCE noun that will instruct the JavaScript client to join a specific conference room.

module TwimlGenerator
  def self.generate_connect_conference(conference_id, wait_url,
                                       start_on_enter, end_on_exit)
    r = Twilio::TwiML::VoiceResponse.new
    d = Twilio::TwiML::Dial.new
    d.conference(conference_id, start_conference_on_enter: start_on_enter,
                                end_conference_on_exit: end_on_exit,
                                wait_url: wait_url)
    r.append(d)
    r.to_s
  end

  def self.generate_wait
    r = Twilio::TwiML::VoiceResponse.new
    r.say('Thank you for calling. Please wait in line for a few seconds. ' \
          'An agent will be with you shortly.')
    r.play(url: 'http://com.twilio.music.classical.s3.amazonaws.com/BusyStrings.mp3',
           loop: 0)
    r.to_s
  end
end

Now let's look at how we dial the first support agent into the conference call.

Dial The First Agent Into the Call

For our app we created a Caller module to handle dialing our agents. This module uses Twilio's REST API to create a new call.

The create method receives a hash with the following keys:

  1. from: Your Twilio number
  2. to : The agent web client's identifier (agent1 or agent2)
  3. url : A url to ask for TwiML instructions when the call connects

Once the agent answers the call in the web client, a request is made to the callback url instructing Twilio to join the agent's call with the conference room where the client is already waiting.

module Caller
  def self.call_agent(agent_id, callback_url)
    account_sid   = ENV['TWILIO_ACCOUNT_SID']
    auth_token    = ENV['TWILIO_AUTH_TOKEN']
    twilio_number = ENV['TWILIO_NUMBER']

    client = Twilio::REST::Client.new(account_sid, auth_token)

    client.calls.create(
      from: twilio_number,
      to: "client:#{agent_id}",
      url: callback_url
    )
  end
end

Next up, let's look at bringing the second agent into the phone call.

Dial The Second Agent Into the Call

When the client and the first agent are both in the call we are ready to perform a warm transfer to a second agent.

The first agent makes a request passing its identifier to allow us to look for the conference_id needed to add the second agent. Since we already have a Caller module, we can simply use the call_agent instance method to connect the second agent.

class ConferenceController < ApplicationController
  skip_before_filter :verify_authenticity_token

  AGENT_WAIT_URL = 'http://twimlets.com/holdmusic?Bucket=com.twilio.music.classical'

  def connect_client
    agent_id = 'agent1'
    conference_id = params[:CallSid]
    Caller.call_agent(
      agent_id,
      conference_connect_agent1_url(conference_id: conference_id)
    )

    twiml = TwimlGenerator.generate_connect_conference(
      conference_id,
      conference_wait_url,
      false,
      true
    )

    call = ActiveCall.with_agent_id(agent_id).first_or_create(
      conference_id: conference_id
    )
    call.conference_id = conference_id
    call.save!

    render xml: twiml
  end

  def connect_agent1
    twiml = TwimlGenerator.generate_connect_conference(
      params[:conference_id],
      AGENT_WAIT_URL,
      true,
      false
    )

    render xml: twiml
  end

  def connect_agent2
    twiml = TwimlGenerator.generate_connect_conference(
      params[:conference_id],
      AGENT_WAIT_URL,
      true,
      true
    )

    render xml: twiml
  end

  def call_agent2
    agent_id = params[:agent_id]
    conference_id = ActiveCall.where(agent_id: agent_id).first.conference_id

    Caller.call_agent(
      'agent2',
      conference_connect_agent2_url(conference_id: conference_id)
    )

    render nothing: true
  end

  def wait
    twiml = TwimlGenerator.generate_wait
    render xml: twiml
  end
end

Once the second agent is in the call we can have the first agent disconnect.  Let's look at the handoff next.

The First Agent Leaves the Call

When the three participants have joined the same call, the first agent has served his or her purpose. Now agent #1 can drop the call, leaving agent #2 and the client to discuss support matters and the weather.

It is important to notice the differences between the TwiML each one of the participants received when joining the call:

  • Both agent one and two have startConferenceOnEnter set to true.
  • For the client calling and for agent two, endConferenceOnExit is set to true.

Translated, this means a conference will start when either agent joins the call.  It also means the client or agent #2 disconnecting will hang up the call.

module TwimlGenerator
  def self.generate_connect_conference(conference_id, wait_url,
                                       start_on_enter, end_on_exit)
    r = Twilio::TwiML::VoiceResponse.new
    d = Twilio::TwiML::Dial.new
    d.conference(conference_id, start_conference_on_enter: start_on_enter,
                                end_conference_on_exit: end_on_exit,
                                wait_url: wait_url)
    r.append(d)
    r.to_s
  end

  def self.generate_wait
    r = Twilio::TwiML::VoiceResponse.new
    r.say('Thank you for calling. Please wait in line for a few seconds. ' \
          'An agent will be with you shortly.')
    r.play(url: 'http://com.twilio.music.classical.s3.amazonaws.com/BusyStrings.mp3',
           loop: 0)
    r.to_s
  end
end

And that's a wrap!  You've now helped us implement warm transfers for our support application.  You're ready to add this capability on your own website!

Where to Next?

Ruby and Twilio are excellent partners.  Here are two other tutorials you're sure to enjoy:

Browser Calls

Learn how to use Twilio Client to make browser-to-phone and browser-to-browser calls with ease.

ETA Notifications

Learn how to implement ETA Notifications using Ruby on Rails and Twilio.

Did this help?

Thanks for checking this tutorial out! Let us know on Twitter what you've built... or what you're building.