Agricultural Monitoring with Twilio Programmable Wireless and Helium
Time to read:
December 15, 2017
Written by
This post is part of Twilio’s archive and may contain outdated information. We’re always building something new, so be sure to check out our latest posts for the most up-to-date insights.

The Internet of Things certainly has potential – and for some applications it’s even currently performing. Smart farming is one of those fields (pun intended), where always-connected sensors can do better at crop monitoring than any human ever could. Watching moisture levels and other soil metrics is a perfect assignment for low-powered microcontrollers scattered throughout amber waves of grain.
Building a Smart Farm with Arduino, Twilio and Helium
Here in the Bay Area, lot sizes are measured in square footage not acreage – so excuse my diversion into hyperbole. At my house, I have a couple of 3’x6.5’ planter boxes where we grow herbs and root vegetables. Today, we’ll wire up a planter box and build an agricultural monitor using Twilio’s Programmable Wireless and SMS, along with a Helium Element Gateway, Helium Atom Prototyping Module and an Arduino Uno.
On the accessories side, we’ll be using a DFRobot Capacitive Soil Sensor for the moisture readings. You’ll also need some male-to-male jumper wires. Although not required, breadboards and a multimeter can help debug any sticky issues during the build.
Finally, on the software side, either download (or open) a copy of the Atom text editor and the Platformio plug-in. If you haven’t used Atom before and would like additional help getting started, read Helium’s post on getting started with Atom, Platformio, and Helium.
Sign Up For – or Sign Into – a Twilio Account
For this project, Twilio will be pulling triple duty. Programmable Wireless will keep your device connected, the serverless Twilio Functions will host logic, and Programmable SMS will deliver those oh-so-important dryness warnings. Either sign up for a Twilio account or log in to your existing account.
Purchase a Twilio Number
When your crops need watering, you’ll use a number purchased through Twilio to deliver that important message via SMS. Navigate to the Phone Numbers in Console.
When searching, make sure you click the ‘SMS’ box for capabilities.
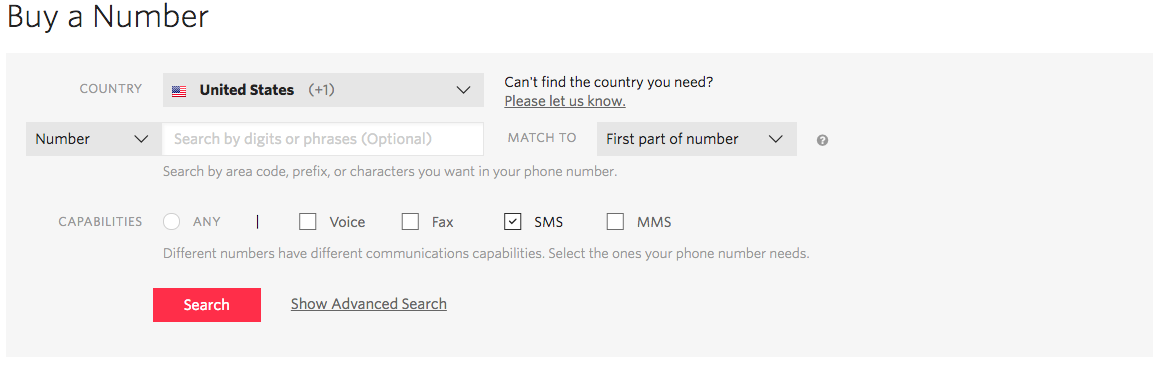
Remember the number or at least where to find it – you’ll need it again in the next step.
Where We’re Going, We Won’t Need Servers…
Twilio Functions is a serverless platform which we’ll utilize today to host our logic. When the Arduino makes a new reading we’ll send it to our Functions-hosted code. The code will check to see how dry the plant is and if it needs watering, send an SMS message to our phones.
(You can find all of our smart farm code hosted in this repository and more details in our smart farm blueprint)
Let’s walk through the next steps together:
- Head on over the the Functions Console
- Hit the red plus (‘+’) button to start creating a Function

- Select ‘Blank’ then ‘Create’ it
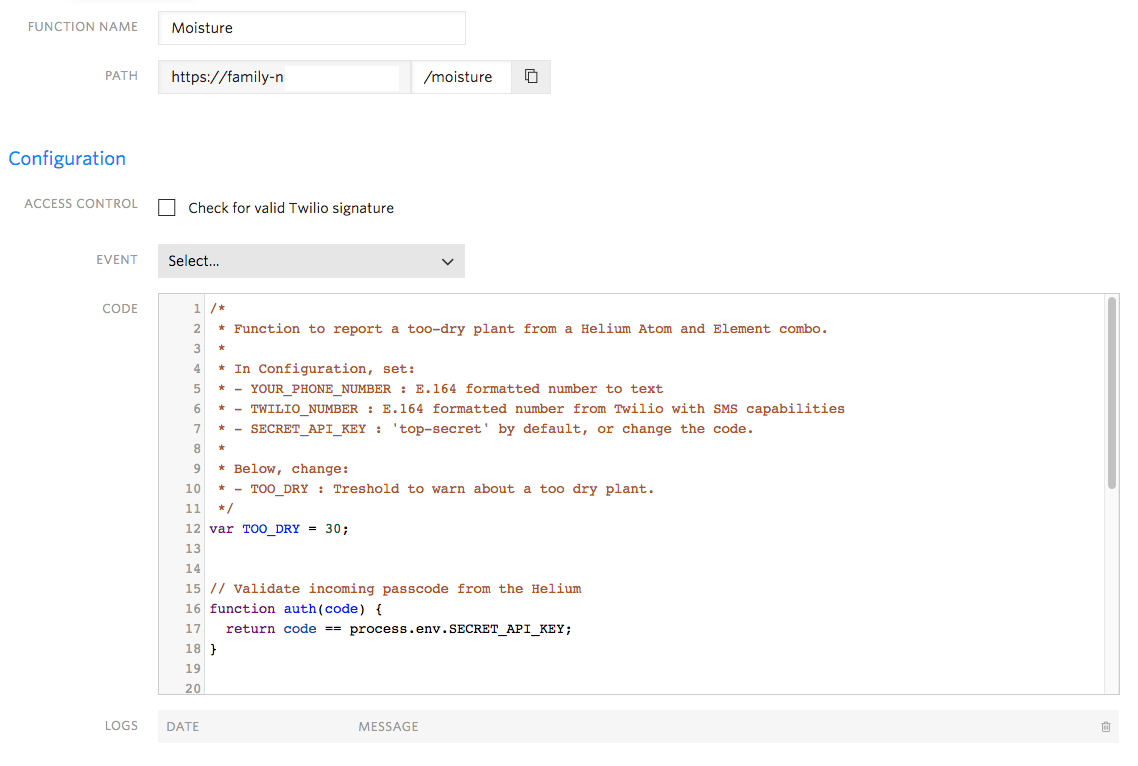
- Under PATH enter ‘moisture’
- Paste the contents of moisture.js into the CODE editor
- Optionally, edit the TOO_DRY variable to set the moisture percentage that will trigger a warning
- ‘Save’ the Function.
Your shiny new Function should look similar to the following if you’ve followed the steps correctly:
Setting Environment Variables in Functions
Now, visit the Configure Pane of the Functions Console.
If you haven’t created a Function before, this is the pane you’ll use to abstract configuration variables from code you enter in the Function editor pane. You can reference any variables you set here inside the code a few different ways, as detailed in our Functions environment article in the documentation. As a general aside, it’s a good practice to separate your configuration constants from your code – see more in this post on environment variables.
Set the following three environment variables:
- SECRET_API_KEY: Use ‘top-secret’ to match the Arduino code (see the below security note)
- YOUR_PHONE_NUMBER: A phone number for your logic to forward moisture warnings in E.164 format
- TWILIO_NUMBER: E.164 formatted number from the above ‘Purchasing a number’ step
Production Security
In production, make sure any API keys or credentials you grant to your device are revocable. Security practices mandate that if a device or machine isn’t in your possession you need to be able to block it – or something masquerading as it – from accessing your resources. One common pattern is to use a key server or a pre-assigned certificates and revoke credentials if a device is lost or stolen.
You should also take pains to limit scope of any of the APIs you expose to your IoT devices. Today’s code, for example, only allows SMSes to be sent which fit a particular pattern and are only sent in response to certain sensor values.
Testing Your Function
The easiest way to test your function before continuing is to use cURL to send a few commands.
To test that your function is properly forwarding warnings, you can use this command:
To test the function will ignore values greater than the one you set at the top of the Function, use this command:
If you execute the two in turn, you should receive a single message, but see that the Function executed twice:

If that looks good, let’s move on and assemble the hardware.
Register with Helium
Our friends at Helium provide convenient and easy to use hardware (and abstractions) that make it easy to build out your IoT applications. Today, we’re going to use a Helium Element and Helium Atom Prototyping Module to build our crop monitor. But first – register an account with Helium.
Register your Helium Atom Prototyping Module by clicking the blue plus (‘+’) sign next to ‘Atoms’ in the sidebar.
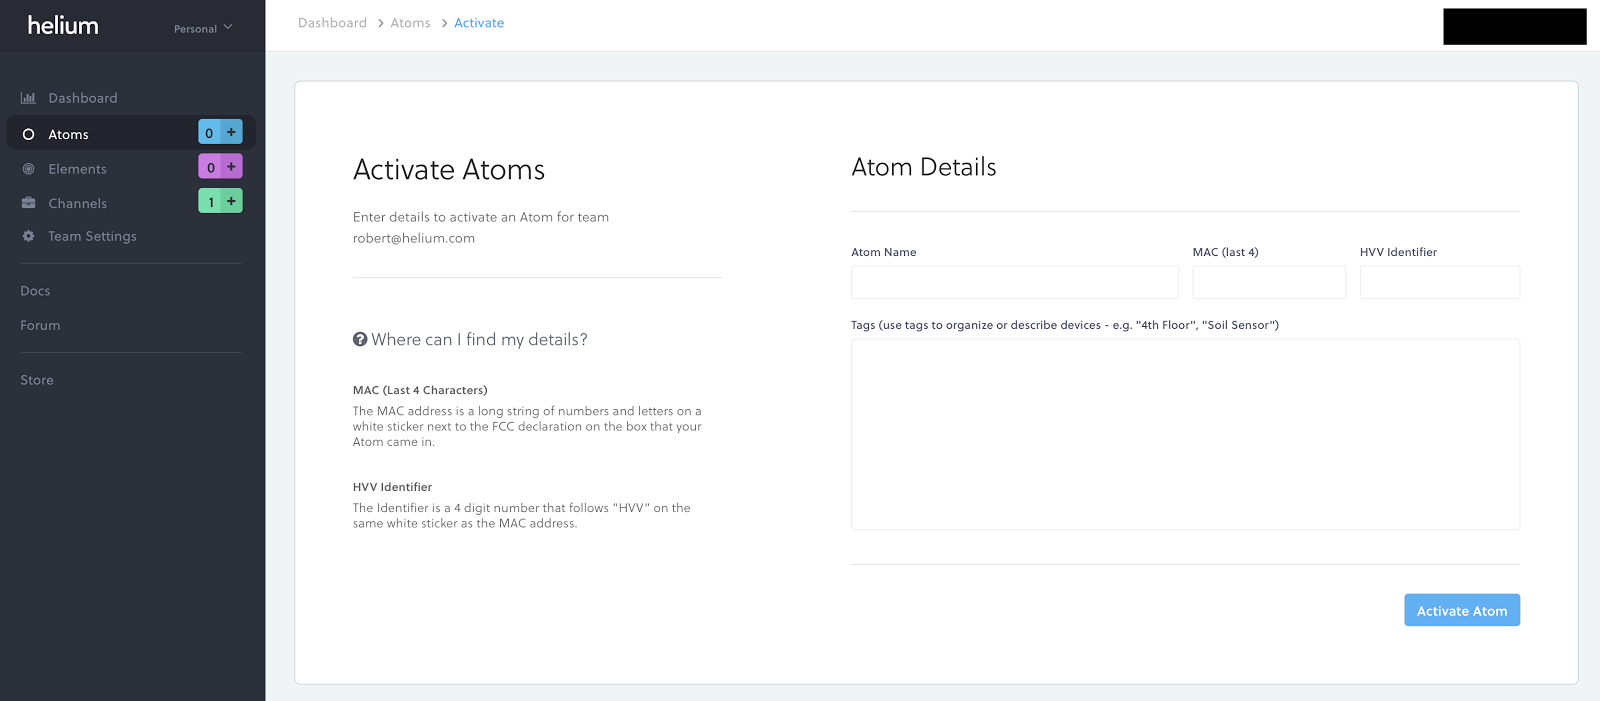
Follow the prompt to register your Helium Atom Prototyping Module. Follow on by clicking the purple plus (‘+’) button next to ‘Elements’, and similarly follow the prompts.
Assemble the IoT Devices!
We’re now at the signature build step on our smart farm hardware journey! Let’s assemble the devices in order so you’ll be ready to start monitoring your garden or farm.
Wire the Helium Element
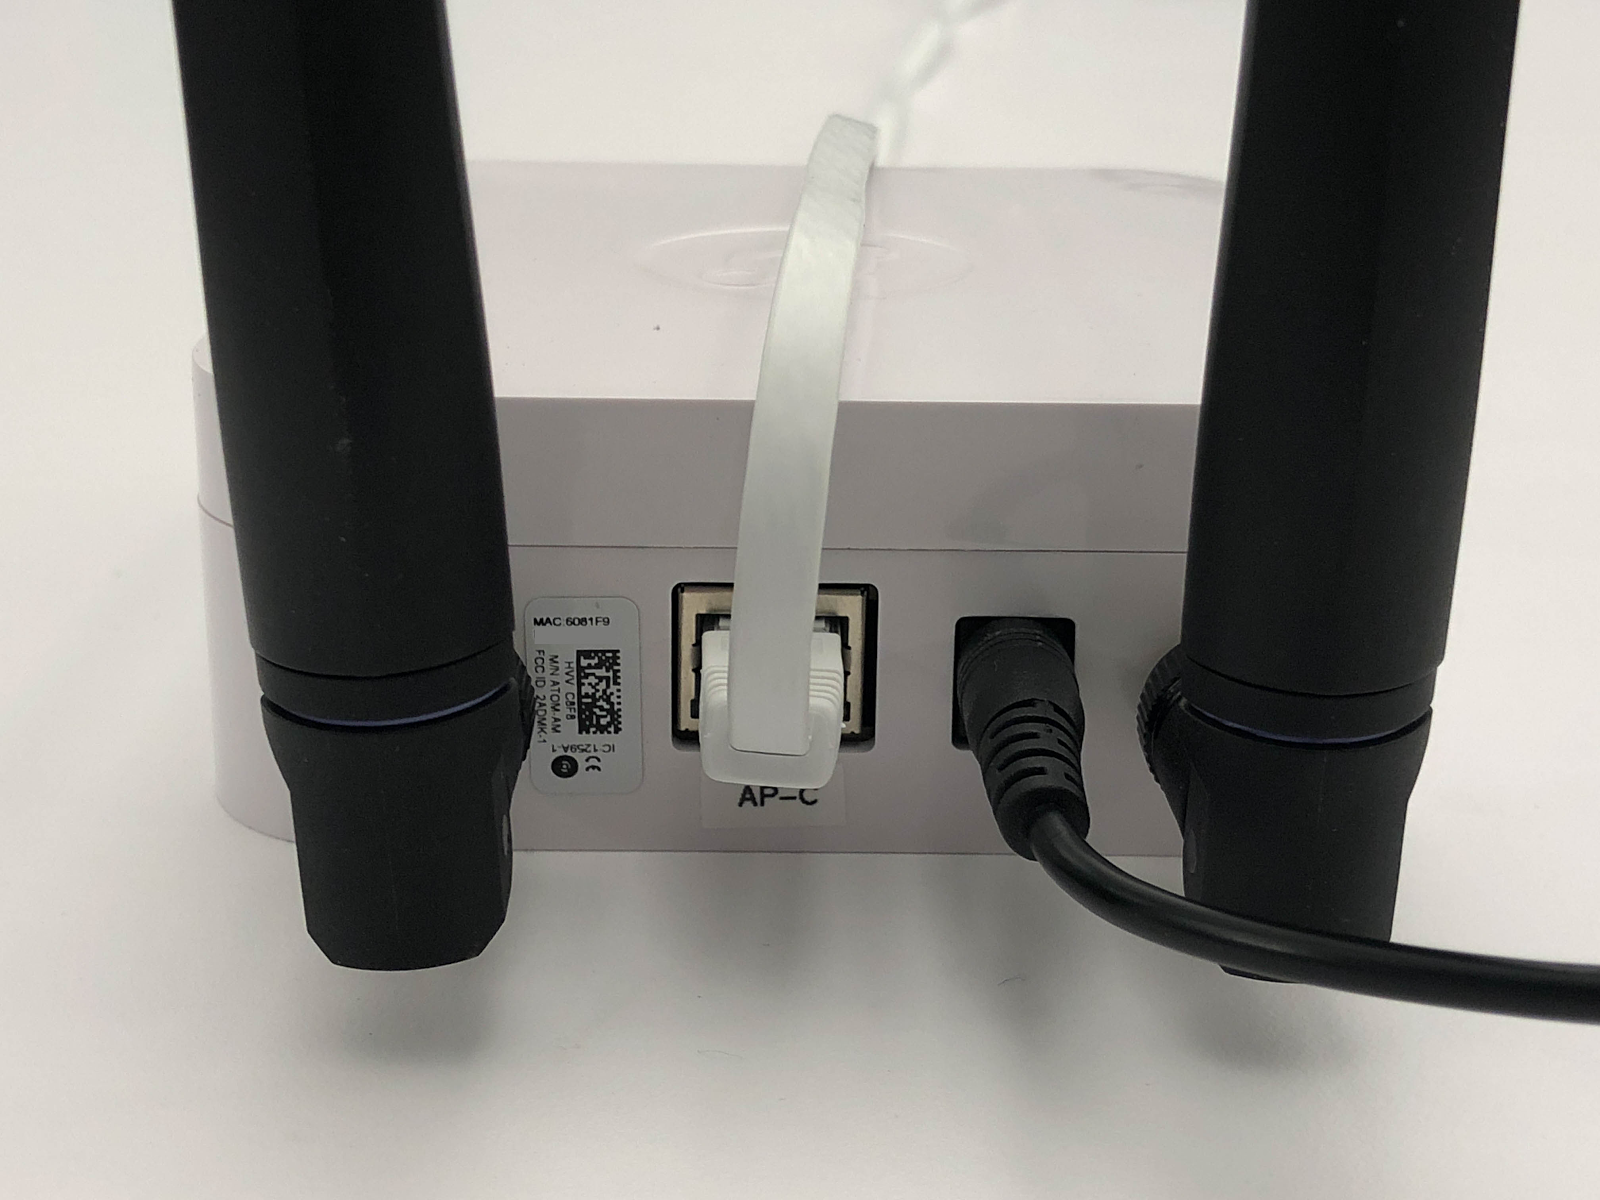
The Helium Element is a relatively straightforward build. If you are using the Cellular version, optionally attach an ethernet cable to an empty slot on a router or switch. For that version, then attach the antennas, carefully connecting the 2.4 GHz labeled antenna to the correct slot.
For either version of the Element, follow by connecting the 5V DC adapter.
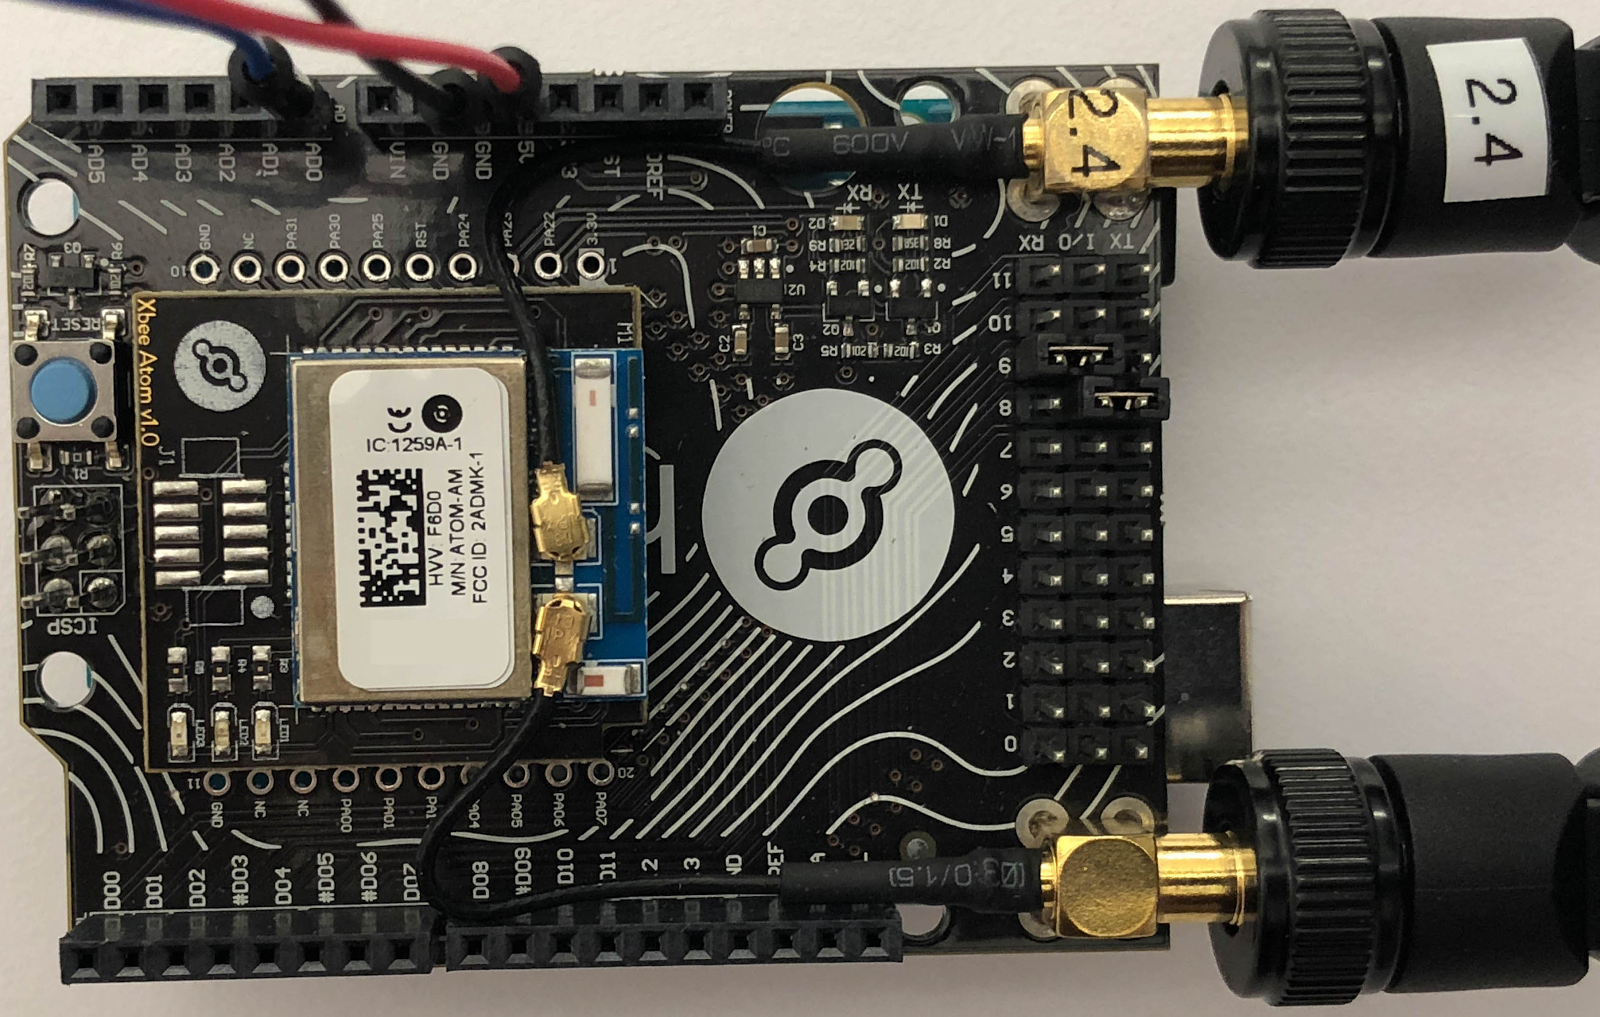
Assemble the Atom Prototyping Module
The Helium Atom Prototyping Module and Arduino shield is a bit more involved. To use it with the Arduino Uno like we are today, follow these steps:
- Use the 2.54mm pitch jumpers included to connect RX to pin 9 and TX to pin 8
- Align the Helium Atom Prototyping Module with the dotted silkscreen and insert it into the shield’s socket
- Connect the antennas, taking care to insert the 2.4 GHz antenna in the proper socket
- Attach the shield to the Arduino board
- Do not plug it into power or USB – we still have to attach the sensor
If you’d like more detail on any of these steps, also see the writeup in Helium’s documentation.
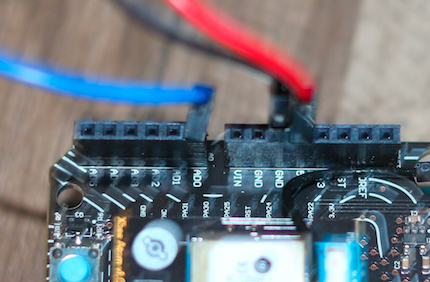
Connect the Capacitive Moisture Sensor
Now, take out the male-to-male jumper wires and separate a red, black, and your choice of color (I picked blue) wire to attach the sensor.
From the sensor’s harness, connect the black header through the black jumper to the GND pin on the shield. Likewise, for the red header, connect the red jumper to the 5V slot on board. For the final signal connect the harness’s last open header to pin AD0 on the shield.
It should look like this when finished:
Open a Helium Channel
Helium’s Channel functionality makes it easy to integrate their hardware with whichever service or endpoint you’d like to eventually consume the microcontroller’s output. Today we’re going to POST our sensor readings to the Twilio Function you developed in an earlier step.
Go back to the the Helium Dashboard to get started, and click the green plus (‘+’) button to create a channel (or visit the Channels link).
- Select ‘HTTP’ for Step 1’s prompt
- Use a POST method, and paste in the URL of your Function. It will be https://SOMETHING.twil.io/moisture ; see your Function for the exact URL
- Add HEADER Content-Type , value application/x-www-form-urlencoded
- Add a name and ‘Save’ your channel
Flash the Microcontroller
You’re really getting close now – you’ve only got to flash the microcontroller then set the assembly to work. Let’s get that Arduino Uno programmed.
Open Atom and start a new Platformio project; if this is your first, Platformio has you covered with the step-by-step guide. Either way, continue by following these steps:
- Add ‘main.cpp’ and ‘Board.h’ to your project
- In ‘main.cpp’, change the following globals
- SECRET_API_KEY: ‘top-secret’ or however you set the Twilio Function environment variable
- CHANNEL_NAME: The name of the Helium channel created above
- Optionally, you can also change:
- PAUSE_MS: Milliseconds to wait between readings
- CYCLES_TO_AVERAGE: Number of readings to average before POSTing to the Function
- Select ‘Build’ in the ‘PlatformIO’ menu
- If you trust your wiring and the project compiles successfully, plug in USB to the Arduino Uno and select ‘Upload’ from the ‘PlatformIO’ menu
- In the ‘PlatformIO’ menu, open a Serial Monitor to the Uno’s port at 115200 baud
Helium supports more than just Atom, see their getting started post for more information.
If everything is correct you should soon see sensor readings streaming in the Serial Monitor. At this point, you should wait for a text message reporting that your air is too dry (well, assuming it’s actually dry…). After that? Onto your garden and then the world!

Smart Farms, Low-Powered Things, and Twilio
At this point, you’re ready to drop the moisture sensor into the soil below your favorite herb, spice, or vegetable (or whatever else you’ve got). The Arduino Uno will faithfully monitor your crops and deliver sensor readings to the Twilio Function. The Function will makes heads and tails of the reading, and warn you when it’s time to intervene and fetch the hose.
From that starting point, you’re ready to scale up or out or strive for other levels of integration. Maybe you add an acidity sensor to the mix? Something to keep an eye on temperature? Integrate the warnings with a reply that lets you turn on and off the sprinklers? Reproduce the setup with another dozen sensors? Build a dashboard combining your monitors with Sync to keep track of your plants?
Wherever you go, Twilio and Helium have your back on your IoT journey. We can’t wait to see what you grow.
Paul Kamp’s last formal farming experience was during High School when he patrolled an apple orchard and helped grade fruit for selling (or cider). You can reach him at any time, harvest or planting season, at pkamp@twilio.com.

Related Resources
Twilio Docs
From APIs to SDKs to sample apps
API reference documentation, SDKs, helper libraries, quickstarts, and tutorials for your language and platform.
Resource Center
The latest ebooks, industry reports, and webinars
Learn from customer engagement experts to improve your own communication.
Ahoy
Twilio's developer community hub
Best practices, code samples, and inspiration to build communications and digital engagement experiences.