Build a Custom Workout Companion Using Twilio Functions and Airtable
Time to read:
December 07, 2022
Written by
Reviewed by
In honor of the holiday spirit of gift-giving, I decided to use my software development skills to come up with an application that can help my partner with their workouts! By texting a number, they can get their workout routine, get helpful instructions for each workout, and even get videos and gifs to help them even more!
In this tutorial, you’ll use both Twilio Functions and Airtable to create a workout companion number for your own use.
Prerequisites
For this tutorial, you will need:
- A free Twilio Account.
- A Twilio phone number.
- An Airtable Account.
- A personal phone number.
- A phone that can make and receive messages.
Set up your Airtable and get your API key
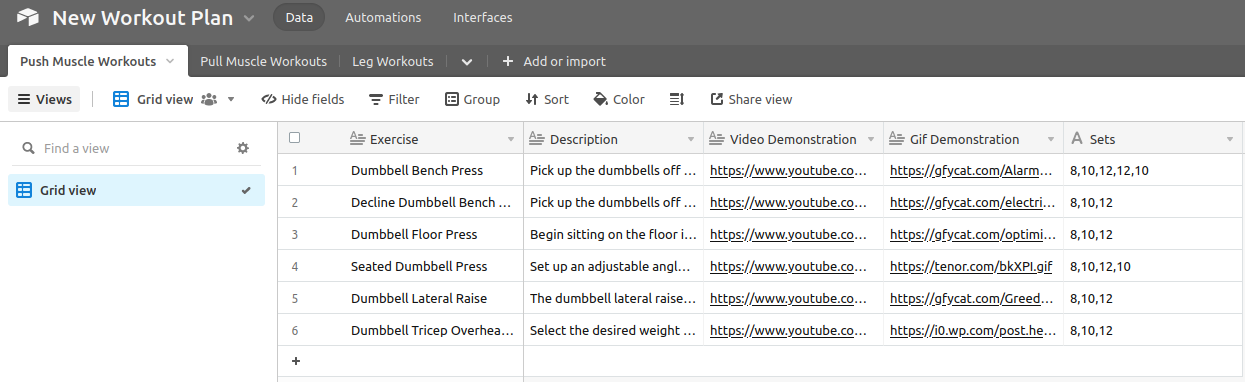
Head over to your Airtable dashboard and create a new base, then give it a suitable name (I named mine new-workout-plan). Next, create an empty table with the following headers:
- Exercise (single line text)
- Description (long text)
- Video Demonstration (single line text)
- Gif Demonstration (single line text)
- Sets (single line text)
Duplicate this table for every other workout routine you’d like to include. Populate the cells with the relevant data, ensuring that all the fields are filled. In case you’d like to copy my data instead of populating the cells on your own, check out this GitHub repository I made which contains the .csv files for three routines.
Next, you will need to get your API key to read the data from the table you just populated. Keep your table open; in a new tab, head over to the Airtable account page and generate your own API key under the API header. Keep this page open for later, as you will need to provide your Twilio Function with this API key as an environment variable.
Finally, you will also need your Base ID and Table IDs. In your Airtable base, look at the URL.
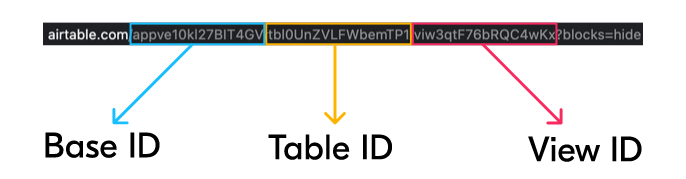
Base IDs will start with app, Table IDs will start with tbl, and View IDs will start with viw. You will only need your Base IDs and Table IDs for this tutorial.
Set up your Twilio Function
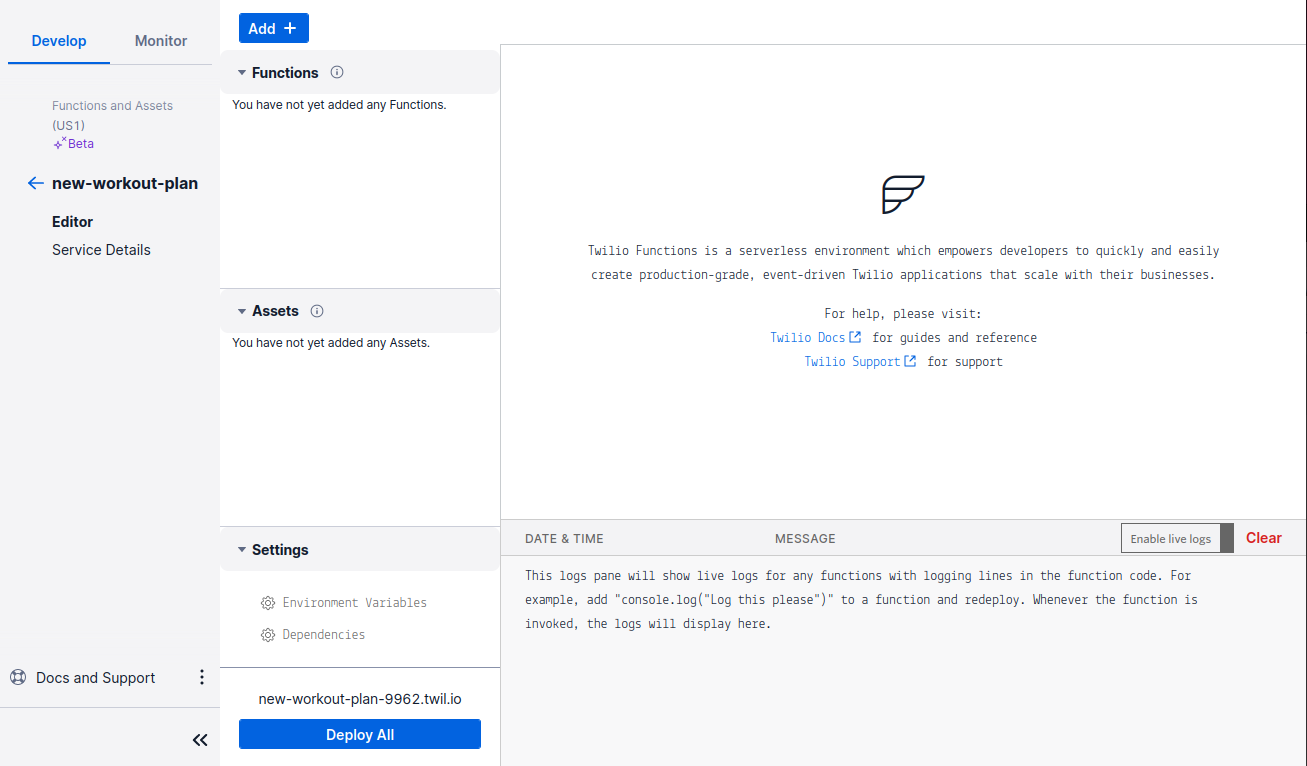
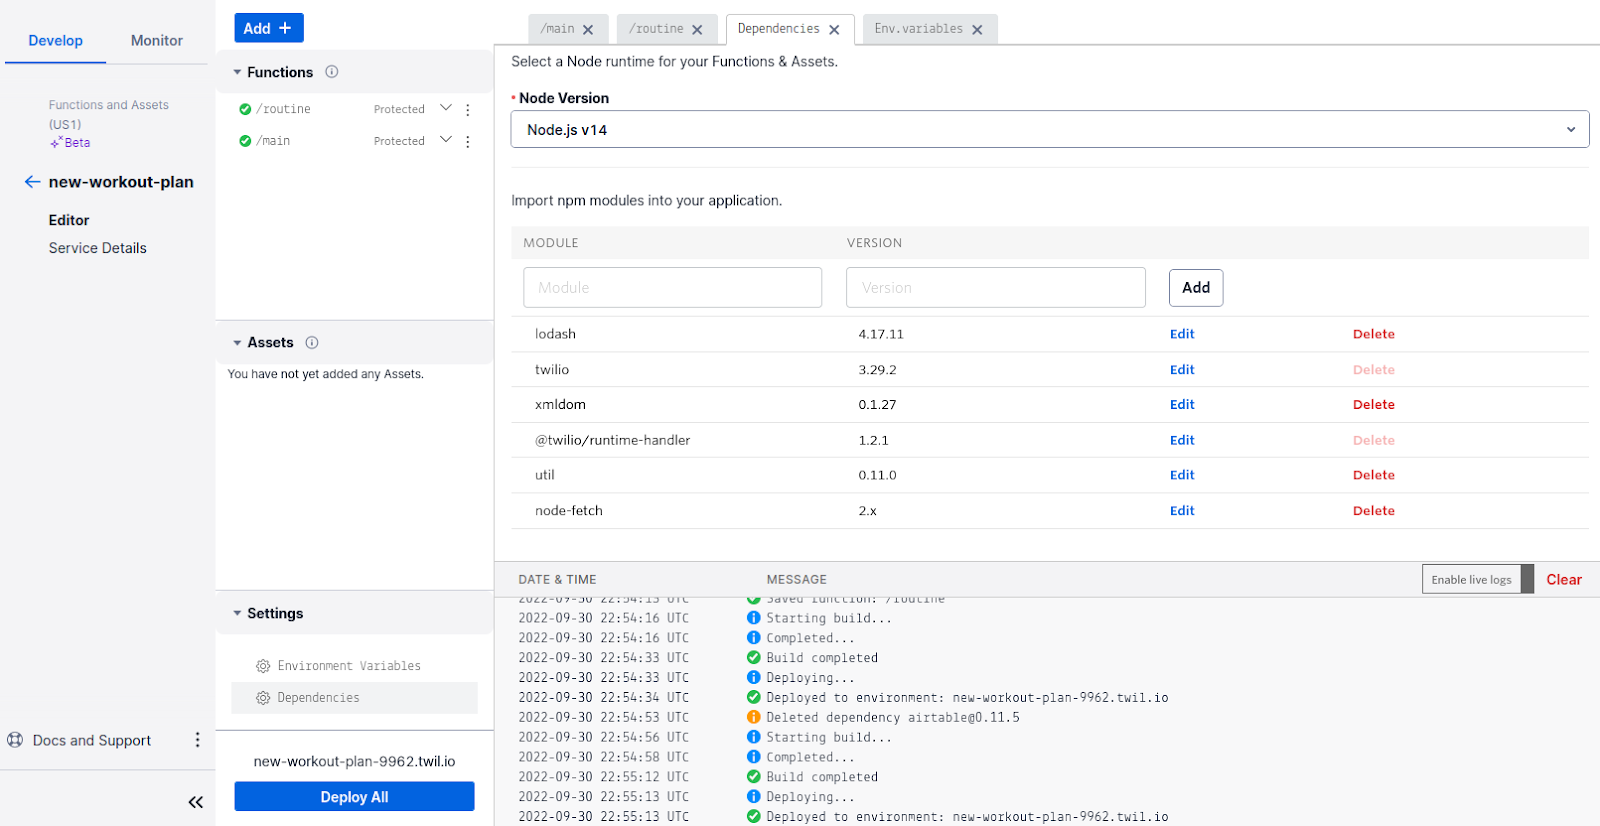
From your Twilio Console, click the Explore Products label on the left-hand sidebar. Then, click on Developer tools in the menu on the left, and then click on the Function and Assets card label. Click on the blue button labeled Create Service, enter a suitable Service Name (I named mine new-workout-plan), and then hit the blue button labeled Next. You should end up on a page like the one below.
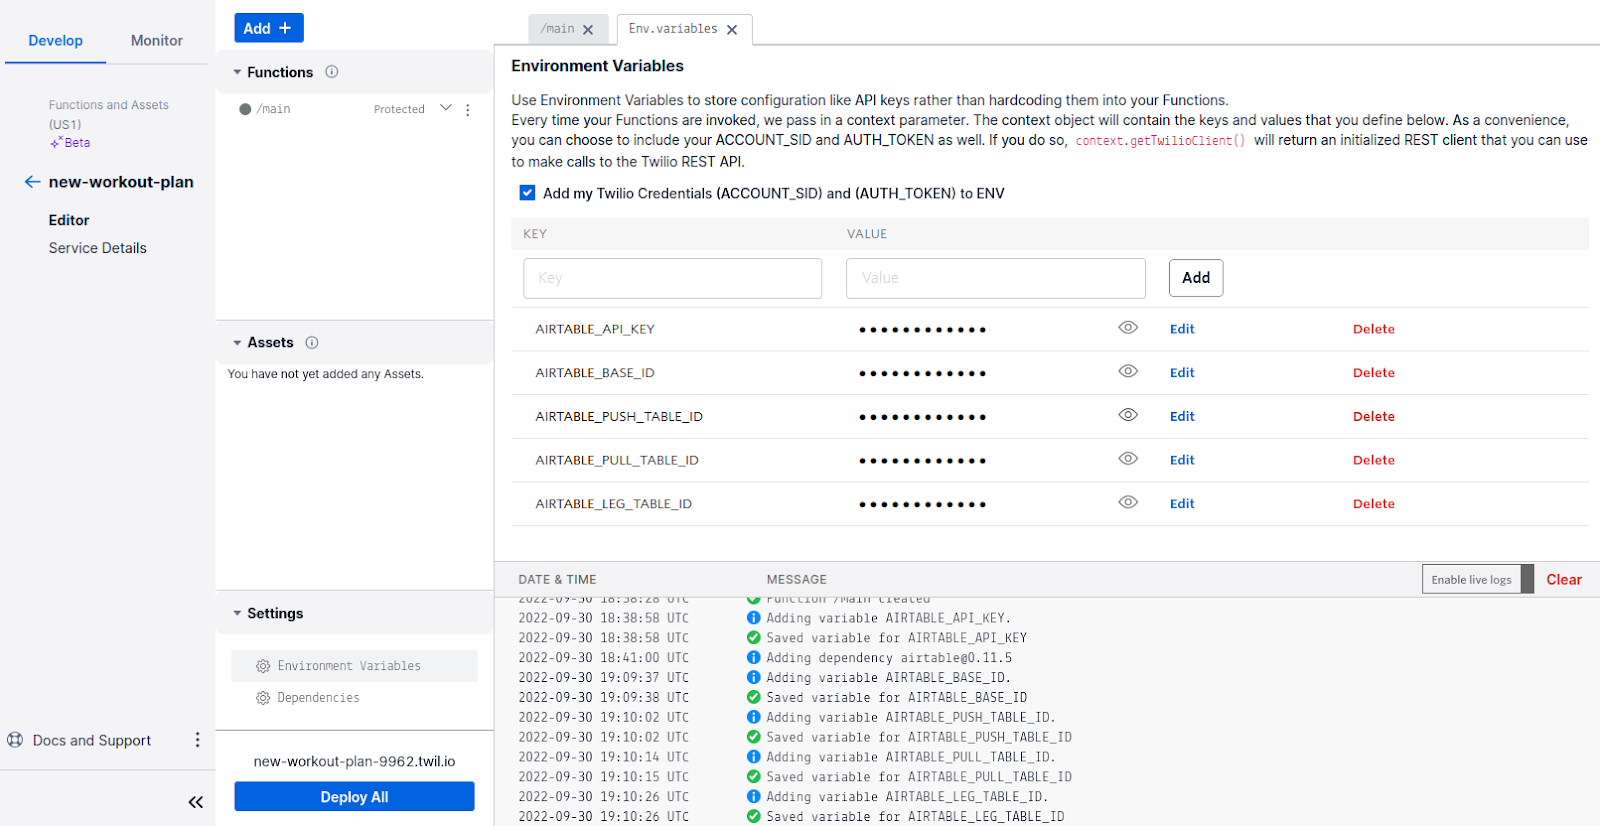
Click the blue button labeled Add on the top of the screen, and rename the path to /main. Next, click on the button labeled Environment Variables under the Settings header in the bottom left of the screen. Copy and paste your Airtable API Key into the Value input box.
Then, click the Key input box and enter AIRTABLE_API_KEY, then click the button labeled Add. Add your Base ID and name the key AIRTABLE_BASE_ID. Also, add your Table IDs and name the keys after their respective table names.
Finally, click on Dependencies, located below Environment Variables. You will need to add the node-fetch module, specifically version 2.x. Enter node-fetch in the Module input box and enter 2.x in the Value input box. Then, click the button labeled Add.
Now, you’re ready to write your code!
Write your code
The code will consist of three parts:
- Give the user instructions on how to start the application
- Prompt the user for the desired workout routine
- Provide the workout routine with instructions and visual references
Give the user instructions and prompt them for their desired routine
Head back to your /main path and replace the preexisting code with the following code below:
This code turns the function asynchronous, then initializes the response, twiml, and body variables. response and twiml are responsible for sending messages and updating the state of your application.
The body variable takes the received text message and turns the response into a number. The stage variable tracks the user’s progress through the application and will be stored in a cookie that will persist on the server as the user sends text messages.
If there are no cookies (i.e. the user has texted the number for the first time or cookies have been cleared prior to texting), then stage is set to “day”. The tableNames variable contains the table names of the tables that you created earlier. Finally, the response variable’s properties get set and then the callback function is sent.
Find the highlighted line in the above code sample, just above the setting of the response variable parameters and below the tableNames variable, and then copy and paste the following code in that space:
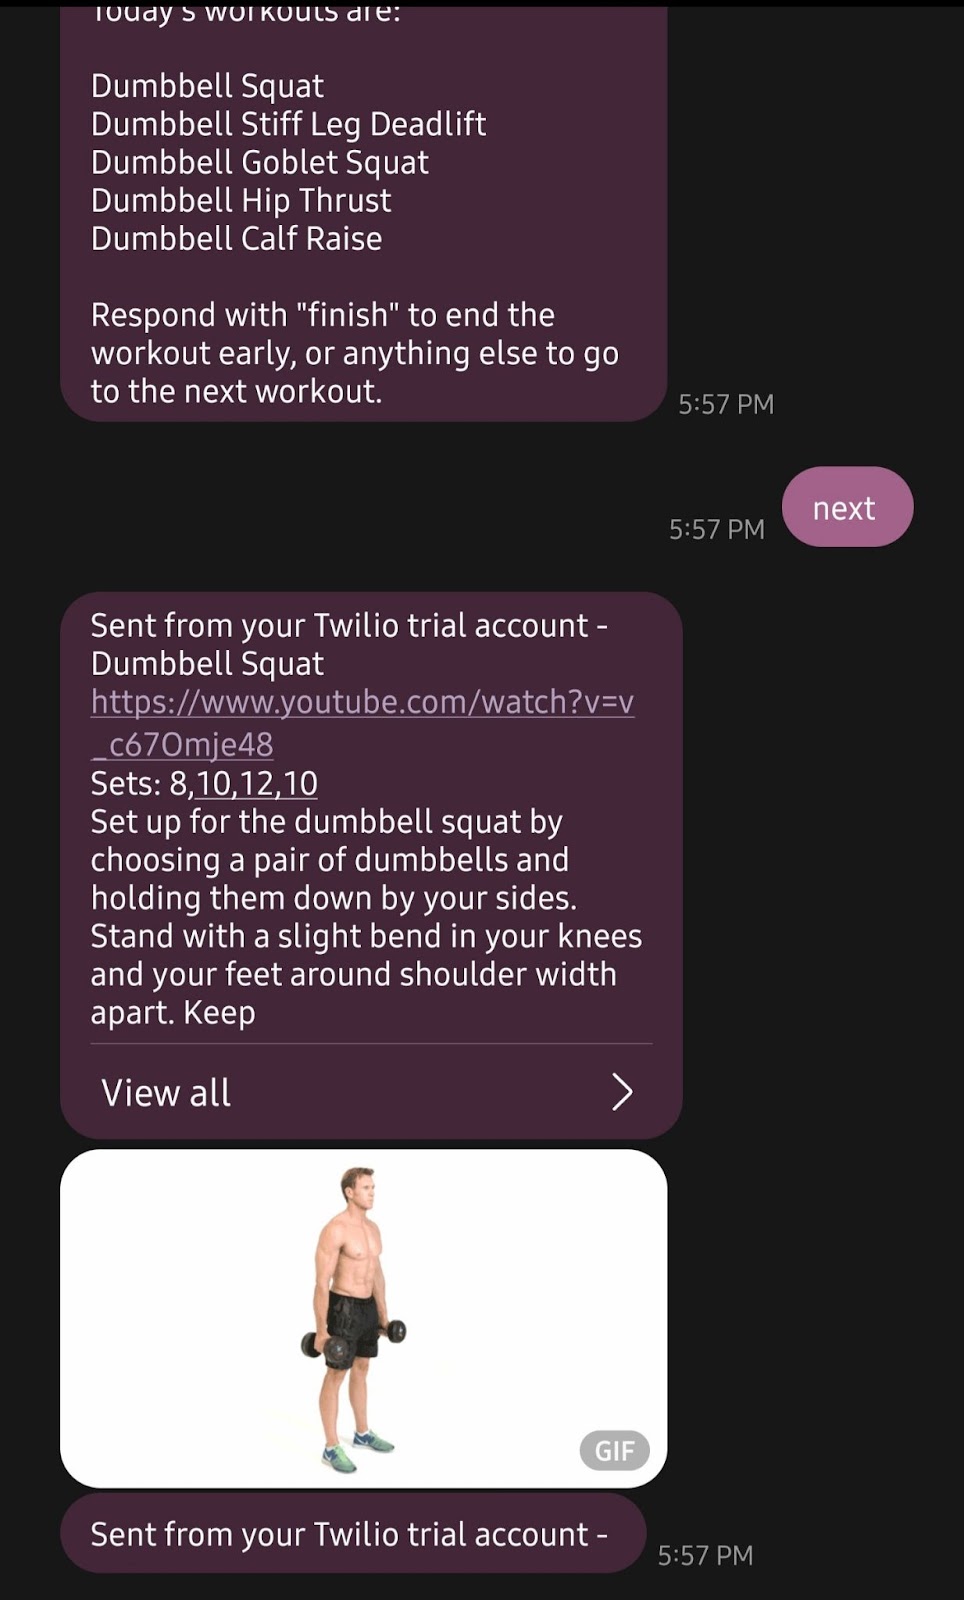
This code handles the logic that is responsible for sending your user the correct text messages. When a user sends a message to the app for the first time, they will receive a reply displaying the workouts stored in your tableNames variable in a numbered list. If they send a valid number (in this case, numbers 1, 2, or 3), then the user will be sent a message prompting them to prepare the necessary equipment and to respond with a message to start their workout.
As you can see from the other case, “routine”, there is another path to add: /routine. Click the button labeled Save below the code editor before moving on and adding this new path.
Provide instructions and visual references
Click the blue button labeled Add on the top of the screen, and rename the newly created path to /routine. Replace the preexisting code with the lines of code below:
The code will first initialize the fetch variable which will utilize the node-fetch module to fetch data from Airtable. The response, twiml, and body variables are then initialized just like in the previous step. The tables variable will be used to get the table IDs that you set earlier. If you added more ID environment variables, be sure to add them to the tables variable.
The routine variable is initialized to the cookie you set in the previous part, and the tableId variable is initialized to the selected ID. idString is initialized to either the idString cookie if one exists, or an empty string if not. Similarly, workout is initialized to the workout cookie parsed as a number if one exists, or a zero if not. Finally, the response variable’s properties get set and then the callback function is sent.
In the highlighted line, below the initialization of the workout variable, add the following code:
This code is the first case in this path’s message tree: if idString is empty, then your code will first need to gather the workouts and exercises. The data is gathered and turned into JSON after fetching the proper Airtable API endpoint. Workout records are added to the message that will be sent to the user, and the IDs of the workouts are stored in the ids variable. The list of exercises and instructions on how to use the bot are added to twiml, and the idString cookie is set.
Below the line where you call the setCookie() method, right where your last pasted code block ended, copy and paste the following lines of code:
In case the user sends “finish” as their message or they reach the end of their workout, then this code will send a goodbye message and remove all the cookies.
Finally, below the line where the workout cookie is removed, add the last lines of code:
This code is responsible for fetching individual workout records for the user’s selected routine. A message is then formatted with all the necessary information, and then a gif is added to show the user how to perform the exercise. The workout cookie is incremented once the message is sent, so whenever the user responds with a message they will get the next workout in the routine.
Whew, your code is finally complete! Be sure to hit Save and then hit the blue button labeled Deploy All near the bottom of the page. The final step is adding this Twilio Function to your phone number!
Add the Function to your Twilio number
Navigate to your Active numbers page and then click on the Twilio phone number that you are using for this tutorial.
Scroll down to the Messaging section. Under the heading that says A MESSAGE COMES IN, click the dropdown menu and select Function. Next, select your Service in the dropdown menu under the SERVICE header, then select ui in the dropdown menu under the ENVIRONMENT header, and finally the function path you named earlier under the FUNCTION PATH header.
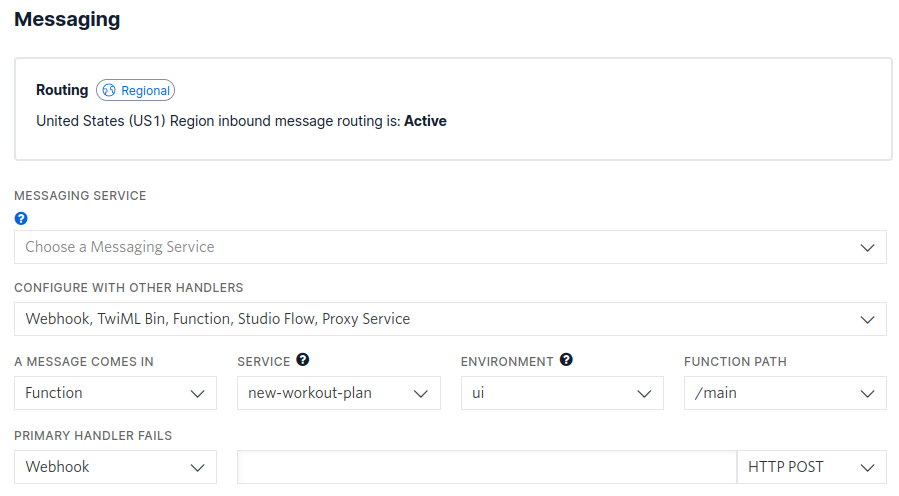
After that, hit the blue button labeled Save at the bottom of the page. You can now text your Twilio phone number and get some help in your workout!
Conclusion
Hopefully this tutorial helps motivate you to do a bit of exercise! By the time this article comes out, my partner and I will have (hopefully) used this number to help us out. Try altering the code and data to match your personal workout plan! Or maybe you could code something for someone special in your life using Twilio’s many APIs?

I can’t wait to see what you build next!
Dainyl Cua is a Software Engineer who loves helping others code. They would love to talk at any time and help you out. They can be reached through LinkedIn.


Related Resources
Twilio Docs
From APIs to SDKs to sample apps
API reference documentation, SDKs, helper libraries, quickstarts, and tutorials for your language and platform.
Resource Center
The latest ebooks, industry reports, and webinars
Learn from customer engagement experts to improve your own communication.
Ahoy
Twilio's developer community hub
Best practices, code samples, and inspiration to build communications and digital engagement experiences.