Build a Progressive Web Application with Django and Angular Part 2: Frontend Interface with Angular
Time to read:
July 05, 2022
Written by
Reviewed by

In the first part of this tutorial series, we began building a trivia game as a Progressive Web Application. We used the Django web framework and the Python programming language to create and populate our project’s database with trivia data, and the Django Rest Framework to rapidly develop a read-only API endpoint for our project’s frontend interface to consume along with a browsable web-based interface for viewing our API data in JSON format. Now in part two of this series, we will build our trivia game’s UI using the Angular frontend framework and TypeScript, a strongly-typed extension of the JavaScript programming language that is fully integrated into Angular. And finally we will convert our project into a Progressive Web Application (PWA) that can be installed alongside native applications on a mobile device such as a phone or tablet.
Tutorial requirements
- Python version 3.6 or higher. If you do not have Python installed on your computer, you can download a free installer here.
- The Django backend web framework which we will install with Python’s pip package manager in the section below.
- An active LTS or maintenance LTS version of Node.js. (This tutorial was written using version 14.17.3.) If you do not have Node installed on your computer, you can download it here.
- The Angular frontend web framework which we will install with Node’s NPM package manager below.
- Chrome web browser and the free, open-source Lighthouse extension for auditing websites and PWAs.
- Ngrok and a free Ngrok account. See this recently published Twilio article on setting up Ngrok in 2022.
What makes an app a Progressive Web App?
The term 'Progressive Web Application' was originally coined by Google to describe web apps that meet a variety of requirements in order to function similarly to native mobile or desktop applications. MDN Web Docs provides a helpful list of these criteria to keep in mind when designing and building PWAs. PWAs should be discoverable by search engines, installable on a user's home screen, linkable via URL, and secured through the HTTPS protocol. They should be designed responsively for a variety of potential device sizes, progressively enhanced to function on both older and newer browser versions, and re-engageable through push messages and notifications used to interact with users even when they aren't logged into a web browser. The goal of this tutorial series is to give you the basic tools for creating your own PWAs with Django and Angular and to provide an improved user experience for your web applications' users.
Angular project setup
If this is your first Angular project, begin by installing the Angular CLI tool globally from NPM and then create a new Angular project for your PWA’s frontend web UI. From the outer djangular-trivia-pwa directory, alongside your Python virtual environment and djangular_trivia_api Django project, run the following commands:
$ npm install -g @angular/cli
$ ng new djangular-trivia-web
Answer ‘Yes’ to the prompt: ‘Would you like to add Angular routing?’, and select the stylesheet format of your choice. Now you can confirm that your Angular installation is working locally with the following commands:
$ cd djangular-trivia-web
$ ng serve --open
When the Angular dev server has started up, you should see the following message in your console: ‘Angular Live Development Server is listening on localhost:4200’. And if you navigate to that URL in your local browser, you will be greeted with the Angular start screen.
Build the Trivia Game UI with Angular
In the root folder of our Angular project at djangular-trivia-pwa/djangular-trivia-web, we can get started building out our UI by installing the Angular Material UI Component library. This toolkit will help us to rapidly develop a mobile-friendly interface for our web app, which is a requirement of a PWA.
Run the following command to install Angular Material locally in your project:
$ ng add @angular/materialAnswer the prompts to select a prebuilt theme and answer ‘Y’ to the prompts for adding global typography styles and browser animations. Once you have done this, the Angular Material NPM package will be downloaded to your project’s node_modules folder.
With Angular Material installed, we can add a toolbar to our site by importing the MatToolbarModule into our djangular-trivia-web/src/app/app.module.ts file and including the module in the imports annotation on the AppModule class decorator like so:
Then replace the auto-generated HTML code in djangular-trivia-web/src/app/app.component.html with this:
Fire up the Angular dev server with ng serve --open and you should be greeted with the following blank canvas for your app:

Our Angular application will be composed of a single Angular component containing an HTML template file for rendering our UI, a TypeScript file for defining our UI’s behavior, and a CSS file for adding custom styles. You can create those files and automatically add the component to the declarations annotation on your global AppModule class by running the following command:
Once you run that command, you should see a new folder at djangular-trivia-web/src/app/trivia/ containing your component files. You can then wire up your component to the Angular router at the root of your site by updating the Routes array in djangular-trivia-web/src/app/app-routing.module.ts:
Now if you refresh your browser at http://localhost:4200/ while running the Angular dev server, you should see the text ‘Trivia works!’ displayed via the <router-outlet></router-outlet> element in djangular-trivia-web/src/app/app.component.html.
With our trivia component all wired up and ready to go, we can now create an Angular service to facilitate communication with our web app’s backend API server. Angular services provide a way to separate our application’s component presentation logic from its data sources, resulting in a nicely composable and decoupled architecture and project structure. We can add a trivia service to our app by running the following command:
This command creates a new file at djangular-trivia-web/src/app/trivia.service.ts, alongside its associated test file trivia.service.spec.ts.
Before writing our service code to consume data from our backend API, we should create contracts for our custom data types by defining TypeScript interfaces for the objects that our API will serve. Create a new file at djangular-trivia-web/src/app/trivia.ts and add the following contents:
These interface definitions match the JSON schema of our backend API, and provide a layer of validation and type-checking which we can leverage in our service and component files where we will work with that data.
In order to communicate with our application’s backend API, we must first import the Angular HttpClientModule into our djangular-trivia-web/src/app/app.module.ts file and add the module to the imports annotation of the AppModule class in that file:
Then open your service file at djangular-trivia-web/src/app/trivia.service.ts and replace its contents with the following code:
Here we use Angular’s dependency injection pattern to inject the HttpClient into our TriviaService class. In the getTrivia() method, we then use the HTTP client to call our backend API and return an RxJS Observable of QuestionArray objects. Now head over to your djangular-trivia-web/src/app/trivia/trivia.component.ts file and edit the file to look like this:
Here we inject our TriviaService class in the constructor() method of the TriviaComponent and define a new getTrivia() method to subscribe to the Observable of trivia data returned by TriviaService.getTrivia(). Then we add a couple of logging statements to the next and error properties of the returned object so we can confirm that everything is working.
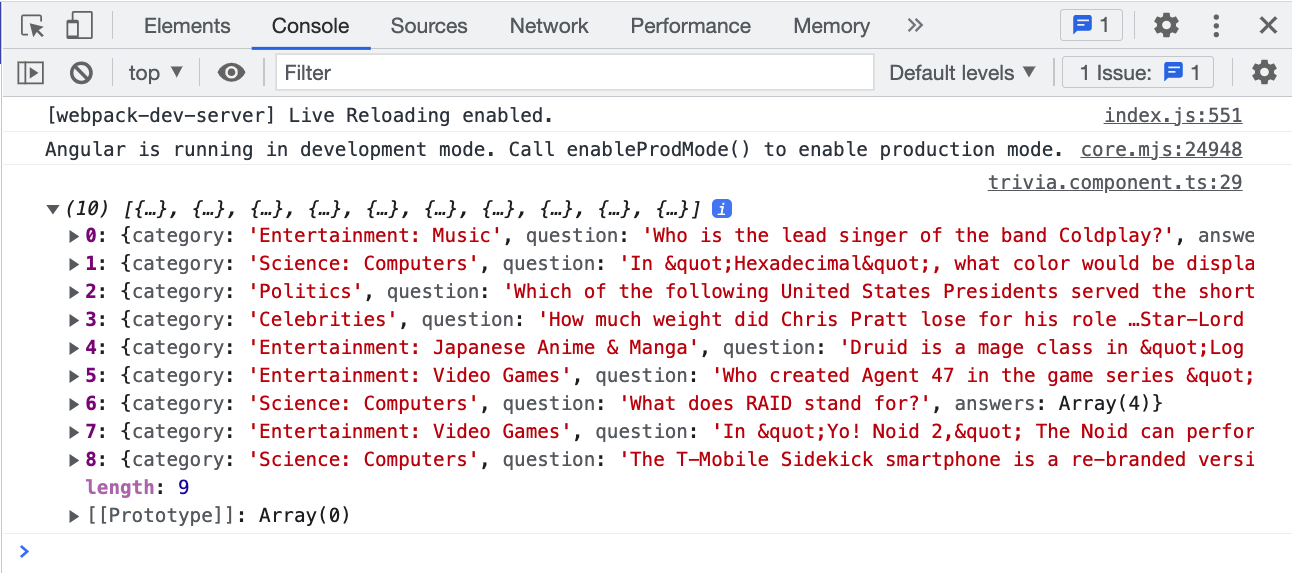
You can do that now by opening a Chrome web browser and navigating to http://localhost:4200/ with the Angular dev server running. Be sure that the dev server for the Django project that we built in part one of this series is also running on your local machine at http://127.0.0.1:8000. Right click anywhere on the screen of the open browser tab, and select ‘Inspect’ from the menu. This will open the Chrome Developer Tools panel alongside your active browser tab. Refresh the page and select the Console tab at the top of the Developer Tools panel. Expand the log line from the trivia.component.ts file that reads Array(10), and you should see the data returned from your backend API:
With our frontend application successfully consuming data from our backend API, it’s time to start building our actual user interface. Let’s begin by displaying a single trivia question on the screen.
In djangular-trivia-web/src/app/trivia/trivia.component.ts add two new attributes to the top lines of your TriviaComponent class, one for triviaData and one for question:
Then remove the console.log(data) statement from your component’s getTrivia() method and update it with the following code:
Define this new getNextQuestion() method on your component class:
Here we create a triviaData attribute to hold all of the questions for our quiz after they are received from our triviaService dependency in the getTrivia() method. We define a question attribute which we will use shortly to display the current question via our HTML template. And we implement a getNextQuestion() method that selects and removes a random question from the triviaData array and sets it as the current value of the question attribute.
Now open djangular-trivia-web/src/app/trivia/trivia.component.html and replace the contents with this code:
In our template code, we use the Angular ngIf directive on an ng-container element to conditionally display our first trivia question once the component’s question attribute contains a value. The [innerHTML] property binding provides a safe way to decode the HTML entities included in the API response and display our questions as plain text. And we provide a fallback message in the ng-template element that will display if there are no more questions to answer. Finally, add a little padding to your component in djangular-trivia-web/src/app/trivia/trivia.component.css:
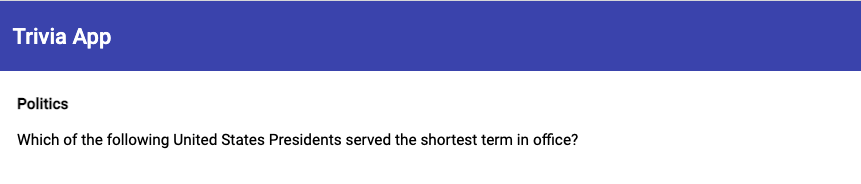
Refresh your local browser that is running the app and you should see a random trivia question displayed on the screen:
Great! Now let’s move on to displaying our multiple choice answers. Angular Material provides a radio button component that will work nicely for presenting our multiple choice and true or false answer options.
Head back over to the djangular-trivia-web/src/app/app.module.ts file and add the following import statements to the top of the file. Then add the modules to the imports annotation on the AppModule class below as you did with your other globally imported modules:
In your djangular-trivia-web/src/app/trivia/trivia.component.ts add an answer attribute to your TriviaComponent class along with an import of your Answer interface from djangular-trivia-web/src/app/trivia.ts:
Then define a new getCorrectAnswer() method on the component class that looks like this:
Update your djangular-trivia-web/src/app/trivia/trivia.component.html template code to use MatRadioModule along with the Angular FormsModule’s ngModel directive:
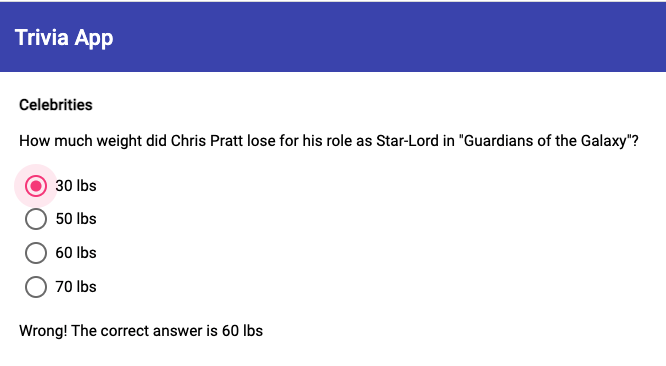
We’ve now moved our trivia question to an HTML label tag for our radio button form. We’ve added a mat-radio-group component and used Angular’s ngModel directive to bind the value of our answer component attribute to the currently selected answer in the form. Then we’ve used the ngIf directive to display a success message if the currently selected answer is correct, or to display that correct answer if the user chooses the wrong answer.
Now we can add the following CSS rules to djangular-trivia-web/src/app/trivia/trivia.component.css to stack the radio buttons in a vertical column and add some spacing to our layout:
Return to your browser window, and the UI for your trivia game should look something like this:
Not bad! Next let’s add a button for the user to submit their answer and move to the next question. First include the MatButtonModule in djangular-trivia-web/src/app/app.module.ts:
Then add a button element to the bottom of your ng-container element in djangular-trivia-web/src/app/trivia/trivia.component.html:
We want the button to be disabled until the user selects an answer, and then to load the next question via our component’s getNextQuestion() method when clicked. We should also disable the radio buttons after the user selects their answer choice. You can add two new attributes to the TriviaComponent class in djangular-trivia-web/src/app/trivia/trivia.component.ts to track these disabled states:
And you can define the following method on your component to update the disabled states' values when an answer is selected, importing the MatRadioChange event object at the top of the file:
You can then call the answerSelected() method in your template by adding a (change) event listener to your mat-radio-button element, as well as a property binding on the disabled attribute of your mat-radio-group element so that it looks like this:
Finally, you will want to reset the state of your component inside your getNextQuestion() method when the Next Question button is clicked:
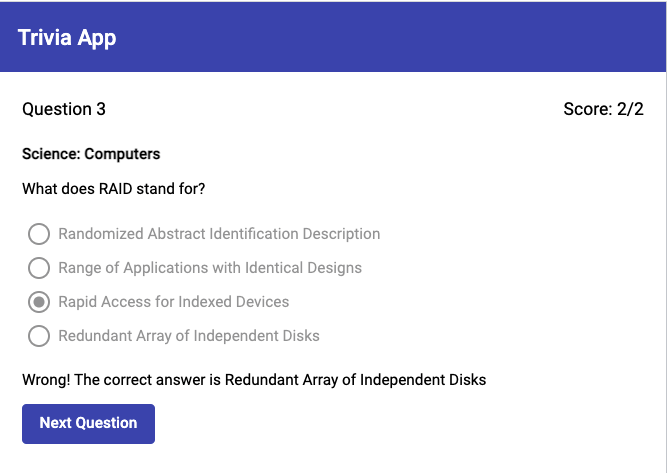
Now when a question loads on the screen, the Next Question button will appear disabled until an answer is selected:
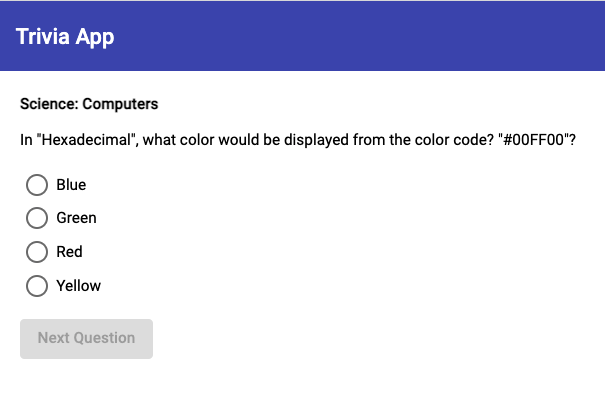
Select an answer, and the button is enabled but the radio select options are locked:

As a finishing touch for our trivia game’s UI, let’s add a header to our HTML template to display the number of questions answered as well as our game score. Add the following code to djangular-trivia-web/src/app/trivia/trivia.component.html just above your ng-container element:
Then add two new attributes to the TriviaComponent class in djangular-trivia-web/src/app/trivia/trivia.component.ts and initialize them to zero:
Update your getNextQuestion() method to increment these values according to the user’s response, so that the final version of the method looks like this:
Then add the following CSS rule to djangular-trivia-web/src/app/trivia/trivia.component.css to align the question number and score elements of our header on the left and right side of the screen:
Now when your users play your trivia game they can keep track of their score and what number question that they are answering in the quiz:

Nice work! We’ll call that good for our trivia game’s UI at this point, and move on to converting our application to a PWA.
Convert your app to a Progressive Web Application
Angular provides a command line utility for converting your project to a Progressive Web Application, allowing for offline caching of HTML files and static assets as well as the ability to install your application on the homescreen of a mobile device for easy access via a touch icon.
Let’s take it for a spin by running the following command:
Now if you open djangular-trivia-web/src/app/app.module.ts you will see a new entry in the imports annotation on the AppModule class that looks like this:
One of the key components of a PWA is the ability to utilize service workers, which are JavaScript scripts that provide a proxy between the browser, your web application, and the network. Service workers have the ability to intercept your application’s HTTP requests and return locally cached files and assets when available, allowing a PWA to function offline, and the scripts can be customized in whatever way is needed to provide the most robust and user-friendly caching mechanism for your application.
The ng add @angular/pwa command you just ran installs the @angular/service-worker package which comes with a default caching strategy already in place. This strategy can be modified by editing the ngsw-config.json config file that is also added to your project when you run the command. If you take a look in that file at djangular-trivia-web/ngsw-config.json, you will see settings under the assetGroups property defining which files and file types should be cached locally, including our project’s static CSS and JavaScript files, image files, index.html file, and a file called manifest.webmanifest. Other files and file patterns may be added here according to your project’s needs.
The manifest.webmanifest file referenced in the service worker configuration is another key component in converting your application to a PWA. This file was also created by the ng add @angular/pwa command, and loaded into your application via the <link rel="manifest" href="manifest.webmanifest"> element in the <head> of your djangular-trivia-web/src/index.html file. This Web App Manifest is written in a JSON-like format and contains all of the necessary data for downloading your app to a user’s device so that it may be accessed in the same way as a native application, including links to images that will serve as touch icons for your PWA on mobile devices. The @angular/pwa utility also provided you with some starter icons in your project’s djangular-trivia-web/src/assets/ folder. However, in order for your PWA touch icons to work on Apple devices, it is necessary for you to add the following line to the <head> of your index.html file:
Because Angular’s PWA features don’t work in dev mode via ng serve, if you want to test these features locally, you’ll need to build your project and serve it with the http-server package from NPM. You can install http-server globally and run your PWA by entering the following commands:
You will also need to add "http://127.0.0.1:8080" to the CORS_ALLOWED_ORIGINS setting in the djangular_trivia_api/djangular_trivia_api/settings.py file of your Django project, as this is the default port that http-server uses to serve from localhost.
Now it’s the moment of truth where we will find out if our application is indeed a fully functioning PWA. With your Chrome web browser pointed to http://127.0.0.1:8080, open the Developer Tools console and select the Lighthouse tab (see the Tutorial requirements section for a link to install the Lighthouse Chrome browser extension). Under ‘Categories’ check only ‘Progressive Web Application’ and for ‘Device’ select ‘Mobile’. Then, click the Generate report button. You will see a message indicating that Lighthouse is auditing your application for PWA compatibility followed by this screen once the audit is complete:

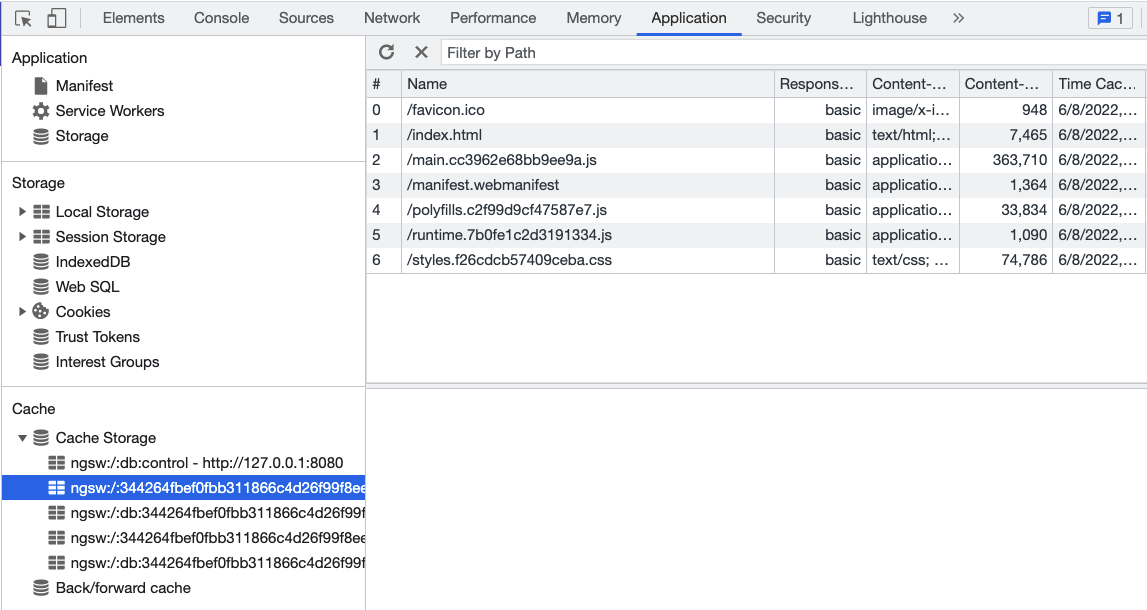
Ok! It looks like we have successfully converted our application to a PWA. For a bit more confirmation, head over to the Application tab of the Developer Tools console. Here you will see a menu that includes Manifest and Service Workers near the top of the screen. Click into those tabs to view the data that the browser has stored from our manifest.webmanifest and ngsw-worker.js files. You can also click on the Cache => Cache Storage menu item to view the files from the service worker config file that have been successfully cached by the browser.
You can take your testing one step further by heading over the Network tab and selecting ‘Offline’ mode from the dropdown that reads ‘No Throttling’. Now if you refresh your browser window, instead of Chrome’s standard ‘There is no internet connection’ message, you should see the trivia app load with the fallback message that shows when no remaining trivia questions are available. Switch back to ‘No Throttling’ and your app will load successfully upon refreshing your browser.
One of the coolest things about PWA’s is the ability to add custom touch icons to a mobile device’s home screen for the same kind of quick and easy access available to native applications. To try out this functionality, you can use Ngrok to serve your local Angular build at a public HTTPS-protected URL. With ngrok installed on your system, and your local http-server running the PWA build on port 8080, run ngrok http 8080 and you should see some output like this in your terminal:
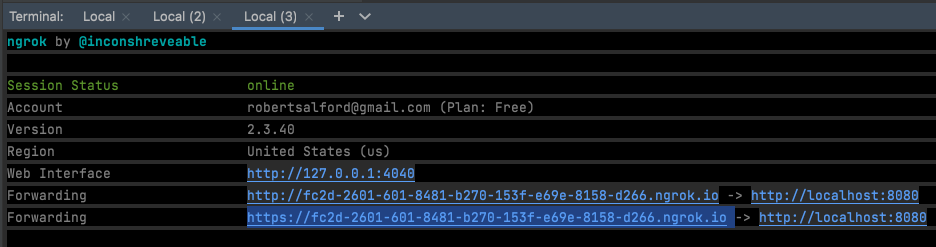
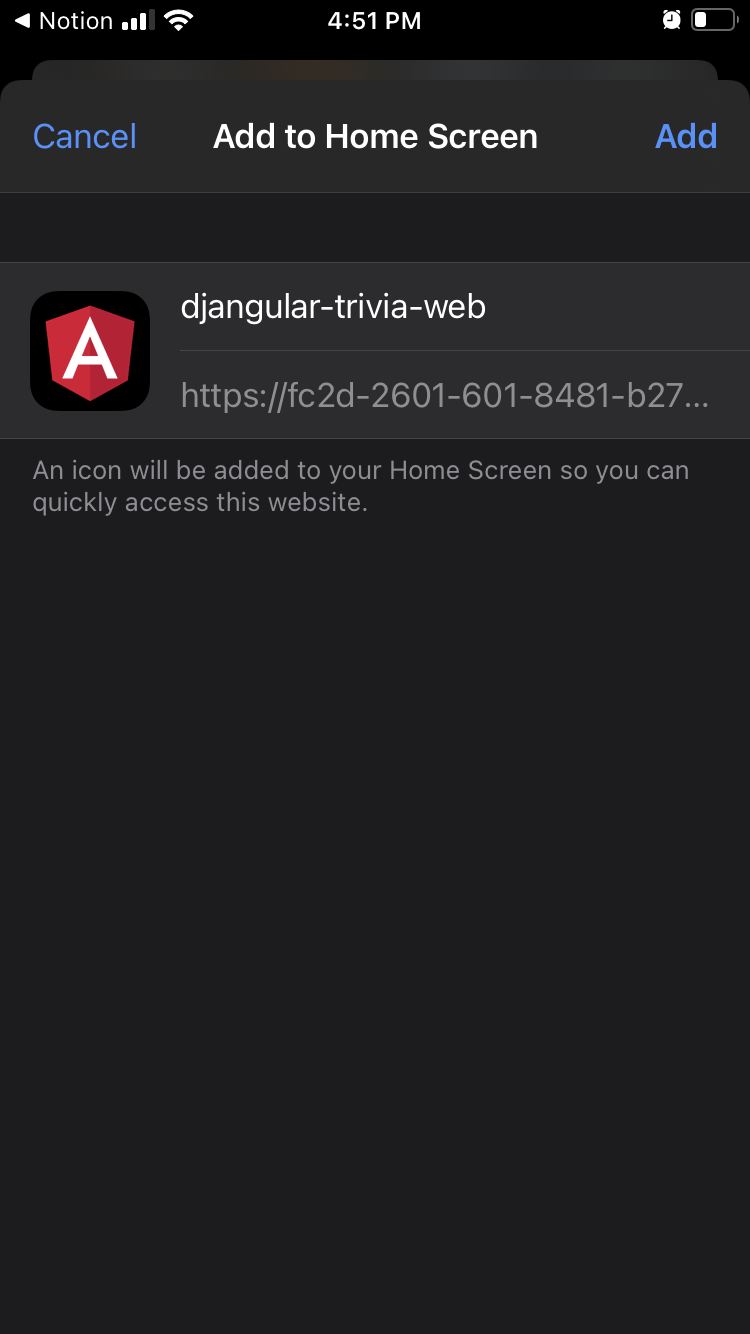
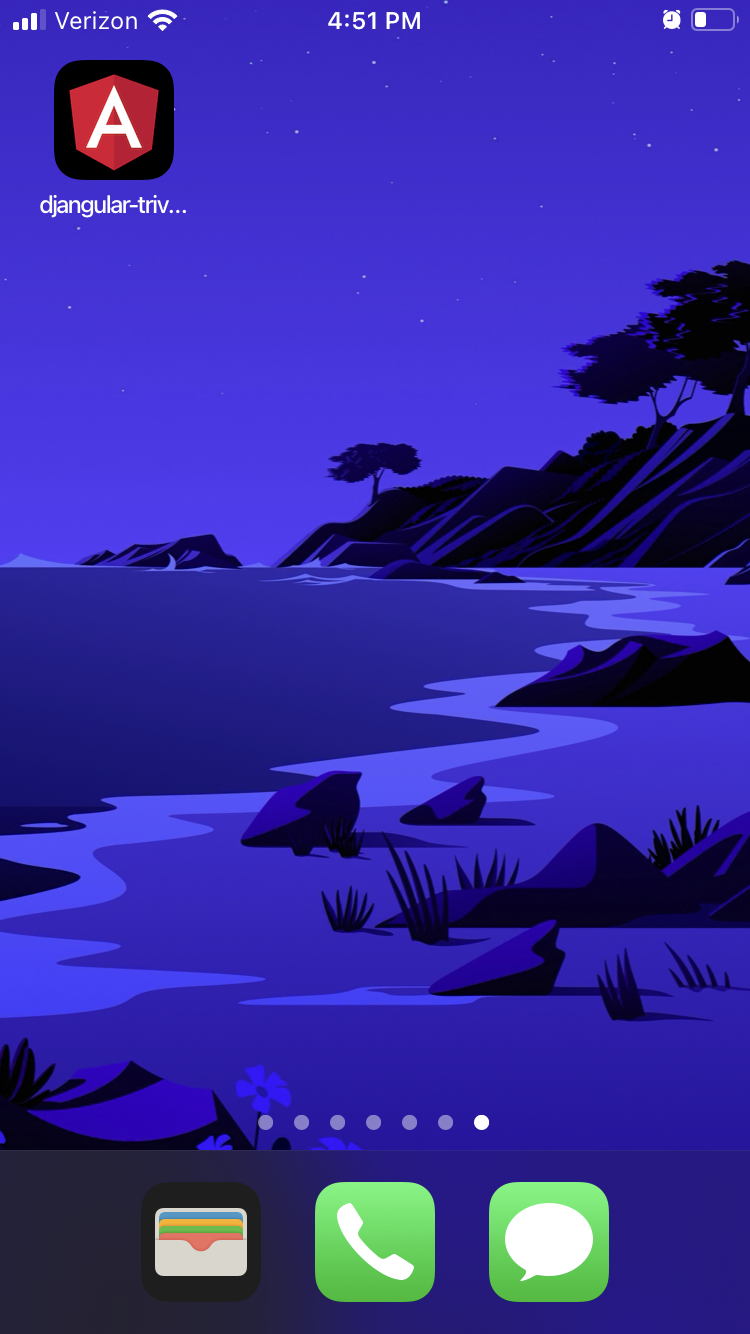
Copy the HTTPS address under the bottom Forwarding entry and add it temporarily to the CORS_ALLOWED_ORIGINS settings in djangular_trivia_api/djangular_trivia_api/settings.py. Now if you visit this web address in your mobile phone’s browser, you can add your application to the device’s home screen.
On my iPhone, this option is available via the ‘Share’ menu of the Safari browser, and as you can see from these screenshots, the data and icons from our manifest.webmanifest file are used by the device to provide our PWA with a seamless appearance alongside the other touch icons from native applications.
Conclusion
In this tutorial series, you’ve learned the basic steps for creating Progressive Web Applications with Django and Angular, and built a fun little trivia app while you were at it. But we’ve only scratched the surface of what you can achieve with PWA technologies. Check out Mozilla’s extensive documentation covering all of the many features available to PWAs, including the Push and Notifications Web APIs. These can be combined with the Twilio Notify API to add re-engageability to your PWA through device-targeted push messages even when your users are not logged into your app. As these technologies advance, the opportunities for web developers to create native-like experiences for their users will continue to grow — a true win-win for web application users and developers alike.
Robert Alford is a software developer, writer, and educator based in Seattle. You can find him on GitHub and LinkedIn.

Related Resources
Twilio Docs
From APIs to SDKs to sample apps
API reference documentation, SDKs, helper libraries, quickstarts, and tutorials for your language and platform.
Resource Center
The latest ebooks, industry reports, and webinars
Learn from customer engagement experts to improve your own communication.
Ahoy
Twilio's developer community hub
Best practices, code samples, and inspiration to build communications and digital engagement experiences.