Design an Intelligent Mobile App Distribution Experience with ASP.NET and Twilio
Time to read:
March 18, 2014
Written by
This post is part of Twilio’s archive and may contain outdated information. We’re always building something new, so be sure to check out our latest posts for the most up-to-date insights.

You spent hours building a beautiful mobile app for your customers. You made the herculean effort to take the app across multiple mobile platforms. “Build it and they will come” they said. But now your app is getting lost amongst the ever growing sea of mobile apps.
If you’ve reached this point it’s time to build a marketing plan for your app and Mobile App Distribution (MAD) can be an important part of that plan. A MAD application makes onboarding new app users as easy as surfing to your website, letting you to deliver your app directly to a potential user instead of depending on a notoriously bad app store search engine.
In a few lines of code you can provide your users a way to enter their phone number on your website and have an SMS delivered to their phone with a link to download your app. All your user has to do is tap the link, install, and they’re off to the races.
In this post I’ll show you how you can use ASP.NET MVC and Twilio to build a simple Mobile App Distribution application. I’ll walk you through building a form that allows a user to enter their phone number to receive a text message with your app’s download link and how you can intelligently direct the user to the appropriate app store without them having to ever tell you about their device.
“Houston, the user has landed”
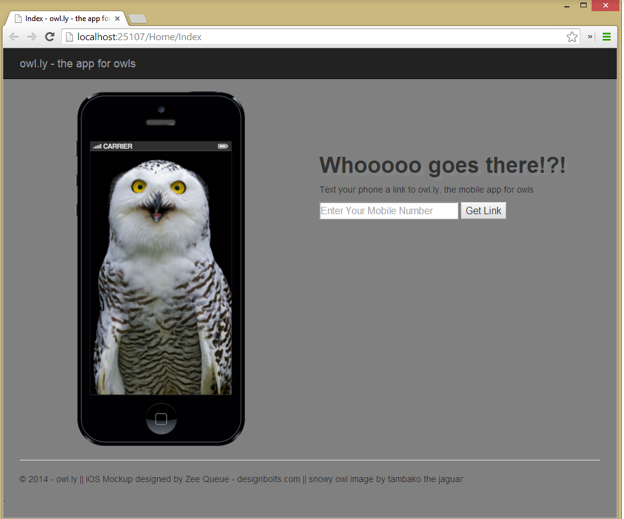
The first step in building my MAD application is to create a landing page which will let a potential app user enter their phone number so that I can send them the text message containing a download link.
Building this page is straight-forward and uses the same development techniques you would use building any ASP.NET MVC application. I started in Visual Studio 2013 by creating a Web Application project and then adding a single controller and corresponding view. In the view, I used the Ajax helper to create a simple HTML form that asks users to enter their phone number:
Text your phone a link to the mobile app
@Html.TextBox(“phone”, “”, new { placeholder=”Enter Your Mobile Number”, style=”width:250px;font-size:18px” })
}
For the purposes of clarity in the post, I’ve made the code above very simple. In your application however you will likely want to add some client side validation to make sure the user enters a value that looks like a phone number. You would also likely want to give your user some feedback after they press the submit button. For an expanded version of the phone number input form that includes these two features, check out the source in Github. When the user presses the submit button, the form will perform an asynchronous callback to an Action Method in my controller named Send whose job, as implied by its name, is to use Twilio to send a text message containing the download link to the phone number provided by the user.
The link included in the text message points to another Action Method in my controller named InstallRedirection which I’ll show a bit later in the post.
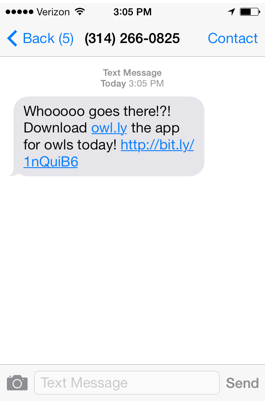
Note that the URL in the text message is a direct link to my web application. I’ve done that in order to demonstrate in this post that when the user taps the link on their device, an HTTP request is sent back to my application from the device. In a production application I would consider replacing the direct URL with a shortened version created by a service like bit.ly. Shortening the URL frees up precious characters in the text message that I can use for a better call to action message, and also gives me a layer of indirection in case I later need to change my applications URL. Thats all there is to creating a basic MAD landing page. Next I’ll show you how to intelligently route a user to the correct app store once they tap the download link.
To the App Store!
Once I’ve sent the user a text message containing the download link, the next job of my MAD application is to get the user to the correct app store once they tap the link. But which app store do I send them to? I never asked them what type of device they were using, so should I point them at the Apple App Store, or the Google Play Store, or the Windows Phone Store? Well, the good thing is that I don’t ever have to directly ask the user. The HTTP request the device makes when the user taps the download link in the text message includes a User Agent string which describes their mobile device. By parsing that string I can determine what device they user is making the request from and direct them to the correct store, and as it turns out there are lot of nice .NET user agent parsing libraries that make this really. In my application I’ve chosen to use a library named UAParser, which is an open source and available on NuGet with an API that I found simple and intuitive. Once I get the device type using the UAParser library, I use the Redirect method to return a HTTP 302 Found response from my action method, specifying the proper app store URL the device should redirect to.
You can see that in this case I am redirecting to either the Apple Store, the Google Play Store or the Windows Phone store depending on the device the user is using. And with that I’ve built a basic Mobile App Distribution application that should make it much easier for potential users to download and install my mobile application. Now I need to test me application, but how? One option is to get a bunch of physical devices, but that could get quite expensive. Or maybe I can borrow devices them from my friends, but thats kind of a hassle as well. The best option might be to simulate a devices request with my own browser, but doing that from my computer isn’t going to send the correct user agent. To solve that I’ve installed a Chrome extension which lets me change the user agent chrome sends with web page requests. I’ve found the User Agent Switcher or the User Agent Switcher extensions (yes, they have the same name, but they are different) give me the most comprehensive list of user agent string options.
Optimized for Mobile Devices
At this point I have a functional Mobile App Distribution application that makes it substantially easier for a user to go from browsing my website to having my mobile app loaded onto their device, but there remains an interesting problem with my current app. Its currently optimized for a scenario where a user browses to my website from their computer. If they happen to browse to my website from their mobile device, having them send a text message to themselves doesn’t make much sense. So as a final tweek to my MAD application, I want to create a separate experience optimized for those users who browse to my site from their mobile device, and ASP.NET MVC makes this very easy by leveraging, you guessed it, the devices User Agent string. ASP.NET MVC 4 introduced a feature which allows you to create and return browser specific views from your application, and thats what I am going to use to create my mobile optimized experience for iOS and Android users. The ASP.NET website has a fantastic walk-through on how to mobile enable your website using a varity of framework features. If you just want to learn about creating browser specific views, scroll down to the section titled “Browser-Specific Views”. As described in that section, I’m going to add some code to my application global.asax that tell it that I have separate views for iPhone and Android devices.
Now I create those Views by adding two files, Index.iPhone.cshtml and Index.Android.cshtml, to my project. In those Views I’m going to remove the HTML form I created earlier and replace it with the device specific store badge, linked to my application in that store: For example, in the iPhone specific view, I’ve replace the content with this:
Now if I browse to my website on an iPhone or Android (or use the User Agent chrome extension to simulate it on my desktop), I’ll see that ASP.NET MVC has correctly detected I am using a mobile device and returned correct device specific view.

In this case I loaded my site using Safari on my iPhone and you can see that the iPhone optimized view includes a direct link to the App Store.
Wrapping It Up
Including Mobile App Distribution in your mobile app marketing plan is an important way you can make it easier for users to install your app. As I’ve shown in this post, building a basic MAD application using Twilio, some features of ASP.NET MVC and a helper external library is straight-forward and simple. You can to get started today by grabbing the source shown in this post from GitHub


Related Resources
Twilio Docs
From APIs to SDKs to sample apps
API reference documentation, SDKs, helper libraries, quickstarts, and tutorials for your language and platform.
Resource Center
The latest ebooks, industry reports, and webinars
Learn from customer engagement experts to improve your own communication.
Ahoy
Twilio's developer community hub
Best practices, code samples, and inspiration to build communications and digital engagement experiences.