Build Scalable Interactive Voice Response with Twilio, AWS and Python
Time to read:
June 09, 2020
Written by
Reviewed by

Today, we're happy to host Meryll Dindin of CalAster, who prototyped an IVR to deal with emergency call centers saturation during rapidly changing situations. You can read more about the team's journey here, and you can find the Github repository backing this tutorial here. CalAster’s core technology helps emergency call takers efficiently avoid saturation through the classification and routing of incoming 911 emergency calls.
During crisis situations such as the current COVID-19 pandemic, call centers are overwhelmed and lack the human resources to deal with the sudden uptick in calls. However, new technology is available to build scalable filters that help avoid saturation.
Among other possibilities, there are IVR (Interactive Voice Response) systems that react to both voice or typed digits. In the case of COVID-19, life-threatening calls could be diverted to medical services, COVID questions redirected to green numbers setup by the government, and symptom checks partially automated and sent to medical students.
In this tutorial, we will build an autonomous IVR using Twilio Programmable Voice, AWS services, and the Python Flask framework.
Prepare your environment for a cloud-based Interactive Voice Response System
This tutorial is based on two major service providers: Twilio, and Amazon’s AWS. We rely on Twilio to process inbound calls through a phone number we purchased, while AWS is used to both provide voice samples and the background decision-making.
Good news for us – both services come with many free features, that I highly encourage you to get familiar with! If you haven’t yet, set up free accounts with both providers:
Purchase and configure a phone number
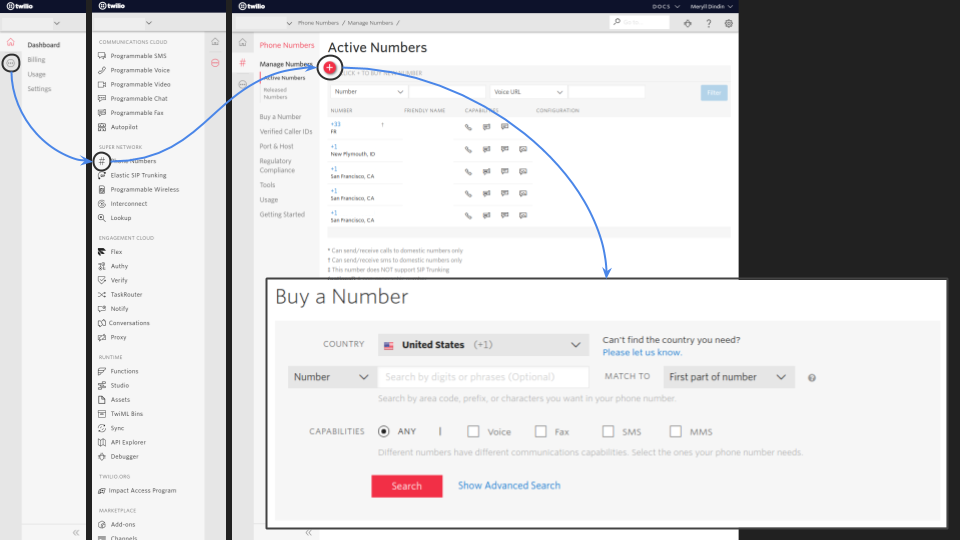
Once our accounts are set up, the first step on our quest to build this IVR is to purchase a phone number. Twilio makes it pretty straightforward to get one, independently from the country you live in.
Some countries have different regulations though, and purchasing a number in France requires more paperwork than purchasing a phone number in the United States. Nonetheless, go through the process and you will be equipped with a brand new phone number in the matter of a few clicks.
Set up a public AWS S3 bucket
We have one step left until we’re ready. The last requirement is to build an S3 bucket on AWS with public access enabled.
To do so, we simply need to log into the AWS console, look for the S3 service (or skip to the console here), and click on ‘create bucket’. Once redirected to the creation wizard, we can give it a fancy name, define its region of availability (it will be available anywhere, this is more of a latency optimization problem), and its public/private settings. Set it up with whatever name you like, and uncheck the “Block all public access” checkbox.
We are now all set with the prerequisites, let’s dive into the fun parts!
Interface your telecommunications with TwiML Bins
An IVR assumes some interactivity. Interactivity, in addition, assumes user input and a corresponding output. There are multiple ways of doing that, but in this post we’ll lean towards the simple and powerful – TwiML Bins.
Practically, a TwiML Bin consists of XML depicting if-else decision trees in a language called TwiML. You can ‘Say’ a batch of words, ‘Gather’ user inputs (either voice or DTMF), or even ‘Play’ audio files – among many other possibilities. In our IVR, we will set up a TwiML Bin that will take advantage of that functionality.
Set up your TwiML Bin
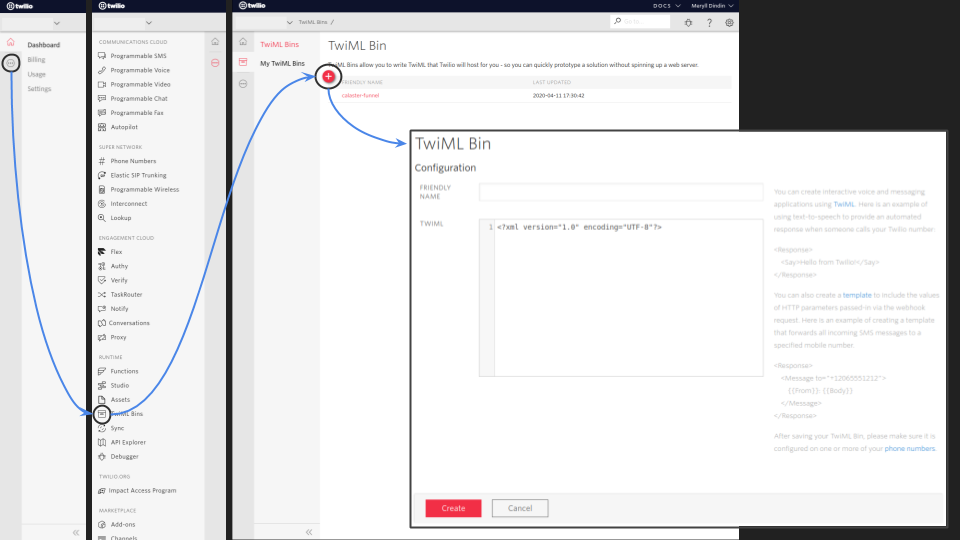
Once in your Twilio console, follow the clicks laid out above to create your first TwiML Bin. (You can also start from the TwiML Bin console and click the button.)
Before filling in the TwiML Bin configuration, we need to think through our scenario. Our use-case template is provided below, and depicts the following:
- Play a hosted introduction audio file to explain to our user what this IVR is all about thanks to the
<Play>TwiML verb. - Play a ‘beep’ sound to announce we will be gathering our user input through Twilio’s
<Gather>function. This function has a few parameters: the input will bespeechfor human voice (it could bedtmfas it is also supported by Twilio), expected to be in French (fr-FR) with a timeout of3seconds. - After the timeout, if voice was captured, Twilio will send the transcripted response to a specific
callbackURL through a POST request. Otherwise, if the<Gather>response was empty, it will play another audio file to handle the error case and retry the process. - If this second attempt also ends up with an empty input, then the IVR plays a final audio message before hanging up.
If you’ve got a sharp eye, you’ll see that we missed the definition of two objects of relative importance: the hosted audio files and the callback URL. The first part is solved through the S3 bucket we initially created, while the second will require a bit more explanation.
Go ahead and save the TwiML Bin now even though it will warn you about ‘Invalid TwiML’. We’ll return to it in a minute.
Make your audio recordings accessible anywhere
Before even thinking about our recordings, we have to properly draft the decision tree that will define our IVR. That is the key to an organized response – drawing the multiple routes will lead us to a prototype faster.
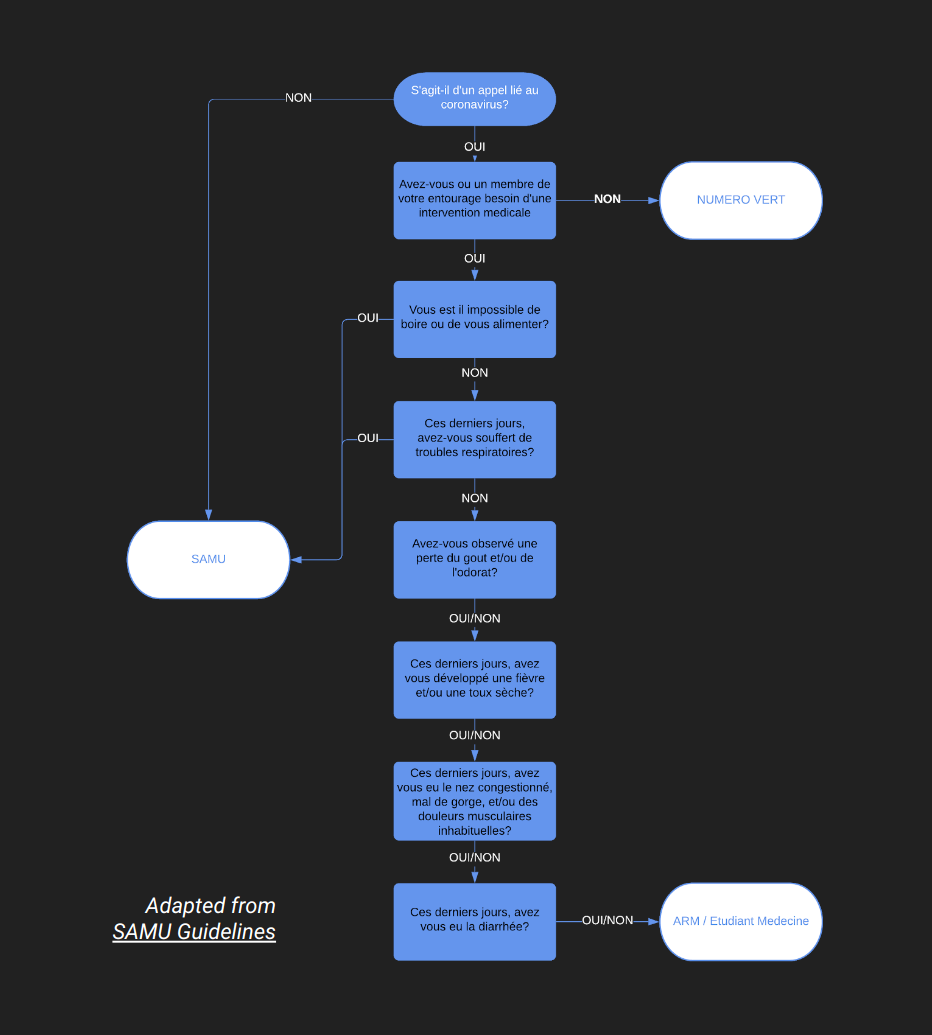
In Calaster’s case for our demo IVR, we adapted the guidelines provided by the SAMU (medical emergency responders) in France for the COVID-19 pandemic, as they were suffering from saturated lines.
Their protocol relies on this storyline:
- if your emergency is not about the coronavirus, then we will keep you queued
- if you have simple questions about the virus then we will redirect you to a green number set up by the government
- if you are worried about several symptoms, we will run a quick six questions symptom check whose answers will either redirect you to the emergency service (due to their gravity) or divert you to a medical student on a specific line who will assess the gravity of your situation with a medical judgment.
This simple decision tree provided us with a list of questions and a list of actions. We could then begin recording the corresponding audio files – which is great, since a human voice is generally better perceived than a generated one.
Once your recordings are done, you need to upload them to your S3 bucket. Now, those files are available everywhere in the world – given that the right URL is provided to access them!
In our case, the URL had the following standardized format:
https://calaster-funnel.s3.eu-west-3.amazonaws.com/{audio-file}
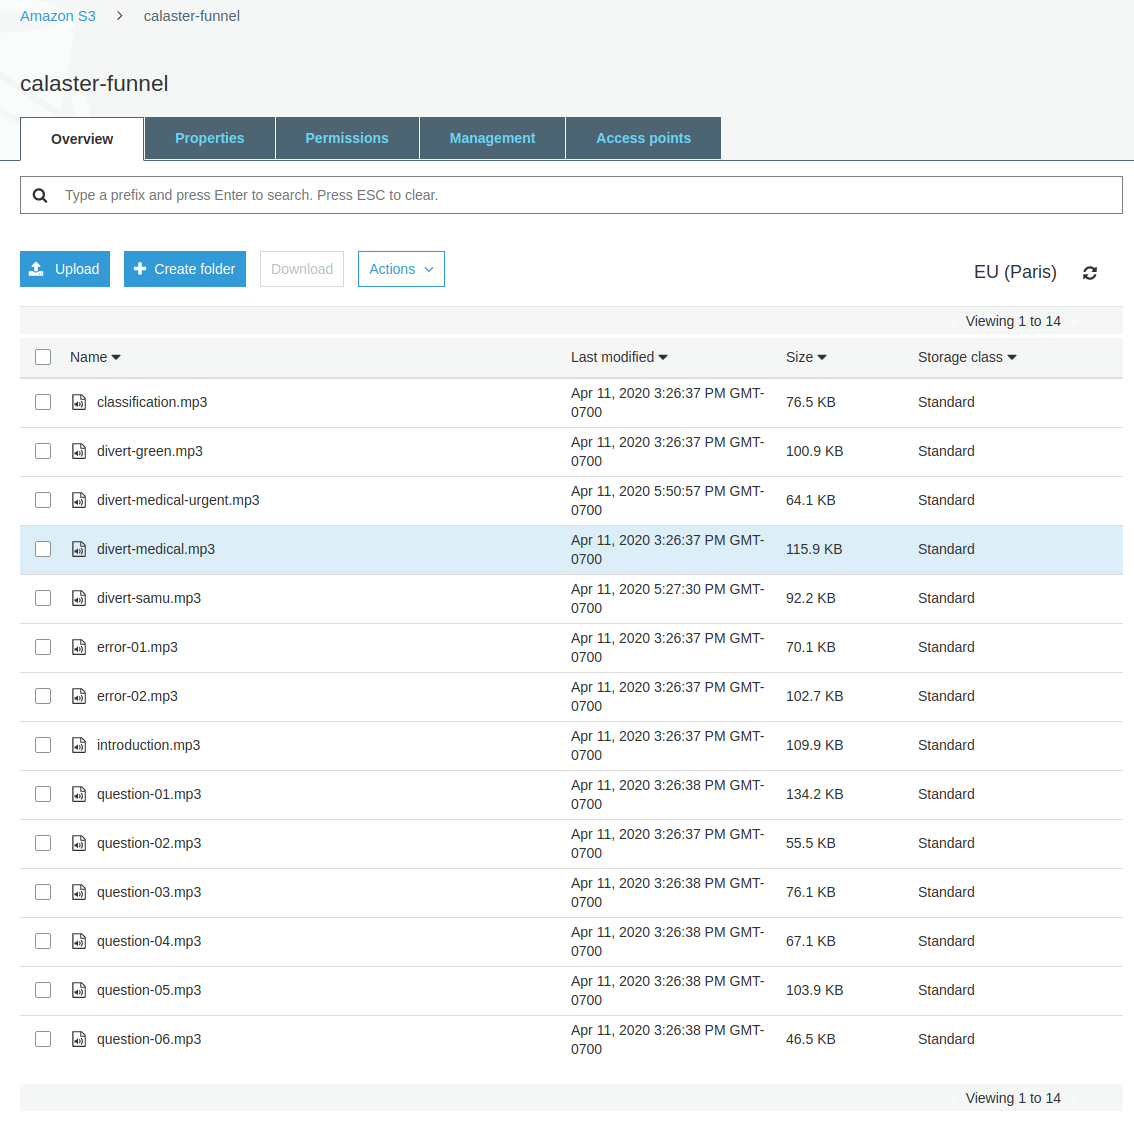
Yours will be a bit different, but note the recording path since we’ll be adding it to the TwiML Bin in a few minutes.
Build a Python Flask application for interactivity
This section will be a bit more technical, and require basic knowledge of Python, Flask, and AWS. As we previously defined our questions and our actions, we have to add the logic that will give life to interactivity.
At the macro level, we are looking for a responsive endpoint that tells our TwiML Bin what to do depending on the input provided by our user. Meanwhile, let’s keep in mind that this response, as specified by Twilio, has to respect the initial TwiML Bin XML formatting.
Initialize your Flask app
If you haven’t yet, install Flask, then initialize a Flask application in an application.py file. Make sure that cross-origin is handled to efficiently communicate with Twilio and AWS services – in this app, that means you should also install Flask CORS.
Finally, install the lxml module. We’ll use its functionalities to build XML responses.
Now you’re ready. Insert the following code in your application.py file:
Template your XML response
Next, build an action template template.xml that gathers the shared XML framework that we will be sending to Twilio as a callback.
This template serves two purposes: walking deeper in our decision tree through the first <Gather>, while handling empty inputs with the second and third <Gather>. In the end, respecting our initial TwiML Bin’s template will ensure the continuity of our application.
Build the Flask app routes
Our Flask application is now working as a web server, but we still have to build the routes constituting our service.
The initial route (POST enabled) will handle the Twilio POST request on our defined callback URL, taking as input the embedded transcription results provided by Twilio. Given our previously presented decision tree, this introduction route is being used to decipher between COVID and non-COVID emergencies. In the latter case, it keeps the user queued to the initial emergency service, while in the former it starts screening for a need for medical assistance.
All those routes will be added in the previously defined application.py file, and added to your app server. Due to Twilio’s expected formatting, the responses provided by those routes have to respect the format of TwiML Bins – that is to say, XML configuration files.
An example of such a route is provided hereunder – merely paste it under the content you have in application.py to add it to your app. (More examples are provided in our Github repository.)
Pretty convenient isn’t it?
Time to launch our app
Finally, it is time to launch our application locally, and see whether everything is running smoothly. The Flask application and the routes being described in application.py, we need to create the worker process, saved as worker.py:
Next, if you haven’t yet, set an environment variable FLASK_SECRET_KEY. For example :
And you should see some cryptic XML output – our instructions to Twilio about how to handle the condition. Well done!
Take our Flask app to production
Having an application that runs locally is great, but having it hosted in the cloud is a whole different story. My usual go-to is AWS Elastic Beanstalk, which makes it super convenient to run python applications in the cloud. (You can read more about creating Elastic Beanstalk applications directly through AWS or another article of mine.)
Having a preference for the command-line interaction myself, let’s walk through classic EB creation together. Ensure you have added your current files to git already, and made at least one commit.
If it is your first time working with the AWS CLI, you will need to configure it first. The default configuration will run your application on a t2.micro instance, whose specifications are 1vCPU and 1Gb of RAM.
You may ask for even greater control and robustness – in that case, I would recommend using Docker and gunicorn. The general build is presented on the project repo, but the Dockerfile given here depicts the steps to follow.
This setup will pull a Python3.7 image, install gunicorn and the packages required by our project (all from a requirements.txt file), and run 2 concurrent threads of the same application called in worker.py (that number of threads is highly dependent on the specs of the instance you decide to spawn on AWS).
First, create the requirements.txt file through the PyPi module ‘pipreqs’:
Now you can create the docker file:
Connect the dots and wire the app
Now that we have hosted our application on Elastic Beanstalk, our Flask endpoint will have an AWS URL of the form http://{application}.{vpc}.{region}.elasticbeanstalk.com
It is official – we now have set up an access door to our audio files as well as our decision making algorithm!
Our interactivity is just missing one thing: the ability to properly inform Twilio how to handle things. Go back to the TwiML Bin console and edit your Bin, and update the placeholders. Add your S3 bucket’s endpoint (with the mp3s you recorded), as well as our callback application's first URL.
This will give you something similar to this code:
Final content of our TwiML Bin attached to our phone number.
Configure our Twilio phone number with our TwiML Bin
This next step is done on Twilio: update the configuration of our recently acquired phone number. By following the steps presented below (or, alternatively, starting from the Phone Numbers console), we redirect the voice calls towards the TwiML Bin that we configured above.
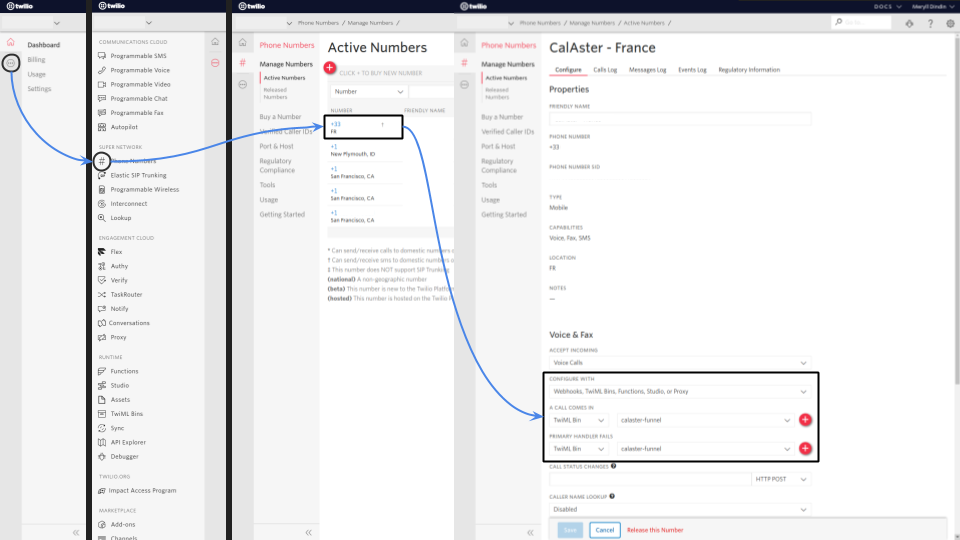
The key is setting the Voice & Fax section to accept Phone Calls and to configure it with Webhooks, TwiML Bins, Functions, Studio, or Proxy. Then under A Call Comes In, select TwiML Bin and drag the right menu down to the Bin you created. (Our TwiML Bin was given the name calaster-funnel in this case.)
Now, by calling this phone number, you’ll be able to hear our sweet pre-recorded voice tree as hosted in our publicly accessible S3 Bucket! You did it – you are all done with the IVR!
Tricks & Tips: Securing and naming your AWS elastic beanstalk application
As you’ve seen, this application is hosted on a specific domain name (in my case, dev-calaster.com) and uses SSL (transcription in transit).
To get those fancy upgrades, you’ll need to do two things: purchase a new domain name and configure the elastic beanstalk instance. AWS did a great job describing the first suggestion in this tutorial. Regarding the latter, here are the required files to configure your instance (FYI: You will have to rename .os-ebextensions and .os-elasticbeanstalk given in the Github repository into .ebextensions and .elasticbeanstalk, respectively):
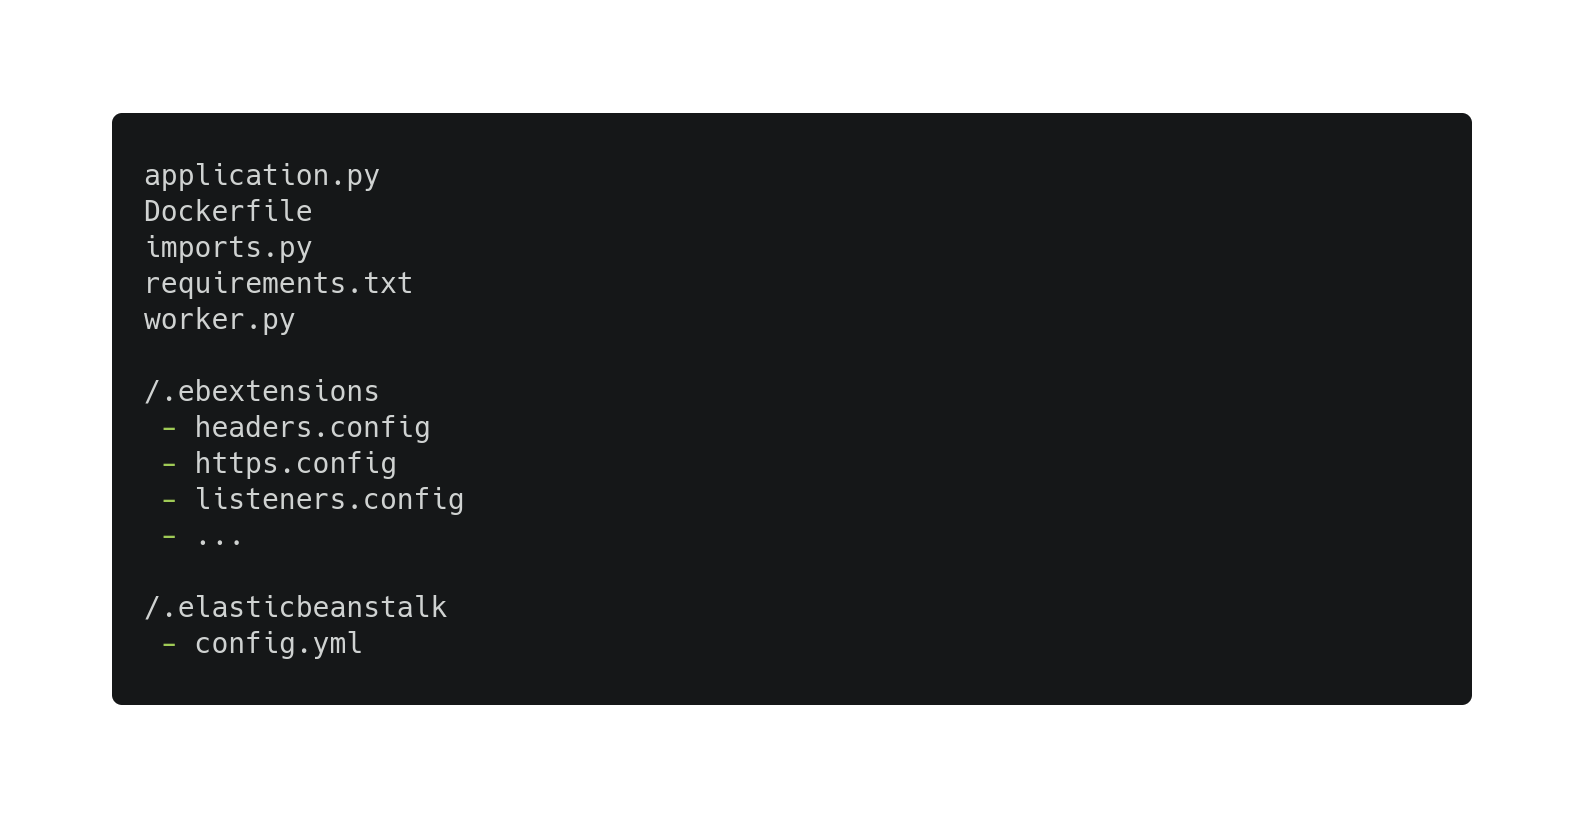
The configuration files that matter the most here are https.config, which tells our NGINX server how and where to configure the protocol, and listeners.config, which tells your instance load balancer to redirect inbound traffic on port 443 to port 80 of our instance (then connected to our Docker image).
Both files are also available on the project Github. Using this configuration will enable you to use your custom domain name, activate the relative SSL certificates, and rely on pure HTTPS transmission of data.
(Security will be fully in-place with encryption between your load balancer and your Docker, as well as encryption at rest. But that is beyond the scope of this post)
Building a cloud IVR using Twilio, AWS, and Python Flask
This tutorial provided a straightforward overview of what it takes to have a fully functioning IVR hosted in the cloud using Twilio and AWS. Retrospectively, both services are very user-friendly and make the prototyping very smooth.
Once developers are equipped, the rest is all about creativity! ;)
In our case, the services allowed us to build an IVR that had the potential to help desaturate an emergency response service, while allowing authorities to better dispatch resources to the callers. If you’d like to push your prototyping even further, I would suggest looking into the usage of multiple languages through Twilio (as easy as replacing ‘fr-FR’ with ‘en-US’) or the usage of pre signed URLs to keep your audio files fully secured at all times.
Meryll Dindin is an entrepreneur who loves taking on a variety of different roles and responsibilities. At the end of the day, he’s most concerned with transforming the world in an impactful and helpful way. To get in touch with Meryll, find him on one of these sites:
- LinkedIn: https://www.linkedin.com/in/dindin-meryll
- Medium: https://medium.com/@merylldin
Related Posts


Related Resources
Twilio Docs
From APIs to SDKs to sample apps
API reference documentation, SDKs, helper libraries, quickstarts, and tutorials for your language and platform.
Resource Center
The latest ebooks, industry reports, and webinars
Learn from customer engagement experts to improve your own communication.
Ahoy
Twilio's developer community hub
Best practices, code samples, and inspiration to build communications and digital engagement experiences.