Pusher and Twilio: Making Realtime Functionality Easy
Time to read:
July 24, 2012
Written by
This post is part of Twilio’s archive and may contain outdated information. We’re always building something new, so be sure to check out our latest posts for the most up-to-date insights.

Phil Leggetter is a Developer Evangelist at Pusher, a real-time web hosted service for adding live interactive content to web and mobile apps. He’s been developing and using realtime web technologies for over 10 years. Pusher is one of our favorite APIs and we recently ran into Phil at a telephony meetup in San Francisco where he demoed a very cool Twilio and Pusher hack.
We asked Phil if he could share how he built his Pusher and Twilio app and he wrote an amazing tutorial below on how to build a realtime web app with Twilio.
A few weeks ago I gave a talk at the San Francisco Telephony Meetup, but since I work for Pusher my focus is the realtime web, and how realtime web technologies can add value to web and mobile applications, and not telephony. However, this talk had to have a Telephony focus. I know UK-based Twilio Evangelist Stevie Graham, and he quite frequently uses Pusher in his awesome hacks.
I thought it was time to return the favour and put together a realtime SMS and incoming call notifications demo for my talk that uses Pusher and Twilio. It goes to show that realtime web and telephony technology work amazingly well together.
Here’s a tutorial demonstrating how easy it is to use two awesome cloud technologies to build this app.
Show Me The Code
Before we start you’ll obviously need a Pusher account, a Twilio account and a Ruby development environment as the back-end code is in Ruby using Sinatra as the web server.
The files within the app are as follows:
- app.rb – main Ruby app code
- config.yml
- Gemfile
- public/js/app.js – core JavaScript code
- views/index.erb
Take the app credentials from your Pusher account and add them to the config.yml file:
Add the following to the Gemfile:
Run bundle install to fetch the app dependencies.
Now the basic structure is in place we can look at app functionality.
Pusher: Connect and Subscribe
For the web browser to receive any data from Pusher a connection must first be established.
Let’s first create an index action within the Sinatra app:
Within the index action we assign the Pusher app_key to an @app_key property which is then available in the index.erb view.
In the view include jQuery, the Pusher JavaScript library, make the app_key accessible to JavaScript and include js/app.js, where we’ll write the rest of our JavaScript:
Run ruby app.rb and open a web browser at http://localhost:4567 to test that app is running.

In app.js create a new Pusher object to establish a connection to Pusher.
If you want to check you are connected you can either bind to connection state changes, use the Pusher.log logging or use the Pusher debug console.
Pusher uses channels as a way of filtering and routing data. In this app we’re interested in SMS messages and phone calls so we’ll subscribe to two channels; one for SMS messages and one for calls:
In the code above we bind to events on the channels. Events are a great way of hooking UI changes to application events. When the sms_received event is triggered on the sms channel we add a new <li> to a SMS list and when the call_incoming event is triggered on the calls channel we add add a new <li> to an Incoming Calls list. Simple!
The HTML for the UI looks like this:
So, although it doesn’t look great that’s actually all the functionality we need on the client. But how do we test it works?
Easy! Use the Pusher Event Creator to trigger events.


We now know that the client-side works so let’s look at the server-side, starting with Twilio.
Twilio: Define WebHook endpoints
WebHooks are a great way of informing web apps of events over a network, in this case the Internet. In the case of Twilio there are a bunch of really handy WebHooks for SMS and call notifications. For our app we want to be informed of SMS messages and incoming calls.

Note: When writing code to handle WebHooks testing locally can be tricky since the WebHooks may come from other services on the Internet and thus your web app needs be made publicly accessible. If you’re familiar with Twilio you’ll probably already know about localtunnel, but if not your can read more about it on the Twilio Engineering blog.
Sinatra: Create WebHook routes
In the image above you’ll see that we’ve defined two WebHook endpoints that should be called when event’s we’re interested occur. So, let’s create the two routes in our Sinatra app to handle the WebHook calls and do some very basic authentication about the WebHook calls; we’ll check that the AccountSid that is sent matches our own Twilio AccountSid which you’ll find in your Twilio Dashboard:
Sinatra makes that too easy. As you’ll see we’ve defined that AccountSid in config.yml.
Note: If you’re creating a production quality app then you should of course also add full Twilio WebHook authentication to your app. For more information see the Twilio security docs.
Pusher: Publish events
All that’s left to do now is publish the events using Pusher. First we need to set up the Pusher gem with our credentials that we set in config.yml.
And then update the route actions to extract the required values from the WebHook call and trigger events on the associated channels.
Tada!
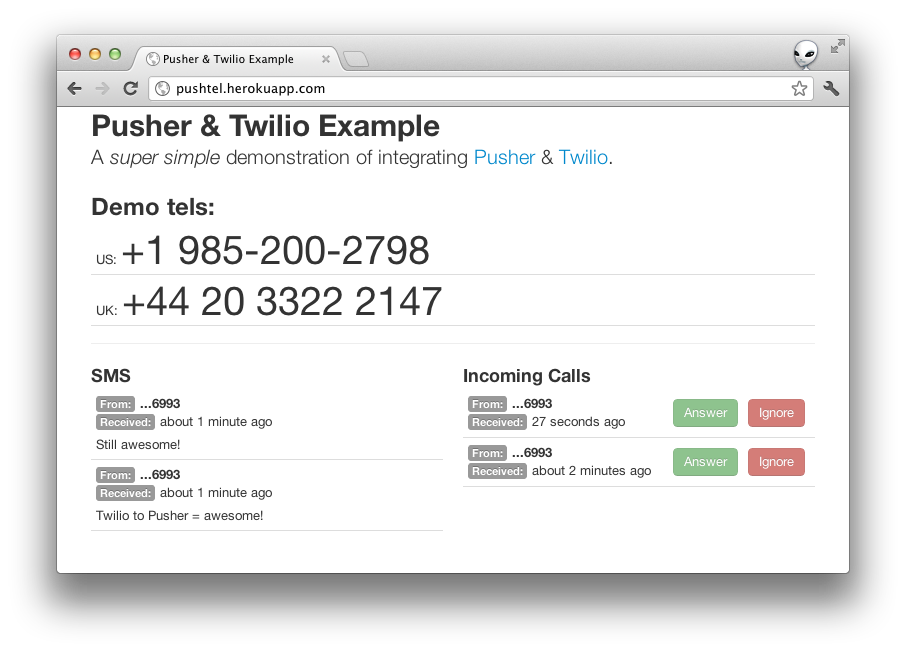
If deploy your application so that it, and your WebHook endpoints, are publicly accessible (on somewhere like Heroku) and text or call the number that is associated with your application WebHook you’ll instantly see the notification appear in the web app…
No, seriously that’s it! You’ve not got realtime notifications of incoming calls and SMS messages being displayed in a web app. I told you Pusher and Twilio made making these types of apps seriously easy!
You can find the code for a slightly more stylised version this app in github. You can also try it out for yourself.
If you build anything cool with Twilio and Pusher, or have any questions, I’d love to hear from you. Please drop me an email via phil@pusher.com or tweet me at @leggetter


Related Resources
Twilio Docs
From APIs to SDKs to sample apps
API reference documentation, SDKs, helper libraries, quickstarts, and tutorials for your language and platform.
Resource Center
The latest ebooks, industry reports, and webinars
Learn from customer engagement experts to improve your own communication.
Ahoy
Twilio's developer community hub
Best practices, code samples, and inspiration to build communications and digital engagement experiences.