How to Build a Video Summarizer with Twilio, ChatGPT and Picovoice
Time to read:
September 08, 2023
Written by
Reviewed by
We’ve seen how to build AI chatbots using Python frameworks such as Django and FastAPI. These chatbots are able to understand text messages coming from users through Twilio’s Programmable Messaging API while also giving intelligent responses via OpenAI’s ChatGPT API. We’ve also built an AI voice assistant that understands users’ voice notes through OpenAI's Whisper API and replies intelligently to each voice note with a ChatGPT response.
Today, you’re going to use Node.js to build an AI chatbot that takes an input as a YouTube Short video and outputs the key learnings from it.
You'll start by setting up the backend using Express.js and then,you'll integrate Twilio's WhatsApp Messaging API with the app to allow users to send a YouTube Shorts link. You’ll then summarize the video using Pivovoice’s Speech-to-Text engine and then pass the summary to the ChatGPT API which will respond back to the user with the summary of that video.
Prerequisites
To follow this tutorial, you will need the following prerequisites:
- Nodejs 20+ installed on your machine.
- A Twilio account. If you don't have one, you can create a free account here.
- Ngrok installed. If you're new to Ngrok, you can consult this blog post and create a new account.
- An OpenAI API key.
- A smartphone with WhatsApp installed to test your AI chatbot.
- A basic understanding of Node.js and Promises.
- A Picovoice access key to access the Leopard SDK. You can sign-in to the Picovoice console and generate an access key. Save this key until you use it in our script.
- ffmpeg installed on your machine to be able to convert the youtube video to an MP3 audio for the Leopard API to transcribe.
Setting up your development environment
Before building the AI summarizer, you’ll need to set up your development environment. Start by creating a new Node project:
Next, open up the package.json file with your preferred IDE and replace it with the following so that your dependencies can be installed:
Here is a breakdown of these dependencies:
@picovoice/leopard-node: A Picovoice Leopard Node.js SDK, a speech-to-text engine that you’ll use to transcribe Youtube Short videos.dotenv: A package for separating the environment variables of your Node.js project from the source code. It allows you to store your environment variables in a .env file instead of hardcoding them into your code.express: Express.js, a Node.js web framework for the backend server.fluent-ffmpeg: A JavaScript wrapper around the FFmpeg command line tool, which is used for working with multimedia files (video, audio, etc.). You’ll use this to convert the YouTube short video to an audio format.openai: A Node.js client for OpenAI API. OpenAI offers various AI models, including the GPT-3.5-turbo model, which will be used in this tutorial to power the AI summarizer.twilio: A Node.js client for Twilio.ytdl-core: A JavaScript library to download YouTube videos.
Install the dependencies with the following command:
Creating your chatbot
Now that you have set up your environment and installed the dependencies, it's time to build the chatbot. In this section, you will write the code for a basic chatbot using the Leopard API and Twilio’s Programmable Messaging API.
Configuring your Twilio Sandbox for WhatsApp
To use Twilio's Messaging API with WhatsApp, you need to configure the Twilio Sandbox for WhatsApp. Here's how to do it:
- Assuming you've already set up a new Twilio account, go to the Twilio Console and choose the Messaging tab on the left panel.
- Under Try it out, click on Send a WhatsApp message. You'll land on the Sandbox tab by default and you'll see a phone number "+14155238886" with a code to join next to it on the left and a QR code on the right.
- To enable the Twilio testing environment, send a WhatsApp message with this code's text to the displayed phone number. You can click on the hyperlink to direct you to the WhatsApp chat if you are using the web version. Otherwise, you can scan the QR code on your phone.
Now, the Twilio sandbox is set up, and it's configured so that you can try out your application after setting up the backend.
Before leaving the Twilio Console, you should take note of your Twilio credentials and create a file named .env and add the following:
Don’t forget to replace the placeholders with their actual values.
Setting up your Twilio WhatsApp API snippet
Before you run the code, make sure to have the OpenAI API key in your .env file:
You’ll want to build a utility script to set up sending a WhatsApp message through the Twilio Messaging API.
Create a new file called utils.js and add the following code:
This script begins by setting up configurations for various APIs using the dotenv package. It loads environment variables from the .env file, which is a common practice for storing sensitive information like API keys.
First, the necessary libraries are imported, which include the following:
fsto interact with the file systemytdl-coreto download YouTube videosfluent-fmpegto work with audio and video filesopenaito interact with the OpenAI APItwilioto interact with the Twilio API. Specifically, we use theMessagingResponseobject from Twilio's TwiML library
Next, the OpenAI and Twilio API keys are configured using the values loaded from the .env file.
An audioFilePath variable is set to a specific location for an audio file. This file path is used later in the script for storing and processing audio. This file will be placed inside the media directory. To create this directory navigate to your terminal and enter the following command:
We will use a few utility functions to build our YouTube summarizer. We start with downloading the YouTube short video and converting it to an MP3 audio. Then, we get the transcript and extract key learnings from it using the ChatGPT API. Once the learnings are ready, you’ll send it over to WhatsApp.
Let’s start with the function that downloads the YouTube video. Add this code to the utils.js file:
The function begins by splitting the YouTube video URL to extract the video's ID; this ID is typically found at the end of the URL. It then creates a readable video stream using ytdl-core, the library we used for downloading YouTube videos. It specifies the desired audio quality as 'highestaudio'. It uses ffmpeg to process the readable video stream and convert it to an MP3 audio file. It also sets the audio bitrate to 128 kbps.
The 'progress' event is used to log the download progress, displaying the size downloaded in kilobytes. The 'end' event is triggered when the conversion is complete. It calculates the time taken for the download and conversion and resolves the Promise with a message indicating the download duration. If an error occurs during the download or conversion process, the 'error' event is triggered, and the Promise is rejected with an error message.
You’ll also need a function to transcribe that output audio file. Add this function to util.js:
This function begins by importing the Leopard class from the @picovoice/leopard-node library, which is used for speech transcription.
It retrieves the Picovoice Access Key from an environment variable named PICOVOICE_ACCESS_KEY in your .env file. Ensure you add this to your .env file:
The function will then initialize an instance of the Leopard class with the access key. Then, it uses the processFile() method of the Leopard instance to transcribe the audio file located at the path specified by audioFilePath. This method returns an object containing a transcript field that holds the transcription result and a words field that holds individual words and their timing information (not used in this code).
Finally, the function resolves the Promise with the transcription result by calling resolve(transcript). You’ll then need a function to extract the key learnings out of that output transcript. Add this function to the utils.js file:
This function begins by logging a message to indicate that it is summarizing.
Inside a try block, it uses the await keyword to asynchronously call the OpenAI API to create a chat completion. It sends a message to the GPT-3.5 Turbo model as a user message. This message consists of the transcribedText followed by a prompt to extract key learnings from it and not to exceed the 1400 characters limit.
The max_tokens parameter limits the response to 200 tokens to keep it concise to our case. The function resolves the Promise with the content of the model's response, which should contain the extracted key learnings.In case of any errors during the API call, the function catches the error in the catch block and rejects the Promise with an error message that includes the OpenAI error message.
After getting the summary of that video, the code will do a cleanup step where it will remove the audio file it converted. Add this to the util.js file:
This function returns a Promise that encapsulates the file removal operation. Inside the Promise, it uses the fs.unlink() method to attempt to delete the file specified by the audioFilePath. This method takes two parameters:
- The first parameter is the path to the file you want to delete (
audioFilePath). - The second parameter is a callback function that handles the result of the deletion operation. It takes an error (
err) as an argument.
If the deletion operation is successful (i.e., there is no error), it resolves the Promise with a success message.If an error occurs during the deletion operation, it rejects the Promise with an error message that includes information about the error.
After the cleanup step, you’ll send the message through the Twilio API. Add this last function to utils.js:
The function takes two parameters:
message: The content of the SMS message to send.res: The response object, coming from an HTTP request handler. You’ll see where you get that response when you build the Express endpoint to send a POST request.
Inside the Promise, it tries to send an SMS message using Twilio:
- It initializes a
MessagingResponseobject from the Twilio library. - It adds the specified message to the response using
twiml.message(message). - It sends the response back to the client by calling
res.send(twiml.toString()).
If the SMS message is sent successfully, it resolves the Promise with a success message indicating that the message is sent. If any error occurs during the process, it catches the error in a catch block and rejects the Promise with an error message that includes information about the Twilio-related error.
Finally, add the following code to export all functions in the utility script so that you can use them in your server.js file:
Setting up your Express backend
To set up the Express.js backend for the chatbot, navigate to the project directory and create a new file called server.js. Inside that file, insert the following code to set up a basic Express.js application that will handle a single incoming request:
To run the app, execute the following command:
or if you want to run it in a development environment where you want to edit your code and your backend will gets updated, you can run it using nodemon. Make sure you install it as a development dependency with:
and then run it:
Open your browser to http://localhost:8000 and you should see a ‘Hello!’ string on the web page.
Since Twilio needs to send messages to your backend, you need to host your app on a public server. To do this, you can use ngrok. If you're new to Ngrok, you can consult this blog post and create a new account.
Leave the Node.js app running on port 8000, and run this ngrok command on another tab:
The above command sets up a connection between your local server running on port 8000 and a public domain created on the ngrok.io website. Once you have the Ngrok Forwarding URL, any requests from a client to that URL will be automatically directed to your Express backend.
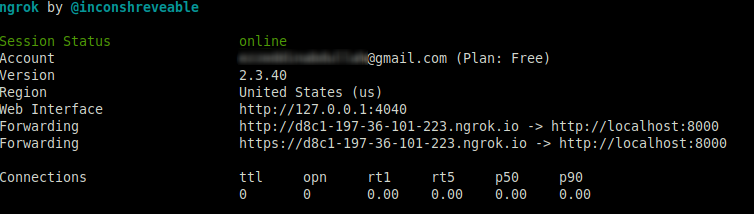
If you click on the forwarding URL, Ngrok will redirect you to your Express app's home endpoint. It's recommended to use the https prefix when accessing the URL.
Configuring the Twilio webhook
You must set up a Twilio-approved webhook to be able to receive a response when you message the Twilio WhatsApp sandbox number.
To do that, head over to the Twilio Console and choose the Messaging tab on the left panel. Under the Try it out tab, click on Send a WhatsApp message. Next to the Sandbox tab, choose the Sandbox settings tab.
Copy the ngrok.io forwarding URL and append /message. Paste it into the box next to WHEN A MESSAGE COMES IN:
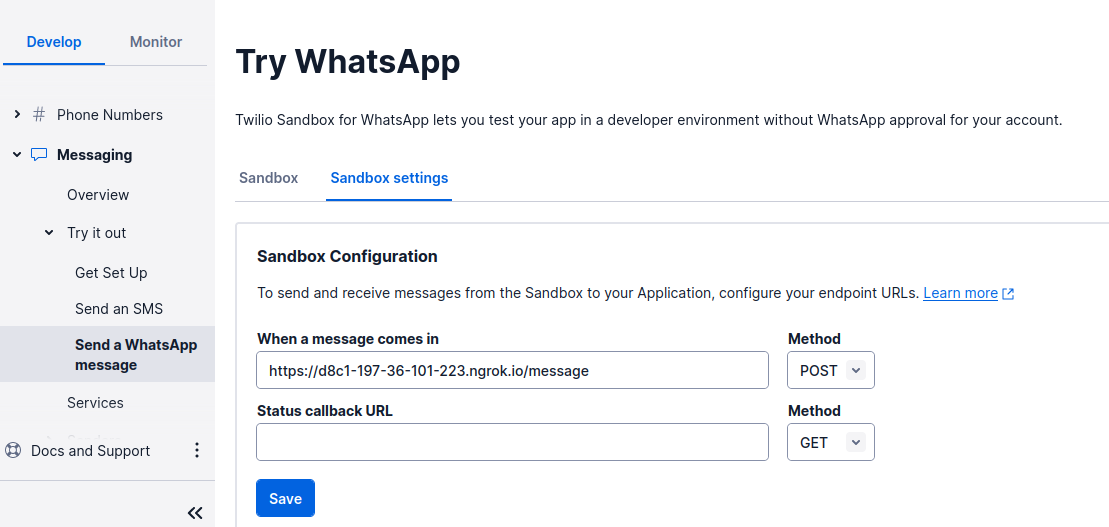
The complete URL should look something like this: https://d8c1-197-36-101-223.ngrok.io/message.
The endpoint you will configure in the Express application is /message, as noted; thechatbot logic will be on this endpoint.
When done, press the Save button.
Sending your summary message to WhatsApp
Now, it's time to create the logic for receiving and responding to WhatsApp messages. Update the entire server.js script to be the following:
You've set up the /message endpoint so that the app will listen to the incoming POST requests to that endpoint. The code begins by setting up middleware to parse URL-encoded data in the request body using express.urlencoded. This is used for parsing data from incoming POST requests as the user should send a URL to the YouTube video he wants to summarize. When a POST request is made to the /message route, it performs a series of Promises to handle asynchronous operations.
It uses the functions youtubeVideo2Mp3, transcribe, extractKeyLearnings, sendMessage, and removeAudioFile to process the incoming message. Each function in the promise chain handles a specific step of the process we discussed in the utility script. It starts by converting a YouTube video to MP3, then transcribing it, extracting key learnings, sending a Twilio message to WhatsApp, and finally, cleaning up the audio file.
If any step in the chain encounters an error, it catches the error and responds with a 500 Internal Server Error and logs the error.
Testing your AI chatbot
Your app is now ready to be tested. Save the file and wait till nodemon restarts the server. If you didnt use nodemon, enter node server.js on your terminal to start the server.
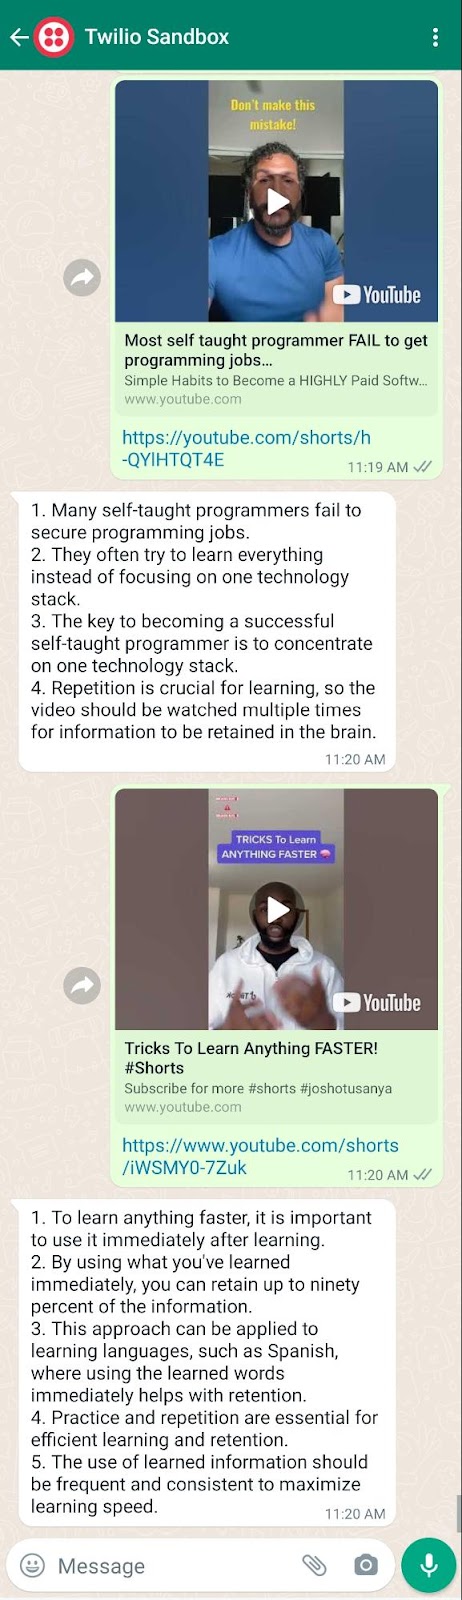
Now, send a Youtube Short URL to your WhatsApp number and you’ll receive an AI summary of it.
The example below shows a couple of YouTube URLs and their responses:
What's next? Perhaps you can make it live in production using a VPS instead of building it locally or expand the service to videos other than Youtube Short videos. I hope you enjoyed this tutorial and I’ll see you in the next one.
Ezz is a data platform engineer with expertise in building AI-powered apps. He has helped clients across a range of industries, including HR, energy, and nutrition, to develop customized software solutions. Check out his website for more information.


Related Resources
Twilio Docs
From APIs to SDKs to sample apps
API reference documentation, SDKs, helper libraries, quickstarts, and tutorials for your language and platform.
Resource Center
The latest ebooks, industry reports, and webinars
Learn from customer engagement experts to improve your own communication.
Ahoy
Twilio's developer community hub
Best practices, code samples, and inspiration to build communications and digital engagement experiences.