How to Build a Customized AI Chatbot on WhatsApp with Python, Twilio, and the ChatGPT API
Time to read:
March 27, 2023
Written by
Reviewed by

As the world becomes increasingly connected through messaging apps, chatbots have become a crucial tool for businesses to engage with customers on a more personal level.
With the rise of artificial intelligence, chatbots have become smarter, more personalized, and more intuitive. In this article, we'll show you how to build a chatbot powered by OpenAI's ChatGPT API and integrate it with WhatsApp using Python and Twilio.
You'll start by setting up the backend using FastAPI and SQLAlchemy to create a PostgreSQL database to store your customers' conversations. Then, you'll integrate Twilio's WhatsApp Messaging API, allowing customers to initiate conversations with your WhatsApp chatbot.
With Pyngrok, you'll put the FastAPI localhost on the internet through Python, making it accessible for the Twilio API to communicate with.
Finally, the core of this AI chatbot will be built using OpenAI's API and one of the GPT-3.5 series models: the model that powers ChatGPT, the GPT 3.5 turbo model.
ChatGPT API (GPT 3.5 turbo model) vs. Davinci model
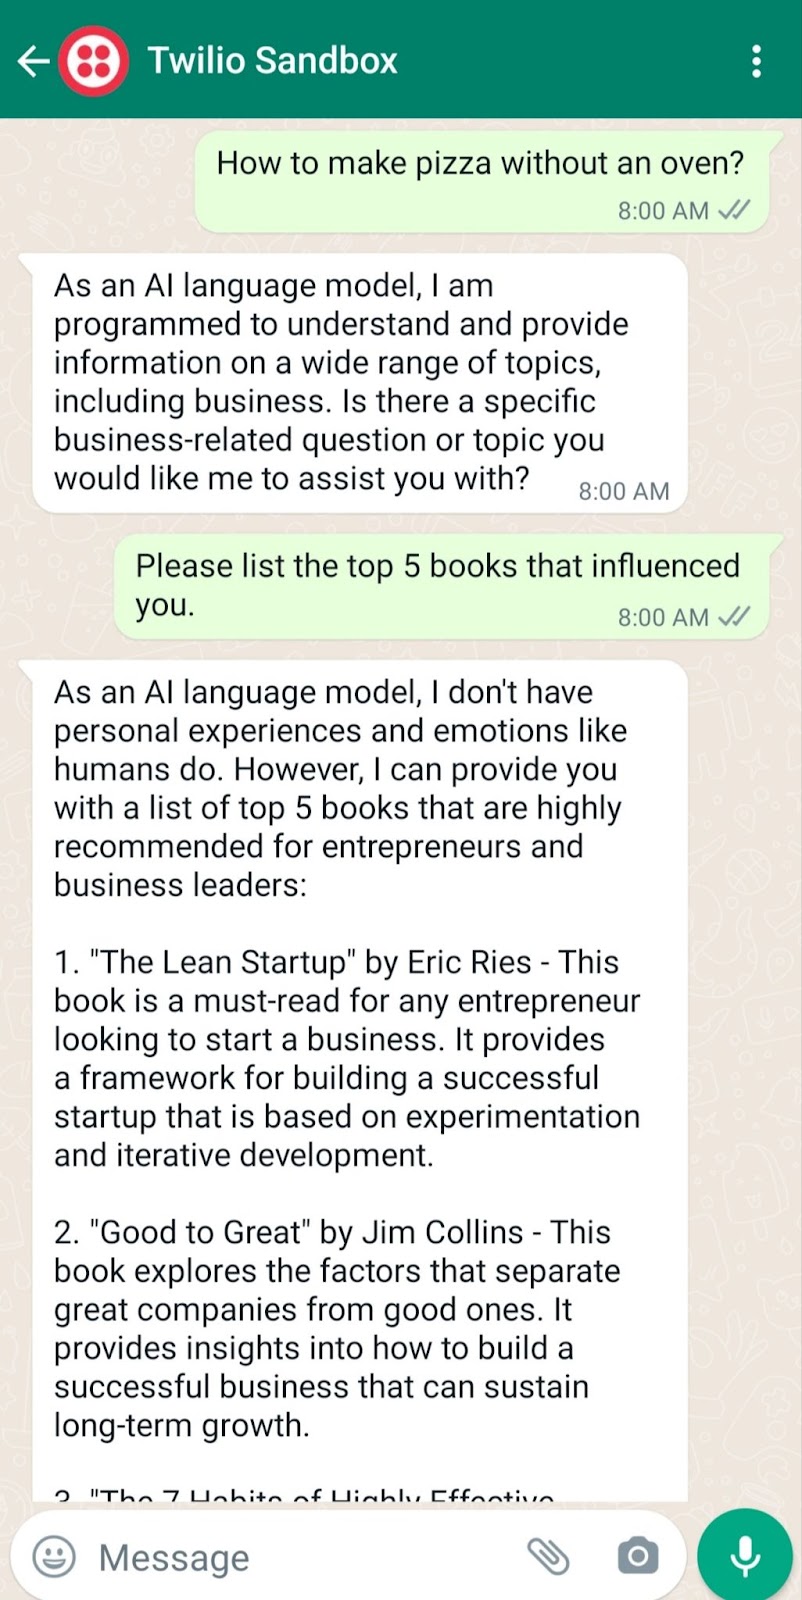
The AI chatbot mentioned in the previous post has some limitations. Take a look at the following conversation:
This AI chatbot was based on the Davinci model, which basically can talk about anything. So if you ask this chatbot about something other than business, you'll get a response like the one to the follow-up clean code question above.
Another issue is that the chatbot's response didn't contain much more information about each book in its answer for the first question.
Furthermore, this API costs $0.02 per 1K tokens, where 1K tokens roughly correspond to 750 words. This is cheap, but what if we could build a 10x cheaper chatbot?
In this tutorial, we will focus on solving the above issues to make the new chatbot:
- More focused and have role-based responses.
- Much cheaper. That's because the GPT 3.5 turbo model costs $0.002 per 1K tokens. This is 10x cheaper than the Davinci model.
- Wordier. So you'll get a richer response than Davinci's chatbot.
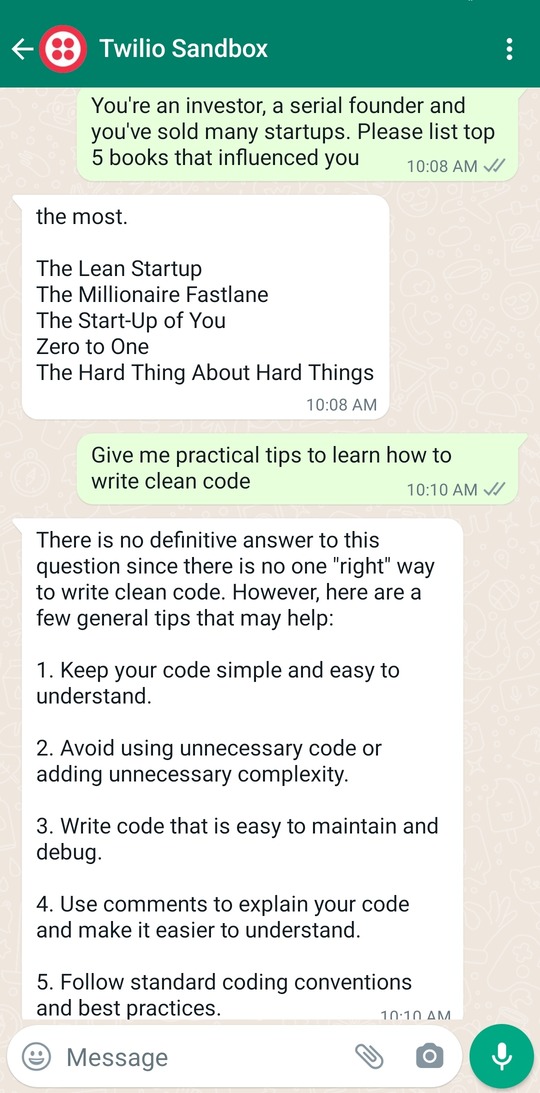
At the end of this tutorial, you will be able to build a customized chatbot on WhatsApp. Here is a sample conversation this AI chatbot can create:
As you can see, this AI chatbot is focused on business questions, so it can't teach you how to cook or participate in a non-relevant topic. Also, the user is not supposed to tell the chatbot its role. The chatbot knows implicitly that it's a business coach.
Prerequisites
To follow this tutorial, you will need the following prerequisites:
- Python 3.7+ installed on your machine.
- PostgreSQL installed on your machine.
- A Twilio account set up. If you don't have one, you can create a free account here.
- An OpenAI API key to access ChatGPT.
- A smartphone with WhatsApp installed to test your AI chatbot.
- A basic understanding of FastAPI, a modern, fast (high-performance), web framework for building APIs with Python 3.6+.
- A basic understanding of what an ORM is. If you are not familiar with ORM, we recommend you to read this wiki page to get an idea of what it is and how it works.
Setting up your development environment
Before building the chatbot, you need to set up our development environment. Start with creating a new virtual environment:
Here, you create the chatgpt_whatsapp directory and navigate into it. Then you create a new Python virtual environment using venv. Finally, you activate the environment and then upgrade pip, the Python package manager.
Next, create a requirements.txt file that includes the following:
Here is a breakdown of these dependencies:
fastapi: A package for FastAPI, a modern web framework for building APIs with Python 3.7+ based on standard Python type hints. It's designed to be easy to use, fast, and to provide automatic validation of request and response data.uvicorn: A package for Uvicorn, a fast ASGI server implementation, using the websockets library for long-polling connections, and based on uvloop and httptools.twilio: A Python helper library for Twilio, a cloud communications platform that allows software developers to programmatically make and receive phone calls, send and receive text messages, and perform other communication functions using its web service APIs.openai: A Python client for OpenAI, a research company that focuses on developing and advancing artificial intelligence in a way that is safe and beneficial for humanity. OpenAI offers various AI models, including the GPT 3.5 turbo model, which is used in this tutorial to power the chatbot.python-decouple: A library for separating the settings of your Python application from the source code. It allows you to store your settings in an environment file, instead of hardcoding them into your code.sqlalchemy: A package for SQLAlchemy, a Python SQL toolkit and Object-Relational Mapping (ORM) library. It provides a set of high-level APIs for connecting to relational databases, executing SQL queries, and mapping database tables to Python classes.psycopg2-binary: A Python package that provides a PostgreSQL database adapter for the Python programming language.python-multipart: A library that allows you to parse multipart form data in Python, which is commonly used to handle form submissions that contain files such as images or videos. In the case of this tutorial, it will be used to handle form data from the user's input through the WhatsApp chatbot.pyngrok: A Python wrapper forngrok, a tool that allows you to expose a web server running on your local machine to the internet. You'll use it to test your Twilio webhook while you send WhatsApp messages.
Now, you can install these dependencies:
Configuring your database
You can use your own PostgreSQL database or set up a new database with the createdb PostgreSQL utility command:
In this tutorial, you will use SQLAlchemy to access the PostgreSQL database. Put the following into a new models.py file:
This code sets up a connection to a PostgreSQL database using SQLAlchemy and creates a table named conversations. Here's a breakdown of what each part does:
URL.createcreates the URL object which is used as the argument for thecreate_enginefunction. Here, it specifies thedrivername,username,password,host,database, andportof the database.create_enginefunction creates an engine object that manages connections to the database using a URL that contains the connection information for the database.sessionmakeris a factory for creating Session objects that are used to interact with the database.declarative_baseis a factory function that returns a base class that can be subclassed to define mapped classes for the ORM.- The
Conversationclass is a mapped class that inherits fromBaseand maps to theconversationtable. It has four columns:id,sender,message, andresponse. idis the primary key column,senderis a string column that holds the sender phone number the message is sent from,messageis a string column that holds the message text, andresponseis a string column that holds the response message coming from GPT-3.5. Base.metadata.create_allcreates all tables in the database (in this case, it creates theconversationstable) if they do not exist.
So the goal of this simple model is to store conversations for your app.
Note: here, you've used decouple.config to access the environment variables for your database: DB_USER and DB_PASSWORD. You should now create a .env file that stores these credentials with their associated values. Something like the following, but replacing the placeholder text with your actual values:
Creating your chatbot
Now that you have set up your environment and created the database, it's time to build the chatbot. In this section, you will write the code for a basic chatbot using OpenAI and Twilio.
Configuring your Twilio Sandbox for WhatsApp
To use Twilio's Messaging API to enable the chatbot to communicate with WhatsApp users, you need to configure the Twilio Sandbox for WhatsApp. Here's how to do it:
- Assuming you've already set up a new Twilio account, go to the Twilio Console and choose the Messaging tab on the left panel.
- Under Try it out, click on Send a WhatsApp message. You'll land on the Sandbox tab by default and you'll see a phone number "+14155238886" with a code to join next to it on the left and a QR code on the right.
- To enable the Twilio testing environment, send a WhatsApp message with this code's text to the displayed phone number. You can click on the hyperlink to direct you to the WhatsApp chat if you are using the web version. Otherwise, you can scan the QR code on your phone.
Now, the Twilio sandbox is set up, and it's configured so that you can try out your application after setting up the backend. Before leaving the Twilio Console, you should take note of your Twilio credentials and edit the .env file as follows:
Setting up your Twilio WhatsApp API snippet
Before setting up the FastAPI endpoint to send a POST request to WhatsApp, let's build a utility script first to set up sending a WhatsApp message through the Twilio Messaging API.
Create a new file called utils.py and fill it with the following code:
First, the necessary libraries are imported, which include the logging library, the Twilio REST client, and the decouple library used to store private credentials in a .env file.
Next, the Twilio Account SID, Auth Token, and phone number are retrieved from the .env file using the decouple library. The Account SID and Auth Token are required to authenticate your account with Twilio, while the phone number is the Twilio WhatsApp sandbox number.
Then, a logging configuration is set up for the function to log any info or errors related to sending messages. If you want more advanced logging to use as a boilerplate, check this out.
The meat of this utility script is the send_message function which takes two parameters, the to_number and body_text, which are the recipient's WhatsApp number and the message body text, respectively.
The function tries to send the message using the client.messages.create method, which takes the Twilio phone number as the sender (from_), the message body text (body), and the recipient's WhatsApp number (to). If the message is successfully sent, the function logs an info message with the recipient's number and the message body. If there is an error sending the message, the function logs an error message with the error message.
Setting up your FastAPI backend
To set up the FastAPI backend for the chatbot, navigate to the project directory and create a new file called main.py. Inside that file, you will set up a basic FastAPI application that will handle a single incoming request:
To run the app, run the following command:
Open your browser to http://localhost:8000. The result you should see is a JSON response of {"msg": "working"}.
However, since Twilio needs to send messages to your backend, you need to host your app on a public server. An easy way to do that is to use Ngrok.
If you're new to Ngrok, you can consult this blog post and create a new account.
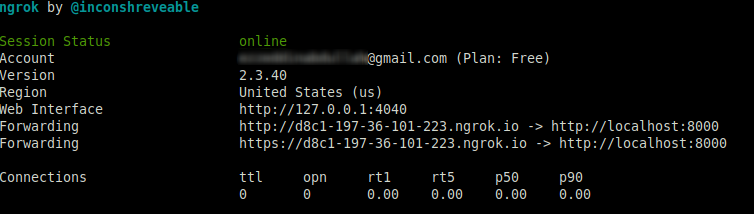
Leave the FastAPI app running on port 8000, and run this ngrok command from another terminal window:
The above command sets up a connection between your local server running on port 8000 and a public domain created on the ngrok.io website. Once you have the Ngrok forwarding URL, any requests from a client to that URL will be automatically directed to your FastAPI backend.
If you click on the forwarding URL, Ngrok will redirect you to your FastAPI app's index endpoint. It's recommended to use the https prefix when accessing the URL.
Configuring the Twilio webhook
You must set up a Twilio-approved webhook to be able to receive a response when you message the Twilio WhatsApp sandbox number.
To do that, head over to the Twilio Console and choose the Messaging tab on the left panel. Under the Try it out tab, choose Send a WhatsApp message. Next to the Sandbox tab, choose the Sandbox settings tab.
Copy your ngrok.io forwarding URL and append /message. Paste it into the box next to WHEN A MESSAGE COMES IN:
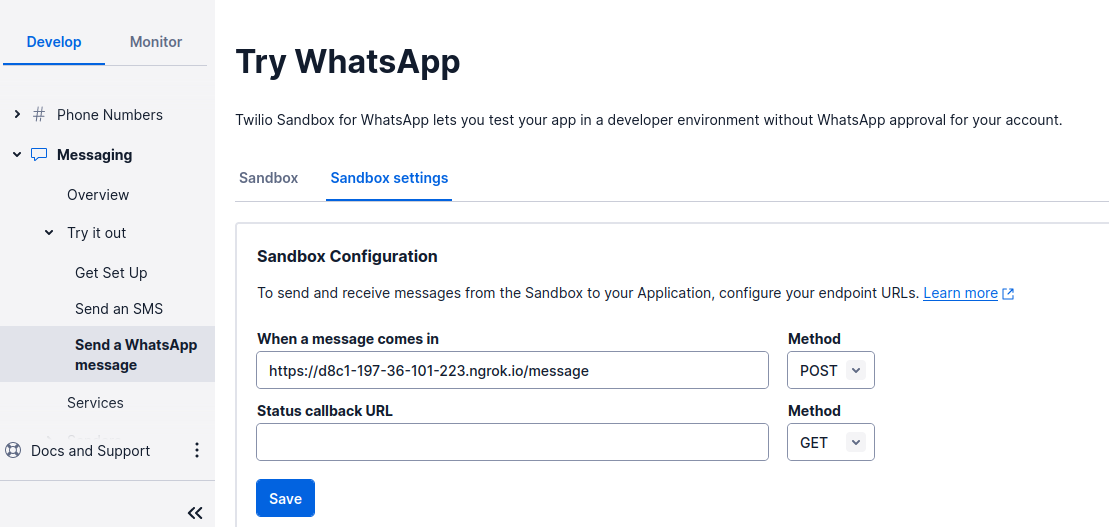
The complete URL should look like this: https://d8c1-197-36-101-223.ngrok.io/message.
The endpoint you will configure in the FastAPI application is /message, as noted. The chatbot logic will be on this endpoint.
When done, press the Save button.
Sending your message with OpenAI API
Now, it's time to create the logic for sending the WhatsApp message to the OpenAI API so that you'll get a response from the ChatGPT API.
Update the main.py script to the following:
This code sets up a straightforward web application that can receive messages and respond to them using OpenAI's ChatGPT language model. The application listens for incoming requests on two endpoints: the root URL (/) and /message.
The openai.api_key variable is set to the value of the OPENAI_API_KEY environment variable using the config() function from the decouple library. The .env file should now look like the following:
The SessionLocal class and Conversation model are imported from the models.py file as you defined previously. These classes are used to set up a database connection and define the structure of the conversation data that will be stored in the database.
The get_db function defines a dependency that is used by the /message endpoint to get a database session object. This function creates a new session object and yields it to the calling function. Once the calling function is finished executing, the finally block ensures that the session object is closed properly.
The / endpoint returns a simple JSON message indicating that the application is working, which was tested already with your ngrok setup.
The /message endpoint is used to receive incoming messages from the user. The Body parameter is used to extract the text of the message. The request parameter is used to extract the sender's phone number from the incoming webhook request.
The ChatGPT API is called to generate a response to the user's message. The prompt consists of the user's message and an additional context message that describes the user as an experienced investor and founder. The generated response is stored in the chatgpt_response variable.
The conversation data (sender phone number, user message, and ChatGPT response) are stored in the database using an instance of the Conversation model. If there is an error when storing the conversation data in the database, the function logs an error message and rolls back the transaction.
Finally, the response generated by ChatGPT is sent back to the user using the send_message function, which is imported from the utility module.
Testing your AI chatbot
Now, you're ready to send a WhatsApp message and wait for a response from your AI chatbot. Try asking the AI chatbot anything you can ask ChatGPT.
The example below shows a couple of questions and their responses:

Now, your AI chatbot is functioning well on WhatsApp. Perhaps your next step is to use your own WhatsApp Business Account instead of Twilio Sandbox and make this business coach assistant live in production using a VPS instead of building it locally. I hope you enjoyed this tutorial and see you in the next one.
Ezz is an AWS Certified Machine Learning Specialist and a Data Platform Engineer. He helps tech companies generate developer leads through his technical blog posts. Check out his website for more.

Related Resources
Twilio Docs
From APIs to SDKs to sample apps
API reference documentation, SDKs, helper libraries, quickstarts, and tutorials for your language and platform.
Resource Center
The latest ebooks, industry reports, and webinars
Learn from customer engagement experts to improve your own communication.
Ahoy
Twilio's developer community hub
Best practices, code samples, and inspiration to build communications and digital engagement experiences.