Build Your Own Agent SMS Chat Using Twilio Toll-free Numbers
Time to read:
June 12, 2014
Written by
This post is part of Twilio’s archive and may contain outdated information. We’re always building something new, so be sure to check out our latest posts for the most up-to-date insights.


Learn more about Twilio Toll Free SMS here and get started with your new numbers here.
Most businesses own a Toll-free number to offer customer service and support. But, wouldn’t it be more engaging if contact centers had the ability to interact with customers via a new channel – texting – to allow calling and texting to the same Toll-free number?
In this tutorial I’ll show you how to add an SMS channel on your Toll-free number for a new way of interacting with your customers.
You’ll learn how to build an agent chat utility that connects your customer service department to mobile customers, via SMS on Toll-free numbers.
This application will have the following functions:
- Customers using any mobile device with SMS capabilities can text to a Toll-free number to receive live support from agents.
- A common agent chat room to handle incoming SMS with customer support inquiries.
- One or more agents can respond to the queries by addressing the customer’s phone number.
- Internal agent communication through the same chat window for escalations or collaboration.
Along the way you will not only use Twilio for it’s powerful Messaging API, but also get a good dose of AJAX, PHP and Javascript.
Previewing The Final Product
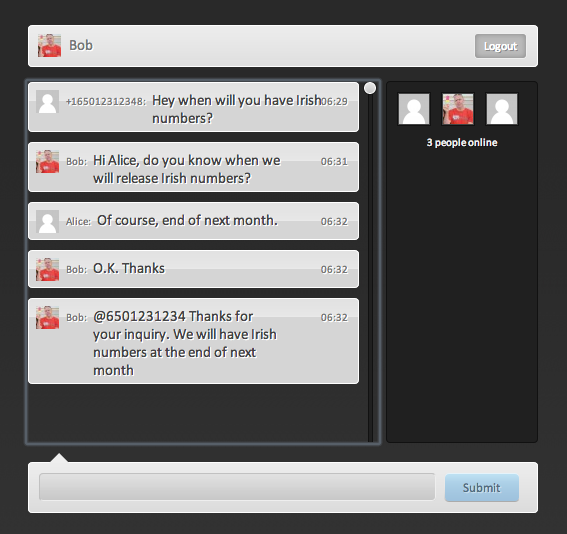
Here Agent Alice and Agent Bob are logged into the support chat room. A customer with phone number (650)123-1234 sends a text message that is displayed in the browser window. The user asks about the release date for Twilio phone numbers in Ireland.
Unaware of the answer, Bob asks Alice. This exchange is internal to the chat room and the mobile phone user doesn’t see it. Once Bob gets his response from Alice, he texts back from within the chat room, to the mobile phone identified with an @ symbol followed by the phone number and the text. This message is received by the customer. Texting becomes a natural extension to an already available service channel. At this stage, to the agent, it doesn’t matter how they are connected, voice, instant messaging or SMS. It is a seamless experience for them as well as the customer.
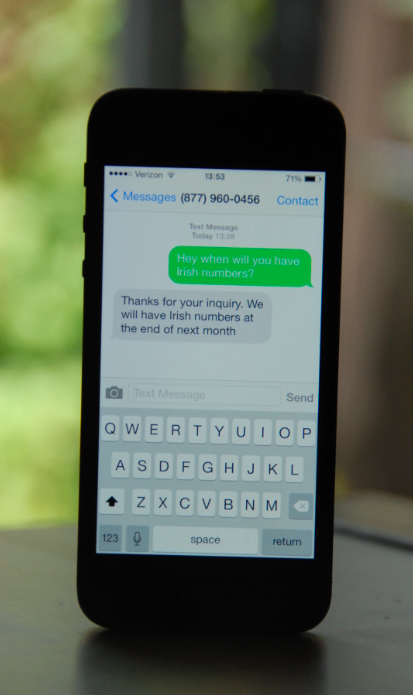
Here is what this exchange looks like. Check out the Toll-free number we text to, and from where we get our reply.
We’ll use existing code components for this exercise so you should have this working in no time.
Our Ingredients List
We use a few components which make building this project really easy. Best of all they are all free. For Twilio you need to signup on the Twilio portal. You get a free $30 credit on your account after you signup. Through the portal, you can purchase Toll-free, or mobile, SMS-enabled phone numbers, and access the REST API for messaging, and a helper library for PHP.
Here are our 4 basic ingredients
- XAMPP or another webserver that can render php files
- ngrok – forwards http request via an encrypted tunnel through your firewall to your local machine
- Twilio Toll-free SMS for sending and receiving of text messages via a programmatic interface
- A prebuild chat application that we will enhance to include SMS texting
Building The Basic Chat
If you look for code for instant chat systems you will find plenty of examples on the web. We are using the excellent work of Tutorialzine for the basic chat functionality. I used XAMPP as my appserver with an already configured MySQL database. You can download and install XAMPP for your favorite OS here.
Checkpoint – Load http://localhost or http://127.0.0.1
This is what you should see
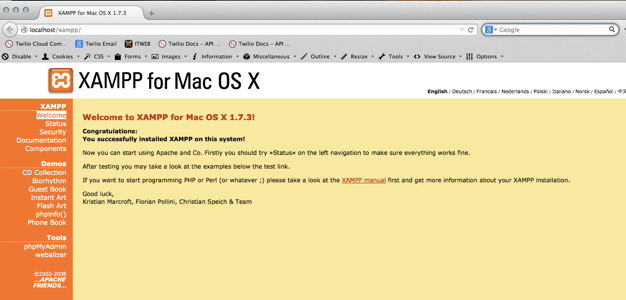
If you don’t see this, check this site for help.
Next we’ll configure a MySQL database with the convenient phpMyAdmin tool. phpMyAdmin comes preinstalled with XAMPP. It provides a graphical interface to configure your MySQL database. You can load it from your XAMPP start page, on the left side, close to the bottom.
Here is a screenshot of how the phpMyAdmin site looks like on my system. I already have a couple databases. Ignore these for now.
Create a new database by selecting the SQL tab and specifying the following command: “CREATE DATABASE ajaxchat”, just like in this screenshot.

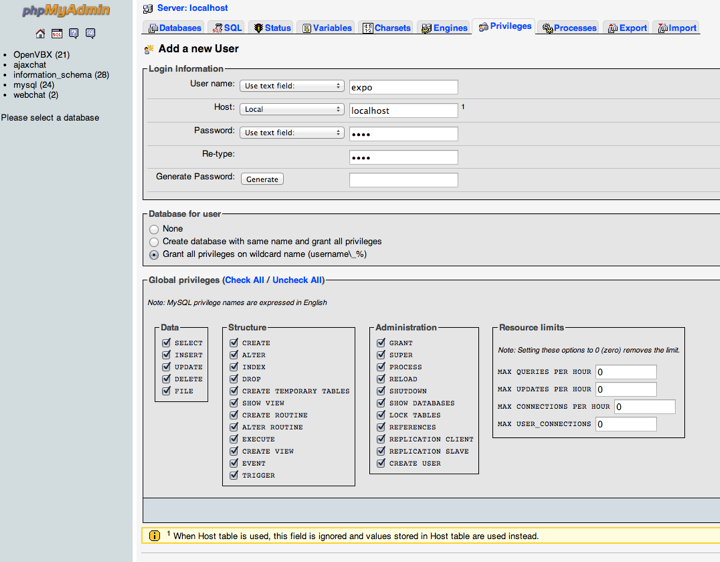
You should see your database “ajaxchat” appear in the left column now. We need to create a connection for this database. Go to the house-button and in the right frame select “Privileges”. Create a user and give this user full access like in the picture below. It works for this prototype, but if you have a better knowledge of security best practices, by all means use what’s considered best practice. Remember the username and password! We will need it later.
Next, check out “Making an AJAX Web Chat” written by Martin Angelov. Read about the best architectures for website development and download his code from their site into the htdocs folder under your XAMPP installation. Once you unzip the files, you will see a tables.sql file in the topmost folder, which issues all the right commands to build the tables in our newly created “ajaxchat” database. Let’s do it.
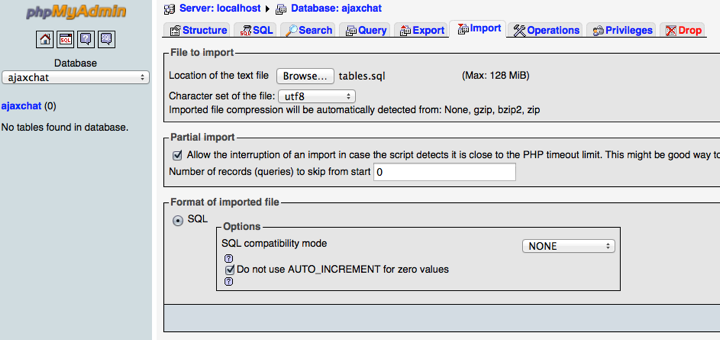
I selected my ajaxchat database and then on the right side the “Import” tab where I browsed for the tables.sql file. Essentially we are importing a file that has SQL instructions in it, which we are going run against our database.
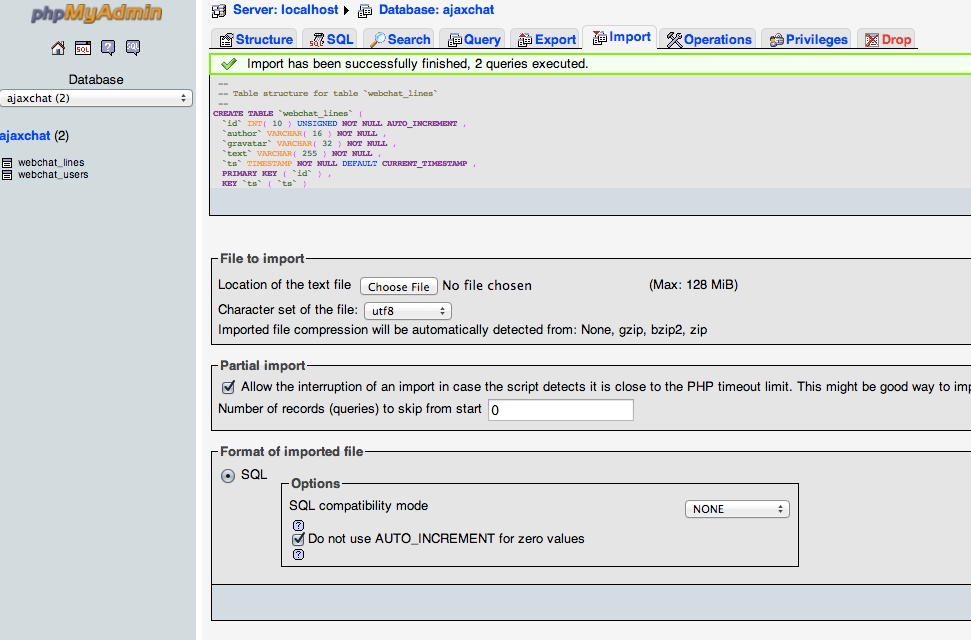
Press GO, and et voila, we have two tables in our database, “webchat_lines” and “webchat_users”. The user table is self-explanatory, these are the people logged into the webchat. The system accepts any new login, no need for explicit provisioning of users. The webchat_lines are the actual text messages ( and later SMS ). Martin built the system in the easiest way for us to modify. Any row in the webchat_lines table is displayed in the browser chat window via AJAX. Later when we insert our SMS messages as table rows, they will be similarly displayed.
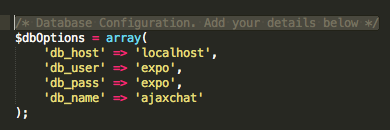
Below in this post you will find a Download to a file 3rdPartyDB.php, which we are going to use. Go back to the downloaded ajax-chat folder. In the ajax-chat folder, under php, add the file 3rdPartyDB.php, add the database connectivity information for the connection we configured above. This is how it looks like for me.
Brave enough to try it?
Checkpoint – Load the http://localhost/ajax-chat/ajax-chat page and login with your name and email address.
If it doesn’t work, please go back to the tutorial, which puts all things into context. Now, open two different web browser programs ( I use one Firefox and one Chrome ), load the AJAX-chat in each, and sign into each under a different name and email address. The system accepts any name/email address right now. We load the chat via a localhost URL for now. We will get to ngrok and public URL’s in a second. As you are typing messages in one window, under one account, you can reply from the other window, under your other user account. Just chat with yourself for the moment, to see how it works. Everything you type in one browser will show up in your and your other identities window.
Introoducing nGrok
ngrok is a free tool you can download here. Twilio, which we are going to use in a second for texting, expects to interact with our application. The way it does this is by using public/internet-accessible URL’s, but my XAMPP server is running on my machine behind my firewall. To expose my webserver to the wider internet we use ngrok. It’s a standalone executable; I still have it in my Downloads folder after many months.
I am a registered user so I can use a domain name that is easier to memorize. I start ngrok with ./ngrok -subdomain ralf 80
This means that all requests to http://ralf.ngrok.com will be forwarded to my XAMPP server as long as ngrok is running. If you are not registered with ngrok, you will get some funky domain name. Just watch the output of the tool and it will tell you what it is.
Checkpoint – load our chat system via ngrok. Browse to http://ralf.ngrok.com/ajax-chat/ajax-chat, well whatever the domain name is you selected, or got assigned.
If it works: Bravo! If it doesn’t work, but ngrok is running, check out this help page.
Even we haven’t done anything with texting yet, we are three quarters through to the final product. The rest is all easy peasy lemon squeezy and only 15 minutes left of work.
Adding The Text Messaging Sauce
So now that we have basic chat functionality going, let’s integrate Twilio text messaging as a new feature. Again, the idea is to send and receive text messages from the browser.
The design is simple. Incoming text messages, which are sent to a Twilio toll-free number ,will be displayed in the chat window under their phone number as label. Outgoing text messages, i.e., the messages sent to the customer, will be triggered by typing the @ symbol followed by the phone number and message text. For example, typing “@4151231234 Hello World” into the chat window would send Hello World to the phone number +1 (415) 123-1234.
I have taken the approach to use the Twilio PHP helper library. Alternatively, you could use cURL, but the helper library has such a nice encapsulation of Twilio REST functionality.
Here are the two basic modifications we need to do to our working chat program. First an inbound message needs to be displayed in the chat window. Second, when agents type the special marker @, we need to send the text message to the customer’s mobile device.
Configuring Your Toll Free Number
Go ahead and purchase a toll free number and let’s use that one for texting.
Twilio responds to an incoming text message with a callback, sometimes called a webhook. In other words, Twilio will POST the message as well as some meta-information to a URL which you specify in your account portal for your number. Basic information includes the parameters ‘From’ (sender), ‘To’ (Twilio number) and ‘Body’ of the message. We will point this Message Request URL to our webchat browser app, from where it is inserted into the database and ultimately shows up in the chat window.
Here is a screenshot how you configure the number in your account portal.

Here, we point the Messaging Request URL to http://ralf.ngrok.com/ajax-chat/php/3rdPartyDB.php. The file 3rdPartyDB.php, which you can find in your ajax-chat folder in the php folder on disk, is the one, where we will handle the inbound message. We just have to write some code to display it in the chat window.
Handling Incoming Texts From Customers
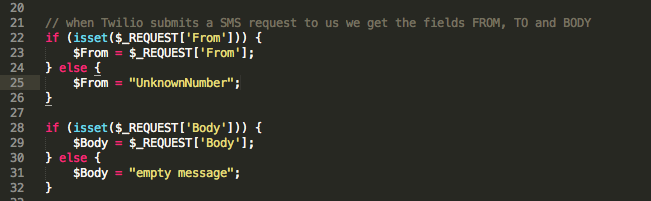
We need to write the code that receives the Twilio callback and displays the text message on screen. Check this out! As mentioned earlier when Twilio receives a message it will POST the parameters ‘From’, ‘To’ and ‘Body’ to your Message Request URL, which we just configured to be http://…../3rdPartyDB.php. So in this file we first extract where the message comes ‘From’. ‘From’ is the senders phone number. We will display this number in the chat window. Next we also extract the message itself from the request, which Twilio sends to us in the same request under the ‘Body’ parameter.
As I mentioned earlier, anything that is inserted as a row into our webchat_lines database table will be displayed in the chat window. That’s what we have to do. We insert the user, here the user is the mobile phone number that sent the text message and the message itself into the database. We escape the the strings to avoid attacks on our database.
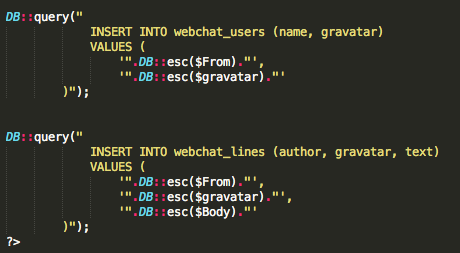
Believe it or not, but this is all the modification we need to display the incoming text message in the chat window. These are 11 additional lines of easy code. Kudos to Martin and Kudos to Twilio. The user identifier here is the sending phone number. The incoming message is displayed after the user identifier.
Checkpoint – let’s do some basic testing first. We mimic Twilio here. In your browser load the page http://ralf.ngrok.com/ajax-chat/php/3rdPartyDB.php?From=%2B14151231234&Body=test
You should see a line in your chat window, that shows the message “test” from the user 14151231234. [%2B is the urlencoded form of “+” – we’ll talk about this later]. If this doesn’t work, go back in the tutorial to recheck all steps.
If it works, proceed by sending the Twilio number you configured in the account portal a text message from your mobile phone, and wait until it arrives in the chat window, which should be within seconds.
Sending Text Messages Back To Customers
Now, where we can receive inbound text messages in our chat window, we need to be able to reply. The same method is also applied for reaching completely new recipients. We’ll distinguish internal chat messages from external texting by using a special address format. As mentioned earlier we will use the @sign followed by the phone number and the text to send, like @4151231234 Hello
Let’s check the code that parses this chat line and uses Twilio to send the text out to the mobile phone. We are working with the file ajax.php here.
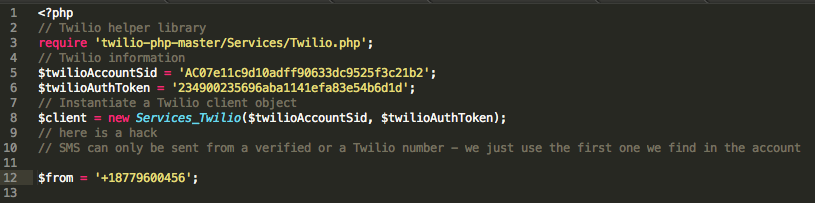
In ajax.php add your Twilio account credentials as variables to the page. Your account credentials can be found in the dashboard section of your Twilio account. We also instantiate a Twilio client object which provides all the methods to talk to Twilio intelligently. Yeah, and don’t worry about trying my credentials. I changed them since then.
The remaining task is to inspect a text that was submitted as a chat line and see if it has the special marker @phonenumber. If it does, we will make a Twilio helper library call to send the text messages. You can see this in the following section.
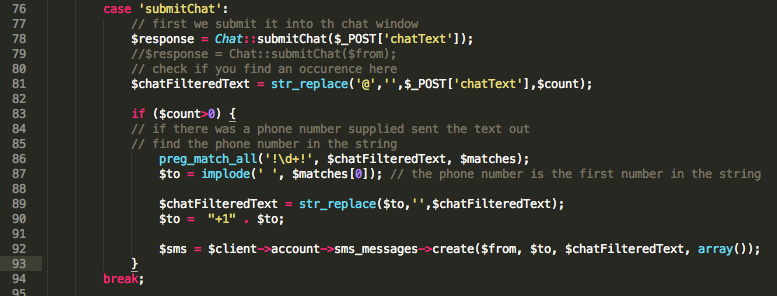
The first line of code submits what I typed to the chat window itself. Again the idea is that other agents can see all the incoming and outgoing texts in one common window. This is done to ensure customers are responded to inquiries in a timely manner and so agents can collaborate.
The next code block is used to identify if this is a text message with the special marker @ and to make an encapsulated Twilio REST request to the Twilio Messages resource to send the message.
First we strip out the @symbol and identify the phone number and text of the message. This is done with some PHP parsing functions. Essentially we look for number groups in the text string and use the first number string as phone number.
One remark about the $to=”+1” . $to. Twilio expects numbers in E.164 format. This means a phone number should be formatted with the “+” sign, followed by the country code, followed by the number. It’s also how Twilio sends you numbers. In North America the country code is 1, so a full number in E.164 would look like +16501231234. I don’t expect the agent to know this and assume they just input @6501231234 which is how we do it all day long. That’s why I am adding the +1. We could apply more logic but this seems natural.
Next we make a request to the Twilio /Messages REST resource to send the message. This is done with the helper library and this line of code:
$sms = $client->account->sms_messages->create($from, $to, $chatFilteredText, array());
Behind the scenes, the messages resource is addressed via https://api.twilio.com/2010-04-01/Accounts/’ . $twilioAccountSid . ‘/SMS/Messages.xml’,
The POST to this resource expects ‘From’, ‘To’ and ‘Body’ which we supply. The helper library takes all this RESTful thinking away from us in a chaining of objects and methods. Sweet.
Checkpoint: Go into your web chat browser window and send yourself a text message. You could type @4151231234 I can text and chat now via my computer.
It’s All Done!
couple lines of code. There are many more enhancements possible. You could map the phone number into a username transparently in the database. You could use Twilio Message Delivery Information to display if the message was delivered on the customer’s device. Or you could add Twilio client to enable voice calling within the same browser window as the chat system.
Download
https://github.com/rschiffert/ajaxchat/blob/master/3rdPartyDB.php
Contact and Comments
We want to see what you are building with Twilio SMS on toll-free numbers, so give us a shout and show us what you got. I am oktoberfest@kasperlkopf.de or @guglhupf on Twitter.
Thanks for reading!

Related Resources
Twilio Docs
From APIs to SDKs to sample apps
API reference documentation, SDKs, helper libraries, quickstarts, and tutorials for your language and platform.
Resource Center
The latest ebooks, industry reports, and webinars
Learn from customer engagement experts to improve your own communication.
Ahoy
Twilio's developer community hub
Best practices, code samples, and inspiration to build communications and digital engagement experiences.