Building a Delivery Reminder System with Twilio’s Answering Machine Detection (AMD) and Node.js
Time to read:
October 06, 2021
Written by
Reviewed by

Background
Twilio offers a wide range of phone related features. Among them, Answering Machine Detection or “AMD” allows you to identify the incoming caller and adjust the call flow accordingly. With AMD, you can determine whether an outgoing call issued from a voice API was answered by a human, an answering machine, or a fax machine. Based on this information, you can update the call and trigger different actions after the call ends.
This tutorial will show you not only the basic features of AMD, but also how to create a delivery reminder system with it.
Goal
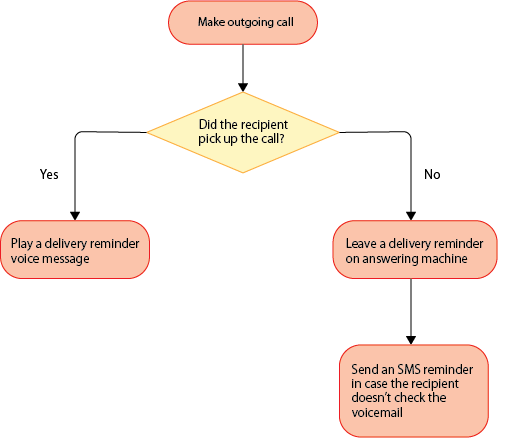
By the end of this tutorial, you will learn the basic features of AMD and have a delivery reminder system built using Node.js. This system plays a reminder message if a human answers the call, but if the call is answered by an answering machine it also sends an SMS message like so:

The processing flow is as follows:
Assumed technical knowledge
This tutorial requires:
- Basic JavaScript knowledge
- Basic Node.js knowledge
Required tools and packages
- Stable version of Node.js and npm.
- A free or paid Twilio Account.
- A Twilio phone number with the ability to make phone calls and send SMS. For instructions on how to get a phone number, see Get your first Twilio phone number in the Twilio Documentation.
- Ngrok with a registered account and AuthToken set up. For more information, see the ngrok's official website.
- A personal phone number with voicemail enabled to test the project.
Basic features of AMD
AMD is a feature provided by Programmable Voice that analyzes the speech patterns that occur in the first few seconds after a call starts. When the responder is a human, it’s common for the responder to say something like “Hello” in response to the call, and then go silent to wait for the caller’s response.
On the other hand, in the case of an answering machine there is no pause, as the responder plays a recorded message, like “Hello, this is…”. AMD recognizes this pattern and determines that a human picked up the call if there is silence for a certain period of time, or decides an answering machine picked up if there is continuous noise.
Basic settings
Now that you understand the basic functions of AMD, let’s start with the basic settings for the program.
Create an amd-node-delivery-reminder directory.
Move to amd-node-delivery-reminder and create 3 files in the root directory: make-call.js for the main project file, .env for storing environment variables, and delivery-data.json for storing dummy data.
Next, we’ll install the required dependencies. Open a terminal and run this command in the root directory of amd-node-delivery-reminder:
The details of the installed dependencies are as follows:
dotenv: Package for importing the values defined in the .env file as environment variables.express: A web application server framework for Node.js.twilio: Twilio Node Helper Library to make HTTP requests to Twilio APIs using Node.js.
You now have all the necessary files and packages for the project.
Build the delivery reminder system
The next step is to build the delivery reminder system.
Set environment variables
To use the Twilio Node Helper Library, you need an Account SID, which is a unique identifier for your Twilio account, and an Auth Token, which is used to authenticate. To manage these IDs securely and efficiently, we'll store them as environment variables.
Open the .env file you created with a text editor, and copy and paste this code:
XXXXX represents a placeholder for Twilio’s authentication information. Below are step-by-step instructions on how to get these credentials and add them to your .env file.
Account SID
Log in to the Twilio Console and copy the value of ACCOUNT SID and paste it into the TWILIO_ACCOUNT_SID variable in the .env file .
Auth Token
Under the Account SID, you’ll find AUTH TOKEN. Copy the value and paste it into the TWILIO_AUTH_TOKEN variable in the .env file.
Your Twilio phone number
Paste your Twilio phone number into the TWILIO_PHONE_NUMBER variable in E.164 format in the .env file.
ngrok URL
This tutorial demonstrates how to run the program locally. To enable Twilio’s APIs to access the program running in the local environment, we’ll use ngrok and expose localhost:3000 to the web.
Open a new window in a terminal and execute this command:
If ngrok works without problems, you’ll see the URL published on the web as shown below.
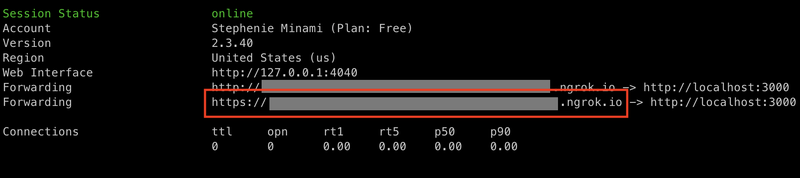
Copy the URL starting with https on the right side of Forwarding and paste it into the NGROK_URL variable.
Save the .env file.
Prepare dummy data
In this delivery reminder system, we’ll create and use dummy data in JSON format. Open delivery-data.json and paste this code:
phoneNumber is the delivery recipient’s phone number we’ll call. Paste the phone number you want to specify as the recipient in E.164 format in {Your personal phone number}.
Save the delivery-data.json file.
Set up outgoing calls
First, we’ll import the environment variables and instantiate the dependencies. Open make-call.js and copy this code to the first line in the file:
At this point, let’s test the server once to make sure it runs correctly. Save the file, open the first terminal window and run this command in the root directory of amd-node-delivery-reminder:
If the server runs without any problems, you’ll see the message “Example app listening on port 3000!”. Once the message is displayed, stop the server.
Next, we’ll implement the outgoing call process. To make a call with Twilio, we send a POST request to the Call resource. The following code defines the makeCall function that sends a request to the Call resource and sets up the outgoing call.
Paste this code between the block for global variables and the app.listen block:
Let’s go through the options passed to the client.calls.create() function in detail.
machineDetection
machineDetection specifies the AMD processing method. There are two AMD processing methods that can be specified in machineDetection: Enable and DetectMessageEnd. When AMD detects a human call or answering machine, it will pass the result of the detection in an AnsweredBy parameter. The timing at which this AnsweredBy parameter is sent to the application depends on the AMD processing method you specify.
With this setting set to Enable, the result is provided to the application as soon as possible. This setting is appropriate if you want to take certain actions immediately, such as transferring the call when a human answers, or hanging up when a machine picked up.
DetectMessageEnd returns the result immediately after a human is detected, but if an answering machine is detected, it will delay the result of the detection until after the recorded message is finished. This setting is appropriate if you want to leave a message on the answering machine. In this tutorial, we will use DetectMessageEnd.
asyncAmd and asyncAmdStatusCallback
AMD detection can be handled asynchronously. If you set asyncAmd to true, the call will continue regardless of whether the call is answered by a human or an answering machine. This setting allows a call to continue without silence if a human answers the call. If set to false, Twilio will block the call from running until AMD completes.
In this tutorial, we will set asyncAmd to true. If you set asyncAmd to true, you need to also set AsyncAmdStatusCallback. AsyncAmdStatusCallback specifies the callback URL to send the detection result to. In this tutorial, we will create an endpoint named /amd-callback and set it to AsyncAmdStatusCallback.
twiml
In twiml, we define what to do while AMD is detected, using TwiML code. In this tutorial, we play the audio message “This is Twilio Logistics. We’re retrieving the message.”
statusCallback and statusCallbackEvent
statusCallback is used to track the status of the call. In this tutorial, we will create and specify an endpoint named /status-callback and set it to statusCallback. When using statusCallback, you need to specify the statuses you want to track in statusCallbackEvent. In this tutorial, we’ll specify an array of all possible statuses that we can receive: initiated, ringing, answered, and completed.
Create an endpoint to receive the call status
Next, we’ll create an endpoint to receive and output the call status sent from statusCallback.
Paste this code under the makeCall function block:
This code creates a /status-callback endpoint that will receive the call status sent from statusCallback. This will output one of initiated, ringing, answered, and completed each time the status changes.
Create an endpoint to configure the process after the recipient of the call has been detected
The next step is to configure the behavior of the program when it detects a human or an answering machine. Paste this code under the block for the /status-callback endpoint:
In the above code, we’re creating the /amd-callback endpoint and defining the process based on the AMD detection results received by the endpoint. If the call is answered by a human (human), a delivery reminder voice message is played. Otherwise, a delivery reminder voice message is left on the answering machine and a reminder message with the delivery ID is sent via SMS.
Finally, paste this code below the app.listen block:
This code starts the outgoing call. Save the file.
The program is now complete!
At this point, you can check the code in make_call.js so far against the code on Github.
Test the program
Verify the program behavior when a human answers the call
In the terminal, run this command in the root directory of amd-node-delivery-reminder:
If the program works without any problems, a call will be made to the phone number registered in delivery-data.json.
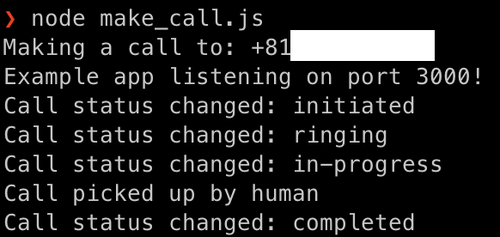
Pick up the phone and say something like “Hello”. Once AMD detects that a human picked up the call, it will play the message “This is Twilio Logistics. We’re retrieving the message.”, followed by “This is Twilio Logistics. We’ll deliver your package between 9 and 11 o’clock today. Goodbye!”.
The terminal will show the status of the call and “Call picked up by human”.
Hang up the call and stop the server in the terminal.
Verify the program behaviour when an answer machine was detected
Run node make-call.js in the terminal again.
When you receive the call, do not answer it this time and let your voicemail take it.
When an answering machine is detected, this SMS message will be sent to the recipient’s phone number.

When you play the voicemail left on the answering machine, you will hear the message: “This is Twilio Logistics. We’ll deliver your package between 9 and 11 o’clock today. Goodbye!”.
Congratulations! You’ve built a delivery reminder system using Twilio’s AMD and Node.js. AMD is a useful feature if you want to take different actions depending on the status of the call recipient. If you’d like to extend this program further, you can use TwiML’s <Gather> verb to allow the recipient to select an option to connect to an agent using a keypad.
Happy coding!
Stephenie is a JavaScript editor in the Twilio Voices team. She writes hands-on JavaScript tutorial articles in Japanese and English for Twilio Blog. Reach out to Stephenie at snakajima[at]twilio.com and see what she’s building on Github at smwilk.
Related Resources
Twilio Docs
From APIs to SDKs to sample apps
API reference documentation, SDKs, helper libraries, quickstarts, and tutorials for your language and platform.
Resource Center
The latest ebooks, industry reports, and webinars
Learn from customer engagement experts to improve your own communication.
Ahoy
Twilio's developer community hub
Best practices, code samples, and inspiration to build communications and digital engagement experiences.