How to Use the Twilio Java Helper Library and AWS CDK to Deploy AWS Lambda Functions
Time to read:
June 27, 2022
Written by
Reviewed by

In this post, learn how to leverage the AWS Cloud Development Kit (CDK) to build and deploy a serverless AWS Lambda function that uses Twilio’s Programmable SMS API to send SMS to users. We will use Java for all components of this post to define the AWS CDK application and AWS Lambda Handler, and we will use Twilio’s Java Helper Library to work with the SMS APIs.
Prerequisites
For this tutorial, you will need to set up Java on your system, since we will be using it to define our AWS CDK application and the AWS Lambda handler. In addition to it, you will need to install AWS CLI and AWS CDK CLI, to configure AWS credentials and to build your CDK application respectively. Finally, you will need to create an AWS account for deploying the application, and a Twilio account with an SMS-enabled phone number to send SMS. Refer to the list below to set up everything required for this tutorial:
- Set up Java development environment
- Install AWS CLI
- Install AWS CDK
- Create an AWS account if you don’t already have one.
- Install Docker to containerize the Lambda project.
- Twilio account with SMS-enabled phone number. If you haven’t yet, sign up for a free Twilio trial. Refer to this guide to get your first Twilio Phone number.
Build the CDK application
Create a new AWS CDK project
To create a new AWS CDK project, you need the CDK CLI installed on your system. First create a new directory for our CDK project and navigate into it.
Next, using the CDK CLI run the cdk init command to create a new CDK project using Typescript. The app parameter specifies the template that we are going to use for initializing the project.
Executing the above command creates a new CDK project with a single CDK stack. The generated project is a Java Maven project. Open it in IntelliJ IDE or another IDE of your choice.
Define the AWS Lambda function
In this section, we will define a Java-based AWS Lambda function that will use the Twilio Java Helper Library to interact with SMS APIs.
Create a new Maven Project for the Lambda function
Create a lambda directory at the root of the CDK project by right clicking on the project name and choosing New > Directory. With the lambda directory selected, click File > New project from the toolbar to create a new Maven project, naming it as twilio-java-helper-send-sms. Choose Java Language for the project and use JDK version 11.
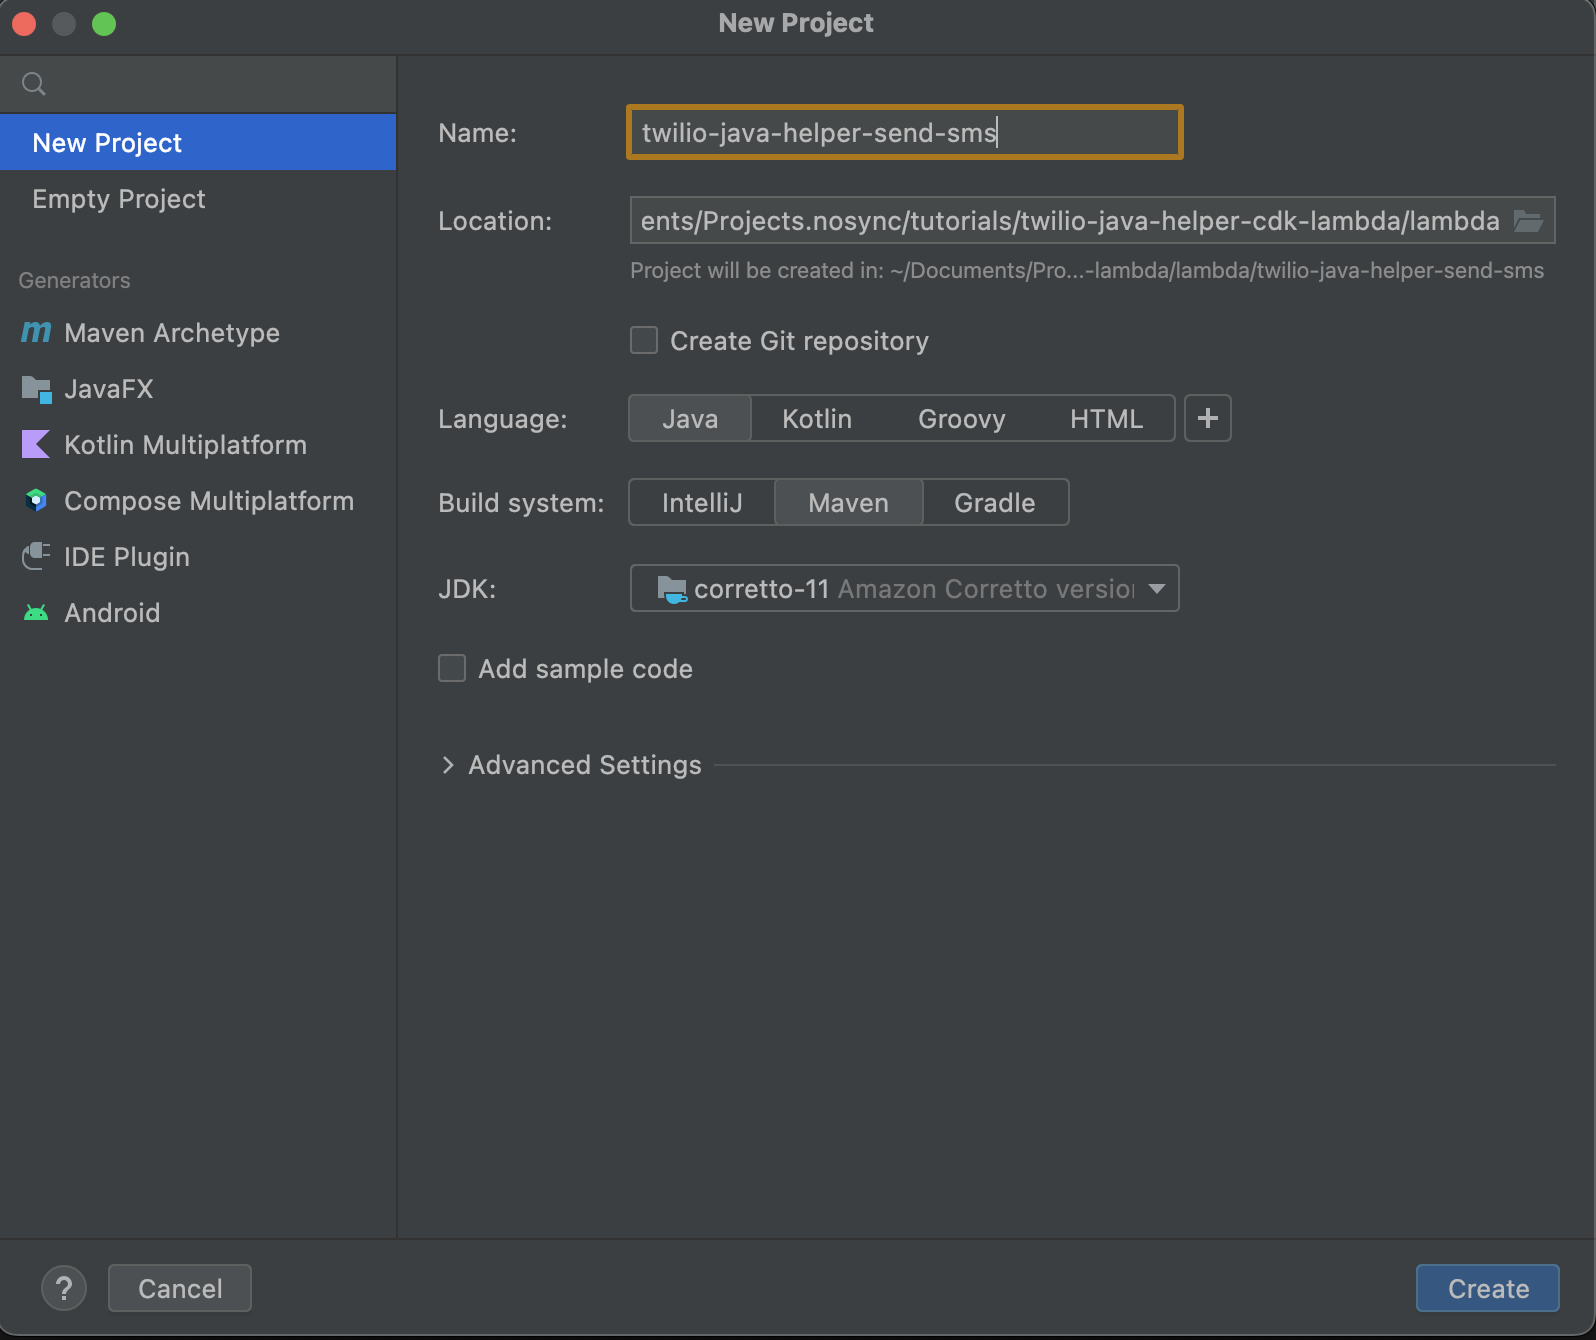
Click on Create to create the project. Choose New window when the IDE prompts you to open the project.
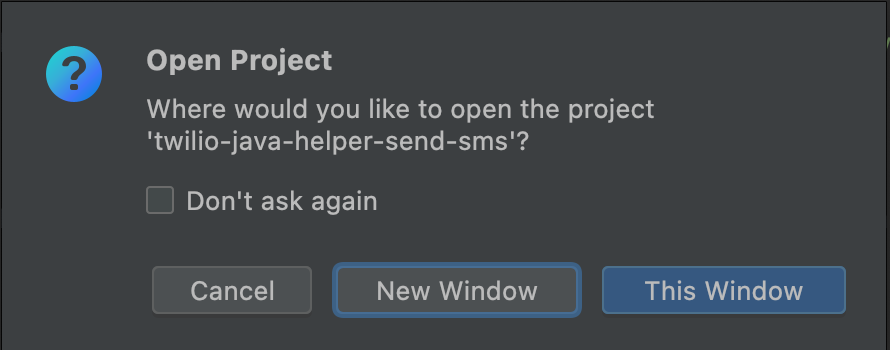
During the remainder of this section, we will work in the new window on the twilio-java-helper-send-sms project that was just created.
Define a group ID for the Maven project
As a convention Maven projects use the reversed domain name for group ID. Add a group ID based on the domain that you own. This tutorial uses com.maskaravivek as group ID. Update your pom.xml file with it.
Create the com/maskaravivek directories inside the src/main/java directory to match the group ID of the project.
Add dependencies in pom.xml
Define the required dependencies in the pom.xml file. To start off, add dependencies for the AWS Java SDK and the AWS Lambda Java core libraries. Open pom.xml and add the following definitions inside the <project> tag:
Since we will be exposing the Lambda function through API Gateway, the function needs to proxy API Gateway’s request and response. So, also add a dependency for the AWS Lambda Java Events library inside the <dependencies> section of the pom.xml file.
We also need the Gson library for working with JSON.
Finally, add a dependency for the Twilio Java Helper Library, to work with the SMS APIs.
Note: After adding the dependencies, you need to sync maven dependencies by right-clicking on the project and selecting Maven > Reload project.
Define request and response classes
The Lambda function proxies the HTTP request and response from the API Gateway, therefore we need to create Java bean classes for them.
Create a SendSmsRequest.java class in the src/main/java/com/maskaravivek package for the Lambda input. In IntelliJ IDE you can create a new Java class by right clicking on the package name and choosing New > Java Class. Add the following code to this file.
The Lambda handler uses the request class to parse the JSON input body from the APIGatewayV2HTTPEvent event.
Also, create a SendSmsResponse.java class in the src/main/java/com/maskaravivek package for the Lambda output.
The class is used by the Lambda handler to set the body of the APIGatewayV2HTTPResponse.
Define the Lambda handler
Next, define the AWS Lambda Handler that takes a JSON input payload containing the receiver phone number and message, and uses Twilio’s Programmable SMS API to send the message.
Create a TwilioJavaHelperSendSmsHandler.java class in src/main/java/com/maskaravivek package and add the following code snippet to it.
Note that the Lambda handler implements the handleRequest method that takes APIGatewayV2HTTPEvent as input and returns APIGatewayV2HTTPResponse.
Next add the implementation for the above Lambda handler.
The handler uses the Message.creator(...).create() function exposed by the Twilio Java helper library to send an SMS to the receiver's phone number.
Note that the handler retrieves the values for TWILIO_ACCOUNT_SID, TWILIO_AUTH_TOKEN and TWILIO_PHONE_NUMBER from environment variables. In a later section, we will see how these environment variables can be set while defining the Lambda function.
Build the Maven Project
Build the Maven project to check if it compiles without errors by clicking on Build > Build Project in the IDE. Alternatively you can use mvn to compile the application using the following command.
After verifying that the project compiles, you can optionally update the version of the Lambda Maven project by modifying the <version> tag from snapshot to a release version in the pom.xml file.
Note, updating to a release version is completely optional but its a good practice to use a release version tag for deployments.
Define the AWS CDK stack
Now that the Lambda handler is defined, switch back to the CDK Maven project i.e., twilio-java-helper-cdk-lambda window in the IntelliJ IDE.
Add CDK dependencies
Add the following dependencies in the pom.xml file of the CDK project. The pom.xml file would be auto-generated by CDK when you initialize the project.
Add a CDK construct for AWS Lambda function
AWS CDK constructs are building blocks for cloud components that encapsulate the configuration detail and gluing logic for using one or more AWS services. AWS CDK provides constructs for most of its popular AWS services.
At the start of this tutorial, when we generated the CDK project using the app template, a TwilioJavaHelperCdkLambdaStack.java file was generated in src/main/java/com/myorg directory. We will now define the constructs for the AWS Lambda function and the API Gateway HTTP APIs. First, add the following imports in the src/main/java/com/myorg/TwilioJavaHelperCdkLambdaStack.java file.
To avoid any manual intervention, we will define packaging instructions for the Lambda function in the CDK stack. We will use the Code.fromAsset API along with bundling commands for the Maven project. The commands will build the Maven project and copy the jar to the asset-output directory. These commands will be executed inside a Docker container created using Java 11’s official image.
Add the following code snippet in the constructor of the TwilioJavaHelperLambdaStack.java file. The generated class should have two constructors and we need to add the code in the constructor with StackProps in its arguments.
Next, define the CDK construct for the AWS Lambda function, right after the code you defined above. We will pass TWILIO_ACCOUNT_SID, TWILIO_AUTH_TOKEN and TWILIO_PHONE_NUMBER as environment variables to the Lambda function. Also, as discussed above, we use the Code.fromAsset API to bundle the Lambda code. It uploads the zipped archive to a temporary AWS S3 bucket for deployment.
Note that the FunctionProps.builder() can be used to set various properties of the Lambda function like memory, timeout, runtime and environment variables.
Adding a CDK construct for API Gateway API
Now that we have defined the AWS Lambda function, go ahead and expose the function using an HTTP API. We will use AWS API Gateway to expose our API(s) over HTTP. Define the service with the following construct, which you should add below the code added in the previous section, and still in the same constructor.
For the last section of this constructor, we will use HttpLambdaIntegration to expose the Lambda as an HTTP API and expose it as a POST method on the /sendSms endpoint.
Deploy the CDK application
Now that we have defined the resources for our cloud application in the CDK stack, go ahead and deploy it to an AWS account. Set the Twilio Account SID and Auth Token as environment variables before deploying the application. You can obtain these credentials from the Twilio Console. In addition to the credentials, set your twilio phone number as an environment variable. If you don’t have a twilio phone number, you can get a phone number following this guide.
There are three steps for deploying a CDK application. Make sure that Docker is running and AWS credentials are configured on your system before deploying the application.
Bootstrap the application
The first step is to bootstrap the application. Bootstrapping provisions the resources that might be required by AWS CDK to deploy your application. These resources might include an S3 bucket for storing deployment-related files and IAM roles for granting deployment permissions. Execute the following command in the root directory of your CDK application to bootstrap the stack.
Synthesize the application
The second step is to synthesize the stack by running the cdk synth command. This command executes your CDK application, which causes the resources defined in it to be translated into a YAML-based AWS CloudFormation template. Run the following command in the root directory of your CDK application to synthesize the stack.
Note that if your CDK application contains multiple stacks then you need to specify the name of the stack while executing the synth command. We don’t need to worry about it since our demo application contains just one stack. Also, the synth command catches logical errors in the stack and throws an exception if the stack isn’t defined correctly.
Deploy the application
Once the above command executes successfully, we can go ahead and deploy the application by executing the following command. You should have AWS credentials configured locally for the deploy command to execute successfully. The deploy command will look for the AWS access key, secret, and region to automatically deploy the application to the associated AWS account.
Note that you might be prompted to confirm the IAM role/policy changes that would be applied to your account.
The application should deploy successfully and it should output the base URL of the HTTP API that we deployed. Keep this URL handy as we will need it while testing the application.
Test the application
Now that the application is deployed to the AWS account, we can get to the fun part - testing the API and checking that we are able to send messages to the specified phone numbers.
Remember that if you are using a trial Twilio account then you can send messages only to numbers that are verified under your account.
Our API accesses a POST JSON request with the receiver phone number and the message. Here’s a sample request object.
You can try the following curl request in your terminal by replacing the base URL to test the API. Replace the fake phone number with your own mobile number.
On executing the above curl request, you should get a JSON response with the message SID.
The number you provided in the request should receive the message in a short moment.
Conclusion
In this post, we learned how to use AWS CDK to programmatically deploy a Lambda function using Infrastructure as Code (IaC) constructs. AWS CDK simplifies the process of provisioning cloud resources for your application using familiar programming languages. It allows you to use object-oriented techniques and makes the infrastructure code testable. This tutorial demonstrated how we can use the Twilio Java helper library in our AWS Lambda function and deploy it to AWS. The Twilio Java helper library makes it easier to interact with various Twilio services with easy-to-consume APIs. With the power of Twilio Java Helper Library and AWS CDK, you can build your services much faster and deliver a rich experience to your users. You can check out the full source code used in this tutorial on GitHub.
Vivek Kumar Maskara is an Associate Software Engineer at JP Morgan. He loves writing code, developing apps, creating websites, and writing technical blogs about his experiences. His profile and contact information can be found at maskaravivek.com.

Related Resources
Twilio Docs
From APIs to SDKs to sample apps
API reference documentation, SDKs, helper libraries, quickstarts, and tutorials for your language and platform.
Resource Center
The latest ebooks, industry reports, and webinars
Learn from customer engagement experts to improve your own communication.
Ahoy
Twilio's developer community hub
Best practices, code samples, and inspiration to build communications and digital engagement experiences.