Build a Voicemail Service using Twilio Voice and ASP.NET Core
Time to read: 7 minutes
March 21, 2023
Written by
Reviewed by

Most mobile networks provide a voicemail service letting people who call you leave a message when you can't answer, and letting you listen to those messages by calling your voicemail number. When you have programmatic access to your calls using Twilio, you can implement your voicemail service and customize it to you or your business's needs.
In this tutorial, you will learn how to implement an Interactive Voice Response (IVR) app using ASP.NET Core Web API project to record and serve your voicemails and how to manage them (play/save/delete) by calling your Twilio phone number.
Prerequisites
You'll need the following things in this tutorial:
- A free Twilio account
- A Twilio phone number
- An OS that supports .NET (Windows/macOS/Linux)
- .NET 7.0 SDK (newer and older versions may work too)
- A code editor or IDE (Recommended: Visual Studio Code with the C# plugin, Visual Studio, or JetBrains Rider)
- ngrok (A free ngrok account is sufficient for this tutorial)
- Git CLI
- Experience with ASP.NET Core, the Twilio voice webhook and TwiML
Project overview
In this tutorial, you will implement an ASP.NET Core Web API to record and manage your voicemails. Before getting into the implementation details, let's take a look at what it does:
The flow of your IVR starts when someone calls your Twilio phone number which Twilio picks up. Twilio passes the call details to your Web API and expects TwiML instructions to manage the call. If the caller's phone number is one of the "owners" phone numbers, the voicemail directory flow will be invoked, otherwise the voicemail recording flow will be invoked.
Voicemail recording flow:
- The IVR asks the caller to leave a message after the beep, after which the call is being recorded.
- Once the caller finishes recording, the IVR thanks the caller for leaving a message and ends the call.
- When Twilio saves the recording, Twilio will notify your Web API of the location of the recording and your Web API downloads the recording to disk.
Voicemail directory flow:
- The IVR informs the user how many new and saved messages are available, and creates a queue of the messages
- The IVR plays the current message in the queue and asks to press the dial pad buttons to either 1-replay, 2-save, or 3-delete the message.
- If 1 is pressed, the message and the queue are not changed. If 2 is pressed, the message is saved, and then the message is removed from the queue. If 3 is pressed, the message is deleted, and then the message removed from the queue. If there are more messages in the queue, go to step 7.
- The IVR informs the caller that there are no more messages and ends the call.
Now that you are more familiar with the end result, let's get started.
Project set up
The easiest way to set up the starter project is by cloning the sample GitHub repository.
Open a terminal, change to the directory you want to download the project and run the following command:
The project can be found in the src\VoicemailDirectory.WebApi subfolder. Open the project in your IDE.
The project comes with empty files that you will implement as you go along. Before starting the implementation, let's take a look at the key points in the starter project:
The API will download the audio recordings and store them under the wwwroot/Voicemails directory. To let Twilio have access to these files, static file hosting is enabled in the API by adding the following line to the Program.cs file:
The downloading operation and all local I/O operations will be handled via FileService, which is added to the IoC by the following statements in Program.cs:
As explained in the project overview section, you must add the owner's phones to the configuration to access your voicemails. You can only listen to your voicemails by calling from one of those numbers.
Update your configuration by adding your phone number(s) to the appsettings.json file:
Next, for Twilio to be able to send HTTP requests to your Web API, you'll need to make your locally running Web API publicly available over the internet. You can use ngrok for this, a free secure tunneling service. Run the following command to create a tunnel with ngrok:
Note the forwarding URL on your screen, which should look like this:
Ngrok has now created a secure tunnel that will accept HTTP requests at the temporary Forwarding URL and forward those requests to http://localhost:5096.
When your Twilio phone number receives a phone call, Twilio will send an HTTP request to your Web API passing in the call information and expecting instructions. You need to configure where this HTTP request is sent when a call comes in.
To do this, go to the Twilio Console, select your account, and then click Phone Numbers → Manage → Active Numbers on the left pane. (If Phone Numbers isn't on the left pane, click on Explore Products and then on Phone Numbers.)
Click on the phone number you want to use for your project and scroll down to the Voice section.
Under the A Call Comes In label, set the dropdown to Webhook, the text field next to it to the ngrok Forwarding URL suffixed with the /IncomingCall path, the next dropdown to HTTP POST, and click Save. It should look like this:
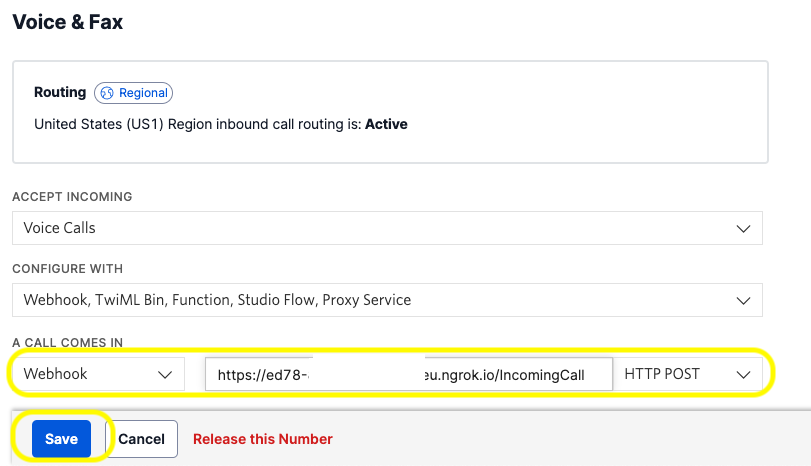
Note that you have to use HTTPS as the protocol when setting the webhook URL.
Now that all the plumbing is done, move on to the next section to implement the application.
Project implementation
The first step to recording voicemails is to receive the calls. As you added the /IncomingCall path to your webhook URL, your controller must match this.
Update the IncomingCallController.cs file with the following code:
The default action (Index) is invoked when somebody calls your Twilio phone number. The calling number is checked here to see if the caller is an owner or anybody else. If the caller is unknown, it redirects to the RecordController's Index action. If the caller is an owner, it redirects to the DirectoryController's Index action.
Update the RecordController.cs with the following code:
Recording the voicemails is a 3-step process:
- Respond with TwiML instruction to tell Twilio to record the call, which is done in the
Indexaction. - When the caller is done recording, Twilio will send an HTTP request to the
Byeaction, because that's theactionURL configured on theRecordTwiML. TheByeaction will acknowledge the message has been taken to the caller, and because there's no further TwiML instructions, the call will be ended. - When the recording status changes, Twilio will send an HTTP request to the
RecordingStatusaction, because that's therecordingStatusCallbackURL configured on theRecordTwiML. The HTTP request sent to theRecordingStatusaction will contain data such as the recording URL, SID, status, and more. If the status iscompleted, the action will download the audio recording and store it locally.
The caller may hang up before reaching the timeout, in which case they will not hear the acknowledgement message, but the recording will still be downloaded.
Next, update the third and final controller, DirectoryController, with the following code:
When you call your Twilio phone number as the owner, the Index action will be executed. You haven't implemented the FileService yet (which is next), but from the function names, you can deduce that this action does the following:
- Get the new and saved recordings separately
- Prepare a welcome message to indicate how many new and how many saved messages are in the directory
- Get a list of all recordings and prepare the TwiML response to play the first message in the queue, followed by prompting the available options.
After the first message is played to the caller and the caller has made their decision, Twilio passes this information to the Gather action of the controller. Now you have to decide what to do based on the caller's action, which is what the switch statement in the Gather action does.
Before going over the logic in this controller, implement the FileService as well, as the controller uses that service heavily.
Update the FileService.cs file with the following code:
If the user has pressed 1 to replay the message, you don't have to do anything in your API other than return the same response. As long as the message is left at the top of the queue, it will be played to the caller.
If the user has pressed 2 to save the message, the controller calls the SaveRecording method of the FileService, which renames the file by replacing "New" with "Saved". This way, the next time you call your voicemail service, this recording will be treated as an old recording.
If the user has pressed 3 to delete the message, the controller calls the DeleteRecording method of the FileService, which deletes the file from the file system.
If the caller has pressed any other key, the action returns the TwiML to say that the key was invalid, replays the valid options, and listens for the next dialpad button to be pressed, so that they can correct their mistake.
Test the application
First, to test leaving a voicemail, remove your phone number from appsettings.json and run the application with the following command:
Call your Twilio phone number. You should be greeted with "Hello, please leave a message after the beep.". Leave your message. After a few seconds, you should see a new MP3 file saved under wwwroot/Voicemails directory prefixed with "New_" indicating that it has not been played to the user before (at least not saved by the user, so it's treated as a new message).
Update the appsettings.json by adding your number in the owner's list and call your Twilio phone number again.
This time you should be greeted with a message telling you have 1 new message and no saved messages, followed by the recorded message. You can then take action and choose what to do with the messages.
Conclusion
When determining the scope and business logic of this voicemail service, I used my own phone provider as a guide. I was able to add all the features that they provide, so by implementing this project you created yourself a voicemail service that actually matches the features of a real voicemail service. You can deploy this to a cloud provider and give your Twilio number to receive voicemails when you don't want to distribute your own phone number.
Apart from that, you learned how to deal with call recordings and user input. If you'd like to keep learning, I recommend taking a look at these articles:
- Build a ChatGPT SMS bot with the OpenAI API and ASP.NET Core
- Build a Soundboard using GCP Speech-To-Text, Twilio Voice Media Streams, and ASP.NET Core
- Automatic Instrumentation of Containerized .NET Applications With OpenTelemetry
Volkan Paksoy is a software developer with more than 15 years of experience, focusing mainly on C# and AWS. He’s a home lab and self-hosting fan who loves to spend his personal time developing hobby projects with Raspberry Pi, Arduino, LEGO and everything in-between. You can follow his personal blogs on software development at devpower.co.uk and cloudinternals.net.
Related Resources
Twilio Docs
From APIs to SDKs to sample apps
API reference documentation, SDKs, helper libraries, quickstarts, and tutorials for your language and platform.
Resource Center
The latest ebooks, industry reports, and webinars
Learn from customer engagement experts to improve your own communication.
Ahoy
Twilio's developer community hub
Best practices, code samples, and inspiration to build communications and digital engagement experiences.