Build a Secure Twilio Webhook with Python and FastAPI
Time to read: 7 minutes
April 28, 2020
Written by

A few days ago I was looking for a web framework to build an asynchronous chat application. I wanted a Python framework with high performance that could handle async requests. Since I’m also very familiar with Flask I did not want to spend a lot of time learning something very different.
So I found FastAPI, a modern web framework for building APIs with Python 3.6+, built on top of Starlette and inspired by Flask. It’s based on standard Python type hints, it has built-in validation and serialization and it uses the open standard for APIs, OpenAPI. It was perfect for me because it supports asynchronous requests, and saves time with automatic documentation. You can find more cool FastAPI features here.
In this tutorial we are going to build a Twilio webhook using this amazing framework. Our example will focus on how to build a secure webhook that validates incoming requests, since a common problem with webhooks is making sure that requests are coming from Twilio and not some malicious third party.
Tutorial requirements
To follow this tutorial you need the following components:
- Python 3.7 or newer. If your operating system does not provide a Python interpreter, you can go to python.org and install the latest version.
- ngrok. We will use this handy utility to connect the Flask application running on your system to a public URL that Twilio can connect to. This is necessary for the development version of the application because your computer is likely behind a router or firewall, so it isn’t directly reachable on the Internet. If you don’t have ngrok installed, you can download a copy for Windows, MacOS or Linux.
- A Twilio account. If you are new to Twilio create a free account now. If you use this link to open your account you will receive $10 in credit once you upgrade it.
Creating a Python virtual environment
Let’s create a separate directory for our Python project and inside it create a virtual environment to install the Python packages that we need. You don’t need to create a virtual environment, but it is recommended to use one while developing Python applications. This allows you to create an isolated environment for each project.
Open the terminal and create a new directory for our project. Inside it we are going to create a virtual environment using the module venv from the Python standard library. To perform these tasks enter the following commands:
This will create the env virtual environment and install the packages that we are going to use in this project, which are:
- The FastAPI framework, to create the web application
- Python-multipart, to parse an incoming form data from the request body. This library is a dependency of FastAPI to receive uploaded files and form data.
- Uvicorn, an ASGI web server to run our application
- The Twilio Python Helper library, to work with the Twilio APIs
Using FastAPI to build our Webhook
Twilio needs to notify our application when certain events happen, like an incoming message. To do that, we use a webhook, which is an endpoint in our script that Twilio invokes to communicate with us. We need to configure the URL of our webhook in the Twilio Console to allow this communication.
When you log in to your Twilio Console, you’ll see the Account SID and Auth Token values for your account. These are your Twilio credentials, which will allow the Python code to access our Twilio account and use the API. For our example, we need to store the Auth Token securely in an environment variable to use it later. From the terminal, run the following command inside the fastapi-webhook folder:
To build this webhook we are going to use FastAPI, a modern web framework for building APIs with Python 3.6+. It’s based on standard Python type hints and the open standard for APIs, OpenAPI.
Let’s write an implementation for our webhook. Inside the fastapi-webhook folder, create a file named main.py with the following contents:
We first import the FastAPI class, which provides the functionality that we need to build our endpoint. You can see that we use this class to create app, our application instance.
The @app.post(“/hook”) decorator defines that the function chat that follows will handle requests that go to the URL /hook using the POST method.
Our data is coming in form fields. In FastAPI we define form data creating parameters of type Form. If you are not familiar with type hints, this code may look strange. Python 3.6+ supports optional type hints, that allow us to declare the types of variables and arguments. This can be useful to make clear what type a variable should be. This also allows code editors and linting tools to check if our code has any bug related to types. In our hook, we use Python type hints to enable FastAPI to do data validation. You can read a quick tutorial about Python type hints and how to use them for data validation in FastAPI here.
Unlike Flask, FastAPI doesn’t have a built-in development server. To run this application you will need an ASGI web server such as Uvicorn. Start the server with:
In this command main defines the file main.py, app refers to the app object we created inside with the line app = FastAPI(), and --reload makes the server automatically restart after code changes.
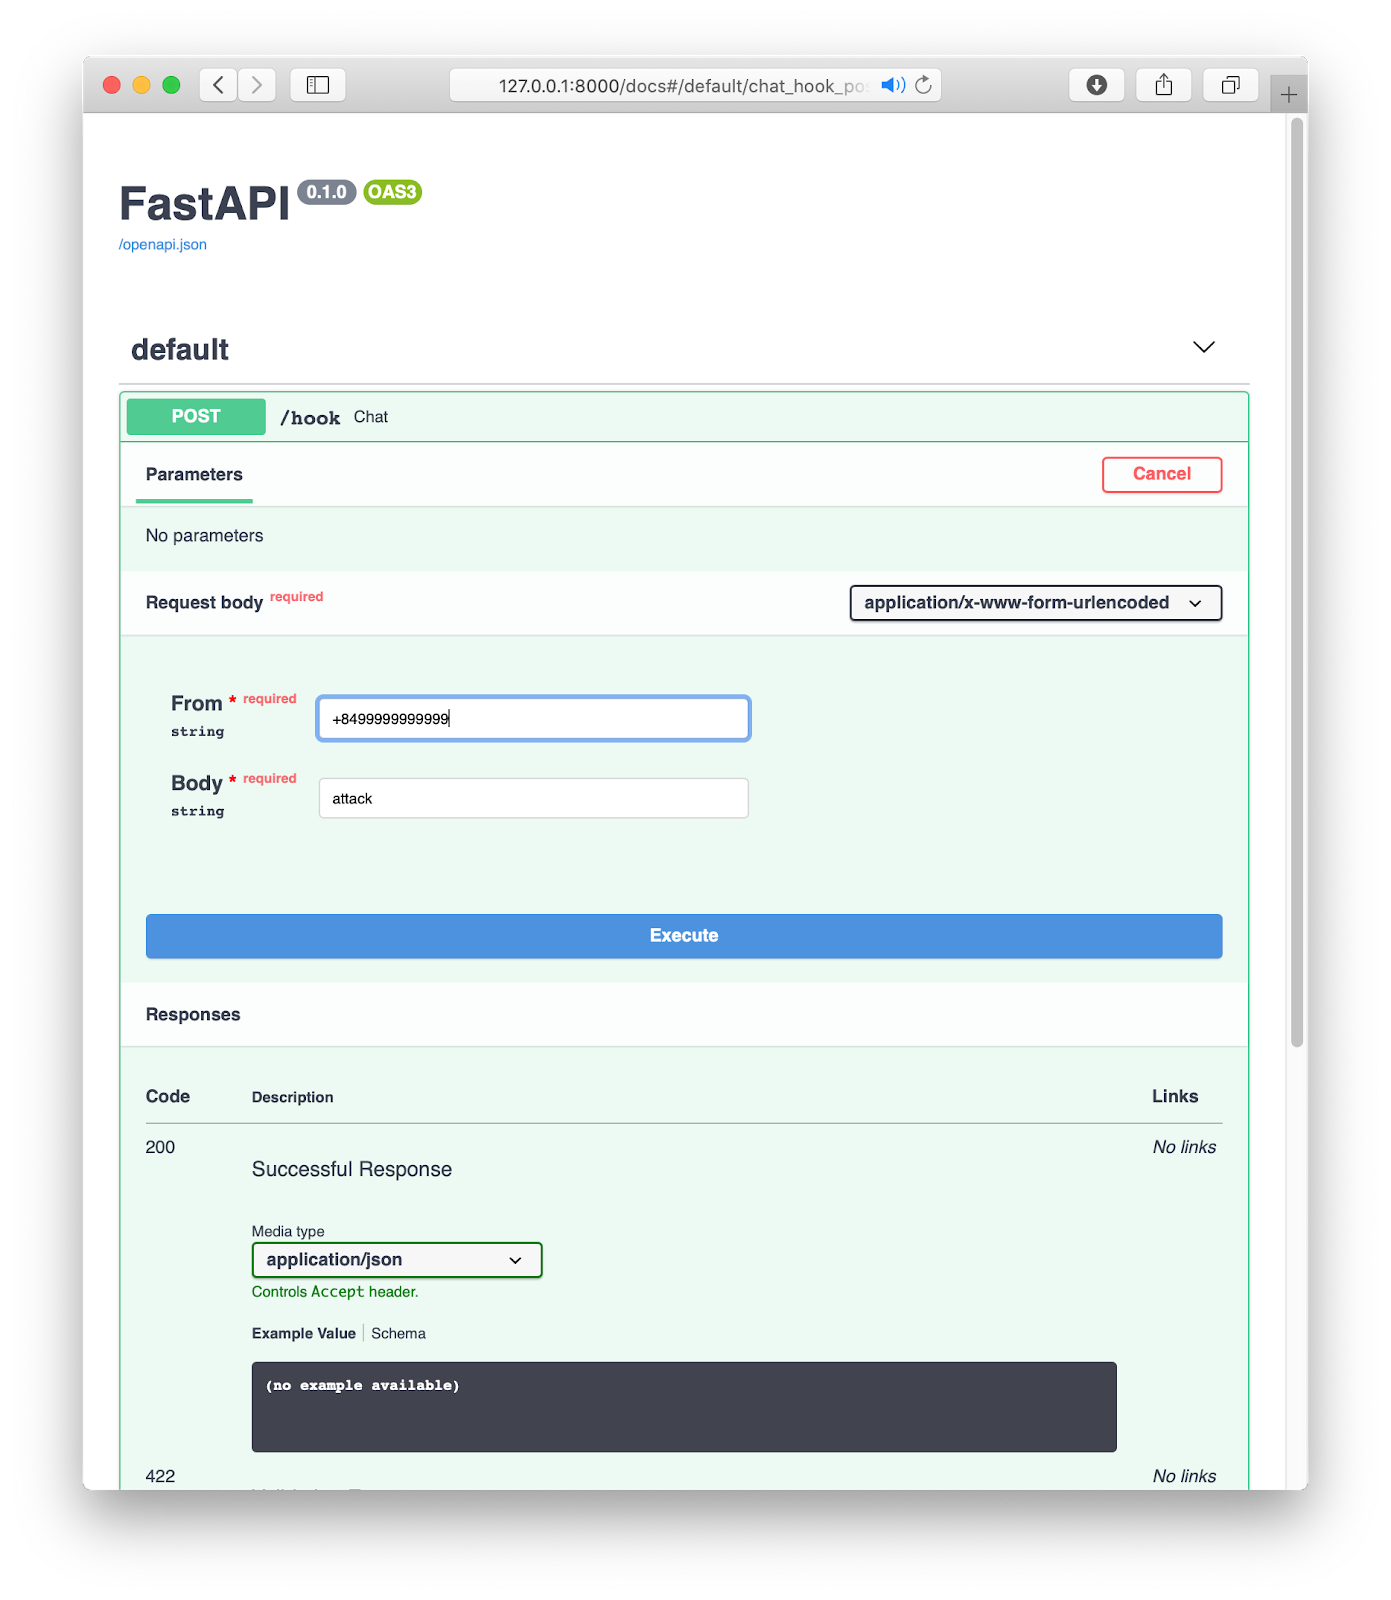
We define the arguments in the chat function with the exact names From and Body, because these are the fields sent by Twilio. If you try to call this endpoint without sending the Body field for example, you will see an error informing you that the Body is a required field and it is missing. Leave Uvicorn running and from another terminal send a request that only includes the From field:
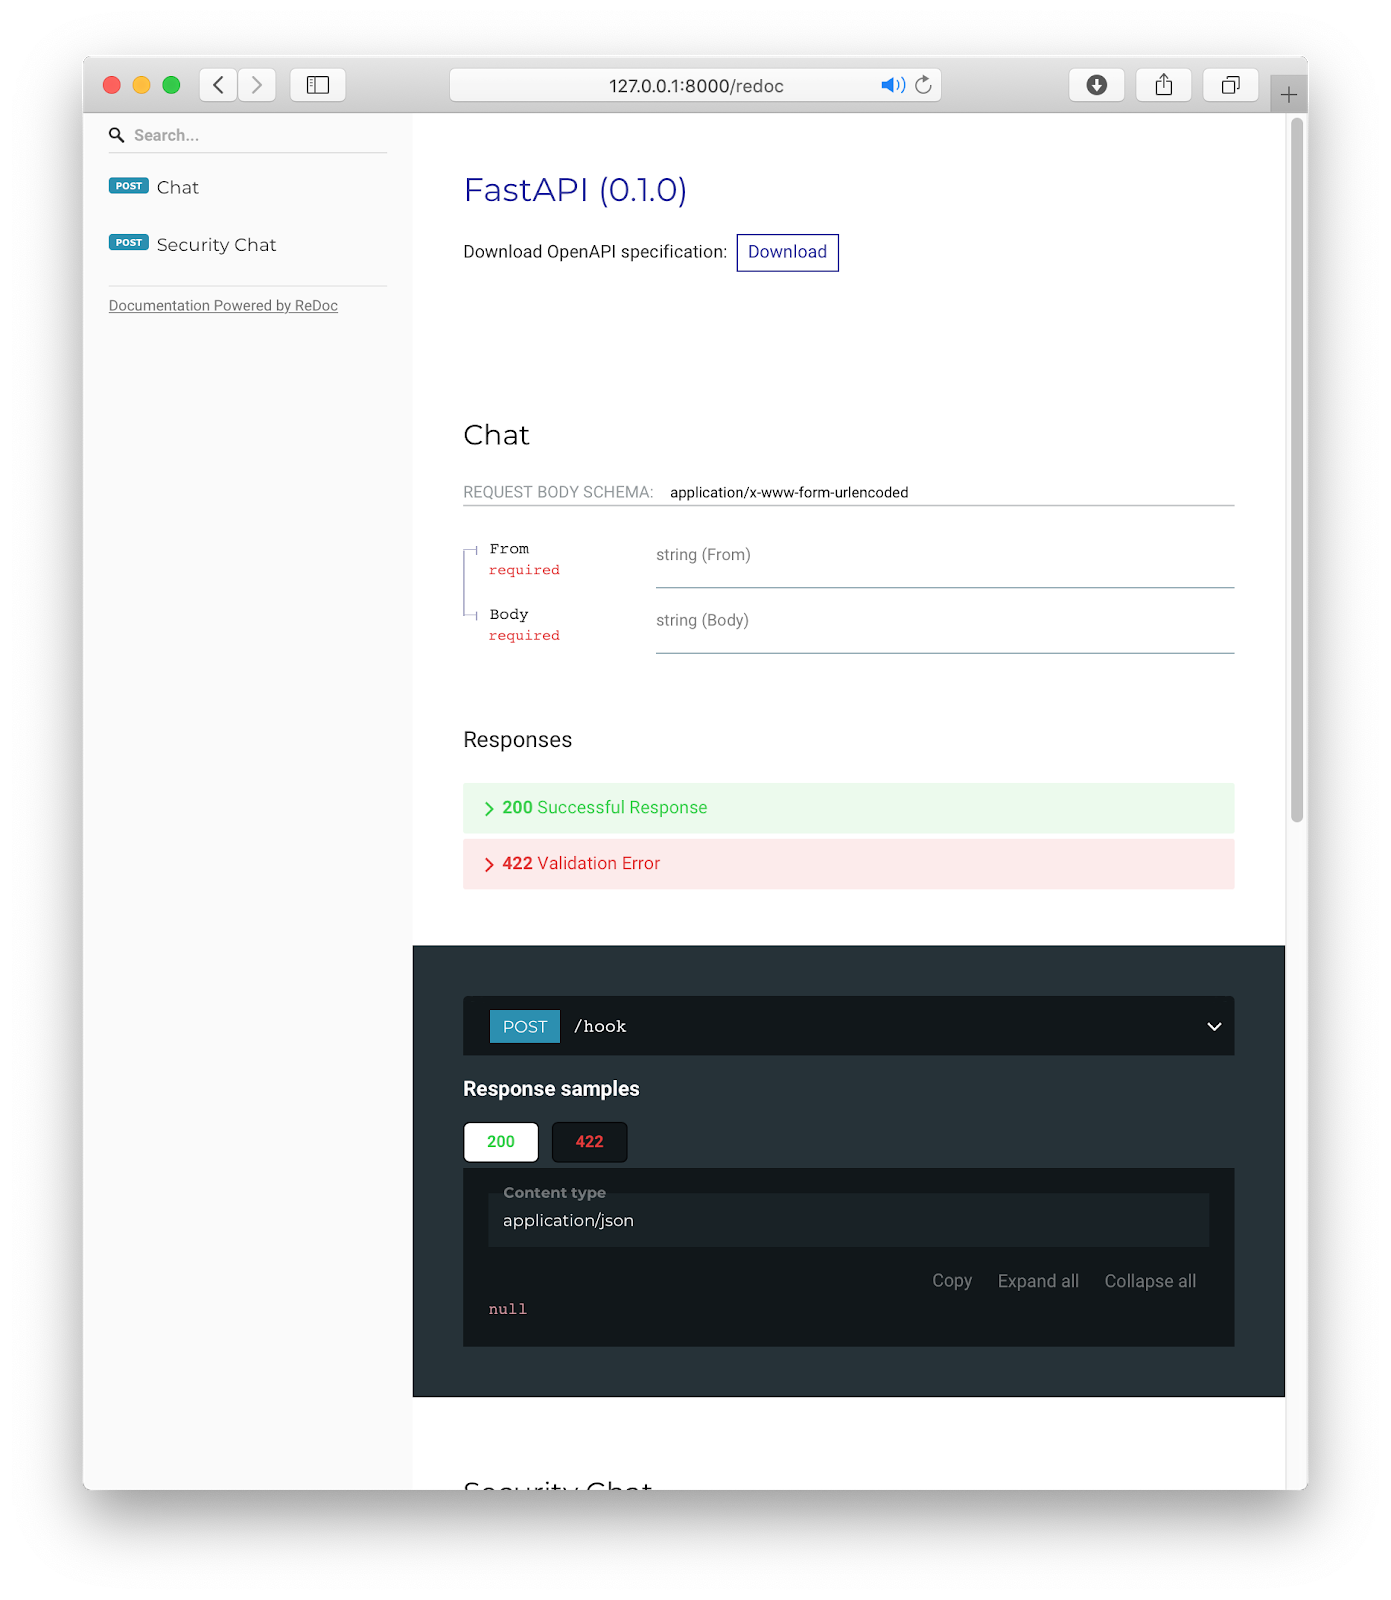
With the server still running, you can go to http://127.0.0.1:8000/docs and check the automatic API documentation provided by Swagger UI, or go to http://127.0.0.1:8000/redoc to see an alternative formatting of the documentation provided by ReDoc.
Testing the webhook
Now we are going to test our Webhook by sending an SMS. If you are not running the Uvicorn server, start it now with this command:
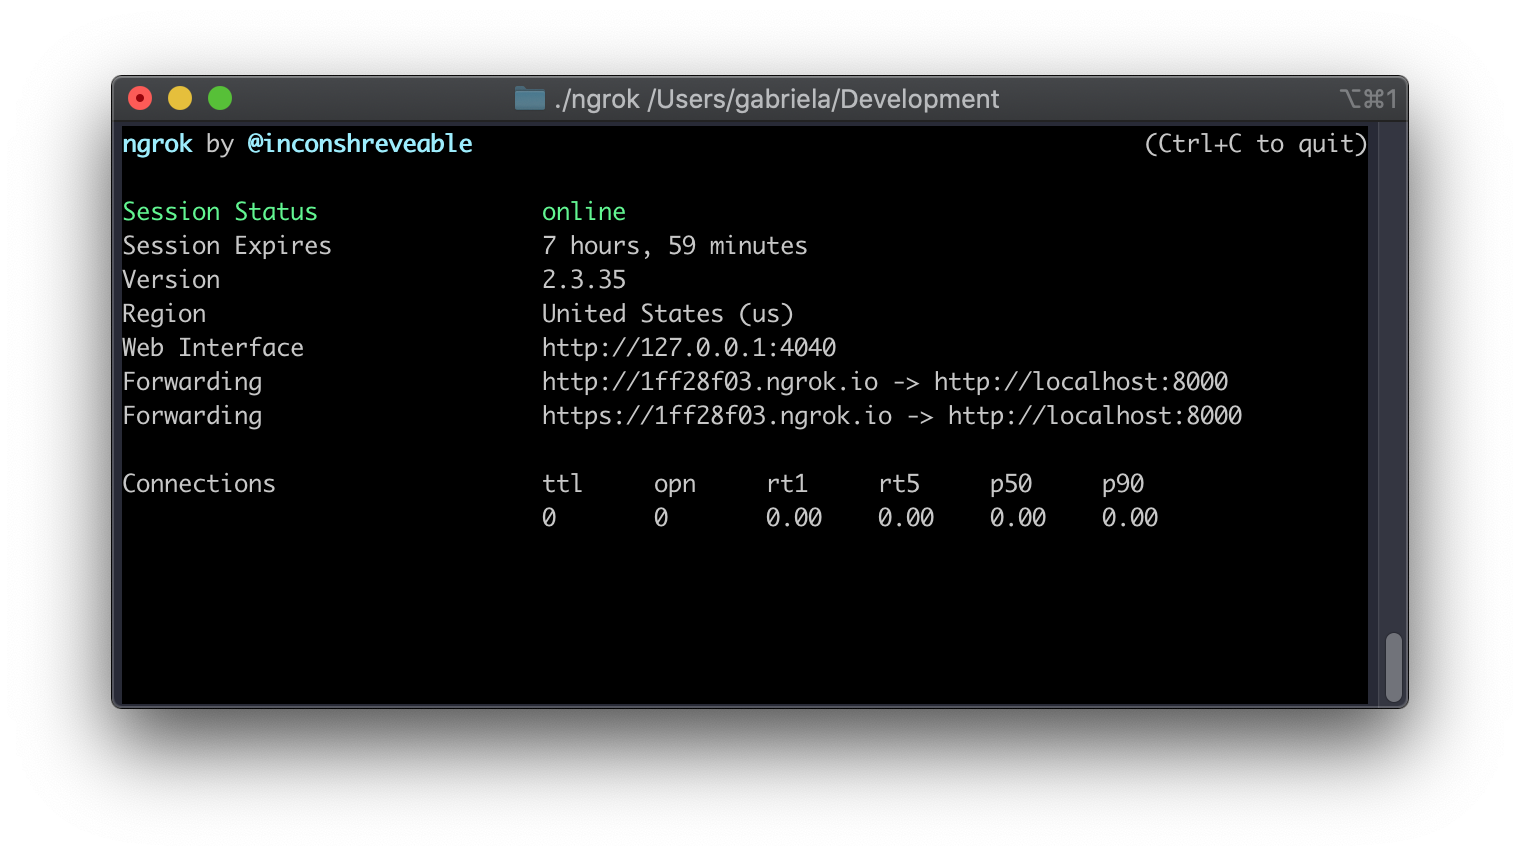
Now your server is running on port 8000, but only inside your computer and as a private service that is only available to you. We will use ngrok to make our server reachable from the Internet. Open a second terminal window and run ./ngrok http 8000 to assign a temporary public URL to the server. The lines beginning with “Forwarding” in the ngrok output show the public URL that ngrok uses to redirect requests into our service.
Go to the Twilio Console and click on Phone Numbers. Select a phone number If you already have one or more in your account, or buy a new one by clicking on the red plus sign. When you buy a phone number you can select your country and request SMS support in the capabilities field.
Note that if you are using a trial Twilio account you will not be charged for this purchase. An additional requirement of trial accounts is that you verify your personal phone number. On trial accounts Twilio only sends SMS to verified numbers. You can verify your phone number here.
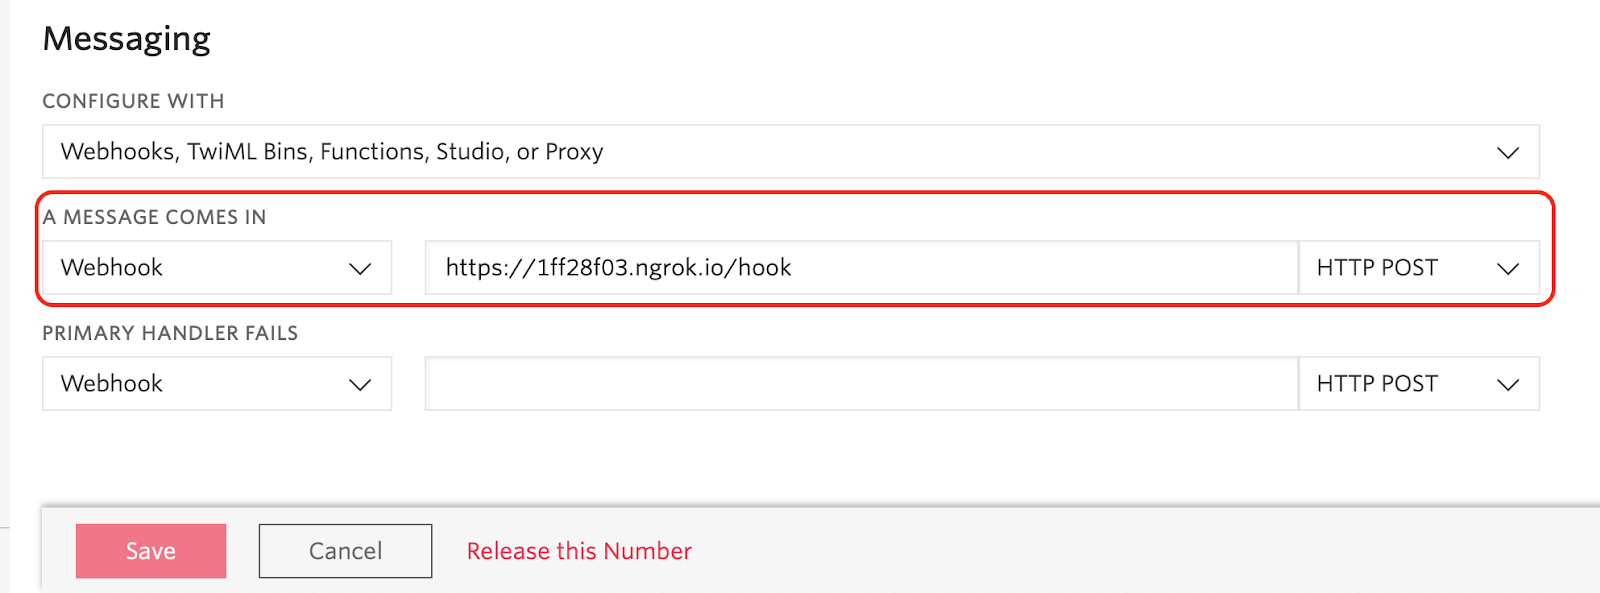
In the phone number configuration scroll down to the Messaging section. Copy the https:// URL from ngrok and then paste it on the “A message comes in” field, appending the /hook URL of our endpoint at the end. Click the red “Save” button to store this change.
To test the application send an SMS to your Twilio phone number and see how the FastAPI application sends you a response!
Keep in mind that as we are using ngrok for free, you can’t keep a session for more than 8 hours. When you restart ngrok, the URL assigned to you will be different, so you will need to update it in the Twilio console. When you deploy your application for production use you will do so on a server that is directly connected to the Internet, so you will not need to use ngrok.
Validating the Twilio signature
Our webhook is created and tested! But, let’s try run this command (being careful to update the ngrok domain to match your own assigned URL):
Ow! We made a POST request passing data with From and Body fields to our webhook and we got a response. So our webhook is receiving requests and answering them, even though they are not from Twilio.
This response is in TwiML format. TwiML is an XML based language with tags defined by Twilio to allow us to build our WhatsApp and SMS responses. You can find the text message inside the <Message> tag.
In our example, it’s not a big issue that the TwiML reply is sent to a third party because we do not include any sensitive information, but your real application could return personal information, private photos or other sensitive details, and in those cases we need to be concerned about who is making the request, and if it’s not Twilio we should assume it is a “bad request” and ignore it.
To help validate requests issued by Twilio, a signature is included in the request. Twilio generates this signature and includes it in every request it sends to webhooks. Let’s see how to validate this signature in our webhook. Replace the contents of your main.py file with the following:
We have added the Request object as an argument into our chat function. Using this object we can get the headers, the request URL and the complete list of form variables submitted by Twilio, all of which are required to recalculate and verify the signature. While we can now get the From and Body form data elements from the form_ dictionary, if we do it that way they won’t be automatically validated or documented, so we keep using the Form and Body arguments as before so that we do not lose these features.
This version of the code has more imports. The RequestValidator is responsible for verifying the Twilio signature, and we initialize it by passing the Twilio Auth Token. We stored the Auth Token in the TWILIO_AUTH_TOKEN environment variable at the beginning of the article.
We call the validate method with three arguments: the URL of the request, a dictionary with the form data that we received, and the Twilio signature, which we get from the X-Twilio-Signature header.
If the Twilio signature is valid, the validate method returns True, and if not it returns False. If the signature generated by the RequestValidator with the arguments we passed does not match the X-Twilio-Signature attached to the request, then our application will return a 400 error. Let’s do a test passing a fake Twilio Signature:
To verify that the signature validation is working, simply send another text message to your Twilio number.
Conclusion
In this tutorial we built a simple yet secure webhook for Twilio using FastAPI. I hope you use this implementation as a base to build your projects and create more applications using the FastAPI web framework.
Good luck!
Gabriela Cavalcante is a Python enthusiast and a Flask fan. You can find some of her projects on GitHub.

Related Resources
Twilio Docs
From APIs to SDKs to sample apps
API reference documentation, SDKs, helper libraries, quickstarts, and tutorials for your language and platform.
Resource Center
The latest ebooks, industry reports, and webinars
Learn from customer engagement experts to improve your own communication.
Ahoy
Twilio's developer community hub
Best practices, code samples, and inspiration to build communications and digital engagement experiences.