Build a Smart Clienteling Mobile App Using a Bot and Twilio Frontline
Time to read: 14 minutes
March 29, 2022
Written by
Reviewed by

Engaging with customers on their channel of preference is always challenging. Companies often need technical solutions to mediate between employees and the private channels of their customers. Twilio Frontline is a configurable software solution that allows anyone to have an omnichannel professional clienteling application on their mobile devices with minimum coding.
When a customer wants to reach out to a company, the first step is finding the right person. With Frontline, we can integrate a given logic if our back-end already knows who this person normally speaks with, but wouldn't it be more pleasant to let the application first ask who they want to speak with?
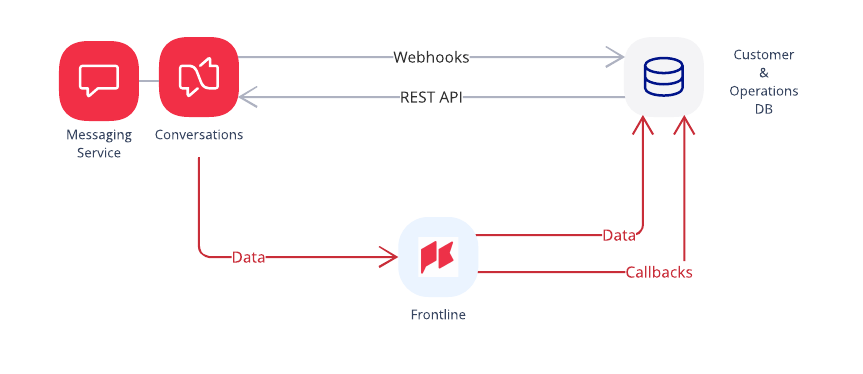
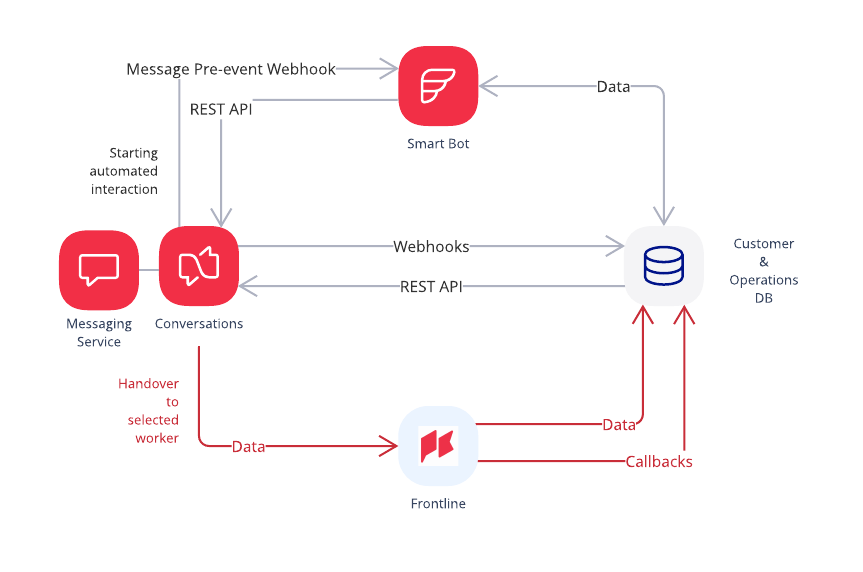
This blog explains how to integrate a bot that will query customers about the expert they need to address their concerns. We will enhance the initial Frontline setup (see Figure 1) with a bot that will manage the messages as part of a conversation independently from The Frontline App (See Figure 2)
Prerequisites
- You will need a Twilio Account. If you do not have one yet, fill this form to get an account for free.
- We will be leveraging Frontline as clienteling app for messaging only.
- We will develop the Frontline integrations to the database and a bot using the Twilio CLI. You can install it from here.
- A CRM database. For our example, we'll be using the Heroku platform and use headless CMS Strapi to create a basic Contact database.
Set Strapi for the contact database
Frontline can be configured to access a contact database that will contain the details of the customers we have already registered, along with their communication preferences and contact channels (e.g., SMS, email). We will use Strapi as our straightforward to edit DB, but you could be using any other CRM DB.
Strapi setup
Follow the steps in this blog post to create a Strapi instance in production which will act as your CRM database. For the sake of this blog the Heroku application is called expert-hub and therefore hosted in the following URL https://expert-hub.herokuapp.com
To add customers into this database, you will need to run the Strapi development environment locally to create the Tables that will host the customer profiles. You will need the following tables:
Customers: will contain the information Frontline will display about your customers following this JSON structure.PermissionandRole: which should come with Strapi and help management of user's access to Strapi's CMS.Token: which we will create to store access tokens for the service account Frontline will be using to access the Customer’s data.User: which will contain the service account Frontline will use.
The steps to follow are:
1. Open your browser to http://localhost:1337/admin.
2. Log in as an admin (create the user if you have not created it yet).
3. Click on "Content-Type Builder" and then "+ Create new component" call the component Channels. Add two Text fields to it: type and value.
4. Now click "+ Create a collection type" and call it Customers. Add the following fields to it:
display_name(Text)customer_id(Number)avatar(Text)channels
Strapi will not nicely expose the list of customers under the API end-point /customers. To access the API securely, we will implement basic auth (user + token) following the Strapi guide.
Once in production you will need to create the user accounts and develop the authentication following this guidance. We will dig into details when we configure the Frontline application later on.
5. Push your Strapi application to production:
$ git push heroku (if you have followed Heroku's guidance)
6. Open https://expert-hub.herokuapp.com/admin, create an admin user, and add the entries you would like your Customer Collection Types. We will be adding the three that follow in the code block, and will use the entry for Maria Sanchez to input our own phone number (to help testing the routing later).
Frontline
Configuration
Start by first integrating Frontline with your identity provider to enable login in the mobile app.
Then, download the Twilio Frontline app from the AppStore or Google Play.
Select "Custom routing" as a way to direct messages that come in. We will create the service that will be handling the routing later (you can leave it empty or add a placeholder URL for now).

We will be using the CRM Callback and the Outgoing Conversations Callback. The next section will explain how we will deploy these services using Twilio Serverless Functions.
Add SMS-enabled numbers to the Frontline messaging service
For Frontline’s messaging service, you will need to buy SMS numbers and add them to the console.
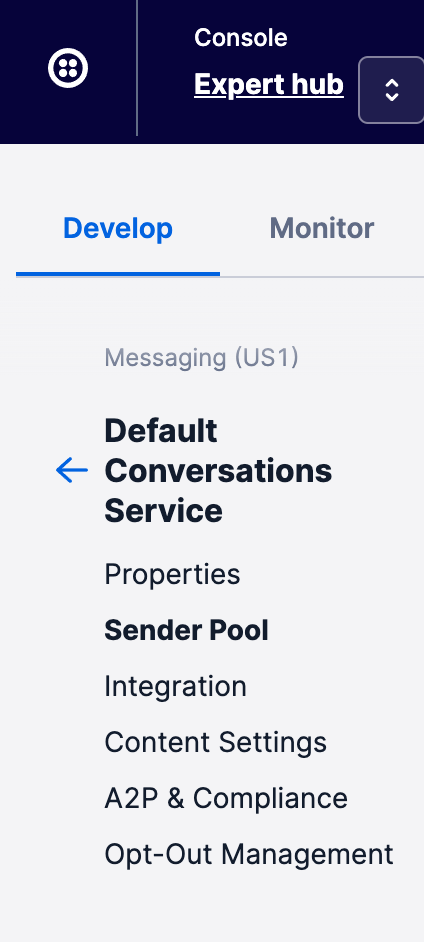
Then, select the "Default Conversations Service" under Messaging Services, and add the purchased numbers inside the "Sender Pool".
You will need different numbers depending on multiple factors. If you have SMS users in different countries, it is best to select a number per country. If you require an SMS user to be discussing in parallel with two or more Frontline workers, you will need as many numbers as active parallel discussions you want to support.
The services that coordinate the Frontline communications
Now, it is time to develop all the backend functions required for our application.
Install the Twilio Serverless Toolkit
Make sure that your Twilio CLI is connecting to the Frontline Twilio account by adding and/or using the correct profile and the right credentials:
This will create a project with a prefilled structure (see documentation for details). Delete all the files in the "assets" folder and in the "functions" folder.
Edit the .env file and add the following, making sure to edit the values to match your environment:
DB_URL is the URI of your Strapi database which contains the customer list.
DB_IDis the ID of the database you created in Strapi and
DB_PASSis the password to connect to the database.
FRONTLINE_MESSAGING_SERVICE contains the SID of the messaging service that contains your numbers.
Each FRONTLINE_PROXY_NUMBER_XX contains each of the senders in your Conversation messaging Service senders used in our code: one per country.
Create the CRM callback to collect customer information from Strapi
The Frontline application needs to collect customer data to populate the “My Customers” tab. We will create a function that will query this data from Strapi and make them available to Frontline.
Create a function called crm.js in the frontline-service, under the functions folder. We will create an internal function called fetchAll that will use axios to connect to Strapi, and list all the customers in the database. This function will access the environment variables DB_URL, that contains the URL to the Strapi database, DB_ID with the database identifier and DB_PASS that contains the password to access the database.
The fetchAll function will be called by the handler function, which will be called by Frontline whenever the application needs to load customer data. When the handler is called, the payload will contain an attribute called location which will contain one of the following values, indicate which data must be returned:
-
GetCustomerDetailsByCustomerId: this means that Frontline is trying to get the details of an individual customer by their customer_id; -
GetCustomersList: in this case, Frontline needs to get the list of all customers.
Here's how the handler function looks:
Still in crm.js, we need to implement a supporting function that will be used later on by one of the Conversations webhooks. This function will query customer data by phone number. This is useful when, for example, a conversation is newly created and we need to add CRM data to a participant in the conversation. We will call this function fetchByPhoneNumber and this function will also use fetchAll.
In the function above, we will return the first customer found in the CRM with the phone number provided as a parameter.
Create the functions that will coordinate the routing and the bot
Every conversation in Frontline is provided by the Twilio Conversations API; this means that the Conversations REST API can be used to manage Frontline conversations. Frontline also leverages Conversations webhooks in order to monitor events in conversations and execute any actions when those events happen.
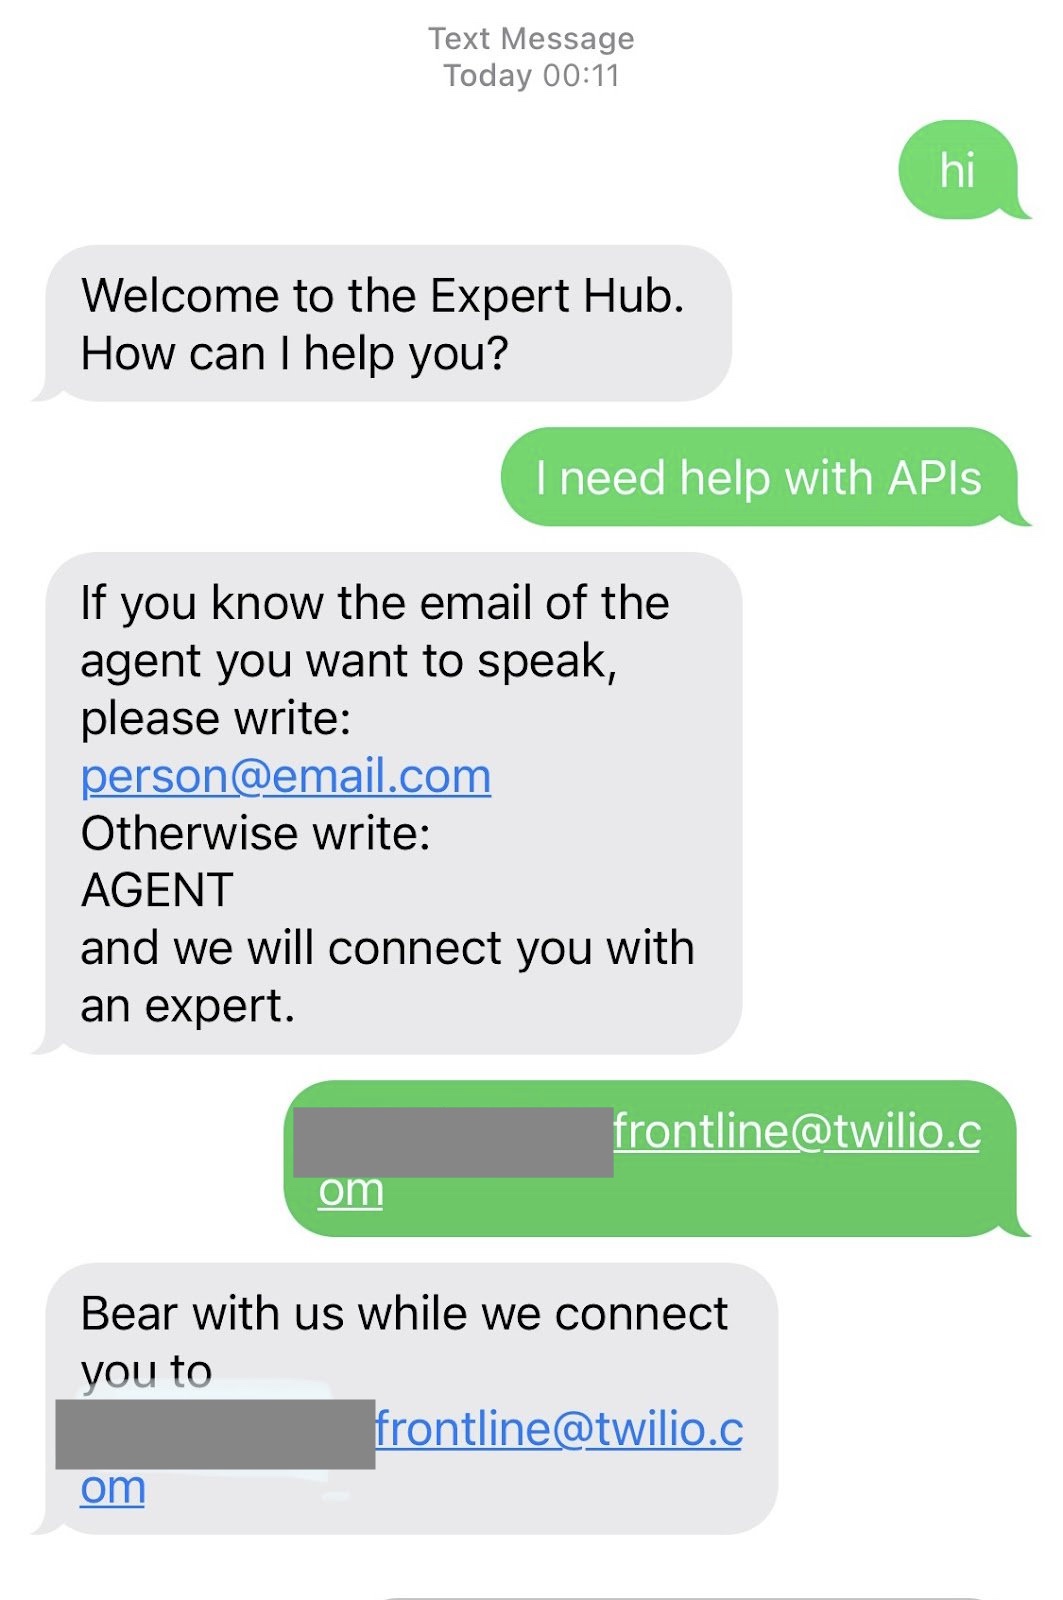
In this example, an end user will send an SMS to a number associated with Frontline, and will interact with a bot before being connected to a Frontline worker.
We will implement the bot interaction using Twilio Functions, and then set up another function as a Conversations webhook that will invoke the bot.
Bot service
Create a function called speakToBot.js in the project frontline-service. Keep in mind speakToBot.js must be under the functions folder.
Ours is a very simple bot that asks whether the user wants to be connected to a known Frontline worker by providing their email, or to any agent (Frontline worker) available. This bot can be enhanced by connecting to an AI conversational platform, for example, Google DialogFlow, IBM Watson Assistant, or Microsoft LUIS.
The function returns JSON composed of a message attribute and a route attribute. This will be used later for making routing decisions.
Pre-event webhook
Create another function called pre-event.js to be the Conversations pre-event webhook that reacts to the onMessageAdd event. The idea is that after the first SMS is sent by an end user, the webhook will invoke the bot.
First, we check the EventType and the source of the message, which, in our example, will be SMS. In case end users are joining a conversation via chat, this condition must be different. In case these two conditions are not met, this webhook should just return with the callback() method.
For a full list of parameters that are sent to the Conversations pre-event webhook, check out this page in Twilio’s docs.
In order to make sure this is the beginning of the conversation, we use the Conversations API to check whether the participant is the only one added to the conversation at this point. If that's not the case, we end the function execution by calling callback() to send a response.
Now, if there's only the first participant in the conversation, it's time to trigger the bot inside the else statement in the code above. The bot is just another Twilio Function in the same serverless service that we created in the previous step of this blog post. The bot receives as a parameter the message sent by the end user: the attribute Body in the event payload. The bot's response is then sent to the same conversation, and therefore to the end user, via the Conversations API.
The bot's response is JSON that also includes the attribute route to be used for routing decisions.
The bot's response format:
After replying to the user, the route attribute is used to decide what is the next step to be done in this conversation:
routeequalsno: no routing to be done at this point, as the bot is still interacting with the end userrouteequalsemail: this indicates the end user chose a specific Frontline worker they want to be connected withrouteequalsAGENT: this indicates that the end user wants to chat to any available Frontline worker.AGENThere is case sensitive.
When route is no, there's nothing to be done in the pre-event webhook.
When route is email, the message attribute in the bot's response contains the email of a Frontline worker the end user would like to be connected with. All we need to do is to add this email as the identity of a participant and add it to the conversation. To be connected to a valid Frontline worker, make sure the email provided matches exactly the email of a Frontline worker; the comparison is case sensitive.
When route is agent, we will need to find an available Frontline worker to connect with the end user and, for that, we need to use TaskRouter.
Integrating TaskRouter
Frontline uses Twilio TaskRouter as the engine to manage workers and routing rules. Frontline workers are TaskRouter workers. When you install Frontline in your Twilio account, a new TaskRouter workspace called Frontline Workspace will be created. In order to find a worker for our Frontline conversation, we will use the TaskRouter API to query available workers.
First, create two environment variables in the .env file with data from TaskRouter:
Then, create a function – it can be either a new file or, to make it easier, just add a new method at the end pre-event.js – to list all available workers in the queue:
This gives you a list of available workers, and from here you can select any of them to connect to the Frontline conversation. If you want to get the longest idle worker, you will need to order availableWorkers by lastAcceptedTaskTime.
longestIdle is your selected worker. To keep it consistent, we need to update this worker’s lastAcceptedTaskTime to “now” before returning the updated worker to the main method in the pre-event webhook.
With a worker selected, all you need to do is add this worker as a participant in the Frontline conversation. Going back to the handler implementation of pre-event.js, this is what we have so far:
Add an else statement to the condition above and all you need to do is to call our getLongestIdleAvailableWorker function to retrieve a worker and then add the worker to the conversation inside the 'else' statement above.
You could also use the pre-event webhook to set a friendly name to the conversation that is going to be visible to the worker in the Frontline application and the push notification. In the example below, we search the participant's name using fetchByPhoneNumber in crm.js and use that as the conversation's friendly name.
Now here's the full implementation of your pre-event.js:
Post-event webhook
We will use a post-event webhook, in the post-event.js file, to enrich the end user participant’s conversation experience with data from the CRM, which only needs to be done upon the onParticipantAdded conversations event in inbound conversations, and for participants that are end users (and not Frontline workers).
In order to check whether the participant being added is a Frontline worker, we check for the Identity attribute. Keep in mind that for chat users, this attribute will be present for both Frontline users and end users and you might need to implement a different condition. As in our example, the end user will be mainly communicating by SMS, so checking this attribute will be enough.
To filter out inbound conversations we check for the Attributes attribute in the event payload, which is empty for outbound conversations.
Then, for the onParticipantAdded event, we will call the fetchByPhoneNumber method in the crm.js function that is available in the same frontline-service. We need to collect the customer phone number which is available in the MessagingBinding.Address attribute of this event's payload to pass as parameter to fetchByPhoneNumber.
Now, all we need to do is to fetch the participant in the conversation by using the Conversations API and update this participant with the data from our query available in the variable crmCustomer.
Query conversation participant, using both ConversationSid and ParticipantSid, available in the event's payload:
Capture the current participant's attributes JSON and update it with the data in crmCustomer:
Finally, use the Conversations API to persist the participant with the newly updated attributes and, by the end of your function, return a callback.
Routing
Frontline provides different routing methods to manage incoming conversations. The selected routing method is triggered by any incoming conversation right after the conversation resource is created. Routing is used by the Frontline backend to decide if and how to route the conversation to a worker. More on Frontline routing can be found in the docs.
In order to connect a bot to an incoming conversation before it is routed to a worker, we need to bypass the standard Frontline routing and only route to a specific worker once the conversation with the bot is finalized. This is the reason why the routing logic was implemented in the pre-event webhook.
You still need to configure routing for Frontline, but the routing implementation does not need to include any routing logic.
Create a routing.js file in the serverless project. Our routing function will basically send a welcome message to the user upon an incoming message.
The author of the welcome message is set as system only to differentiate this author from a real worker once added to the conversation.
Deploy the functions in production
The next step is to deploy all functions created to your Twilio account, so they will be available to the Frontline configuration (to be done later in this document).
So far, we have created the following functions:
crm.jsspeakToBot.jspre-event.jspost-event.jsrouting.js
For simplicity, we did not create a function here to support outbound conversations, but you can find our entire source code for an outbound function, including the complete code for all functions listed above in this repo: https://github.com/teresan/twilio-frontline-expert-hub
In this project we are using an external package – axios – that needs to be added to package.json in order to be installed by your deployed instance. You can add this dependency to package.json by running npm install in the frontline-service folder.
To deploy all the functions to Twilio account, run:
This command will deploy the frontline-service and all its functions to your Twilio account. Take note of your functions' paths, listed on this command's output, as those will be needed in the next step. The –force flag will redeploy on top of another service with the same name if needed.
Callback configuration
Go to the Frontline product tab in the Twilio console and select “Manage” -> “Callbacks”. Set the Frontline CRM Callback URL with the path to the deployed /crm function. Follow this guide for more details.
In the routing configuration (under “Manage” -> “Routing”), select "Custom routing" and update the Custom routing callback URL with the path to the deployed /routing function. Follow this guide for additional details.
Now, head over to the Conversations product tab in the console in order to set up the Conversations webhooks. Select “Manage” -> “Global webhooks” and provide the paths of
/pre-event and /post-event to Pre-event URL and Post-Event URL fields, respectively. Follow this guide for more.
On the same page, under Webhook Filtering, we need to select the types of events that both pre-event and post-event webhooks will be listening to. Select the following events:
- Pre-webhooks:
onConversationAdd,onMessageAdd - Post-webhooks:
onParticipantAdded
And with this, you're all set!
Testing the final experience
It's time to test your bot integrated to Frontline! Using your phone, send an SMS to one of the Twilio proxy numbers – the one relevant to your country – and start engaging with the bot.
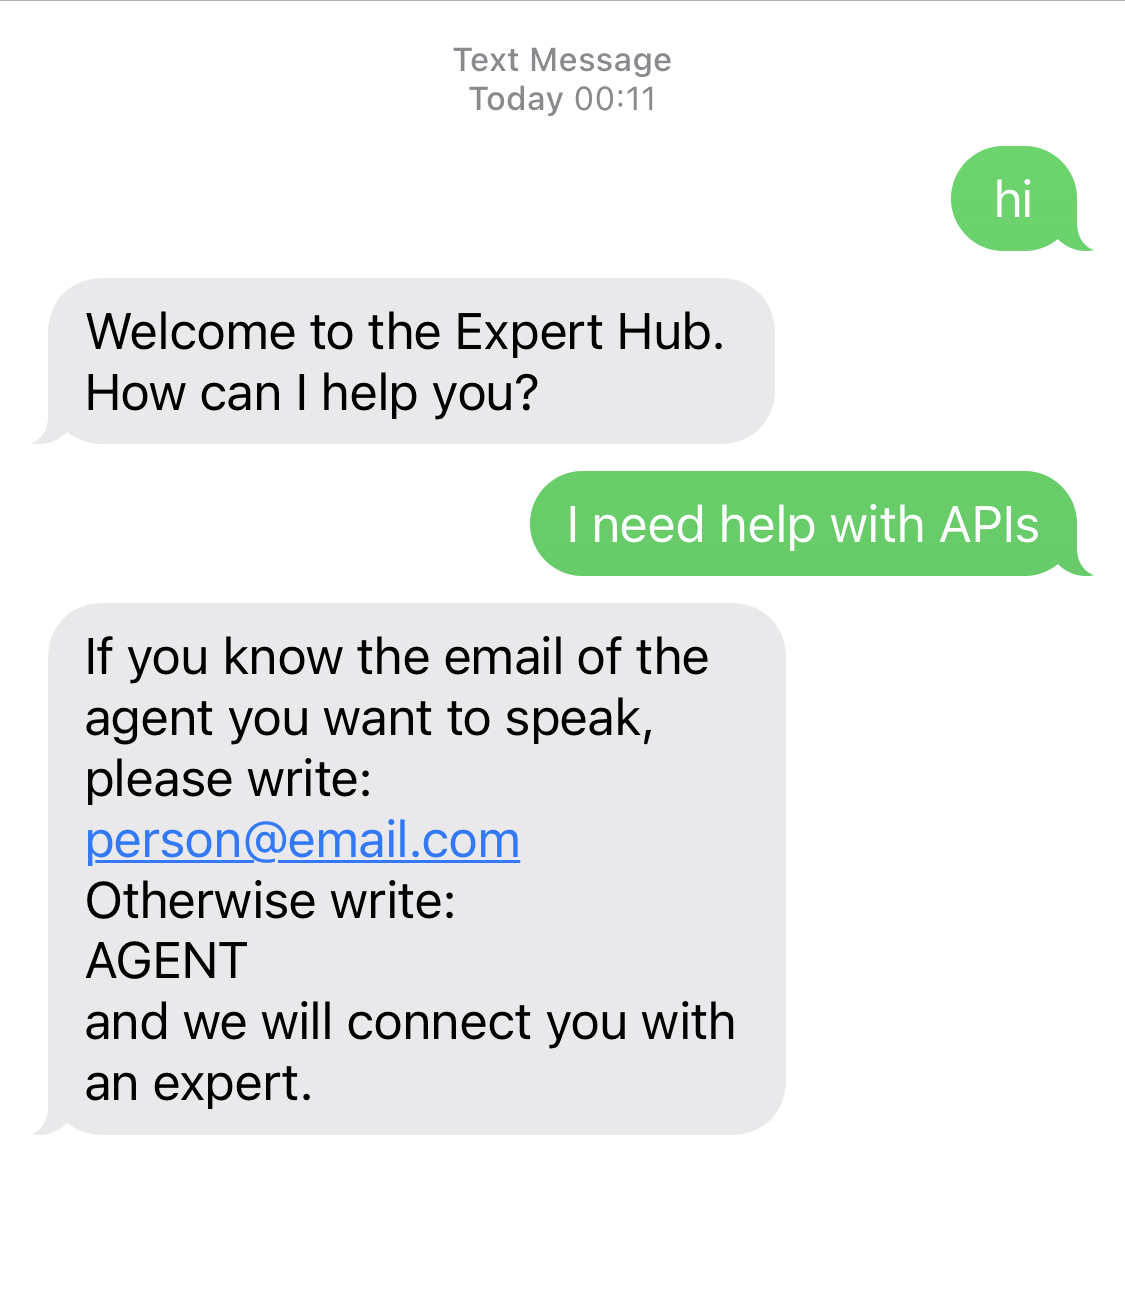
After providing the email of a Frontline worker you want to connect with, you will be routed and can continue the conversation directly with the worker (and no longer with the bot).
When the Frontline worker receives the conversation, they have access to the history of the conversation with the bot. The worker can also see the CRM data that was added to the participant in the post-event webhook – in this case the avatar picture and the display name – and provide a more personalized experience to the user.
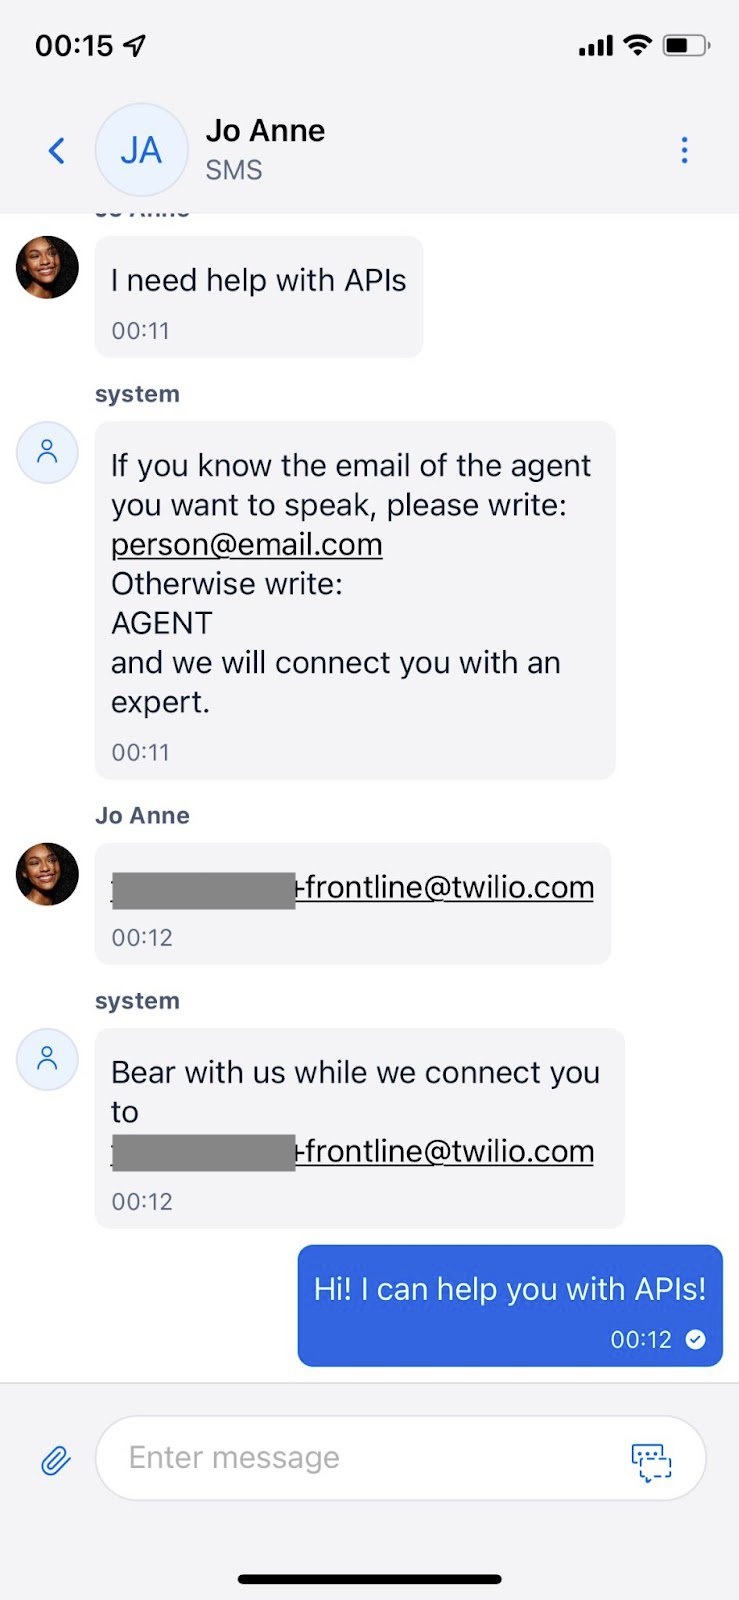
In case you input that you would like to speak to any agent, you will be connected to the longest idle and available Frontline worker and continue the engagement in the same manner.
Conclusion
This is just the start! You can improve and add more intelligence to your bot by using an AI conversational platform or provide a more personalized experience by connecting a user with the last Frontline worker they talked to in a previous chat. Or, you could expand your channels by adding voice support.
Another way to enhance this experience is to redirect the conversation in Frontline to a Flex contact center. To do so, you will need two Twilio accounts: the Frontline account and a Flex account (as of this post’s publication, Frontline cannot be installed in a Flex account). In the Frontline account, implement a Twilio Function that creates a task in the Flex account using the TaskRouter API. In this function, you can add to the task all the information needed to give context to the agent, including the history of the conversation in Frontline, and configure this function to be triggered to onMessageAdd events, so it would react whenever the user express in a message that they need to connect to a contact center. Once the conversation is "redirected" from the Frontline account, make sure to properly manage the status of the conversation to maintain consistency.
Start today delivering personalized experiences with Frontline. We can't see what you build!
Ana Andrés is a Telecommunications Engineer and Computer Science PhD. She is part of the Solutions Engineering team in Twilio. She acts as a trusted advisor for customers in Europe in everything related to Twilio technology and products. You can reach to Ana by email aandresdelvalle@twilio.com
Teresa Nascimento is a Solutions Engineer at Twilio, helping customers in Europe to deliver amazing customer experiences by using Twilio APIs. Teresa is a long time software engineer, women in tech advocate and passionate about building solutions with social impact. Teresa can be reached at tnascimento at twilio.com.
.png)

Related Resources
Twilio Docs
From APIs to SDKs to sample apps
API reference documentation, SDKs, helper libraries, quickstarts, and tutorials for your language and platform.
Resource Center
The latest ebooks, industry reports, and webinars
Learn from customer engagement experts to improve your own communication.
Ahoy
Twilio's developer community hub
Best practices, code samples, and inspiration to build communications and digital engagement experiences.