Build an SMS-to-Email Bridge with Python, FastAPI and Twilio
Time to read:
September 08, 2020
Written by

Ever had a situation where you wanted to provide a phone number but due to security issues you don’t want to share your personal number but still want to receive SMS? You can use Twilio to get those messages forwarded to an email address!
Today we’re going to explore how to set up a bridge between your email inbox and SMS using Twilio, SendGrid and Python. We’ll be using the FastAPI framework for building the server, Twilio SendGrid to send emails and Twilio Programmable Messaging to accept SMS.
Tutorial requirements
- Python 3.6 or newer. If your operating system does not provide a Python interpreter, you can go to python.org to download an installer.
- A free Twilio SendGrid account. Sign up here.
- A Twilio account. If you are new to Twilio create a free account now!
Setting up the development environment
Before we kick off, let’s create a Python virtual environment to start clean. We’ll be making a folder and a virtualenv inside the folder. We’ll then install the following packages to use with this project:
- FastAPI for the back end
- Uvicorn for the web server
- HTTPX to send HTTP requests to Twilio and SendGrid asynchronously
- Pyngrok to expose our server to the web during development
- Python-dotenv to load the environment variables
- Python-multipart for parsing form data in FastAPI
- Twilio Python Helper Library for using Twilio Services
Follow these steps to setup a virtualenv and install the packages:
These are the versions of the packages and their dependencies that I tested:
After installing all the packages, the next step is to make a .env file (note the leading dot), where we will store the environment variables that will serve as configuration for our project. Put the following contents in this file:
For now you can set the FROM_EMAIL and TO_EMAIL variable to the address you want emails to be sent from and the emails the SMS has to be received. We’ll set the remaining variables on the way.
Getting a Twilio phone number
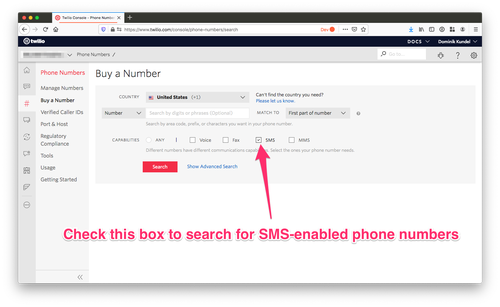
The next step is to get a Twilio phone number. Twilio phone numbers help us send and receive SMS. If you’re new to Twilio and don’t have a phone number, go to the Phone Numbers section in your Twilio Console and search for a phone number in your country and region. Make sure the SMS checkbox is ticked.
Once you get your number make sure to jot it down somewhere and also save it in the .env file. If you’re running on a free trial, the cost of the phone number will be deducted from your trial credits.
Note that the phone number needs to be entered in the E.164 format.
Setting Up Twilio SendGrid
In this section we’ll create a new SendGrid account, get an API key for sending emails and save the key in the .env file.
Creating a Twilio SendGrid account
If you don’t already have one, you can create a new SendGrid account. Follow these steps to make one:
- Create a Twilio SendGrid account from this page.
- Enter a Username, Password and an Email Address.
- Create and Verify your account.
Once your account is verified you can use that account to send up to 100 emails per day for free.
Creating and Saving an API key
Once you have a Twilio SendGrid account, you can get an API key to be used in our application to authenticate and send emails.
Navigate to your SendGrid Dashboard. In the side Navigation bar you’ll see a “Settings” drop down. Select the “API Keys” option and click on “Create API Key” to create a new key.
Give your new key a name such as “SMS Email”, select the “Restricted Access” option to give your API key customized access to the API. Scroll down to the “Mail Send” scope and slide it all the way to the right to the “Full Access” position. Click “Create and View” to generate your key.
After you’ve done this, you’ll get an API key that you can save in the .env file under the SENDGRID_API_KEY variable. Note that if you lose your key you will need to create a new one, as SendGrid only shows you the key once during creation.
Writing the server
We’ll use FastAPI to build our server. FastAPI is a modern web framework for building APIs with Python 3.6+. It’s based on standard Python type hints and the open standard for APIs, OpenAPI. Our Server will perform the following tasks:
- Process incoming SMS
- Send an Email to the provided email address with the SMS content
Our server will only have a single endpoint and this endpoint will be where the SMS data will be received. Our code will be on a file named main.py.
Receiving and processing the SMS
We’ll write an endpoint to receive and process incoming SMS. For every SMS sent to the Twilio number, Twilio sends a request to a specified URL. The payload in this request will use the application/x-www-form-urlencoded content type, which is the same one used for web form submission. You can learn more about application/x-www-form-urlencoded here.
The Application will forward this SMS data to the email address you specified in the TO_EMAIL environment variable using SendGrid’s HTTP API.
Copy the following code to a main.py file:
You can see that we have used the python-dotenv package’s load_dotenv function to load the environment variables from the .env file.
The @app.post(“/hook”) decorator is from FastAPI and it defines that the function process_sms that follows will handle requests that go to the URL /hook using the POST method.
FastAPI uses the python-multipart package to parse the form-field data from a request. The From and Body are part of the form-field data and will be parsed using the Form(...) class. The ... also called Ellipsis specifies that From and Body don’t have a default parameter.
As we stated earlier, our data is coming in form fields. In FastAPI we define form data by creating parameters of class Form. If you are not familiar with Python type hints, this code may look strange. Python 3.6+ supports optional type hints, that allow us to declare the types of variables and arguments. This can be useful to make it clear what type a variable should be. In our hook endpoint, we use Python type hints to enable FastAPI to do data validation. You can read a quick tutorial about Python type hints and how to use them for data validation in FastAPI here.
We’ll use SendGrid’s HTTP API to send the emails and use Httpx library to asynchronously send the POST request. You can read more about using SendGrid’s HTTP API here.
The SENDGRID_API_KEY value is passed as a Bearer token for the POST request, and this will be used to authenticate the request. The request will use the content type application/json and will contain the information about the sender, receiver, subject and content of the email.
We load the ‘from’ and to email addresses from environment variables. We check SendGrid’s HTTP response code to determine if the email has been accepted by SendGrid for delivery. You can read more about SendGrid’s HTTP status codes here. The 202 code means that the message is valid and will be sent.
Once the Email has been sent, we’ll use TwiML to send a response back to Twilio. We’ll use the Twilio Client Library for creating a TwiML response and use FastAPI’s Response class to return the TwiML response as application/xml. TwiML is Twilio’s markup language, which is similar to XML. You can read more about TwiML here.
Running the server
Since we have written the endpoint, it’s time to run the server!
Unlike the Flask framework, FastAPI doesn’t have a built-in server, it uses Uvicorn which is an ASGI server. ASGI stands for Asynchronous Server Gateway Interface, which is a standard for asynchronous applications. To run the server execute the following in your terminal:
Our server will start on port 8000. We are telling Uvicorn to run the application instance(app = FastAPI()) from the main file(main.py) and --reload makes the server restart after code changes.
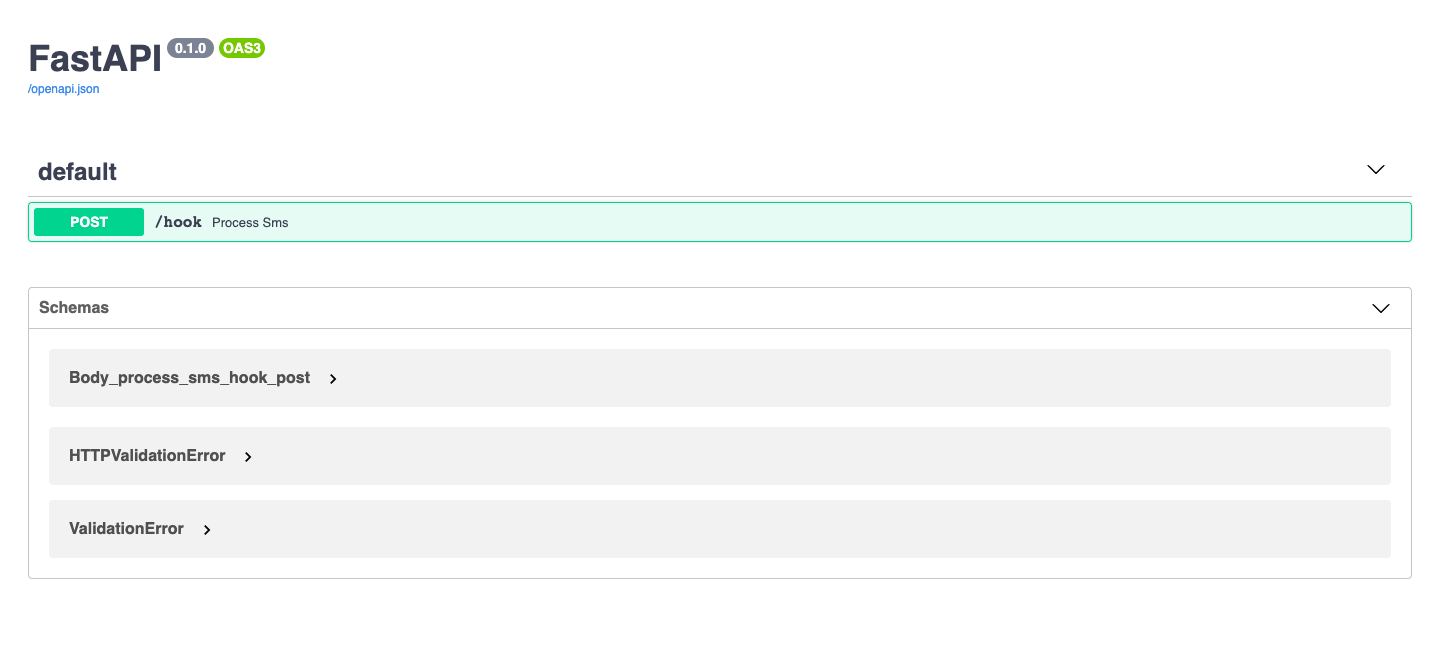
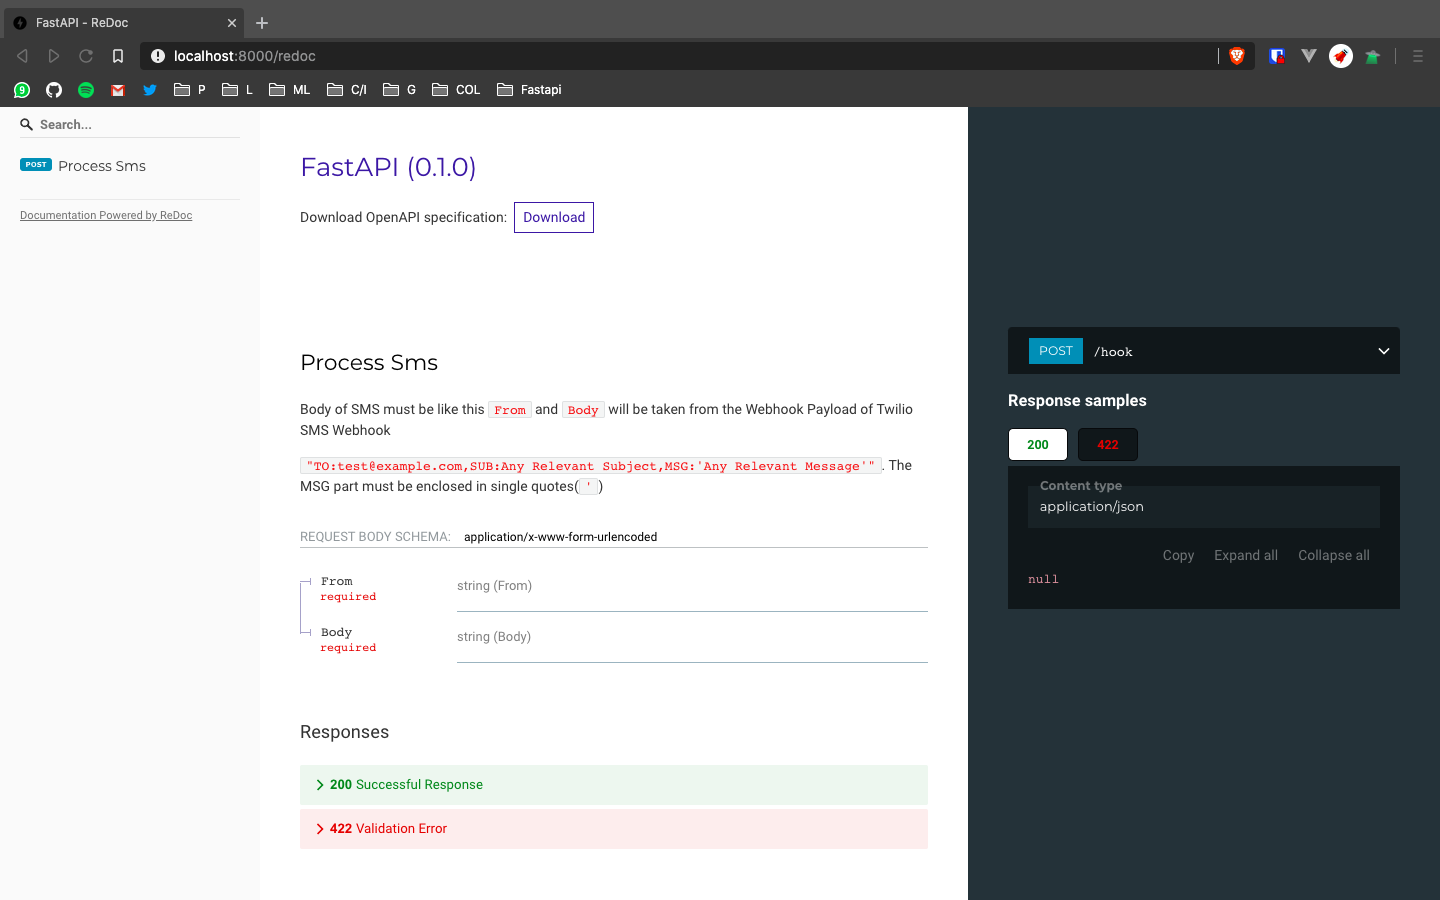
One of the convenient things of FastAPI is auto generated API docs. While the server is running you can go to http://localhost:8000/docs to check the API docs for our server generated by Swagger and you can goto http://localhost:8000/redoc to check the docs generated by ReDoc.
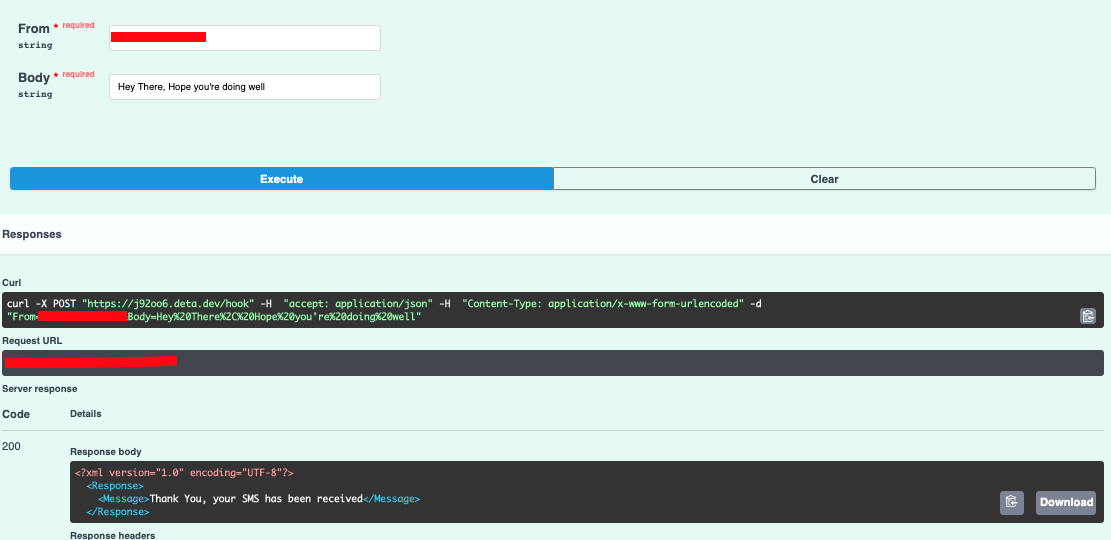
You can try the server before we connect it to Twilio for the incoming SMS. Just open https://localhost:8000/docs and try out the /hook endpoint. Pass your mobile number (not the Twilio number) in the “From” field and a message in the “Body” field.
Exposing our server with Pyngrok
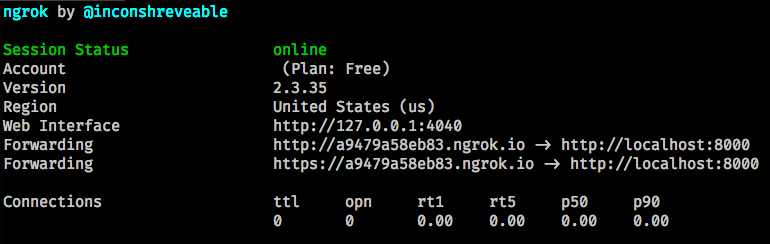
Before we connect our server to receive data from Twilio, we need to expose our server to the Internet using pyngrok. Pyngrok is a Python wrapper for ngrok that manages its own binary, which makes it easy to use it with Python.
Switch to another terminal tab or window, activate the virtual environment and execute the following command:
This will give an output including two temporary URLs (http and https) of our server publicly available on the Internet. A main point to note is that whenever you run ngrok, a new random URL will be generated. A permanent ngrok URL can be used with their paid plan.
Configure Twilio Webhook URL and Test the Server
The next step is to connect our server to receive calls from Twilio. We’ll configure Twilio Webhook URL and use our server endpoint to receive the data.
Configuring Twilio Webhook
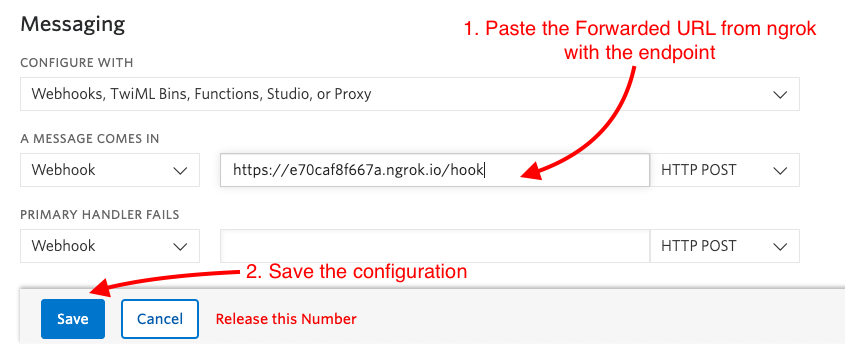
Navigate to your Twilio Console and select the Phone Numbers section. You can see the details of the phone numbers you bought. Select the phone number you want to use for this application and scroll down to the Messaging section. Copy the https:// URL from ngrok and then paste it on the “A message comes in” field, appending the /hook URL of our endpoint at the end. Click the “Save” button to save this change.
Testing the application
Now it’s time for us to test out the server and send an email. For that send an SMS to your Twilio phone number with any message. Shortly after you’ll receive an email with the SMS contents on the TO_EMAIL address you configured for the application.
Conclusion
In this post, we learned how to use FastAPI to build a server, used Twilio SendGrid to send emails and Twilio Programmable Messaging to receive SMS messages. You can extend this to something like a chatbot or an emailing application, the possibilities are endless!
You can reach me out on:
- Email : athul8720@gmail.com
- GitHub: athul
- Twitter: athulcajay
he code for the project is on GitHub. Go forth and build awesome stuff ⚡️


Related Resources
Twilio Docs
From APIs to SDKs to sample apps
API reference documentation, SDKs, helper libraries, quickstarts, and tutorials for your language and platform.
Resource Center
The latest ebooks, industry reports, and webinars
Learn from customer engagement experts to improve your own communication.
Ahoy
Twilio's developer community hub
Best practices, code samples, and inspiration to build communications and digital engagement experiences.