Building a Video Chat Web App with ASP.NET Core Blazor and Twilio Programmable Video
Time to read:
August 25, 2020
Written by
Reviewed by

Realtime user interaction is a great way to enhance the communication and collaboration capabilities of a web application. Video chatting with colleagues, friends, or family has become the new norm, and video chat is an obvious choice for sales, customer support, and education sites. For remote workforces, video chat improves the effectiveness of team collaboration.
But is video chat practical to implement?
If you’re developing with Blazor WebAssembly (WASM) on the front end and ASP.NET Core for your server, the answer is: Yes. Twilio Programmable Video and the Twilio helper libraries for JavaScript and .NET enable you to efficiently add robust video chat to your application.
Whether you’re building solutions for telemedicine, distance learning, or workforce engagement, Twilio has GDPR compliance and HIPAA eligibility. With Twilio Programmable Video you can build secure video applications that scale.
In this post you’ll learn how to create a fully operational video chat application using the Twilio JavaScript SDK in your Blazor single page application (SPA) and the Twilio SDK for C# and .NET in your ASP.NET Core server code. You’ll build the interactions required to create and join video chat rooms, and to publish and subscribe to participant audio and video tracks.
Prerequisites
You’ll need the following technologies and tools to build the project described in this post:
Software and services
- .NET Core 3.1 SDK – version 3.1.300 or higher.
- Node.js and npm – The Node.js installer also installs npm.
- Visual Studio Code, Visual Studio 2019 – version 16.7.2 or higher, or another IDE compatible with the above.
- Git – Needed if you’re going to clone the companion repository or use Git for source code control.
- Font Awesome account – Copy your
<script>tag to a safe place. - Twilio account
Hardware
To test and fully experience the completed app you’ll need the following hardware:
- A connected video device, such as a laptop’s integrated webcam
- A second video device, like the highly regarded Microsoft LifeCam Studio
Knowledge and experience
To get the most out of this post you should have:
- Awareness of the Blazor feature of ASP.NET
- Basic knowledge of Razor markup
- A general understanding ofASP.NET Core, including dependency injection
There is a companion repository for this post available on GitHub. It contains the complete source code for this tutorial.
Getting started with Twilio Programmable Video
You’ll need a free Twilio trial account and a Twilio Programmable Video project to be able to build this project with the Twilio Video SDK. Getting set up will take just a few minutes.
Once you have a Twilio account, go to the Twilio Console and perform the following steps:
- On the Dashboard home, locate your Account SID and Auth Token and copy them to a safe place.
- Select the Programmable Video section of the Console.
- Under Tools > API Keys, create a new API key with a friendly name of your choice and copy the Account SID and API Secret to a safe place.
The credentials you just acquired are user secrets, so it’s a good idea not to store them in the project source code. One way to keep them safe and make them accessible in your project configuration is to store them as environment variables on your development machine.
ASP.NET Core can access environment variables through the Microsoft.Extensions.Configuration package so they can be used as properties of an IConfiguration object in the Startup class. The following instructions show you how to do this on Windows.
Execute the following commands at a Windows or PowerShell command prompt, substituting your credentials for the placeholders. For other operating systems, use comparable commands to create the same environment variables.
If you prefer, or if your development environment requires it, you can place these values in the appsettings.development.json file as follows, but be careful not to expose this file in a source code repository or other easily accessible location.
You may want to add the appsettings.development.json file to your .gitignore for this solution to protect your credentials.
Creating the video chat solution
You can use the .NET tooling to create Blazor WebAssembly (WASM) web applications from either the Visual Studio 2019 user interface or the .NET Core CLI. When you run either one, the tooling will create a Visual Studio Solution (.sln) file and three C# project (.csproj) files:
One ASP.NET Core 3.1 project:
Blazor.Twilio.Video.Server – responsible for serving the Blazor WASM client app to client browsers and providing a Web API.
Two .NET Standard 2.1 projects:
Blazor.Twilio.Video.Client – responsible for the user interface, including how video chat rooms are created and joined, and for hosting the participant video stream.
Blazor.Twilio.Video.Shared – used by the .Client and .Server projects to bridge the gap between the server’s Web API and the client HTTP calls with common object graphs.
See Target frameworks in SDK-style projects for more information about how target frameworks work and the valid combinations of frameworks.
Visual Studio 2019: From the menu bar, select File > New Project. Select Blazor App from the list of templates.
The Configure your new project window should open and display “Blazor App” as the project type. For Project name, enter “Blazor.Twilio.Video”. Be sure to include the dots. Pick any appropriate local directory for Location.
Check Place solution and project in the same directory. Because the tooling is creating a multi-tier folder structure and multiple projects, it will actually place the solution (.sln) file in a parent folder and the project folders underneath, in standard fashion. Placing the solution file in a separate folder will create an additional, unneeded, level.
.NET Core CLI: execute the following command-line instruction in the directory where you’d like to create the top-level directory for the solution:
You should see a number of lines of output followed by a final “Restore succeeded” message.
Adding NuGet packages for Twilio and SignalR
The ASP.NET Core server application will use the Twilio SDK for C# and .NET to access Twilio Programmable Video.
You can install the Twilio, SignalR Client, and MessagePack NuGet packages with the Visual Studio 2019 NuGet Package Manager, Package Manager Console, or the .NET Core CLI.
Here’s the .NET Core CLI dotnet add command-line instruction:
The Server/Blazor.Twilio.Video.Server.csproj file should include the package references in an <ItemGroup> node, as shown below, if the command completed successfully. (The version numbers in your project may be higher.)
The Blazor.Twilio.Video client application will use the SignalR MessagePack protocol package to provide fast and compact binary serialization. It will also use the SignalR Client package to provide access to SignalR hubs.
Here’s the dotnet add command-line instruction for the SignalR MessagePack client package:
To add the SignalR MessagePack protocol package, use the following dotnet add command:
The Blazor.Twilio.Video.Client.csproj file should contain an <ItemGroup> section that looks like the following:
The minor version numbers in your project may be higher.
Enabling nullable reference types
C# 8.0 introduced nullable reference types and they can make a useful contribution to this solution. You enable nullable reference types by modifying the C# project (.csproj) file.
In all of the .csproj project files for the .Client, .Server, and .Shared projects, add the following XML element to the top <ItemGroup> node:
Deleting unneeded template files
You won’t need some of the files created by the tooling. Delete the following files, but not the folders:
/Client
/Pages
Counter.razor
FetchData.razor
/Shared
NavMenu.razor
SurveyPrompt.razor
/wwwroot
bootstrap/**
open-iconic/**
/Server
/Controllers
WeatherForecastController.cs
/Shared
WeatherForecast.cs
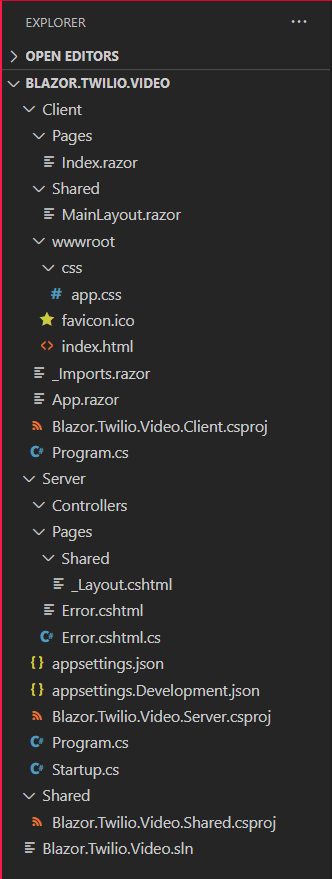
When you’re finished your Explorer folder and file structure should look like the following:
Creating the folder and file structure
Add the following folders and files to the existing folders and files:
/Client
/Components
Cameras.razor
Cameras.razor.cs
/Interop
VideoJS.cs
/Pages
Index.razor.cs
/wwwroot
site.js
/Server
/Controllers
TwilioController.cs
/Hubs
NotificationHub.cs
/Options
TwilioSettings.cs
/Services
TwilioService.cs
/Shared
CameraState.cs
Device.cs
HubEndpoint.cs
RoomDetails.cs
TwilioJwt.cs
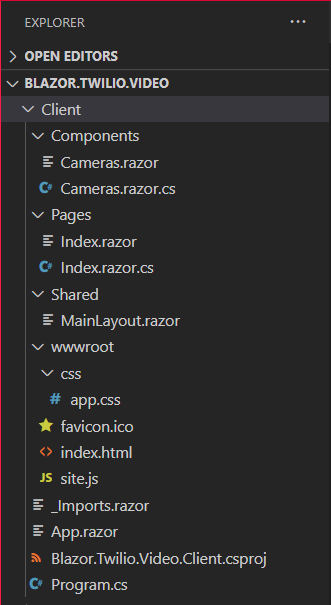
The Client folder should look like the following:
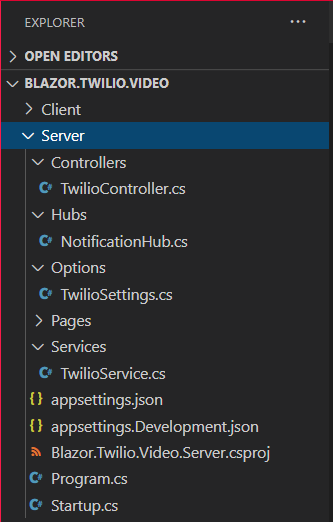
The Server folder should look like the following:
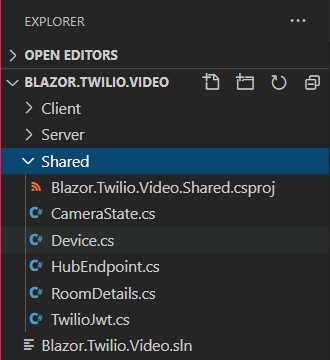
The Shared folder should look like the following:
Building and testing the configured solution
Build and run the application to ensure that it compiles and works properly: press F5 to do this from either Visual Studio or Visual Studio Code, or run the app from the .NET CLI with the dotnet run command:
You should see a default home page similar to the one created by the tooling, but missing the pieces provided by the files you removed.
Close the browser and end the terminal session.
Creating services
The server-side code needs to do several key things, one of them is to provide a JSON Web Token (JWT) to the client so the client can connect to the Twilio Programmable Video API. Doing so requires the Twilio Account SID, API Key, and API Secret you stored as environment variables. In ASP.NET Core, it’s common to use a strongly-typed C# class to represent the various settings.
Replace the contents of the Server/Options/TwilioSettings.cs file with the following C# code:
These settings are configured in the Startup.ConfigureServices method, which maps the values from environment variables and the appsettings.json file to the IOptions<TwilioSettings> instances that are available for dependency injection. In this case, the environment variables are the only values needed for the TwilioSettings class.
Insert the following C# code in the Shared/RoomDetails.cs file:
The RoomDetails class is an object that represents a video chat room. You’ll also need a simple object to represent the Twilio JSON Web Token (JWT); add the following C# code to the Shared/TwilioJwt.cs file:
Note the use of the C# 8.0 ! (null-forgiving) operator in the property declaration.
To implement the VideoService, replace the contents of the Server/Services/TwilioService.cs file with the following code:
The TwilioService class constructor takes an IOptions<TwilioSettings> instance and initializes the TwilioClient, given the supplied API Key and corresponding API Secret. This is done statically, and it enables future use of various resource-based functions. The implementation of the GetTwilioJwt is used to issue a new Twilio.Jwt.AccessToken.Token, given the Account SID, API Key, API Secret, identity, and a new instance of HashSet<IGrant> with a single VideoGrant object. Before returning, an invocation of the .ToJwt function converts the token instance into its string equivalent.
The GetAllRoomsAsync function returns a list of RoomDetails objects. It starts by awaiting the RoomResource.ReadAsync function, which will yield a ResourceSet<RoomResource> once the async operation returns. From this listing of rooms, the code projects a series of Task<RoomDetails> where it will ask for the corresponding ResourceSet<ParticipantResource> currently connected to the room specified with the room identifier, room.UniqueName.
You may notice some unfamiliar syntax in the GetAllRoomsService function if you’re not used to code after the return statement. C# 8 includes a static local function feature that enables functions to be written within the scope of the method body (“locally”), even after the return statement. They are static to ensure variables are not captured within the enclosing scope.
Note that for every room n that exists, GetRoomDetailsAsync is invoked to fetch the room’s connected participants. This can be a performance concern! Even though this is done asynchronously and in parallel, it should be considered a potential bottleneck and marked for refactoring. It isn't a concern in this demo project, as there are, at most, a few rooms.
Creating the API controller
The video controller will provide two HTTP GET endpoints for the Blazor client to use.
|
Endpoint |
Verb |
Type |
Description | ||||
|
api/twilio/token |
GET |
JSON |
an object with a | ||||
|
api/twilio/rooms |
GET |
JSON |
array of room details: | ||||
Replace the contents of the Server/Controllers/TwilioController.cs file with the following C# code:
The controller is decorated with the ApiController attribute and a Route attribute containing the template "api/twilio".
In the TwilioController actions, the VideoService is injected using the FromServicesAttribute, which provides the instance to the methods.
Creating the notification hub
The ASP.NET Core application wouldn't be complete without the use of SignalR, which “... is an open-source library that simplifies adding real-time web functionality to apps. Real-time web functionality enables server-side code to push content to clients instantly.”
When a user creates a room in the application their client-side code will notify the server and, ultimately, other clients of the new room. This is done with a SignalR notification hub.
Add the following C# code to the Shared/HubEndpoint.cs file:
Replace the contents of the Server/Hubs/NotificationHub.cs file with the following C# code:
The NotificationHub will asynchronously send a message to all other clients notifying them when a room is added.
Configuring the Server project Startup class
There are a few things that need to be updated in the Startup class and the ConfigureServices method.
Replace the C# using statements at to the top of the Server/Startup.cs file:
In the ConfigureServices method, replace all the existing code with the following code:
This configures the application settings containing the Twilio API credentials, maps the video service to its corresponding implementation, assigns the root path for the SPA, and adds SignalR.
Replace the Configure method body with the following C# code:
This maps the notification endpoint to the implementation of the NotificationHub. Using this endpoint, the Angular SPA running in client browsers can send messages to all the other clients. SignalR provides the notification infrastructure for this process.
This concludes the server-side setup. From the command line or terminal window, run the dotnet build command to ensure that the application compiles. At this point, there should be no errors, but you should expect warning(s) at this point — you’ll address those soon.
Finalizing the Shared library classes
The Shared project is intended to hold common objects used by both the Server and the Client. Since you’re using Blazor WebAssembly on the client, you can use C# objects just as you do on the server.
Add the following C# code to the Shared/CameraState.cs file:
Add the following C# code to the Shared/Device.cs file:
The other objects should have already been fulfilled in previous steps. At this point you shouldn’t need to alter anything in either the Server or Shared projects. You have a shared library and an ASP.NET Core server project that are both good to go.
Building the interop service
The VideoJS class serves as an interop between the Blazor WebAssembly C# code and the JavaScript running in the client browser. One of the biggest misconceptions about WebAssembly is that people assume JavaScript is no longer needed. That is not true. In fact, they complement each other.
Add the following C# code to the Client/Interop/VideoJS.cs file:
These interop functions expose JavaScript functionality to the Blazor WebAssembly code and return values from JavaScript to Blazor.
Building the client-side Blazor WebAssembly SPA
If you recall, earlier in this tutorial you deleted Bootstrap and open-iconic. Instead of having your server executable serve these static files to the client app, you can rely on third-party content delivery networks (CDNs) instead, such as https://cdnjs.com.
Replace the contents of the Client/wwwroot/index.html with the following markup:
You’ll need your Font Awesome script tag to completely configure the user interface. If you need to find the tag that was created when you signed up, go to https://fontawesome.com/kits and click the code number under Your Kits.
In the index.html file, paste your Font Awesome <script> tag into the <head> element immediately after the <link href="css/app.css" rel="stylesheet" /> node.
The index.html file is all fairly standard HTML, but have a look at the <app> element in the <body>. This is where things get a bit interesting. Much like other single page application (SPA) frameworks, Blazor names its target host element as app by default, although this can be changed. When Blazor starts running it will hook into this DOM element and it will serve as the anchor for the client-side user experience. All markup inside the <app>…</app> element is replaced when the app is fully operational. You can place markup here to represent some sort of loading indicator, which is helpful to end-users to indicate progress.
Replace the contents of the Client/wwwroot/css/app.css file with the following CSS code:
The cascading style sheet is now greatly simplified; it's nearly half the number of lines. It contains two :root variables that hold the official Twilio colors. The participant-grid class is how you style a two-by-two grid, in which one of the four tiles will represent a participant in the video chat.
Replace the contents of the Client/Shared/MainLayout.razor file with the following Razor markup:
In keeping with the separation of concerns principle, the markup acts as a template and the logic is separated into the Client/Pages/Index.razor.cs file. In Visual Studio, these two files are collapsed onto each other, as they’re known by convention to be related.
The markup consists of:
- the camera selection component
- an input for creating a new room
- a listing of existing rooms
- the participant grid
When the user enters a room name, the create room button is enabled. If the user clicks it, the TryAddRoom logic is called.
Add the following C# code to the Client/Pages/Index.razor.cs file:
The Index.razor.cs C# code has a few properties that are decorated with the InjectAttribute attribute. This indicates that they will have their implementations resolved from the dependency injection service collection and provided at runtime:
IJSRuntime represents an instance of a JavaScript runtime to which calls may be dispatched.
NavigationManager provides an abstraction for querying and managing URI navigation.
HttpClient provides the ability to send HTTP requests and receive HTTP responses from a resource identified by a URI.
There are several fields that contain application state; such as the rooms that exist, the room name the user has entered, the active room, the active camera, and a SignalR hub connection instance. The OnInitializedAsync is overridden to call the servers api/twilio/rooms endpoint to get the current rooms. Additionally, it instantiates the SignalR hub connection using the MessagePack protocol, with automatic reconnect, and registers a listener on the “rooms updated” endpoint, just before starting the connection.
The corresponding Razor markup is in the Client/Pages/Index.razor file. Replace its contents with the following Razor markup:
The markup includes a non-standard HTML element named <Cameras />. This element is a Razor component and contains its own C# and Razor markup. The camera component exposes an event named, CameraChanged. The event fires when the camera selection is made from the camera component.
Add the following C# code to the Client/Components/Camera.razor.cs file:
Blazor uses the Razor view engine to compile views. The Razor markup creates a template where C# data model binding takes place.
Note that the Cameras component is a partial class. This is needed Because the Razor markup actually compiles to a class named Cameras you need to declare your Cameras.razor.cs class as partial.
Add the following Razor markup to the Client/Components/Camera.razor file:
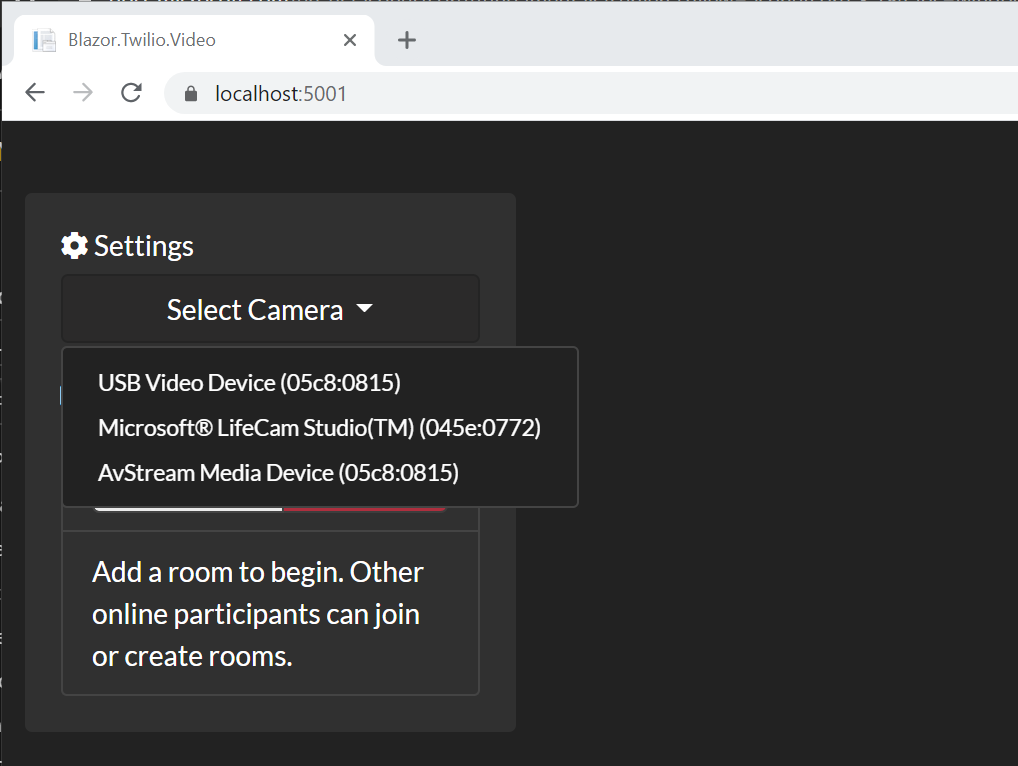
The Cameras component markup includes a dropdown menu that enables the user to select a camera. When the component is initialized, the devices are retrieved from the JavaScript interop functionality encapsulated in the VideoJS class. When a camera is selected its device identifier is used to start the live camera preview.
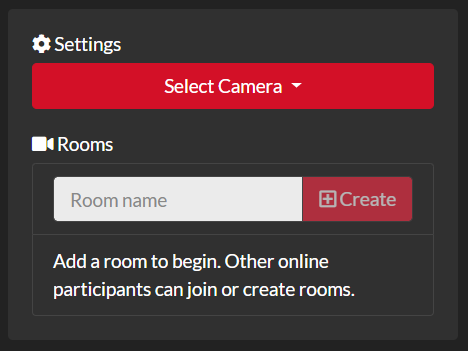
If you recall from the Index page, the Cameras component was positioned above the rooms layout and input controls. When the app is running it looks like this:
A world without JavaScript
While this is a clickbait-worthy heading, it’s not true. Here’s the JavaScript code that’s loved by WebAssembly and for which the VideoJS interop class bears billets doux between it and the WebAssembly code.
Add the following JavaScript code to the Client/wwwroot/site.js file:
You may see some ESLint warning messages regarding _videoTrack and _activeRoom properties. The app can only call createOrJoinRoom when there is a local _videoTrack. When this call is being made it is not possible for the other to be made at the same time. So you can ignore the warning.
The .site.js JavaScript file provides a number of key functions:
- Exposing video devices
- Starting video preview
- Creating or joining a room
- Leaving a room
All of the functionality is exposed by window.videoInterop. The four functions are represented by the object literal, and there is very little state to be maintained.
Exposing video devices
The getVideoDevices function asynchronously asks the navigator.mediaDevices to getenumerableDevices.
If the devices list returned is empty, that means the function needs to prompt the user for permission to use their webcam and microphone. The function explicitly asks for user media as follows:
The user is prompted for permission as part of getUserMedia, then the devices are enumerated once more to populate the devices list. The array of devices is then returned to the Blazor WebAssembly caller. The results are serialized from an array of JavaScript literal objects that have deviceId and label members to an array of the C# Device class.
Starting video preview
The startVideo function accepts the deviceId the user selected from the Camera component, and a selector which represents the element identifier of the camera container. If there was a previous _videoTrack it is detached and recreated using the Twilio.Video.createLocalVideoTrack function. It is then attached and appended to the camera container. This will serve as the client’s local video preview stream.
Creating or join a room
The createOrJoinRoom function takes a roomName and token. The token is the TwilioJwt which is resolved from the servers api/twilio/token endpoint. With these two arguments, and the _videoTrack in context, the function can call Twilio.Video.createLocalAudioTrack to get everything it needs to connect to the room.
The token and an options object containing the local audio and video tracks, and the room name are used to call Twilio.Video.connect. The connect function will return the _activeRoom and exposes a number of events. The following table provides a comprehensive list of each event associated with an SDK resource:
|
Event Registration |
Description |
|
|
Occurs when a user leaves the room |
|
|
Occurs when a new participant joins the room |
|
|
Occurs when a participant leaves the room |
|
|
Occurs when a track publication is published |
|
|
Occurs when a track publication is unpublished |
|
|
Occurs when a track is subscribed |
|
|
Occurs when a track is unsubscribed |
Leaving a room
The leaveRoom function checks if the _activeRoom is truthy, and calls disconnect to end the call. Furthermore, the list of _participants is cleared if it was also truthy. All of the resource cleanup occurs implicitly.
Putting it all together and testing the completed app
Phew, this was quite the project! Congratulations on completing this build. Well done!
Now you can run the app and do any necessary debugging.
Configuring your test environment
If you’re using Visual Studio 2019 there are a few things you can do to make your testing run more smoothly:
- Set the Blazor.Twilio.Video.Server project as the startup project.
- Change the web server host from IIS Express to the Kestrel web server. You can do this by changing the dropdown next to the green Run arrow from IIS Express to Blazor.Twilio.Video.Server.
Using the Kestrel web server will open a console window which will provide you with additional debugging information. It also enables you to run ASP.NET Core web apps on macOS and Linux, in addition to Windows.
The settings for running the app can be found in:
Blazor.Twilio.Video/Server/Properties/launchSettings.json
If you’re using Visual Studio Code, be sure:
- the latest version of the C# extension for VS Code is installed
- the latest version of JavaScript Debugger is installed
- JavaScript debugging is enabled
The settings for running the app can be found in:
Blazor.Twilio.Video/.vscode/launch.json
Testing the video chat app
Run the application.
If you’re working in Visual Studio 2019 the app should open the browser you’ve selected and go to https://localhost:5001.
If you’re using Visual Studio Code, open a browser and go to: https://localhost:5001 (or the port you’ve configured) with your browser.
You should see a large “Loading…” message.
After the application loads your browser will prompt you to allow camera access: Grant it.
Select a video device from the list in the user interface, similar to the one shown below:
Once you’ve selected a video device in the app your browser may prompt you to select an audio device.
If you have two video sources on your computer, open an incognito window or a different browser and select a different video device from the one you selected in the first browser window..
Note: Chrome and Firefox handle video devices a bit differently, so the behavior you see may be slightly different depending on the browser(s) you are using.
Enter a name for a video chat room, press Tab, and click Create. You should see the room name added to the list of rooms along with the number of current participants and the maximum number of participants.
When a room is created the local preview is moved just under the settings so that remote room participants join their video stream will render in the larger viewing area.
Note: The grid system in the CSS for this application is set up for a 4 x 4 grid. Adding more than two participants will likely make the layout look odd.
Below is a screen capture showing testing of the final app with two browsers stacked atop each other. You can see the room creator’s view across the top and underneath it the second “participant’s” view with the order of the views reversed.
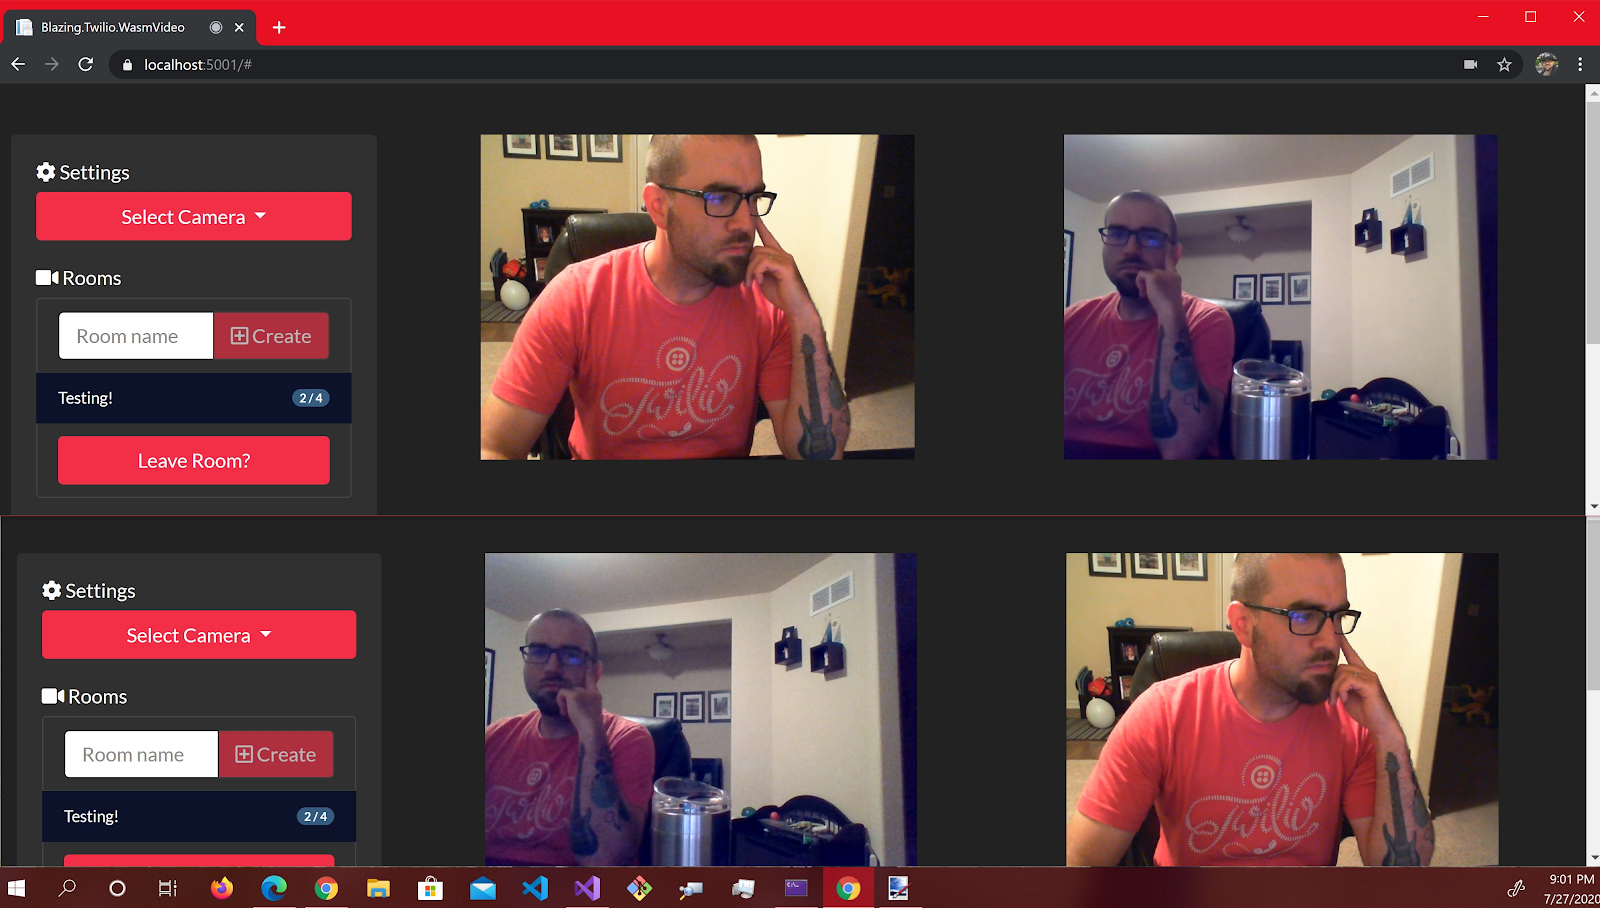
Author’s note: I’m wearing a Twilio shirt, my tattoos look great, and I’m able to have a conversation with myself.
Editor’s note: Business as usual, really.
Summary
This post showed you how to build a fully functioning video chat application with ASP.NET Core Blazor WebAssembly, SignalR, and Twilio Programmable Video. The Twilio .NET SDK provides JWTs to client-side Blazor frontend code as well as getting room details via the ASP.NET Core Web API. The client-side Blazor SPA integrates the Twilio JavaScript SDK.
Additional resources
The companion repository on GitHub includes persistent selections, which you may want to include in your production app.
To learn more about the tools and technologies used in this tutorial, consult the following fine resources on docs.microsoft.com, the standard-bearer in technical documentation:
To see how to implement video chat with ASP.NET Core and an Angular frontend, check out this post on the Twilio blog, along with its companion post about deploying and running the app on Azure:
Building a Video Chat App with ASP.NET Core 3.1, Angular 9, and Twilio
Also check out the appearance by Twilio Developer Evangelist Corey Weathers on the .NET Docs show for more “blazing bits”!
David Pine is a 2x Microsoft MVP, Google Developer Expert, Twilio Champion, and international speaker. You can follow him on Twitter at @davidpine7. Be sure to check out his blog at https://davidpine.net.


Related Resources
Twilio Docs
From APIs to SDKs to sample apps
API reference documentation, SDKs, helper libraries, quickstarts, and tutorials for your language and platform.
Resource Center
The latest ebooks, industry reports, and webinars
Learn from customer engagement experts to improve your own communication.
Ahoy
Twilio's developer community hub
Best practices, code samples, and inspiration to build communications and digital engagement experiences.