Building a Chatbot with the ChatGPT API, Twilio Programmable Messaging and Python
Time to read:
March 16, 2023
Written by
Reviewed by
A chatbot is a software application that is able to conduct a, usually, written conversation with a human user. In this tutorial I’m going to show you how easy it is to build an SMS chatbot using ChatGPT, the extremely popular chatbot from OpenAI that is practically indistinguishable from a human. To create this chatbot, the Flask framework for Python will be used.
Introduction to ChatGPT
ChatGPT is a highly advanced language model trained on large amounts of text. It is based on the GPT-3 family of language models developed by OpenAI. In spite of its internal complexity, ChatGPT is surprisingly simple to operate: you feed it some text, such as a question or prompt or maybe a list of questions and answers, followed by an open question. Then, the model generates some text as a response, following a similar style and structure to the input data. In this article you will learn how to embed this amazing chat engine into your Twilio SMS application!
OpenAI provides an interactive website where you can try out ChatGPT at https://chat.openai.com. As an example, I just had the following conversation with it:
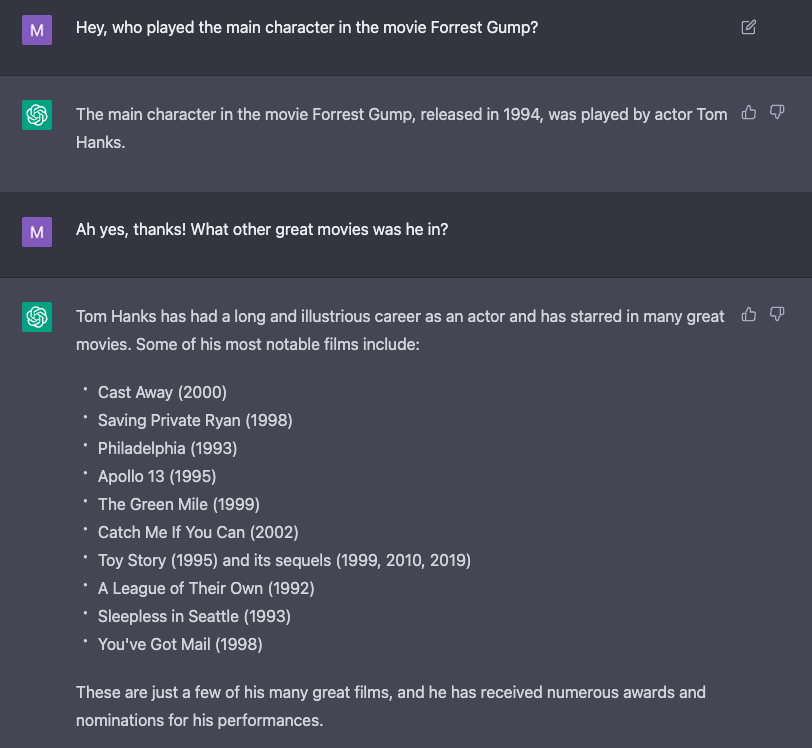
Pretty amazing, right?
Tutorial requirements
To follow this tutorial you need the following items:
- Python 3.7 or newer. If your operating system does not provide a Python interpreter, you can go to python.org to download an installer.
- A Twilio account. If you are new to Twilio click here to create a free account.
- An OpenAI API key. Request access here.
- A phone that can send and receive SMS.
Create a Python virtual environment
Following Python best practices, as a first step in creating the chatbot you are going to create a separate directory for the project, and inside it you are going to create a virtual environment. Then, you are going to install the Python packages that are needed for the chatbot in it.
If you are using a Unix or macOS system, open a terminal and enter the following commands to do the tasks described above:
For those of you following the tutorial on Windows, enter the following commands in a command prompt window:
The last command uses pip, the Python package installer, to install the five packages that are needed for this project, which are:
- The OpenAI Python client library, to send requests to the OpenAI ChatGPT engine.
- The Twilio Python Helper library, to work with SMS messages.
- The Flask framework, to create the web application.
- The python-dotenv package, to read a configuration file.
- The pyngrok package, to temporarily make the web chat application available on the Internet.
Configuration
As mentioned above, this project requires an API key from OpenAI. The Python application will need to have access to this key, so you are going to create a .env file and store it there. The application will then import it from this file as an environment variable.
Create a .env file in your project directory (note the leading dot) and paste the following into the file, replacing your-openai-api-key-here with your OpenAI key:
You will learn how to work with this file in the next section.
Sending ChatGPT requests from Python
In this section you are going to create the support code that works with the ChatGPT engine. The code will be stored in a file called chatbot.py. Below you can see the initialization section of this file:
The load_dotenv() function imports data stored in the .env file as environment variables, which in this case is done to read the OpenAI key you stored in this file earlier. Note how the OPENAI_KEY variable is used in the following line to initialize OpenAI with the key. The completion variable holds the actual client to the ChatGPT engine. This is the object that will interact with the OpenAI service.
The start_chat_log variable is a list that is going to contain all the interactions between the user and ChatGPT. At this initial stage, it has only one entry, which has the purpose of initializing the chat engine and setting the tone for it.
Each message in the chat log is assigned a role. The three available roles are:
system: only used in the first prompt to give the chat engine some guidelines on its personality and how to respond and interact with the user.user: the questions or prompts entered by the user.assistant: the responses returned by the ChatGPT engine for previous questions.
The system message can be changed to create different styles of chatbots. Once you have the bot up and running, I encourage you to try different system prompts to see how the responses change accordingly.
Let’s now write a function that sends a query to ChatGPT and gets a response. Add the following function at the bottom of chatbot.py:
The askgpt() function takes the question from the user as a first argument, followed by an optional chat log. If the chat log is not provided then the function uses start_chat_log to initialize a new chat with the default system prompt.
The function adds the question from the user as the last item in the chat_log list with the user role. It then sends the list to the completion.create() function, which returns the chat engine’s response. The model argument that is passed along with the chat log is used to specify which language model to use. The gpt-3.5-turbo model is designed to work with ChatGPT at the time I’m writing this. But make sure to check the ChatGPT API documentation as this model might have been superseded by another one by the time you read this.
The response from ChatGPT is an object that has a choices attribute, which is a list of possible responses. At this time, this list always comes back with a single response. The message element in this response has the text of the answer in the content sub-element. Before it ends, the function extracts the text returned by ChatGPT from the response objects and adds it to the chat log using the assistant role. It then returns both the response and the updated chat log.
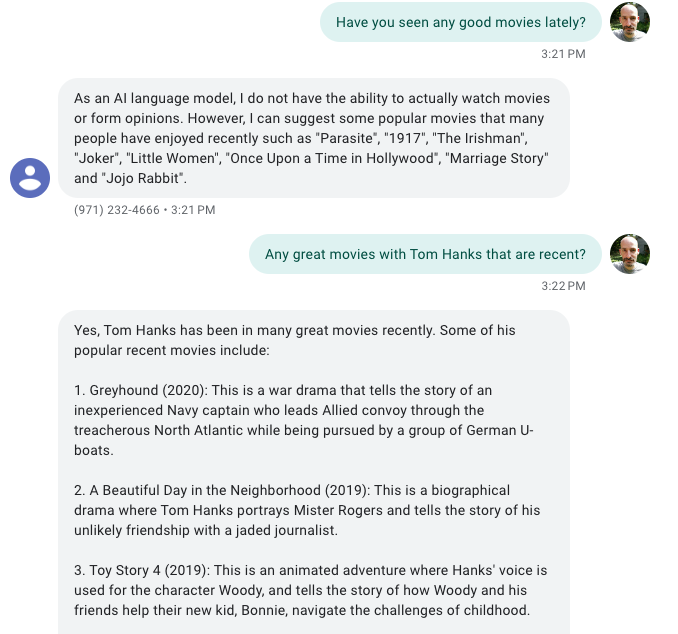
Start a Python shell to test the askgpt() function:
Pretty cool, right? Note how by passing the chat log in the second question the engine knows that the discussion is centered on movies in which Tom Hanks has appeared, even though the name isn’t explicitly mentioned.
The askgpt() function is all we need to manage the chat portion of this project. In the next sections you are going to integrate this function with Twilio SMS messaging.
Configure Twilio Programmable Messaging
The next step is to configure a Twilio phone number for the chatbot to use. If you haven’t created a Twilio account yet, create it now and log in.
Buying a Twilio phone number
If you already have a phone number in your Twilio account, you can proceed to the following section. Read on if you need to acquire a phone number.
Open the Twilio Console in your web browser and visit the Phone Numbers section to buy a phone number. Select your country on the “Buy a Number” screen, and check SMS in the capabilities field. If you’d like to request a number from your region, you can enter your area code in the "Number" field.
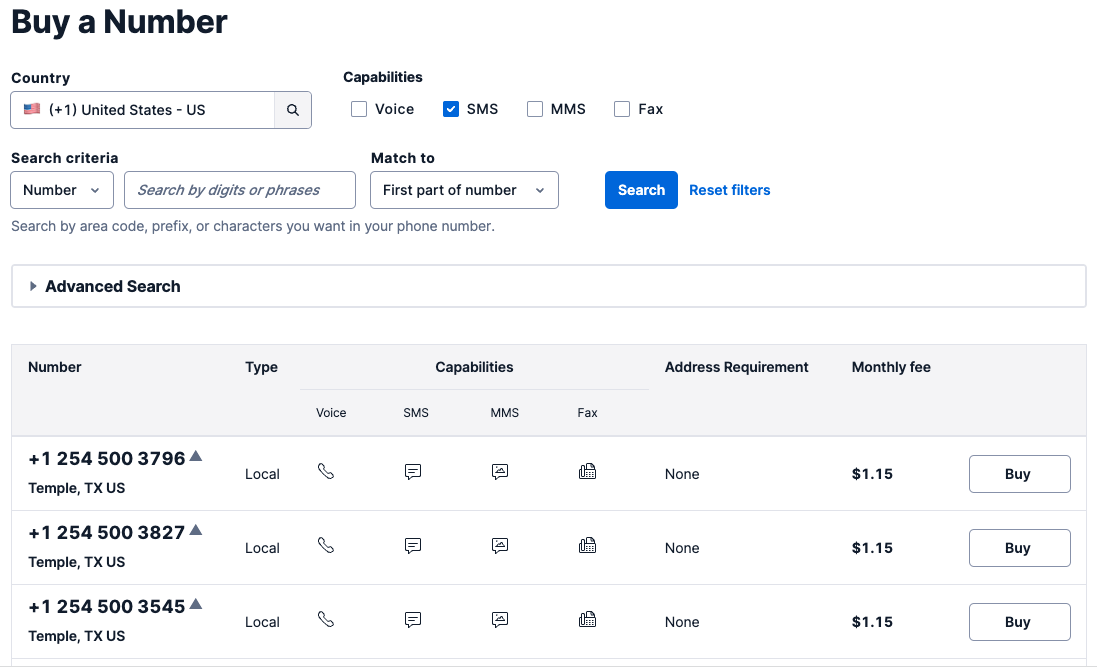
Click the "Search" button to see what numbers are available, and then click “Buy” for the number that you like from the results. After you confirm your purchase, click the “Close” button.
The documentation provides more details about the phone number buying process.
Configuring the webhook URL
The Twilio Programmable Messaging API uses a webhook to notify an application when there is an incoming message. The chatbot application presented in this article will implement a webhook that will be called by Twilio each time the user sends an SMS to the Twilio phone number. The webhook is going to use the ask() function you created earlier to respond to the user.
The Flask web framework greatly simplifies the task of creating a webhook. Below is a skeleton application with a webhook definition. Copy the following code into a new file called app.py, in the same directory as the chatbot.py file:
This code creates a Flask application that has an endpoint with the URL /bot. When Twilio is configured to know about this endpoint, it will send a request each time an SMS is received on the phone number you purchased earlier. The application can read the incoming message, do some processing and generate a response, which is returned at the end of the function.
You can start the above application as follows:
The application is now running on your computer at the http://localhost:5000 URL, but it is not accessible from the Internet. The next step is to provision a temporary public URL that we can give to Twilio so that it can send requests to this webhook.
For this you are going to use the ngrok tool. Leave the application running and open a second terminal. Activate the virtual environment on this terminal as you have done on the first at the start of the tutorial and then enter the following command:
You should see a screen similar to this:
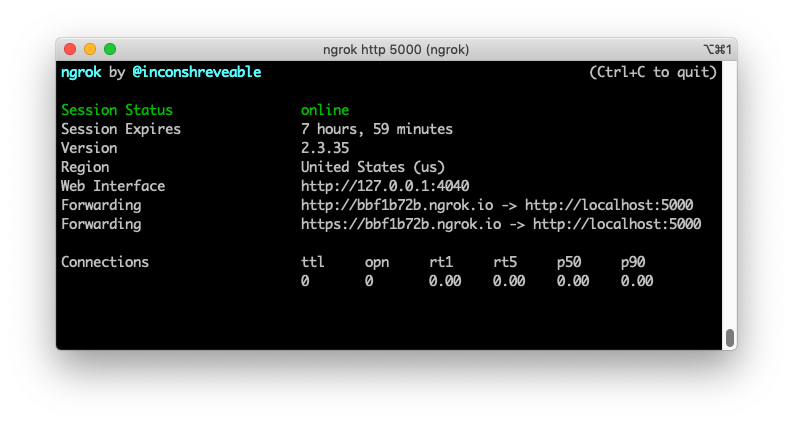
Note the lines beginning with “Forwarding”. These show the public URLs that ngrok uses to redirect requests into our service, both in http:// and https:// format. What we need to do now is tell Twilio to send incoming SMS notifications to this URL.
Go back to the Twilio Console, click on Phone Numbers / Manage / Active numbers, and then on the phone number that you purchased above. Scroll down to the “Messaging” section, copy the https:// URL from the ngrok output and then paste it on the “A message comes in” field with /bot added at the end of the URL. Make sure the request method is set to HTTP POST. Don’t forget to click the blue "Save" button at the bottom of the page to record these changes.

To test your webhook, send an SMS to your Twilio phone number from your personal phone. You should get the generic response that comes from the Flask application:
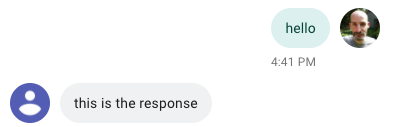
Now we know how to run the ChatGPT engine, and how to receive and reply to SMS messages with Twilio. In the next section will integrate the two and have a complete chatbot project.
SMS chatbot with ChatGPT and Twilio
Let’s expand app.py to send the messages received from users to the askgpt() function that we created above, and to maintain the log of the chat. Here is the updated app.py:
The most convenient place to store the chat log with a user is in the session variable from Flask, which uses an HTTP cookie for storage. Twilio works similarly to a web browser in this respect, and will accept, store, and resend cookies during a conversation with a user for a period of up to four hours. If there are two or more users chatting with the bot at the same time, each will have their own cookie.
Since session cookies are signed, the Flask application needs to have a secret key configured to be able to generate signatures. For security, you should replace the placeholder value I used for the secret key with something unique.
The bot() endpoint begins by obtaining the user message as before, and the chat log from the session. The session object uses the familiar dictionary syntax, so session.get() will return a previously stored chat log if it exists or None if this user does not have a session. This is convenient because the askgpt() function uses the initial chat log if None is passed.
Calling the askgpt() function works exactly as before. We pass the user message and the current chat log, and we get back the chatbot’s response and the updated chat log.
The now expanded chat log is stored in the Flask user session so that it is recalled when the user writes again. To end the function, the answer is returned as the response, and this will make Twilio send it back to the user over SMS.
Ready to try your new bot? If you are still running your Flask application, stop it with Ctrl-C and then run it again so that it incorporates the latest updates. If you are not running ngrok anymore, go to your second terminal and restart it, and then follow the instructions in the previous section to update your webhook URL in the Twilio Console; as ngrok allocates a different URL every time it runs.
With the Flask application and ngrok running, you are ready to start sending SMS to the bot. Send a text with your first question to the Twilio phone number like you did before, and in a few seconds the response should arrive. Feel free to try the bot on different topics, it knows about a lot of things!
Continuing with the theme of movies and Tom Hanks, here is a short conversation I had with ChatGPT through the Twilio SMS integration:
Conclusion
I hope you had as much fun as I had with this project! The possibilities of the ChatGPT engine are endless, so I encourage you to experiment with it by adapting this project and making it your own.
If you are interested in learning more about OpenAI’s language models, I invite you to read my GPT-3 posts as well. GPT-3 is the underlying technology that powers ChatGPT. It has its own API, with additional features and customization options:
- The Ultimate Guide to OpenAI's GPT-3 Language Model
- Building a Chatbot with OpenAI's GPT-3 engine, Twilio SMS and Python
If you build something cool I’d love to hear about it!
Miguel Grinberg is a Principal Software Engineer for Technical Content at Twilio. Reach out to him at mgrinberg [at] twilio [dot] com if you have a cool project you’d like to share on this blog!

Related Resources
Twilio Docs
From APIs to SDKs to sample apps
API reference documentation, SDKs, helper libraries, quickstarts, and tutorials for your language and platform.
Resource Center
The latest ebooks, industry reports, and webinars
Learn from customer engagement experts to improve your own communication.
Ahoy
Twilio's developer community hub
Best practices, code samples, and inspiration to build communications and digital engagement experiences.