Create a Standalone Voicemail Using Java and Twilio
Time to read: 10 minutes
October 16, 2015
Written by

Why is receiving voicemails still such a pain in 2015? With landlines you need to deal with overpriced and outdated hardware. On mobile phones you need to call a number, enter a password, and sift through the voicemails until you reach the one you want. Wouldn’t it be easier to just receive a text message to listen to a new voicemail? Fortunately, Twilio plus a little Java code gives you the power to do just that.
In this blog post we will use Apache Tomcat and Twilio to create a virtual answering machine that will receive and record all incoming calls. The answering machine will then text you a link to hear the message that was left for you.
If you don’t want to follow along and just want to see the code, it has all been open sourced in this Github repository.
Getting Started
The first step to building our answering machine is to set up our environment. Let’s walk through the setup process now.
We will be using Tomcat to run our servlets. Twilio’s Quickstart can help you get started with Tomcat and the Twilio SDK. Alternatively, you can just download this archive I’ve put together that contains Tomcat 8.0.26 and the Twilio Java SDK 4.5.0.
Your file structure should look similar to this once you’ve extracted the archive or finished going through the quickstart:
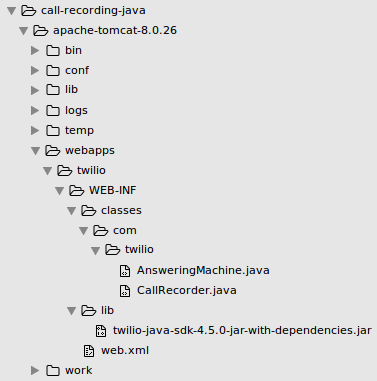
There may be a few extra folders in your /webapps/ directory that came with Apache. You don’t need to worry about removing them as they are contain the Tomcat homepage and documentation pages. You will not see AnsweringMachine.java, CallRecorder.java, or web.xml because we will be creating those files ourselves.
If you’ve never used Tomcat before, we should first test that our servlets can run locally. Open a terminal, navigate to the top of your project directory and run the following:
If you run into an error saying Cannot find ./bin/catalina.sh we can easily fix this by changing some file permissions in our bin/ directory. Run the following command in your terminal from the top of your project directory to do so (source):
Otherwise, you should see Tomcat started in your terminal. Open a web browser and navigate to http://localhost:8080/ and you should see the Apache Tomcat landing page:
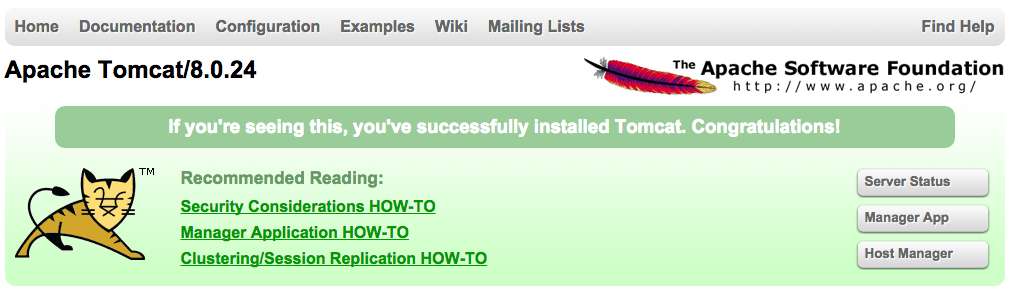
If you see a page like the one above then your environment is setup correctly and we can move on!
You can shut down your Tomcat server at any time by running the following from the top of your project directory:
If your terminal shows an error saying java.net.ConnectException: Connection refused do not worry, it just means that your server is already not running so there is nothing for the script to shut down.
*Ring Ring*
Now that our setup is out of the way it’s time to start building our web application. We will start by mapping our endpoints to servlets in our server’s web.xml file, which will be located in /webapps/twilio/WEB-INF/. That file is going to look as such:
The first few lines are just XML meta-data that we don’t need to modify. The block is where we are naming our servlet and telling Tomcat to look at the com.twilio.AnsweringMachine path for a Java class.
The block specifies that requests made to the /handle-call endpoint should be handled by the servlet named AnsweringMachine that we defined just above it. Let’s create the AnsweringMachine class now!
Please Leave a Message After the Beep
Our AnsweringMachine servlet will receive all incoming calls to our “voicemail”. By “voicemail” I’m referring to the Twilio phone number we will purchase and set up later on in the post.
Navigate to /webapps/twilio/WEB-INF/classes/com/twilio and create a new file called AnsweringMachine.java. The servlet is going to return TwiML instructions to record all incoming calls using the verb.
We first need to import a number of packages in order to use servlets and the Twilio library. Place the following code at the top of your file:
Our AnsweringMachine class is going to have a single method called service which will handle incoming requests. Use the code below to create the AnsweringMachine class and service method:
You can change “Brodan” to any name you wish in the pleaseLeaveMessage object. The TwiMLResponse object we are building allows us to generate a valid TwiML file without actually writing any XML. response.getWriter().print(twiml.toXML()); is going to return a response equivalent to the following XML:
You’ll notice we are sending our recording to a /twilio/handling-recording endpoint but we don’t have a block for that endpoint in our web.xml file. To handle this, we need to create another servlet.
Open your web.xml file again and add the following blocks above to create our second servlet:
This mapping will send any requests made to the /twilio/handle-recording endpoint to the CallRecorder servlet to be handled. We need to create the CallRecorder class as well.
Beeeeeeeeeeeep…
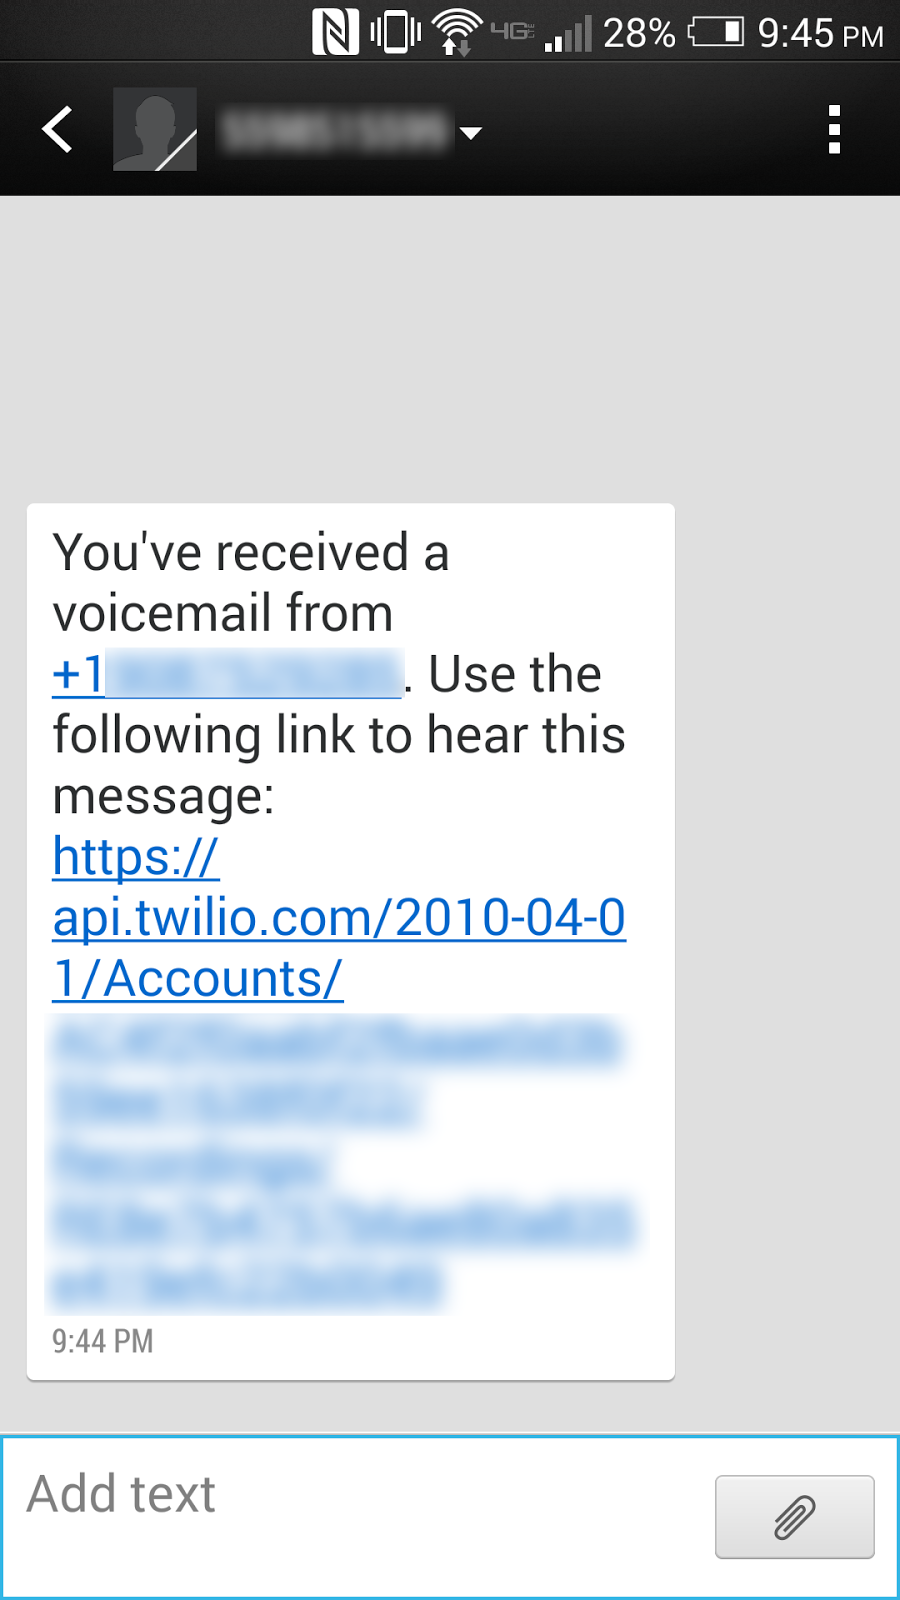
Navigate to /webapps/twilio/WEB-INF/classes/com/twilio and create another new file named CallRecorder.java. This servlet will send an outgoing messages notifying the user that they received a voicemail and will contain a link to the recording of the message. Lucky for us, Twilio takes care of storing the recording so we do not have to worry about writing files to our server.
We need to import a number of packages again. Place the following code at the top of your file:
Our CallRecorder class should be set up like this:
The service method is simply going to pass a couple of the incoming request’s parameters into a new method named sendSMS which we will create in a minute.
We need to configure our account credentials in order to authenticate with Twilio and send outgoing messages. We will define some constants to do this.
Add the following lines right below public class CallRecorder extends HttpServlet { :
Your ACCOUNT_SID, AUTH_TOKEN, and TWILIO_NUMBER can all be found in your Twilio account dashboard. Set YOUR_NUMBER to your actual phone number.
The sendSMS method should be placed inside your CallRecorder class, right below the service method. Use the following code to define that method:
Here we are instantiating a TwilioRestClient object with our account credentials and using them to send an outgoing SMS using a MessageFactory object. The text message will contain a message body informing the user of their new voicemail, and it will be sent to the specified “To” number from the specified “From” number. Feel free to modify the message body to your liking.
That’s the last of the Java we will need to write. Take a minute to celebrate!

Here we are specifying the paths of the Java class files for the classes we imported at the top of each .java file. Any time you make changes to your .java files you will need to run this command to recompile them. If you are receiving compilation errors then the classpaths specified in your command are not correct or you are running the command from the wrong directory.
Next we need to purchase the Twilio phone number that will act as our voicemail. Follow along with this wonderful gif to do that:
The last step before we can record calls is to make our Tomcat server publicly accessible so that Twilio can reach it. We can use ngrok to do this. Ngrok is a command line tool that can create a public tunnel to access your localhost. If you’ve never used ngrok before consider reading this blog post by Kevin Whinnery to get familiar with it. You can also read my colleague Phil’s recent post, 6 awesome reasons to use ngrok when testing webhooks, to get a good understanding of Ngrok’s more advanced capabilities.
Once you have ngrok installed, run $ ngrok http 8080 in a terminal and you will see a window like this:
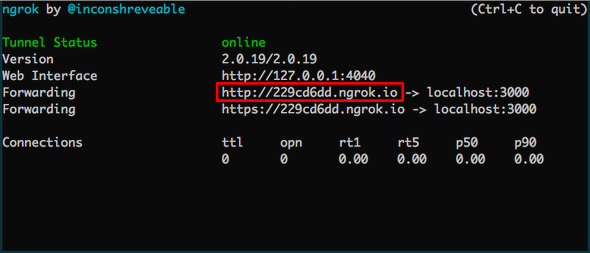
Configure your Twilio number’s Voice Request URL from step 4 of the above gif to reach out to your ngrok URL from the window above with your Tomcat endpoint appended to it (e.g. http://229cd6dd.ngrok.io/twilio/handle-call). Then scroll down and be sure to click save to save your Twilio number’s settings.
Start your server again with $ sh bin/startup.sh and let’s test this bad boy out. Call your Twilio number and you should hear a greeting before leaving yourself a voicemail. After you hang up you should receive a text with the link to hear the recording you just made.
Wrapping Up
Congratulations! You now have a brand new answering machine and you didn’t have to deal with landlines or outdated hardware! Here are just a few things you can do with this application:
- set up multiple answering machines to record different types of calls, such as customer support, incoming orders, shipment tracking, etc.
- take messages without giving out your real number
- call yourself and record important messages for later.

If you are interested in building a similar app with Java and Twilio Voice, check out my recent How to Warm Transfer a Call with Java and Twilio post, which uses much of the same setup as this post.
If you ran into any issues or have feedback on this tutorial, please don’t hesitate to leave a comment below or reach out to me via Twitter @brodan_ or email me at chranj@twilio.com.


Related Resources
Twilio Docs
From APIs to SDKs to sample apps
API reference documentation, SDKs, helper libraries, quickstarts, and tutorials for your language and platform.
Resource Center
The latest ebooks, industry reports, and webinars
Learn from customer engagement experts to improve your own communication.
Ahoy
Twilio's developer community hub
Best practices, code samples, and inspiration to build communications and digital engagement experiences.