How to Warm Transfer a Call with Java and Twilio Voice
Time to read:
August 19, 2015
Written by
This post is part of Twilio’s archive and may contain outdated information. We’re always building something new, so be sure to check out our latest posts for the most up-to-date insights.

Calling into customer support or similar support lines can lead to some not so great experiences. Often times I find myself being tossed back and forth between different agents with no context of who I am talking to and when I am being transferred. These kinds of calls feel a lot like this:

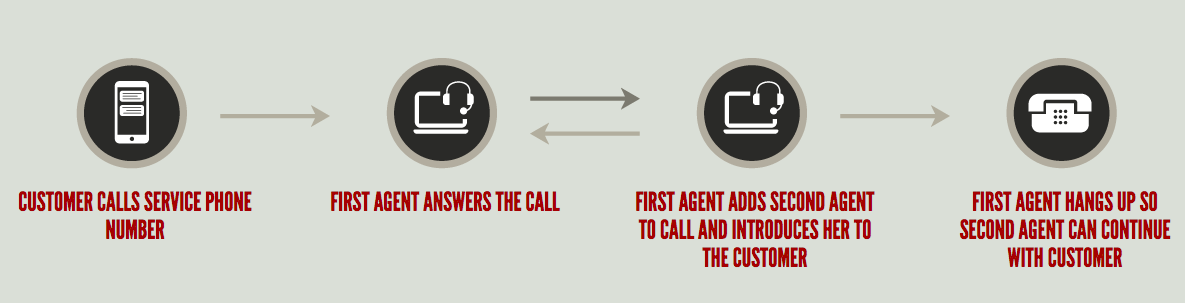
A better way for agents to handle incoming callers is to use a warm transfer. The term “warm transfer” can mean different things to different people. For this blog post we are going to use this scenario to explain a warm transfer: Agent A (Artemis) is speaking to the caller. Artemis needs to transfer the caller to Agent B (Barnabas). Artemis conferences in Barnabas, introduces the caller to Barnabas and then releases the call.
In this blog post we will setup a very simple call center that supports warm transfers using Twilio’s Java helper library and an Apache Tomcat server.
If you are only interested in the finished product, all of the code used in this post can be found on Github here.
“Charlie Work”
The first step to building our call center is to set up our environment. Since we are using Tomcat to implement our web server you can follow the Twilio Quickstart to get started with Tomcat and the Twilio SDK. Take your time and make sure your environment is setup properly before continuing on with this post. If you’ve never used Maven, I suggest following Option 2 in the quickstart and downloading the .jar file directly.
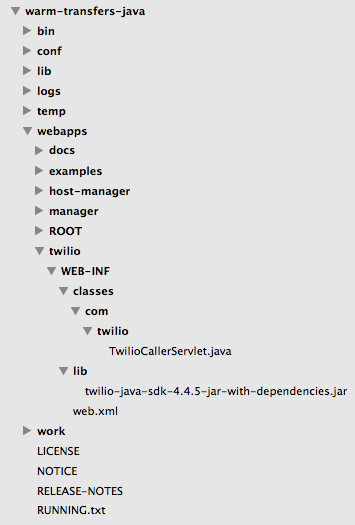
Your file structure should look something like this if you followed along with the quickstart:
Once we have Tomcat running properly, we can test that our servlets are running locally. Open a terminal, navigate to the top of your project directory and run the following:
You might run into an issue saying Cannot find ./bin/catalina.sh. We can easily fix this by running the following in our terminal (source):
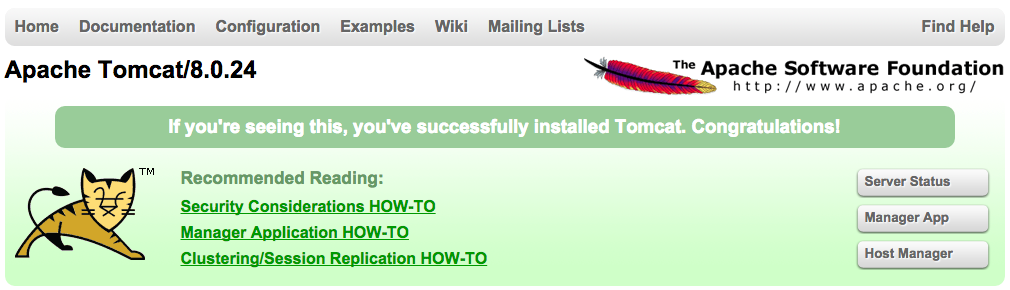
Once our server has started, navigate to localhost:8080 in a web browser and we should see the Apache Tomcat landing page:
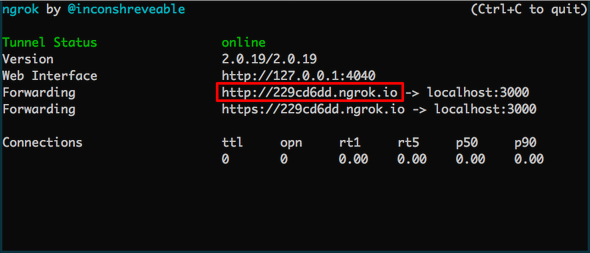
Our server is working locally, but we will need to be able to access it publicly so that Twilio can reach it. We can use ngrok to do this. Ngrok is a command line tool that can create a public tunnel to access your localhost. If you’ve never used ngrok before consider reading this blog post by Kevin Whinnery to get familiar with it. Once you have ngrok installed, run $ ngrok http 8080 in a terminal and navigate to the URL it gives you (see image below) in a browser.
We should see the same landing page as we did at localhost:8080, meaning our server is now publicly accessible. Before moving on, take a moment to appreciate this cat wearing mittens:

“The Gang Hits the Road”
In order to handle incoming requests we need a map to tell our Tomcat server which Java files handle which requests. We can map servlets to endpoints in our server’s web.xml file, which will be located in /webapps/twilio/WEB-INF/. This servlet is going to handle all incoming/outgoing calls to our two agents. Configure this file as such:
This mapping tells our web server that when a request to the /handle-caller URL is made it should forward to the TwilioCallerServlet class. Let’s build this class in a new file now.
Building Our Servlet
Navigate to /webapps/twilio/WEB-INF/classes/com/twilio and create a new file called TwilioCallerServlet.java. This servlet will return TwiML instructions according to the incoming caller.
We first need to import a number of packages in order to use servlets and the Twilio library. Place the following code at the top of your file:
We can now create our TwilioCallerServlet class. The class will contain a method called service that will handle incoming HTTP requests and create HTTP responses. Place the following code after your imports:
This code creates a new TwiMLResponse() object and appends a Dial verb and a Conference noun to it. This means that when this TwiML is prepared by Twilio, the caller will be placed in a conference named “SupportRoom”. If you wish to learn more about TwiML verbs see the Twilio documentation here.
Testing Our Servlet
Before we move on let’s make sure that our TwilioCallerServlet is functional and returning the correct TwiML. We need to compile our Java files before our Tomcat server can use them. During compilation you must specify the classpath of the jar file containing the Twilio SDK. Navigate to the top of your project directory and run this command to compile all of your java files:
If you are receiving compilation errors then the classpaths specified in your command are not correct or you are running the command from the wrong directory.
Now we need to restart the Tomcat server for our changes to take effect. Do this by running $ sh bin/shutdown.sh and then running $ sh bin/startup.sh again. Remember you’ll need to restart your server any time you recompile your Java files for the changes to take effect.
Navigate to http://localhost:8080/twilio/handle-caller in your browser and you should see the following:
Replace each variable with the appropriate data: Your ACCOUNT_SID and AUTH_TOKEN can be found on your Twilio account dashboard. CALL_ENDPOINT will be the URL generated by your ngrok server with your servlet mapping appended to it (For example: http://229cd6dd.ngrok.io/twilio/handle-caller). ARTEMIS_NUMBER is the phone number of your first agent. This is the number that will answer all incoming calls to your Twilio number. BARNABAS_NUMBER is the phone number that will receive the warm transfer from Artemis. Lastly, SUPPORT_NUMBER is your Twilio number that callers will call into.
Now let’s add some additional logic to handle agent transfers and outgoing calls. Add the following code above your response.setContentType("application/xml"); line:
Our servlet is checking if a “1” was entered into the keypad by our first agent (Artemis) after disconnecting from the conference. If it was, our second agent (Barnabas) will be dialed and Artemis will be reconnected to the conference.
If no input was sent, we must check where the incoming call is coming from. If a regular caller is dialing into your Twilio number, they must be connected with Artemis. Artemis will be sent different TwiML that contains a Gather verb to collect input from the keypad. Combined with the setHangupOnStar attribute, this allows Artemis to press “*1” to dial Barnabas.
You’ll notice we haven’t defined the makeCall function. Let’s add this function right before the class’s closing bracket. The following code will make calls for us using a TwilioRestClient:
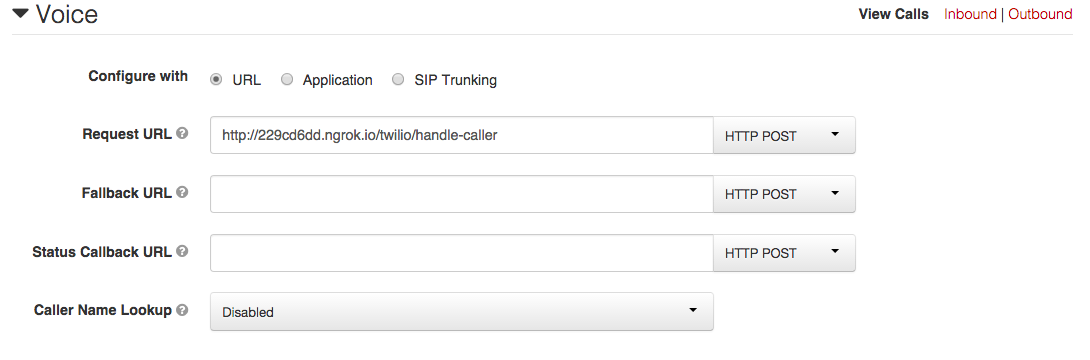
In the Setup Number screen, under Voice, set your ‘Request URL’ to the CALL_ENDPOINT URL we used in our code and click save:
Remember to restart your Tomcat server and make sure your ngrok tunnel is online. You can test out your application by having someone call your Twilio number. Your first agent (Artemis) will receive a phone call and be placed into a conference with the caller. When Artemis presses “*1”, your second agent (Barnabas) will then receive a call and be placed into the same conference. This allows Artemis to introduce the caller before handing them off to Barnabas.
It’s Always Servlet in Philadelphia
Congratulations! You’ve now built a call center that supports warm transferring incoming callers. With warm transfers, your callers will now feel more like this:

Note: This is a very simple implementation of a call center and it can be improved in many ways. Keep your eyes peeled for future Java posts that expand on what we’ve built here.
If you ran into any issues or have feedback on this tutorial, please don’t hesitate to leave a comment below or reach out to me via Twitter @brodan_ or email me at chranj@twilio.com.


Related Resources
Twilio Docs
From APIs to SDKs to sample apps
API reference documentation, SDKs, helper libraries, quickstarts, and tutorials for your language and platform.
Resource Center
The latest ebooks, industry reports, and webinars
Learn from customer engagement experts to improve your own communication.
Ahoy
Twilio's developer community hub
Best practices, code samples, and inspiration to build communications and digital engagement experiences.