Create a Notification System in ServiceNow using Twilio SMS and Voice
Time to read: 8 minutes
July 21, 2022
Written by
Reviewed by
If you're using ServiceNow, you might want a straightforward way to add one-way outbound messaging with voice and conferencing.
This tutorial shows how ServiceNow customers can utilize the out-of-the-box integration with Twilio Messaging and Programmable Voice using the free ServiceNow Notify plugin. The plugin is straightforward to set up, and the business value of implementing it is immense. You can greatly reduce your incidents' time to resolution, shorten the timeline for mobilizing resources to solve incidents, and streamline communications with your customers during active incidents.
In this tutorial, you'll implement the ServiceNow and Twilio integration by configuring the following features:
- ServiceNow Notify for basic SMS and conference calls
- Alerts and Notifications using the ServiceNow Workflow Designer
- Alerts and Notifications using ServiceNow Business Rules
ServiceNow and Twilio integrations
This post is Twilio's recommended Crawl integration with ServiceNow. You can learn more about the ServiceNow use case on the Twilio website.
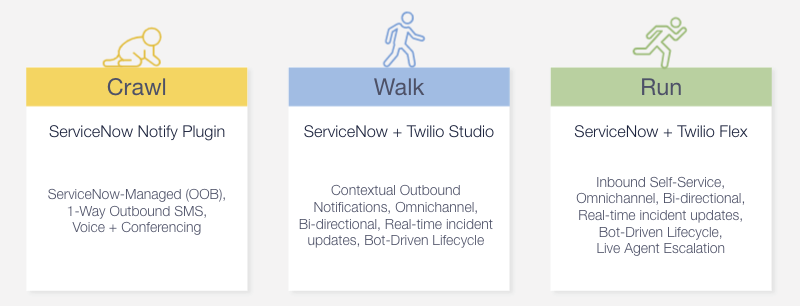
If you'd like to do contextual outbound notifications and update ServiceNow in real-time via SMS or Voice, see our bi-directional incident management framework to integrate Twilio with ServiceNow – Walk.
If you're looking for the most fully-featured Flex and ServiceNow integration, which includes inbound self-service and the ability to escalate to a live agent, see our guide on how to integrate Twilio Studio & Flex with ServiceNow – Run.
Prerequisites
Before you get started, you will need:
- A Twilio account (Sign up for a free trial account)
- A ServiceNow account (Sign up for a free developer instance)
Configure Twilio phone numbers
Login to your Twilio account.
If you are using a free Twilio account, check out this helpful guide on the ServiceNow community board.
If you are going to follow Part 2 or Part 3 of this series, or if you are currently using other phone numbers in the account for a different application, consider implementing this tutorial on a separate account or subaccount. The ServiceNow Notify plugin automatically creates a TwiML "ServiceNowTwilioDirect" app for all phone numbers attached to your Twilio account, which will overwrite the current configuration for those phone numbers.
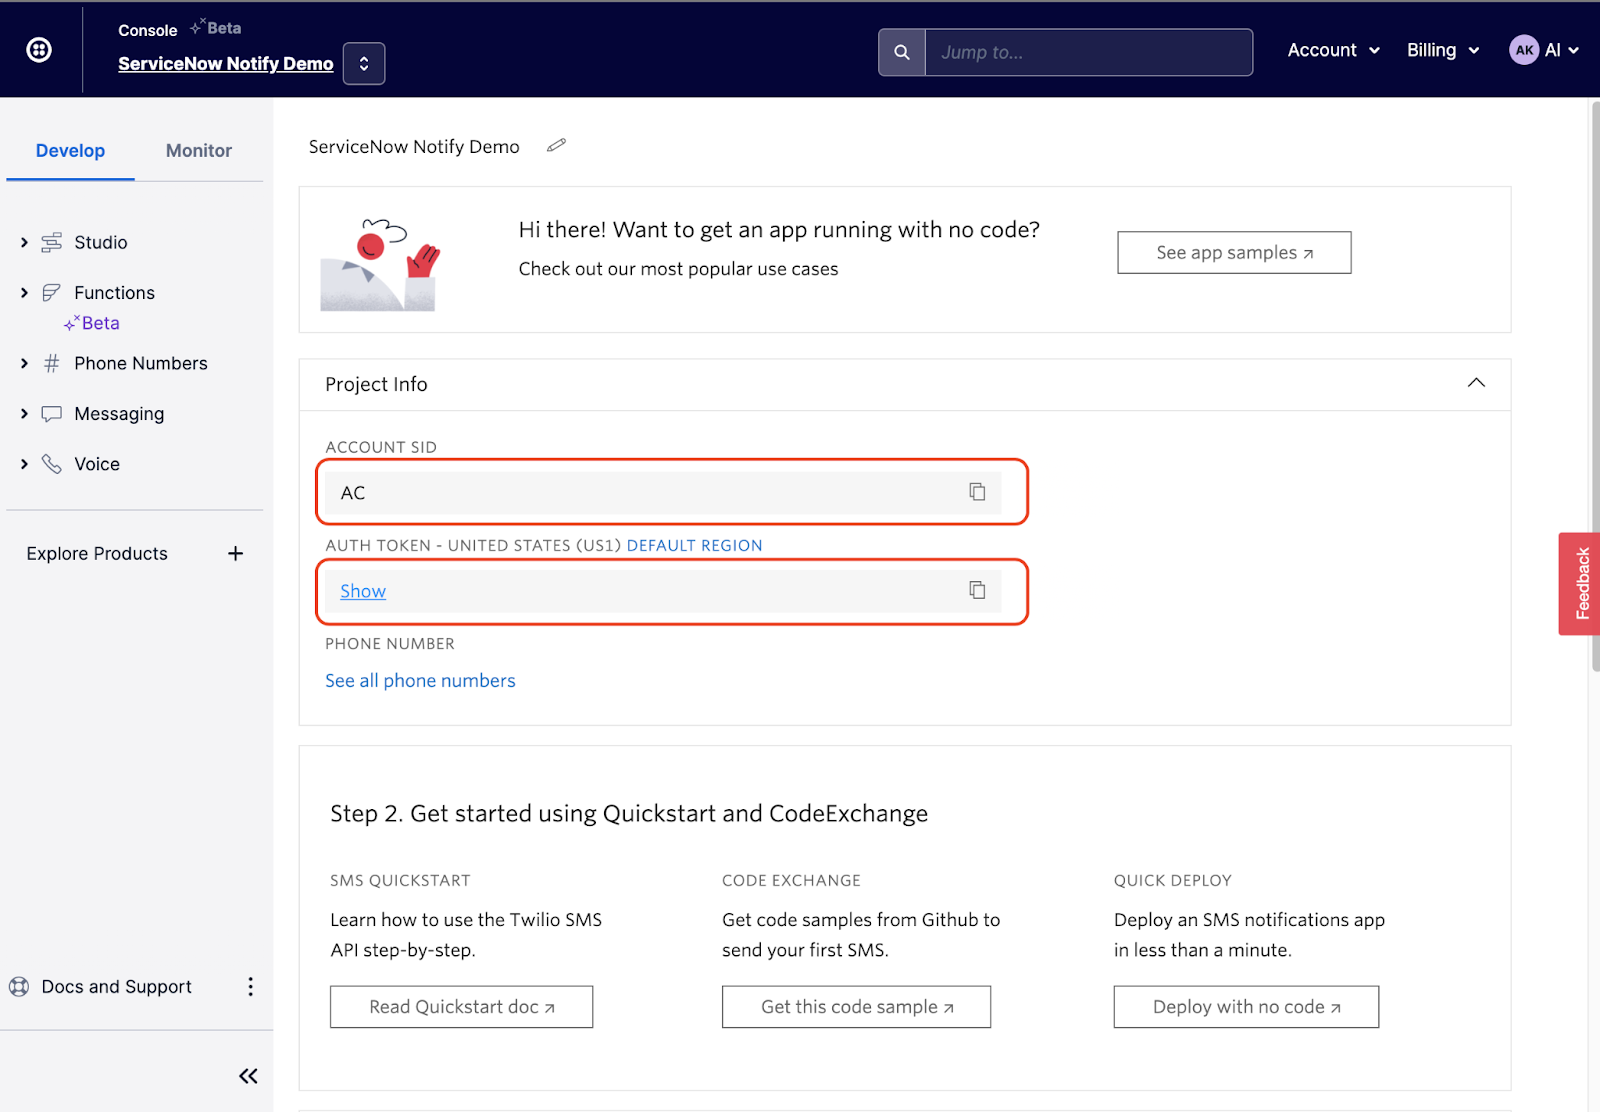
Collect your Account SID and Authentication token under Project Info from the Twilio Console:
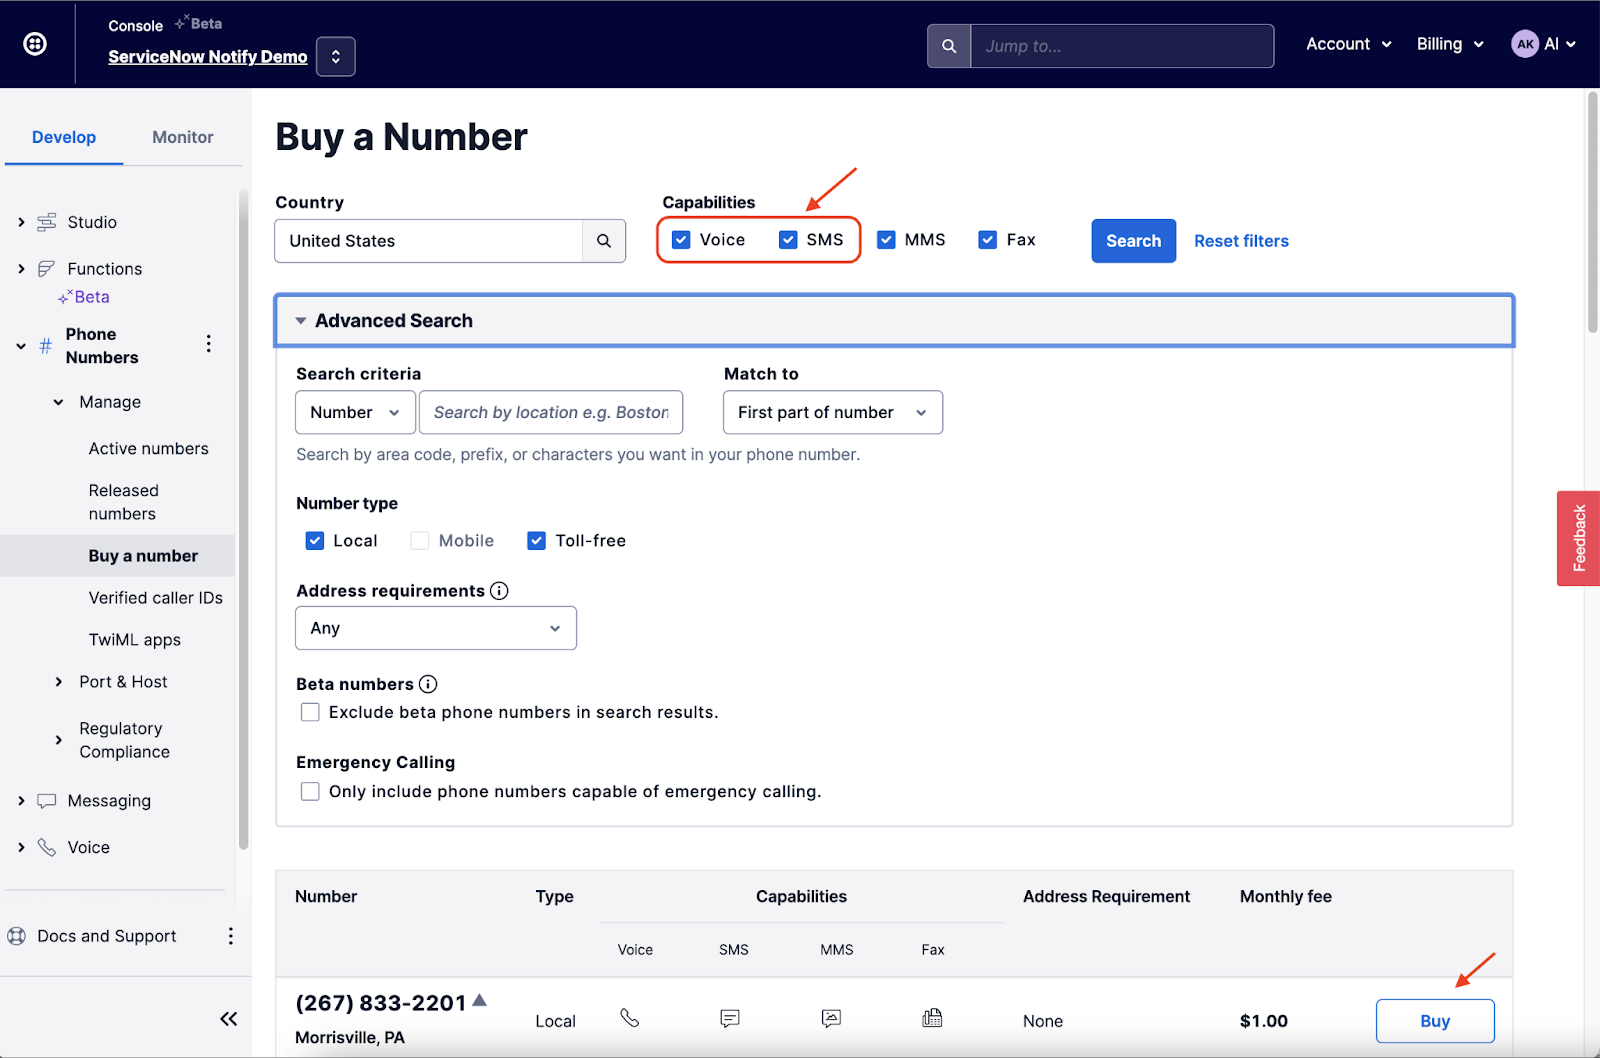
You will need at least one Twilio number from which to send messages and place calls.
Buying one Twilio number per Notify Number Group will allow you to group Notify phone numbers, then share workflows across those grouped numbers. For each number group, you can specify a workflow for incoming and outgoing calls.
Under the “Phone Numbers” section of the Twilio Console, view the “Buy a number” section to buy SMS and Voice capable numbers:
Configure ServiceNow Notify
If you haven’t already done so, log into your existing ServiceNow account. In this blog post, we are using the San Diego release.
If you are working with prior releases (e.g., Rome), please follow this guide instead.
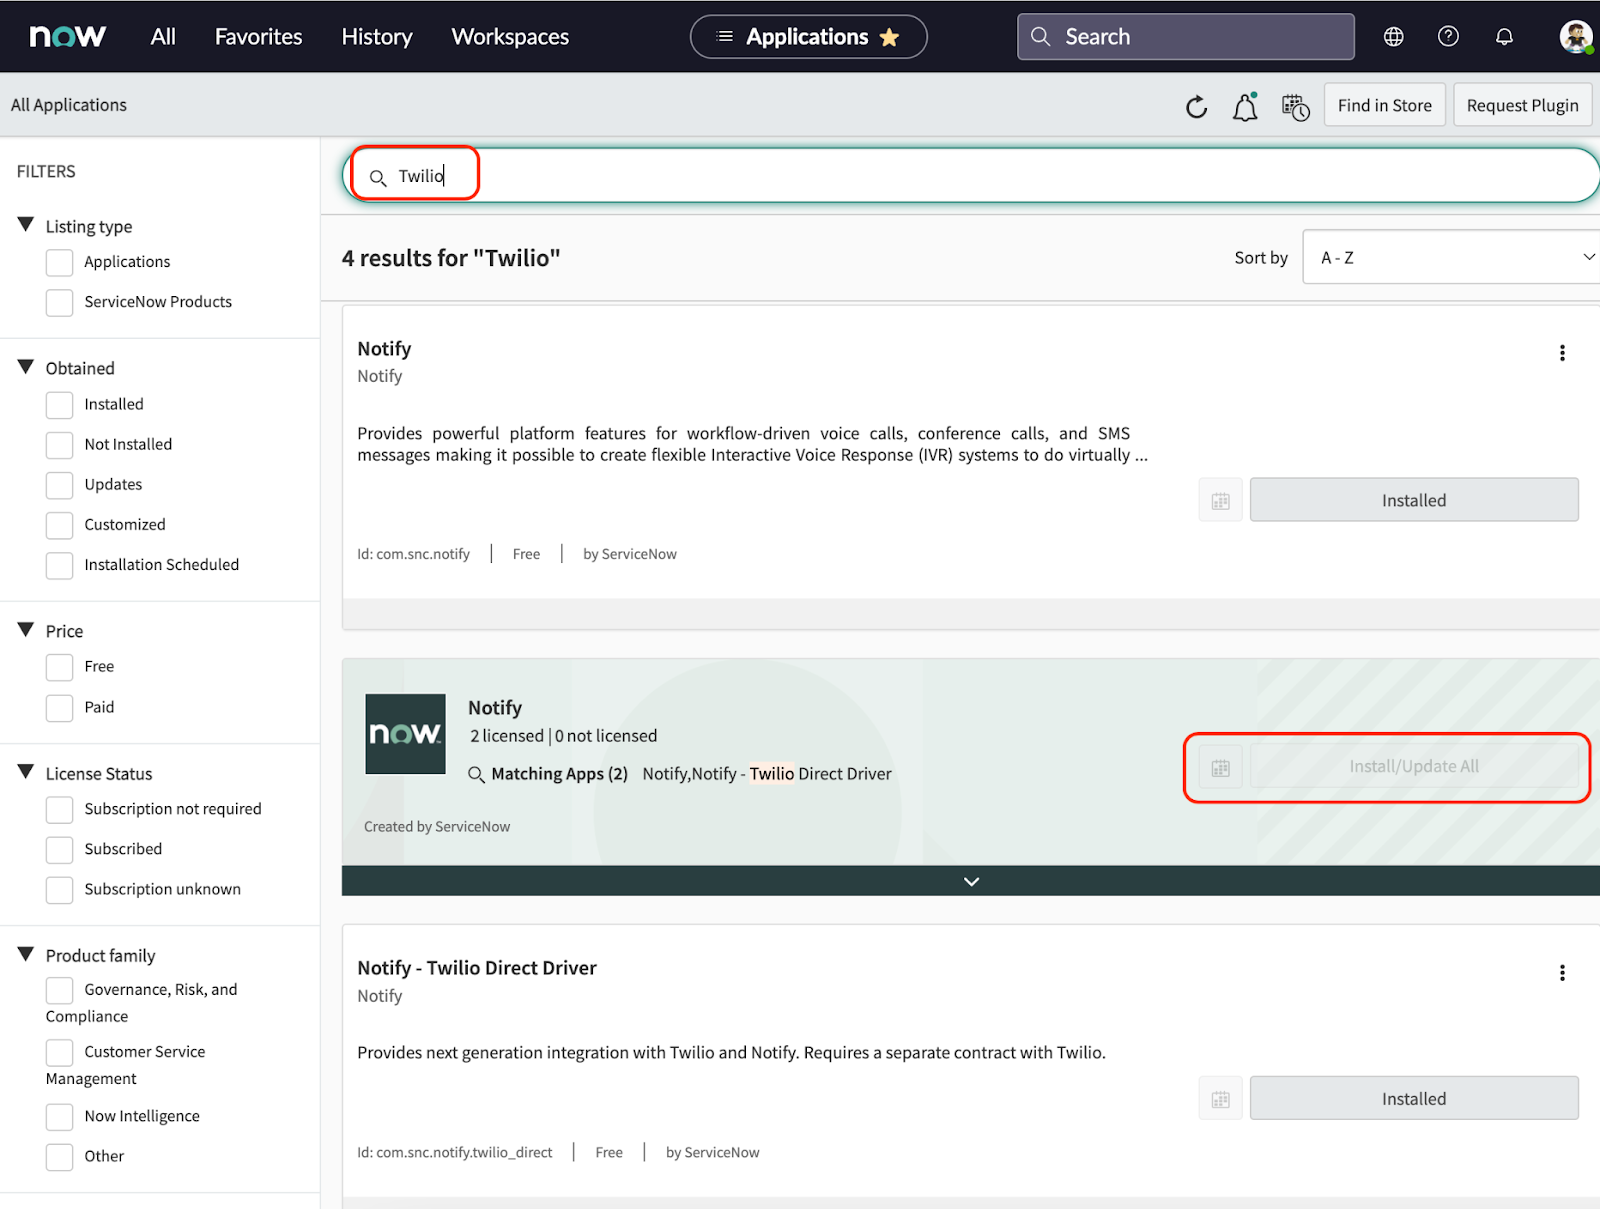
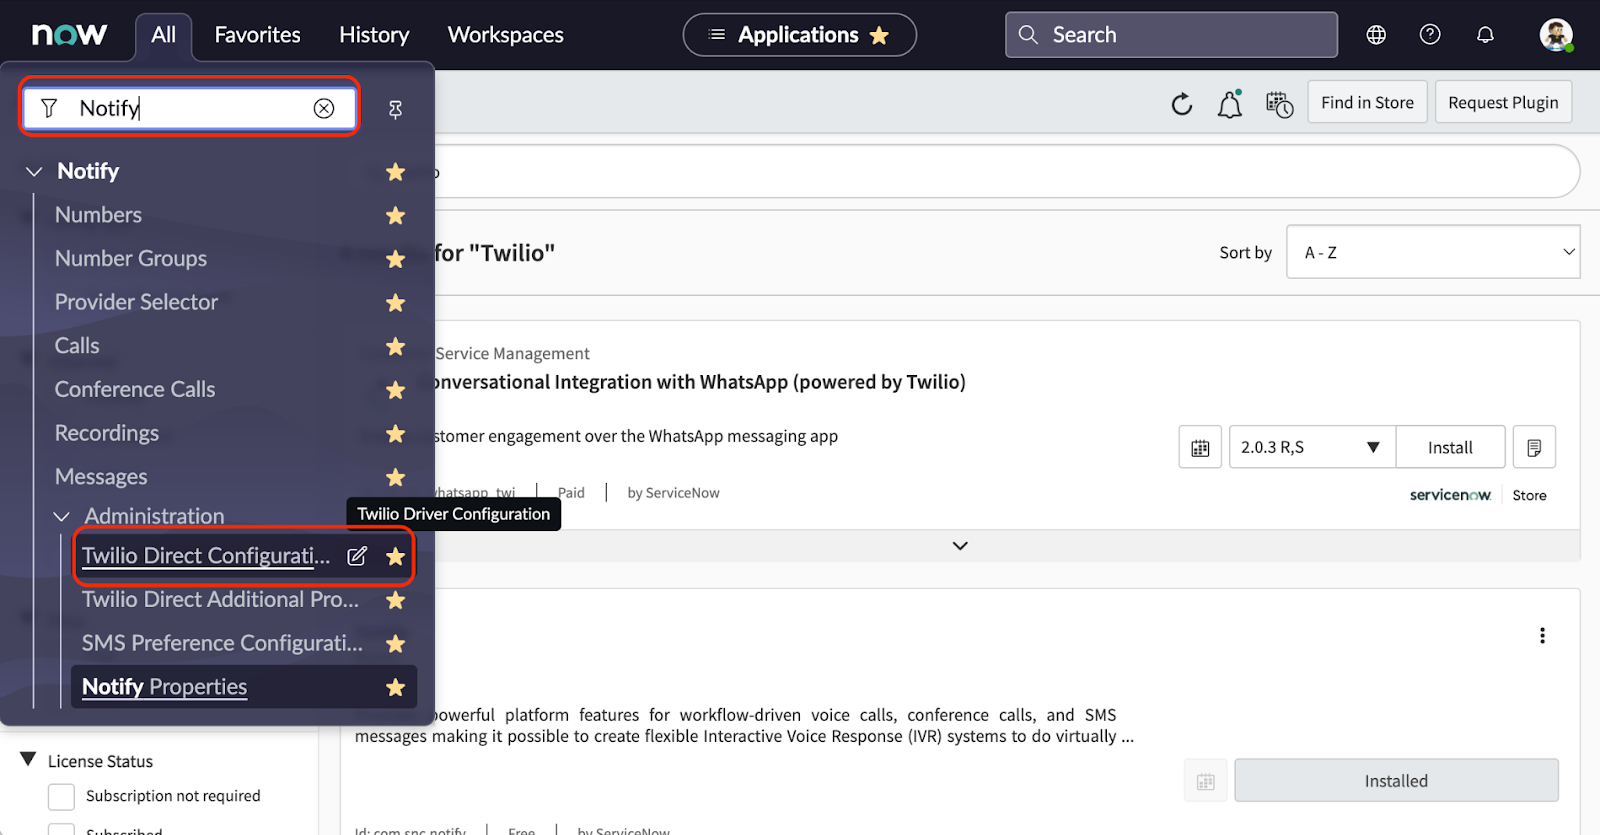
Log into ServiceNow, select All then type ‘Plugins’ on the filter. Click on ‘Plugins’. You will be redirected to All Applications:

In the search field, type ‘Twilio’ then select Install for the Notify Plugin:
- Install the Plugins for Notify
- Notify (
com.snc.notify) plugin - Provides powerful platform features for workflow-driven voice calls, conference calls, and SMS messages. You can activate the Notify plugin if you are an administrator. - Notify - Twilio Direct Driver (
com.snc.notify.twilio_direct) plugin - Provides next generation integration with Twilio and Notify.
- Notify (
Once installed, go to All, then type ‘Notify’ on the filter. Select Twilio Direct Configuration:
- Configure the ServiceNow integration with your Twilio account, then add your account SID and your Auth token. (You can find these in your Twilio Console.)
- Import the phone numbers associated with your Twilio account to Notify.
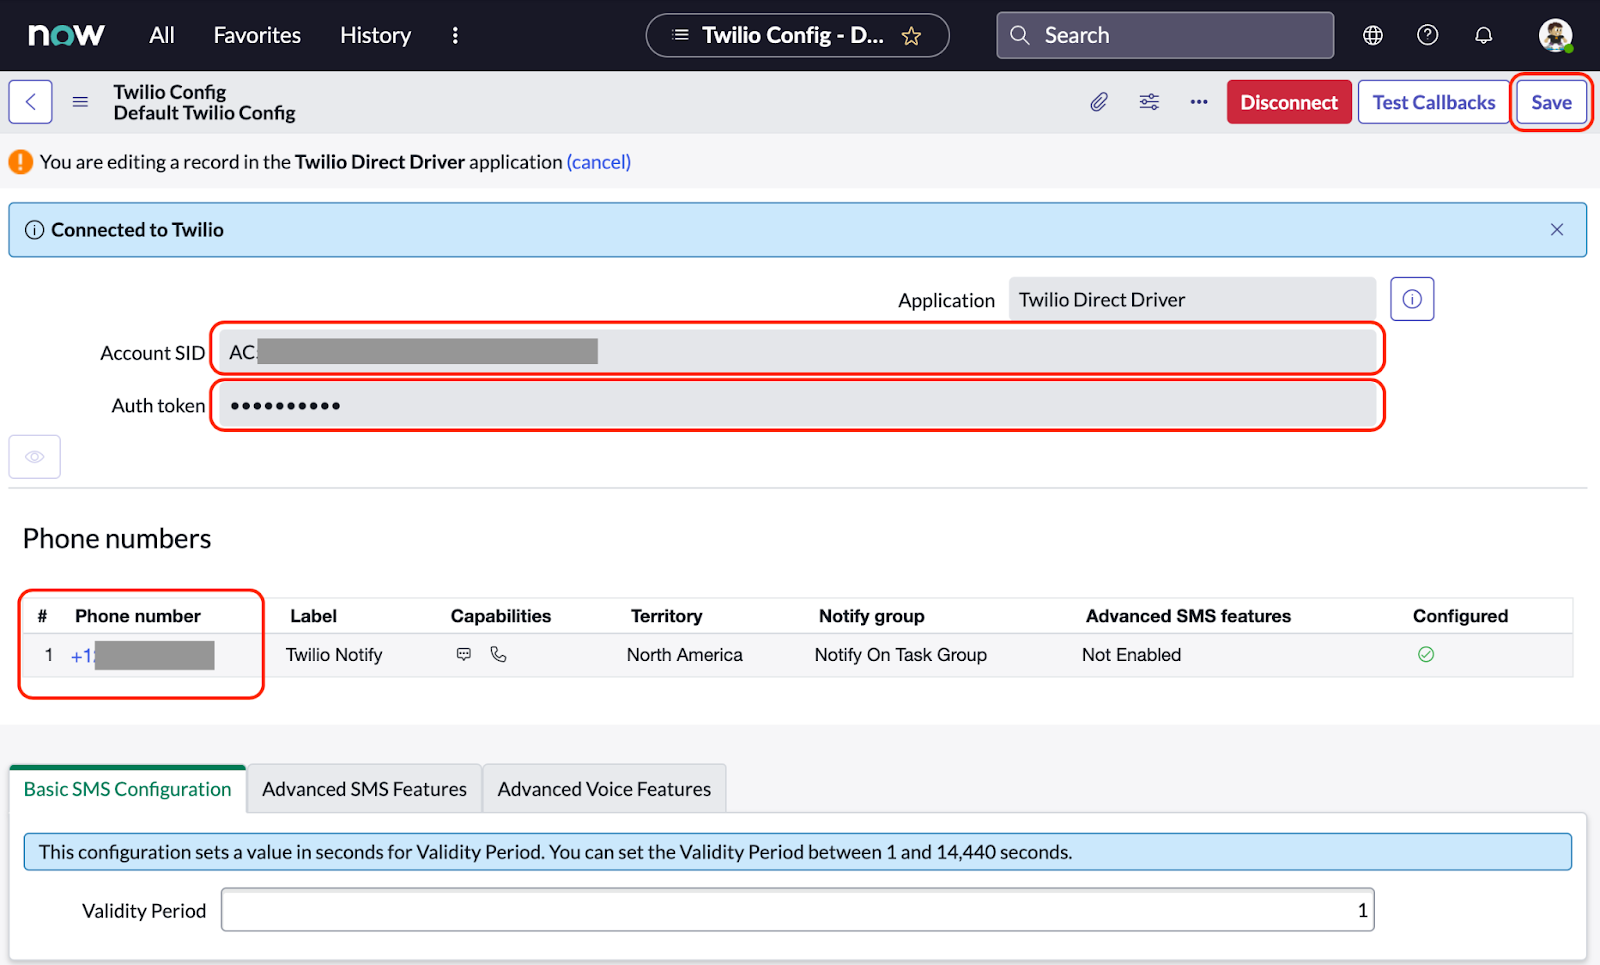
Click on the phone number to configure it:
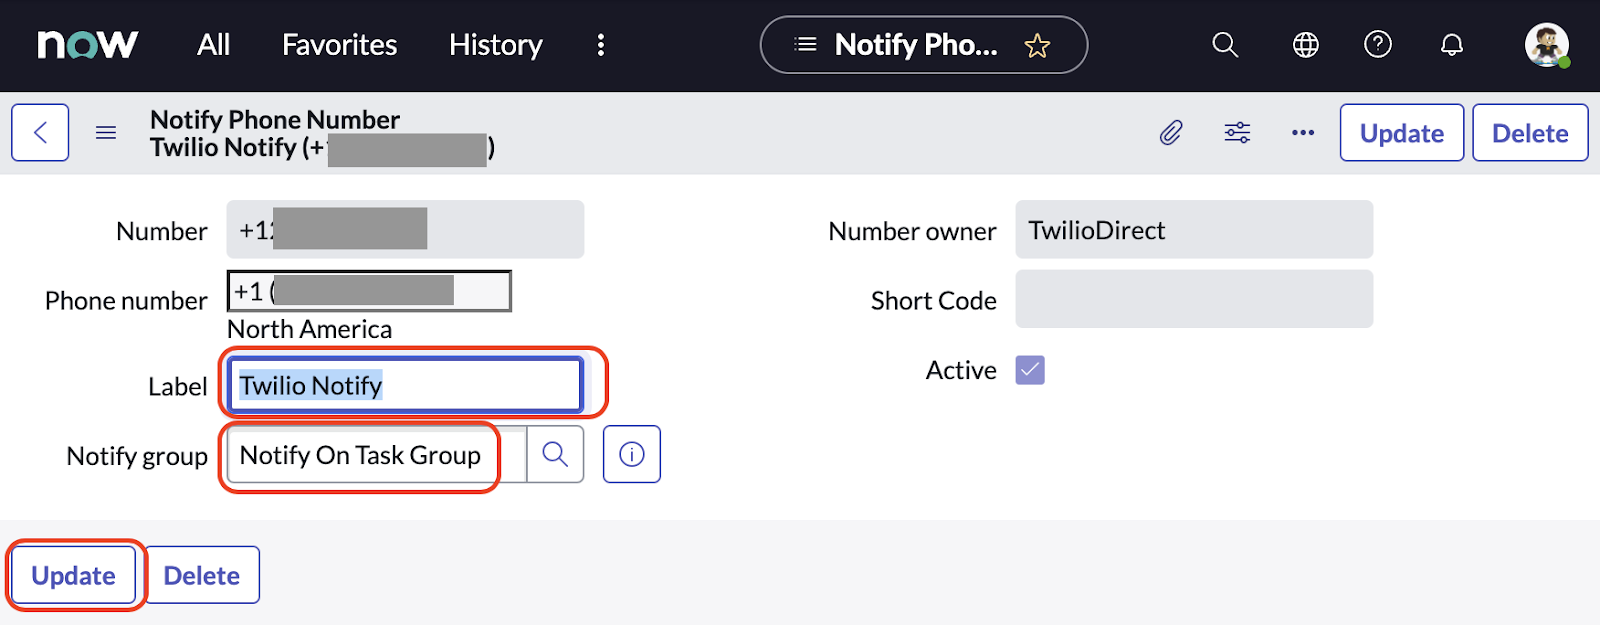
- Add a label (e.g., ‘Twilio Notify’)
- Associate your Twilio number with the appropriate Notify Group (e.g., ‘Notify On Task Group’)
- Hit the Save button
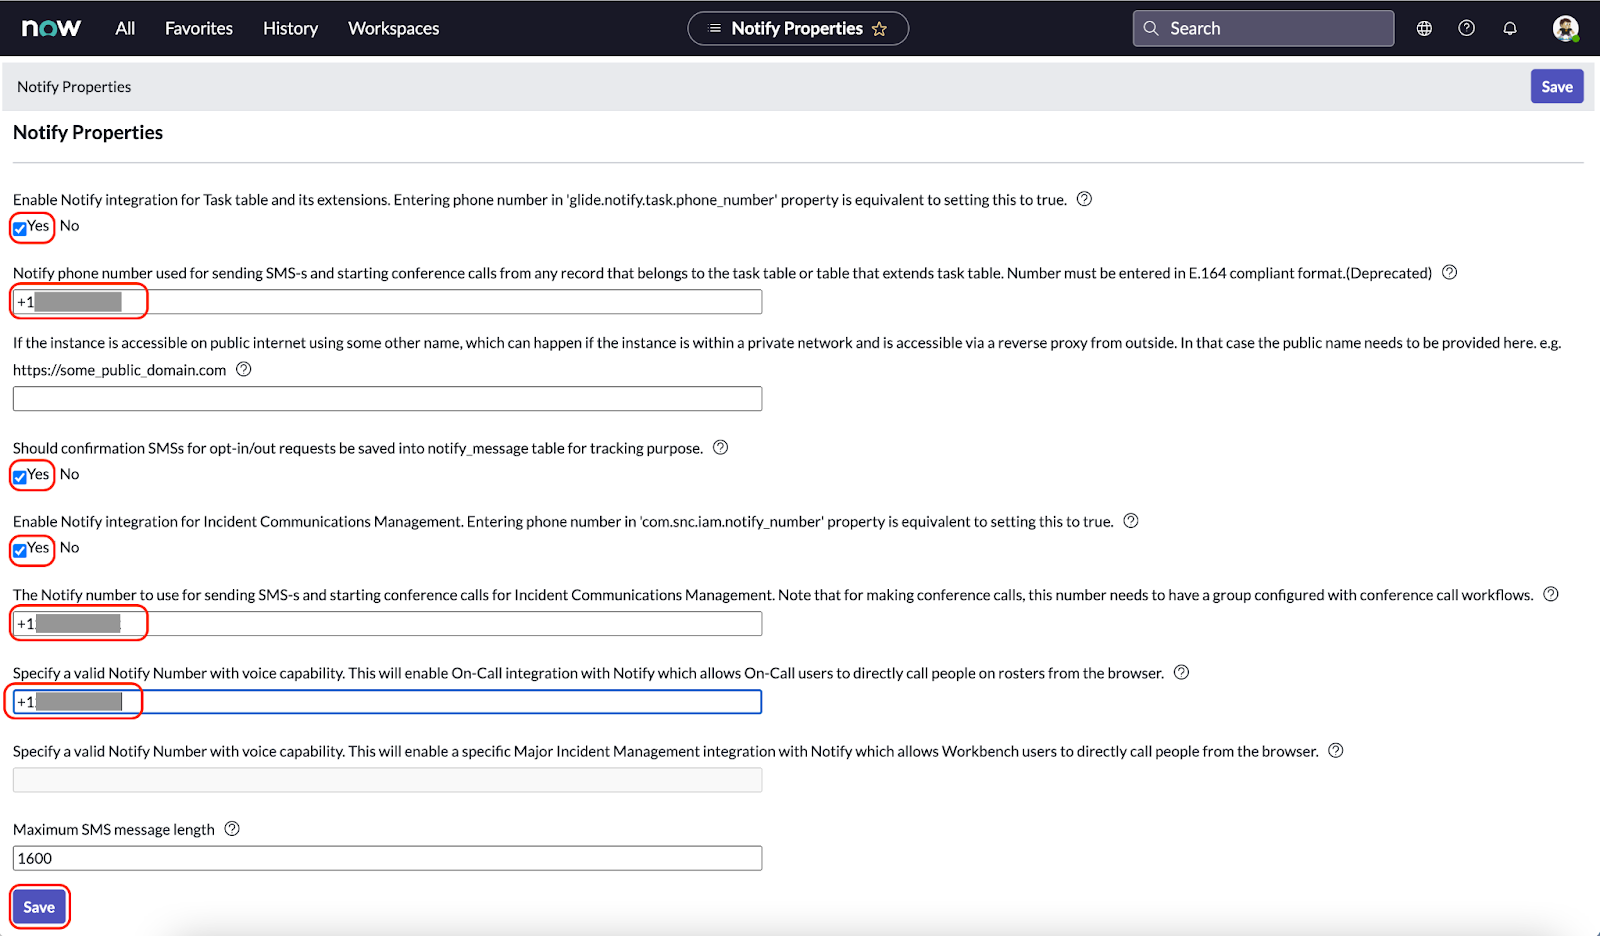
- Update the Notify Properties (All > Notify > Administration > Notify Properties)
- Enable Notify integration for Task table and its extensions.
- Enter the ‘Notify phone number used for sending SMS-s and starting conference calls from any record that belongs to the task table or table that extends task table’ – the Twilio number you bought.
- Set the ‘Should confirmation SMSs for opt-in/out requests be saved into notify_message table for tracking purpose.
property to ‘yes’ - Set the ‘Enable Notify integration for Incident Communications Management property to ‘yes’
- Add the ‘The Notify number to use for sending SMS-s and starting conference calls for Incident Communications Management’ – the Twilio number you bought.
- Add the ‘Specify a valid Notify Number with voice capability’ – the Twilio number you bought.
- Hit Save
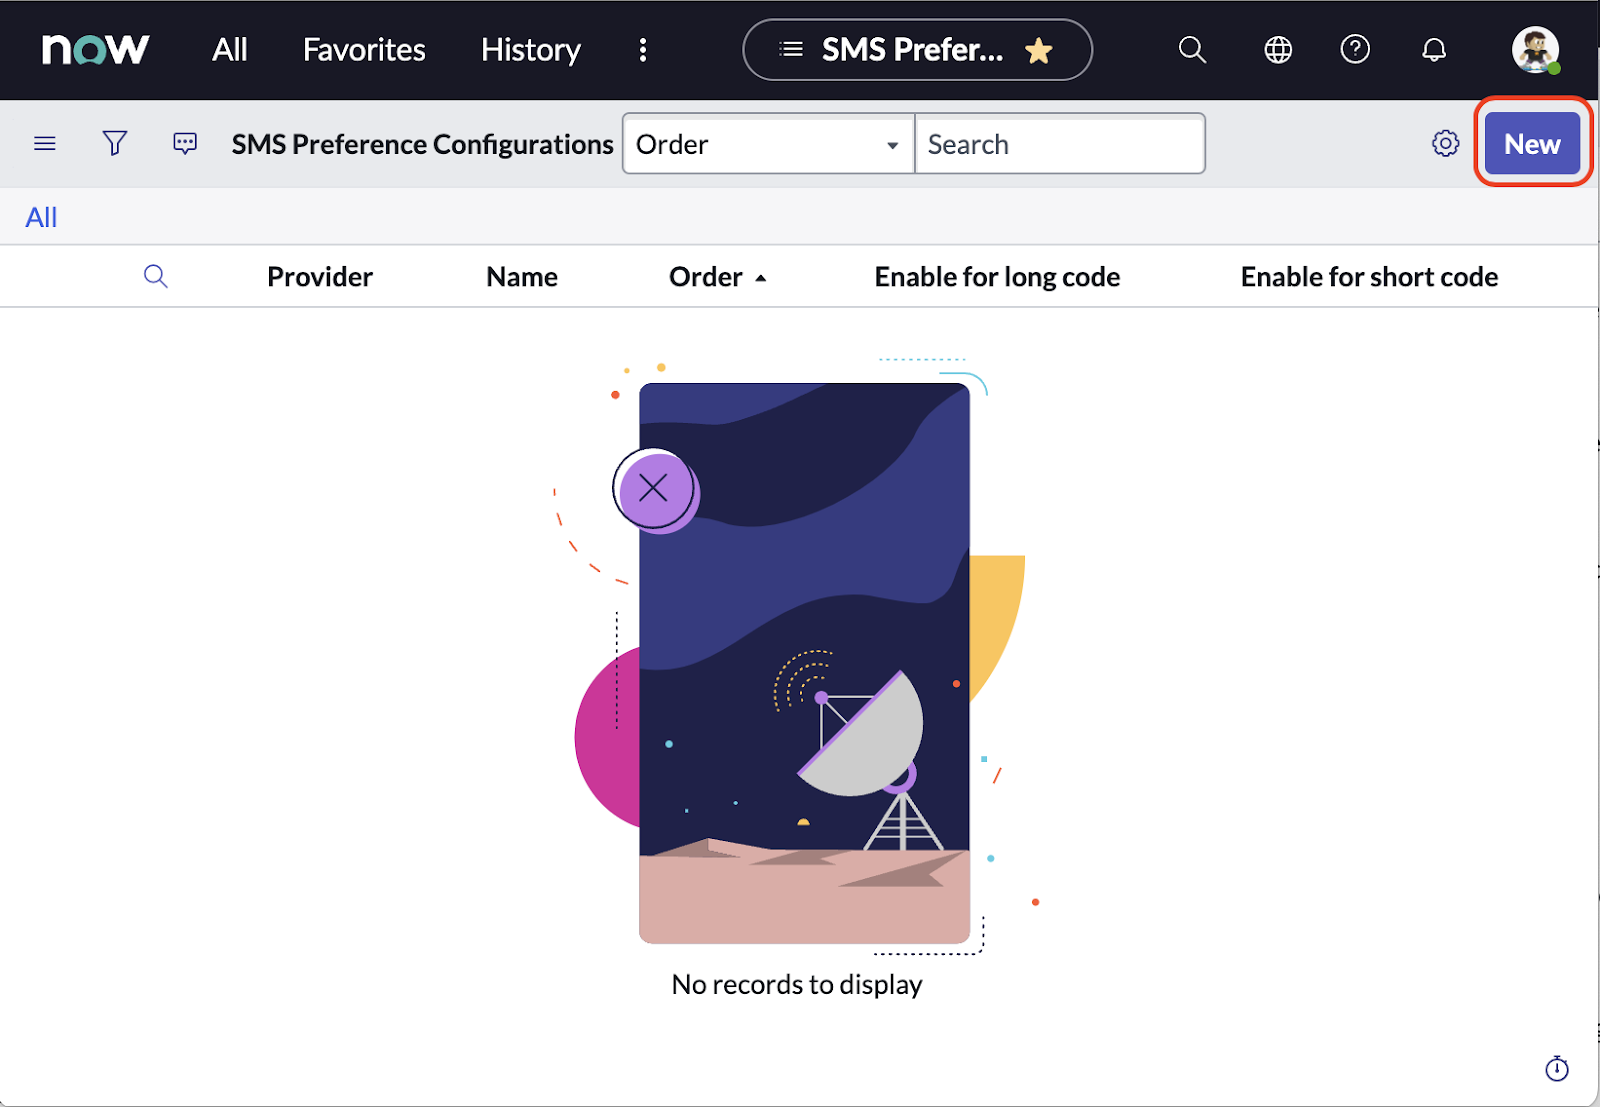
Opt-In and Opt-Out configuration (optional)
You can optionally setup the Opt-In and Opt-Out configuration. Go to the All > Notify > Administration > SMS preference configuration:
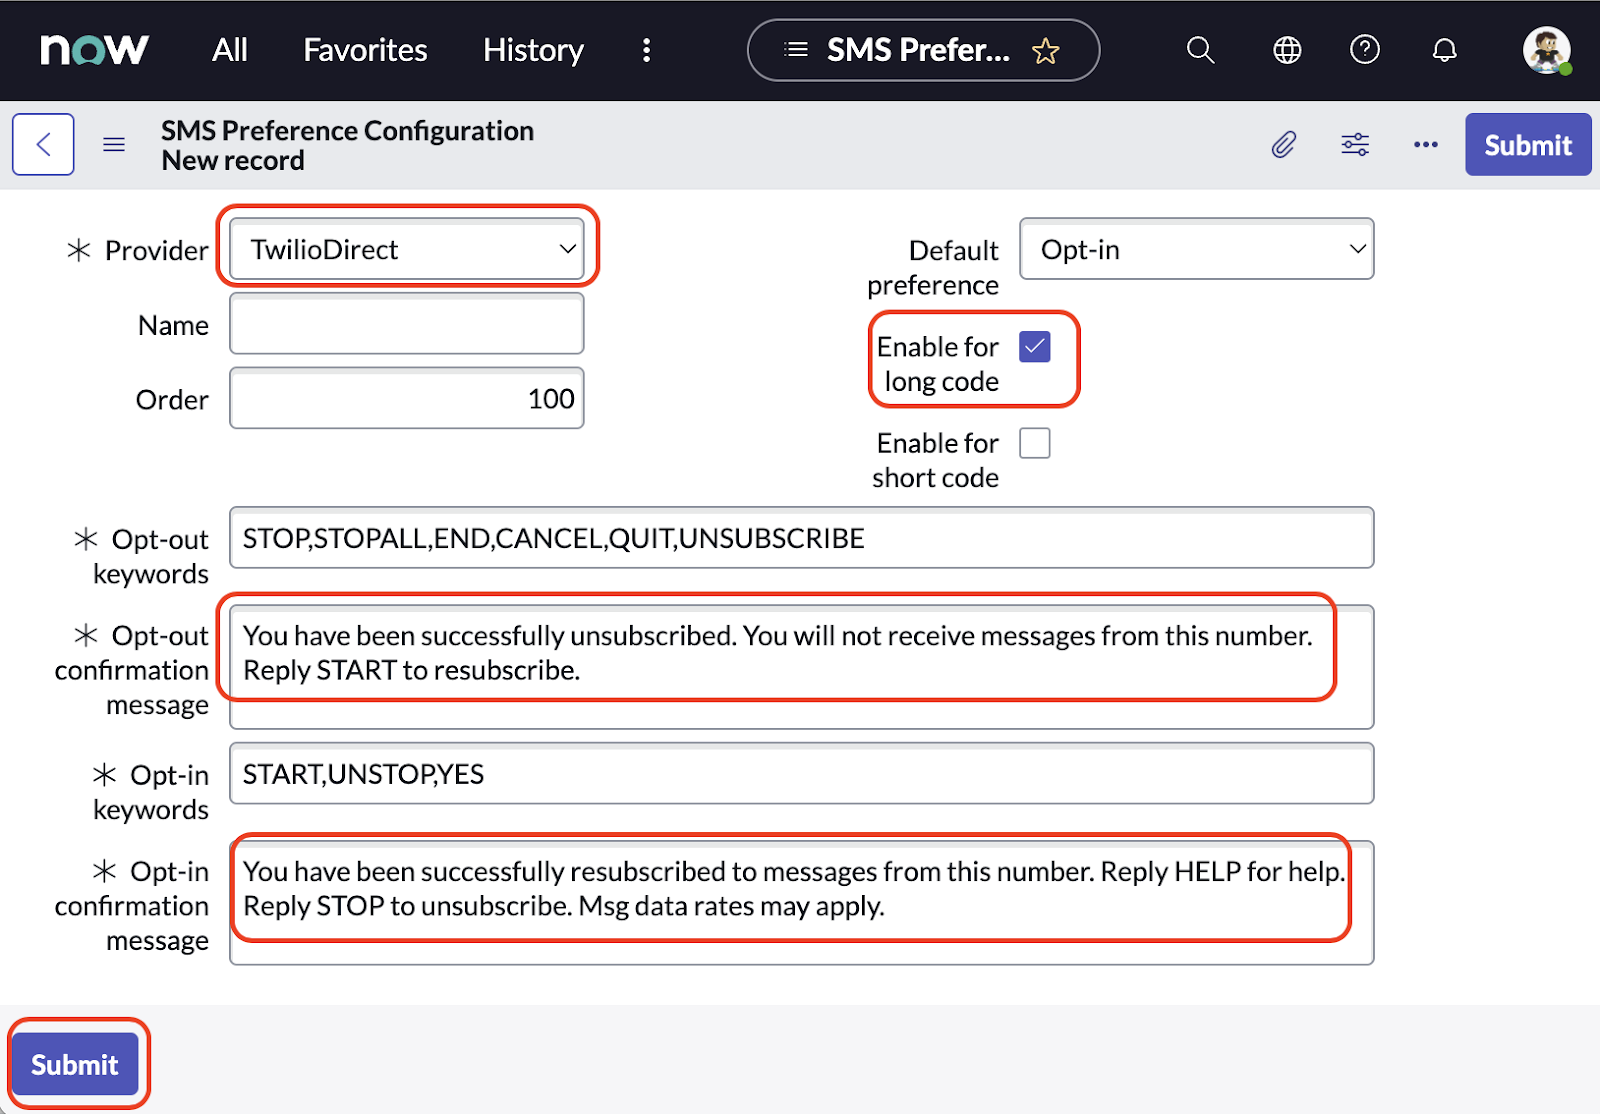
- Update the SMS Preference Configuration:
- Select ‘TwilioDirect’ for Provider.
- Check Enable for long code
- Set the Opt-out confirmation message – see an example below
- Set the Opt-in confirmation message – see an example below
- Hit Submit
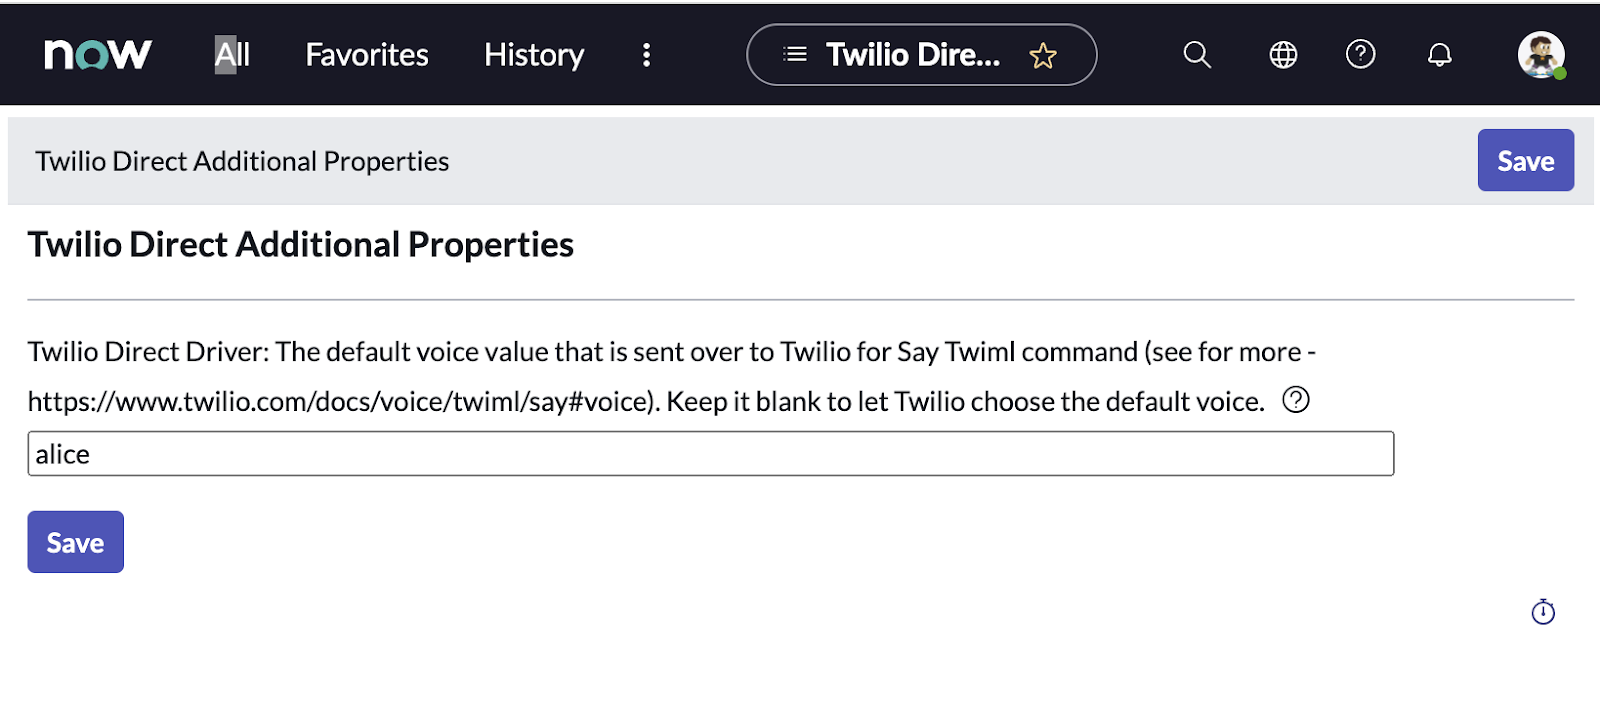
Set default voice (optional)
Go to All > Notify > Administration > Twilio Direct Additional Properties:
Select your favorite voice (man, woman, alice, or any of the Amazon Polly voices):
Convert phone numbers to E.164 format (optional)
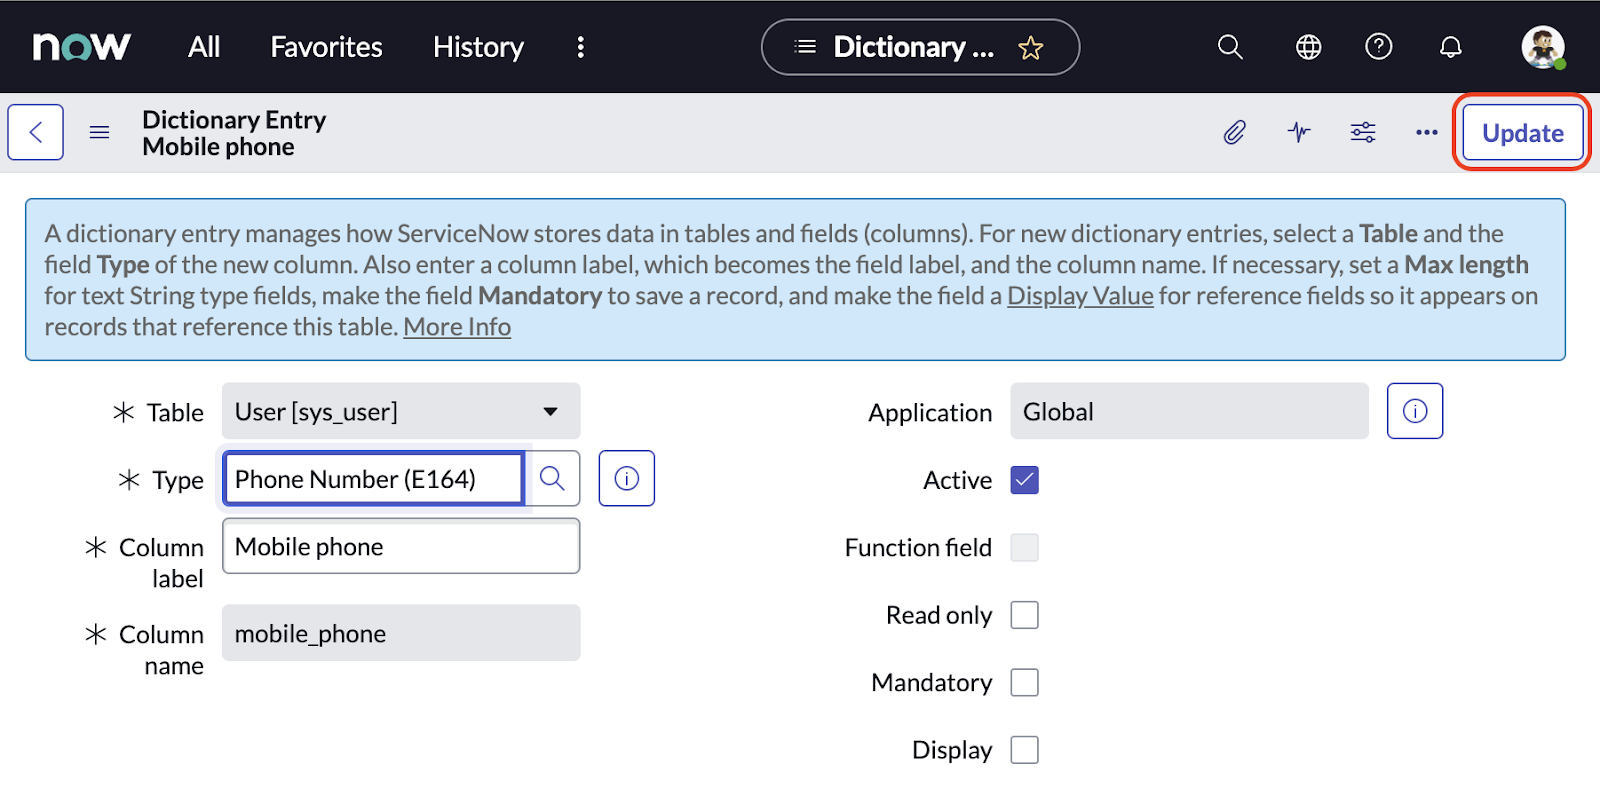
You can optionally setup the Phone Number entries to be formatted in the E.164 format. Go to All > My Profile, then with the cursor close to "Mobile phone", right click and select Configure Dictionary:
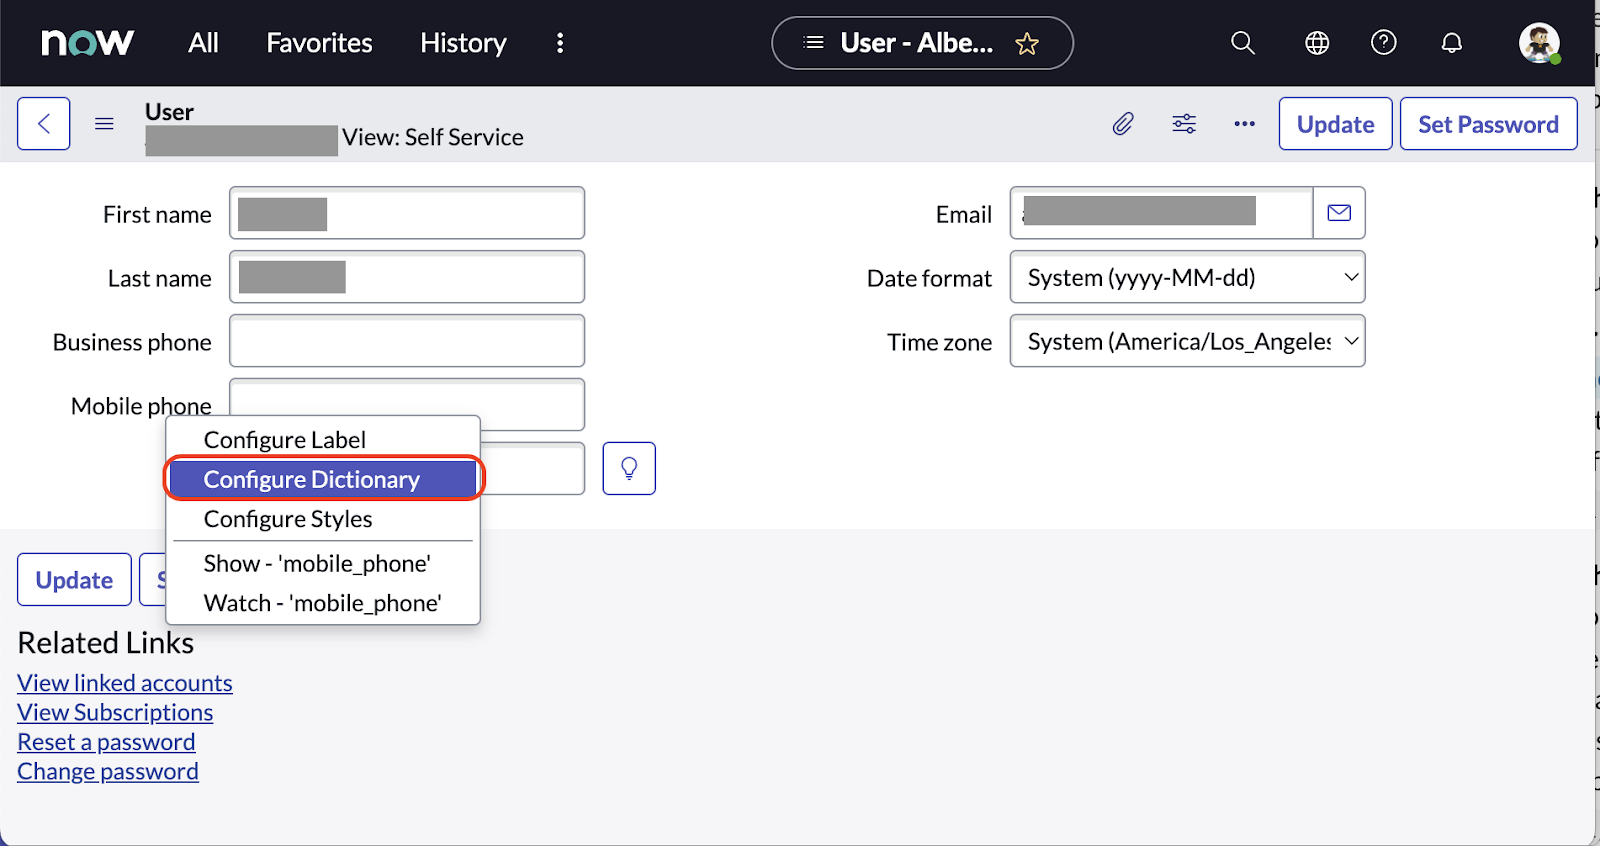
Change the type to Phone Number (E164) and hit Update:
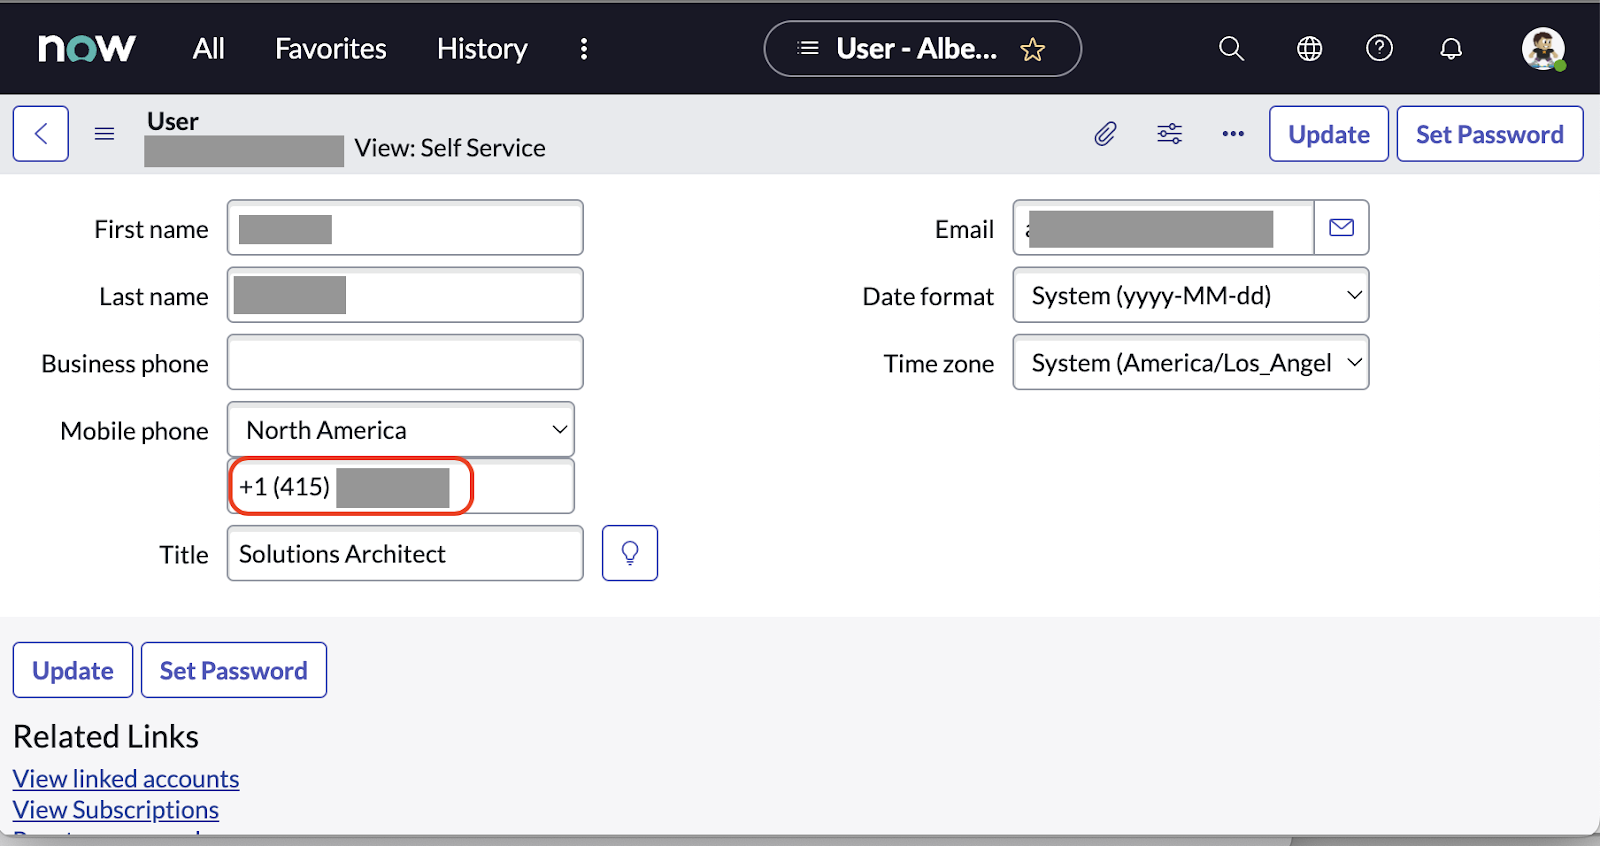
Go back to your testing user record and type your phone number into the Mobile Phone field (e.g., +12121234567). The system will automatically convert it to the E.164 format +1(212)123-4567:
Verify the integration was successful
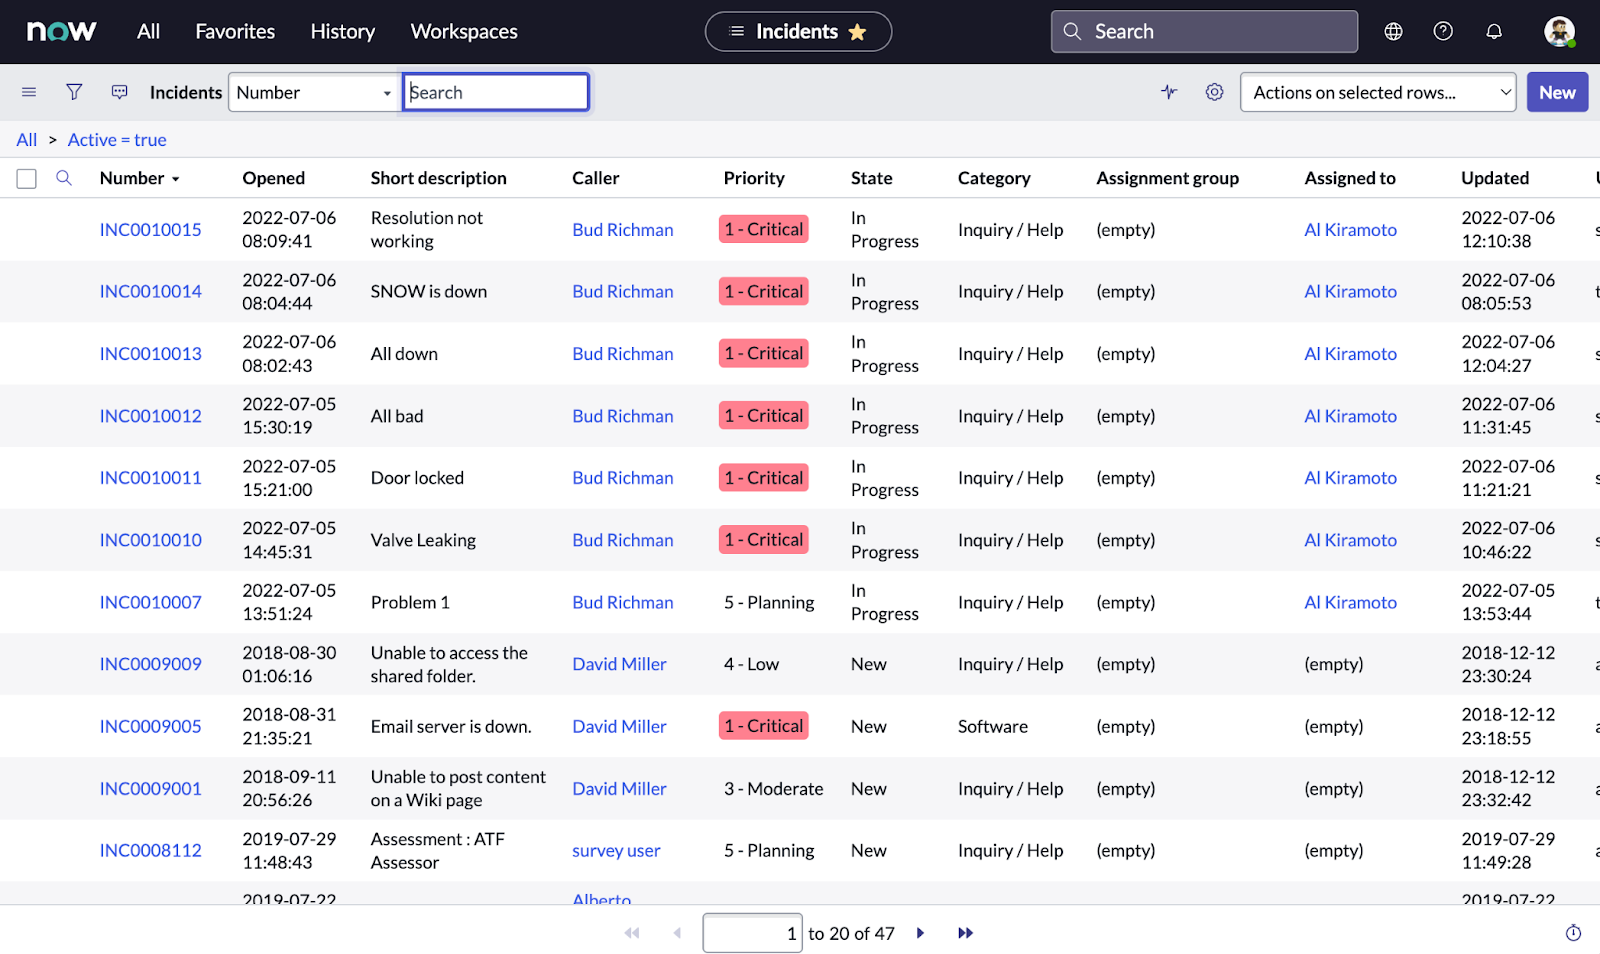
Go to All > Service Desk > Incidents. Select any of the existing Incidents:
You should be able to see "Send SMS" and "Start Conference Call" links as shown below. If you do not see these links, follow this helpful guide on the ServiceNow community board for the steps needed to test the integration.
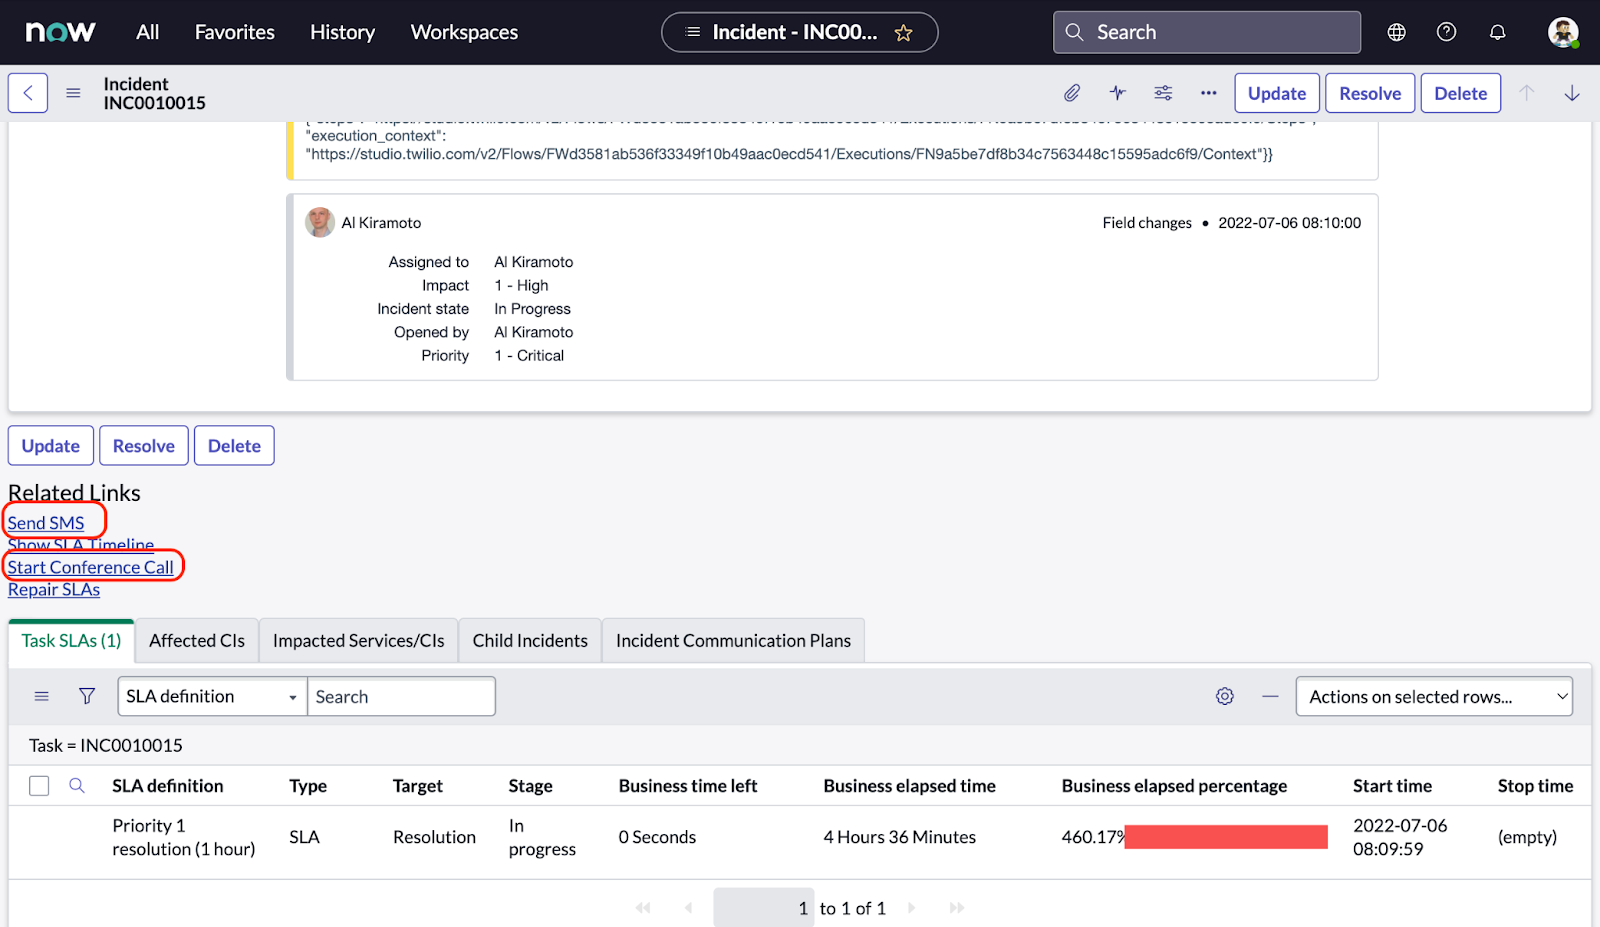
At this point, Notify is ready to be used directly from the incident tickets dashboard in ServiceNow to “Send SMS” or “Start Conference Call”.
Both options are intuitive and easy to use. Follow this helpful guide on the ServiceNow community board to further test the “Start Conference Call” functionality.
Configure Alerts and Notifications
Integrating Twilio with ServiceNow can reduce an incident’s time-to-resolution by:
- Sending SMS notifications to the user confirming that the incident was opened and assigned to an engineer.
- Alerting the on-call engineer via SMS that a High Priority incident was just assigned to them.
Watch this How to send SMS from ServiceNow with Twilio video to learn how to build these features. We’ll walk through the steps from the video below.
First, let’s send a message to the customer confirming that the incident was created, and provide the engineer’s contact information. We will use the ServiceNow Workflow Designer for this.
Go to the Workflow Editor in the ServiceNow dashboard. To locate it, type “Workflow Editor” in the search bar at the top of the left navigation bar.
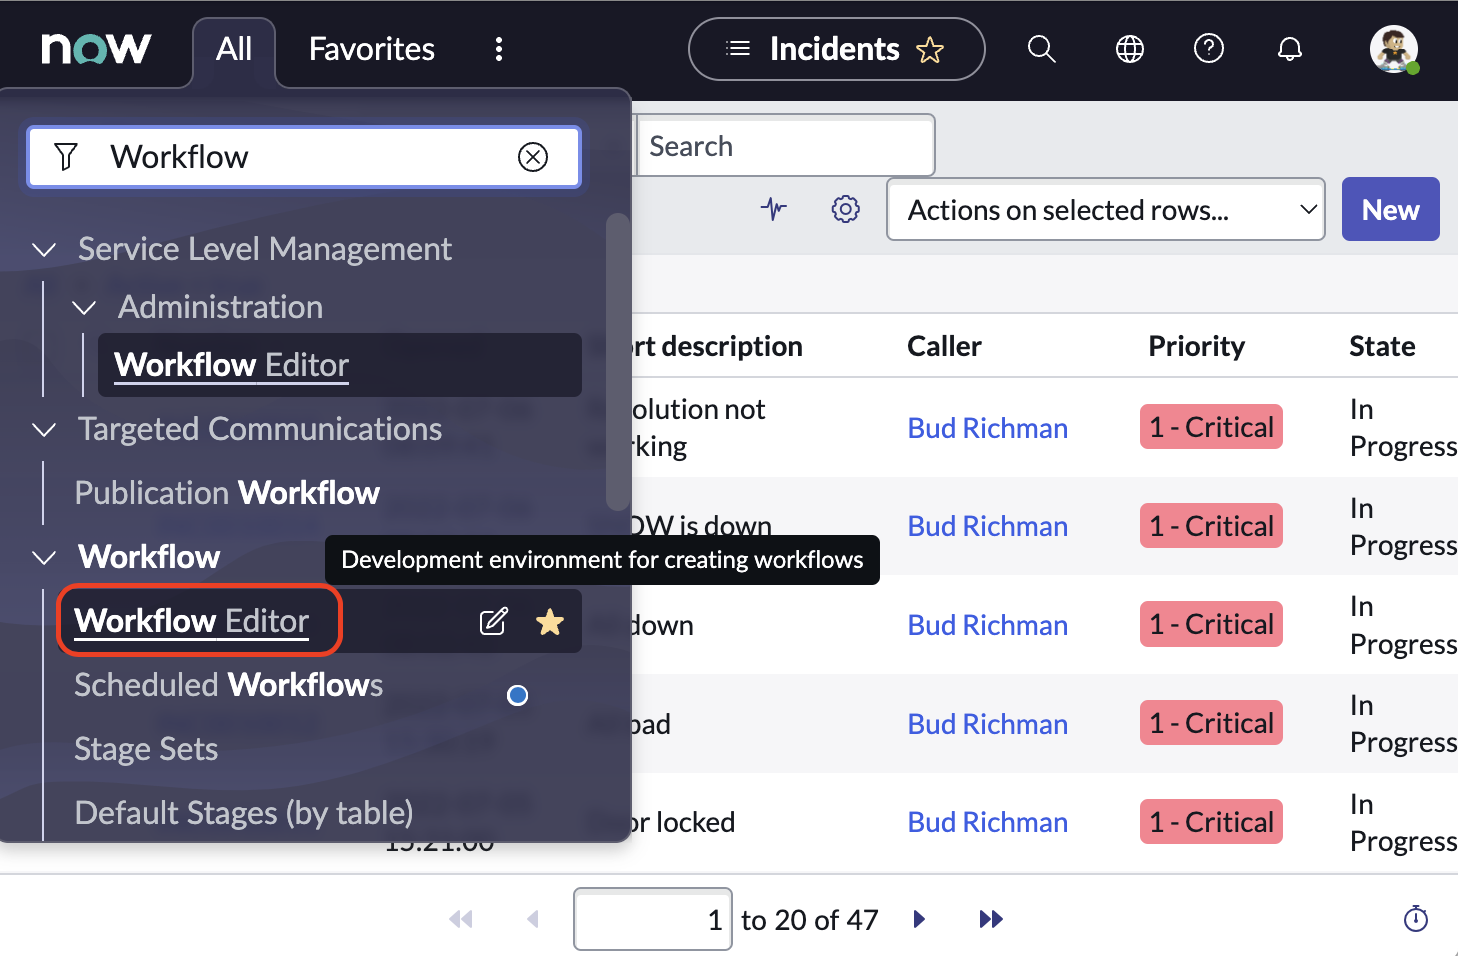
A new tab will open. Click on “New Workflow”. This window will open:
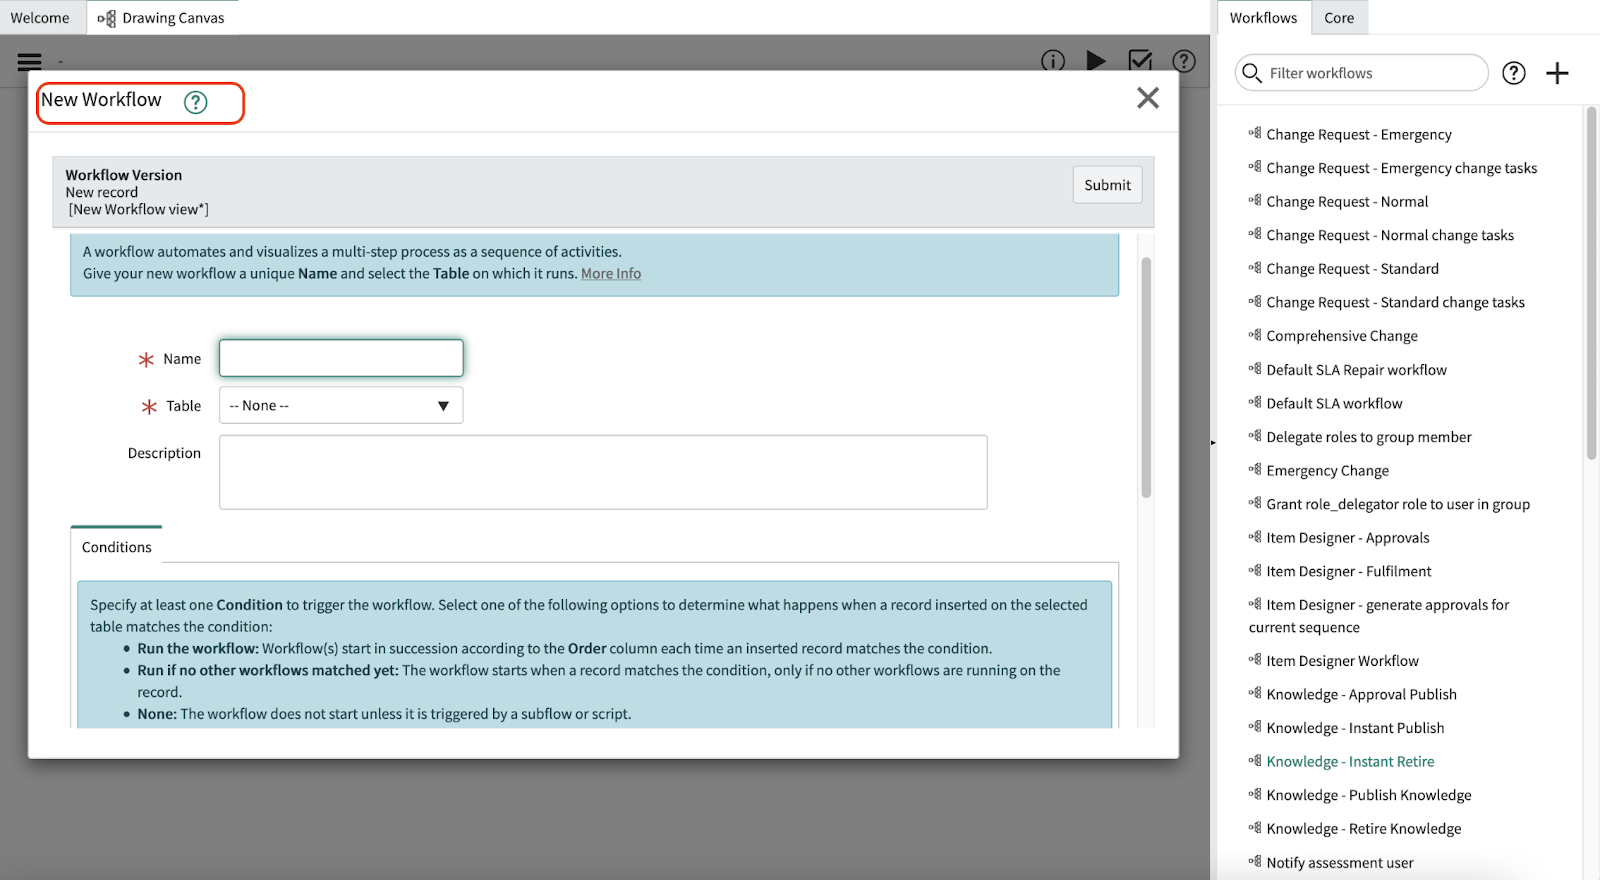
- Enter a Name for this flow (e.g.,
NotifyCustomerCaseAssigned) - Define the Table on which it will run (e.g.,
Incident[Incident]) - Provide a Description for this workflow (e.g., “Notify customer that ticket was created and assigned to someone”).
- Under the Conditions tab, for If condition matches select Run the workflow always. For this example, select Assigned to and is not empty. It should look like this:
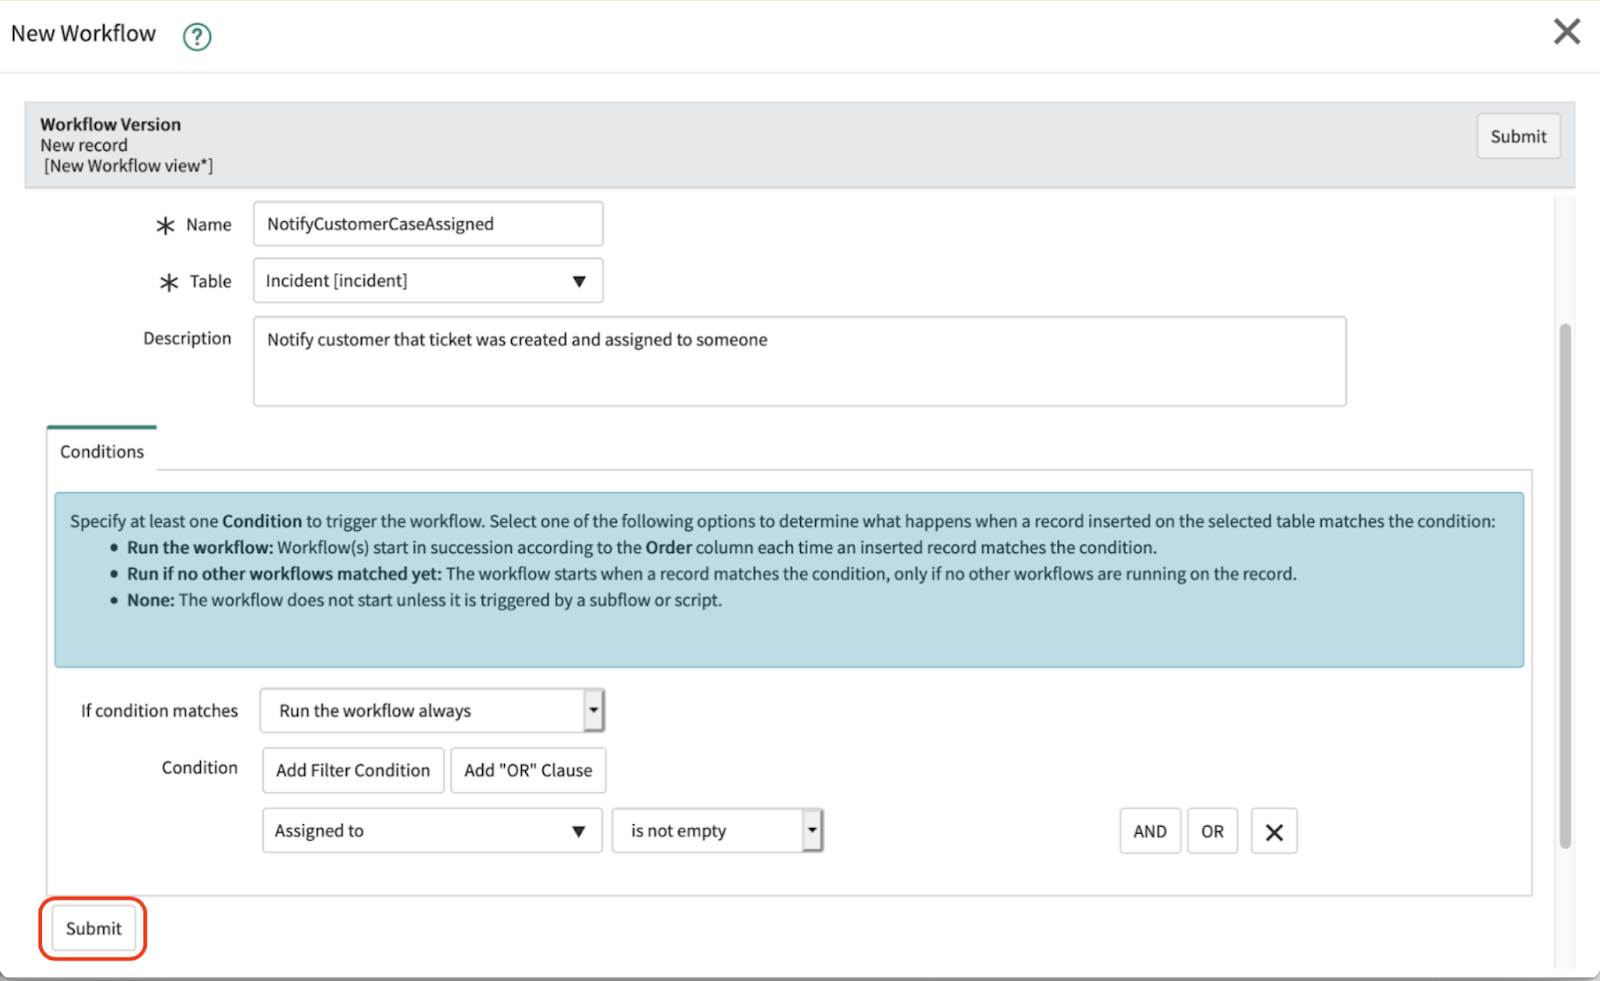
Click Submit. You will see your new Workflow created in a new tab:
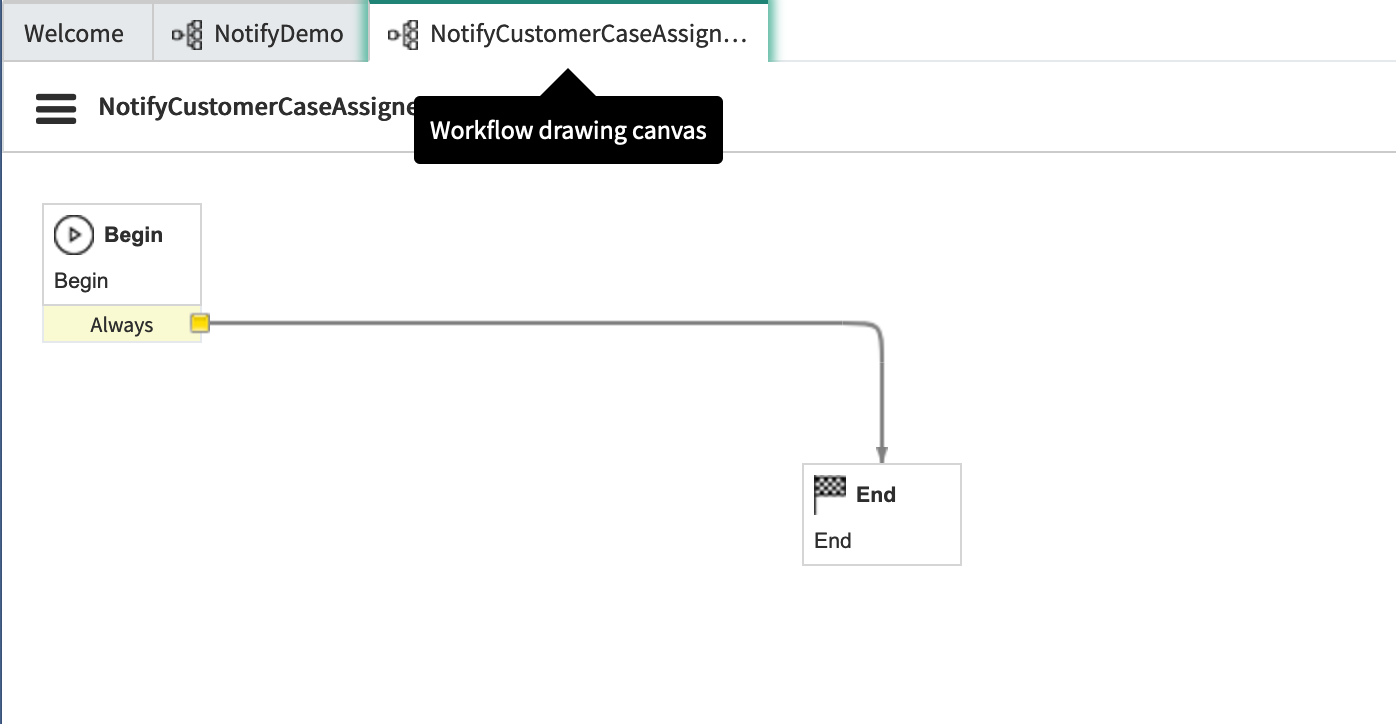
Delete the arrow connecting the boxes. On the tab Core on the right, open Core Activities > Notify > Send SMS. Drag and drop the Send SMS activity on the Workflow drawing canvas. A new window will appear to configure the Send SMS activity:
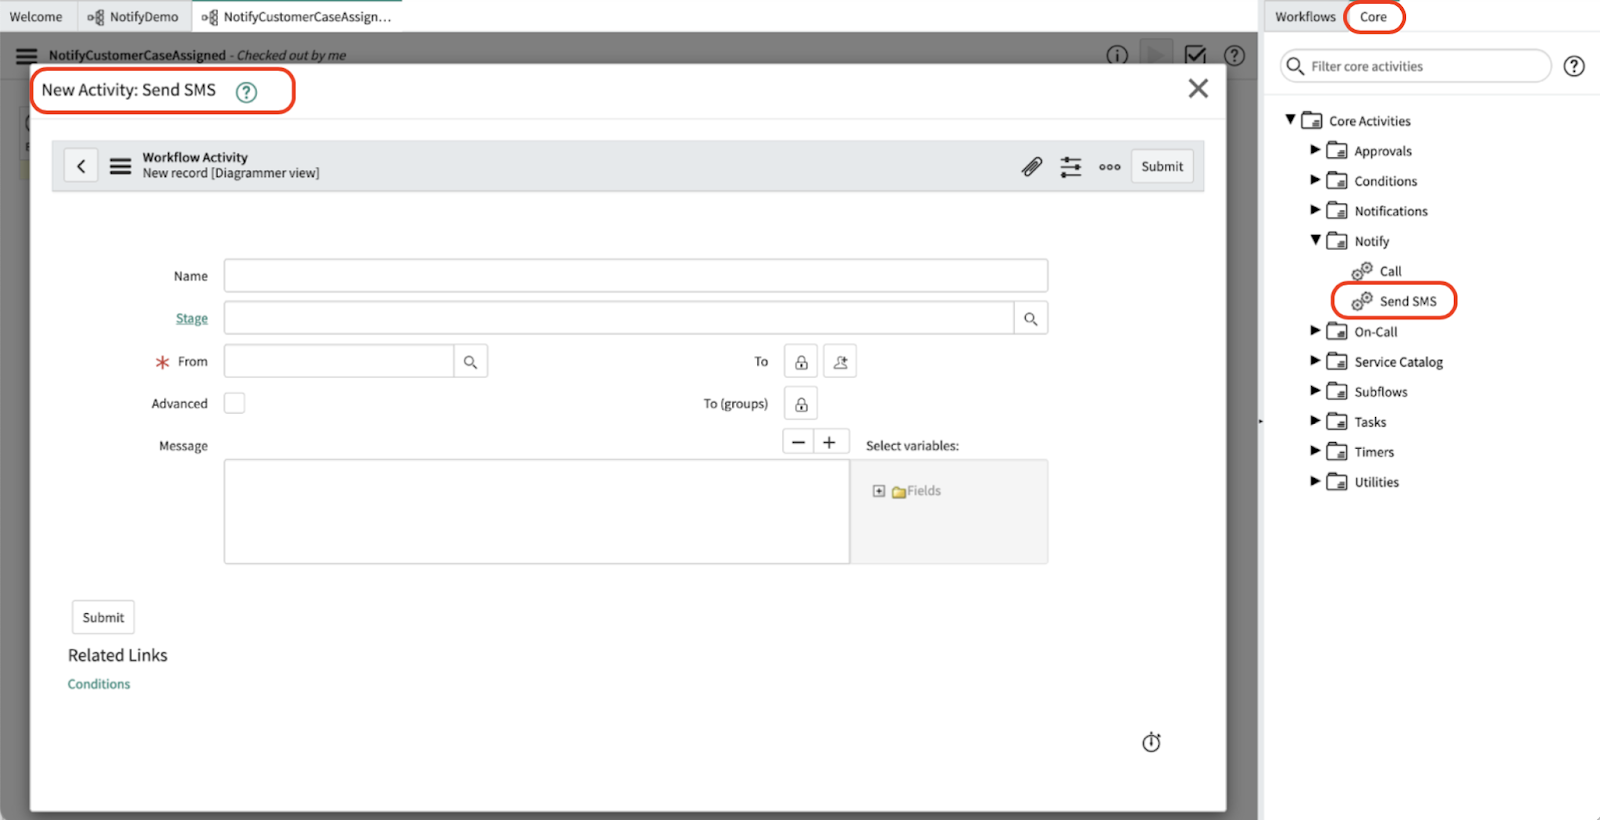
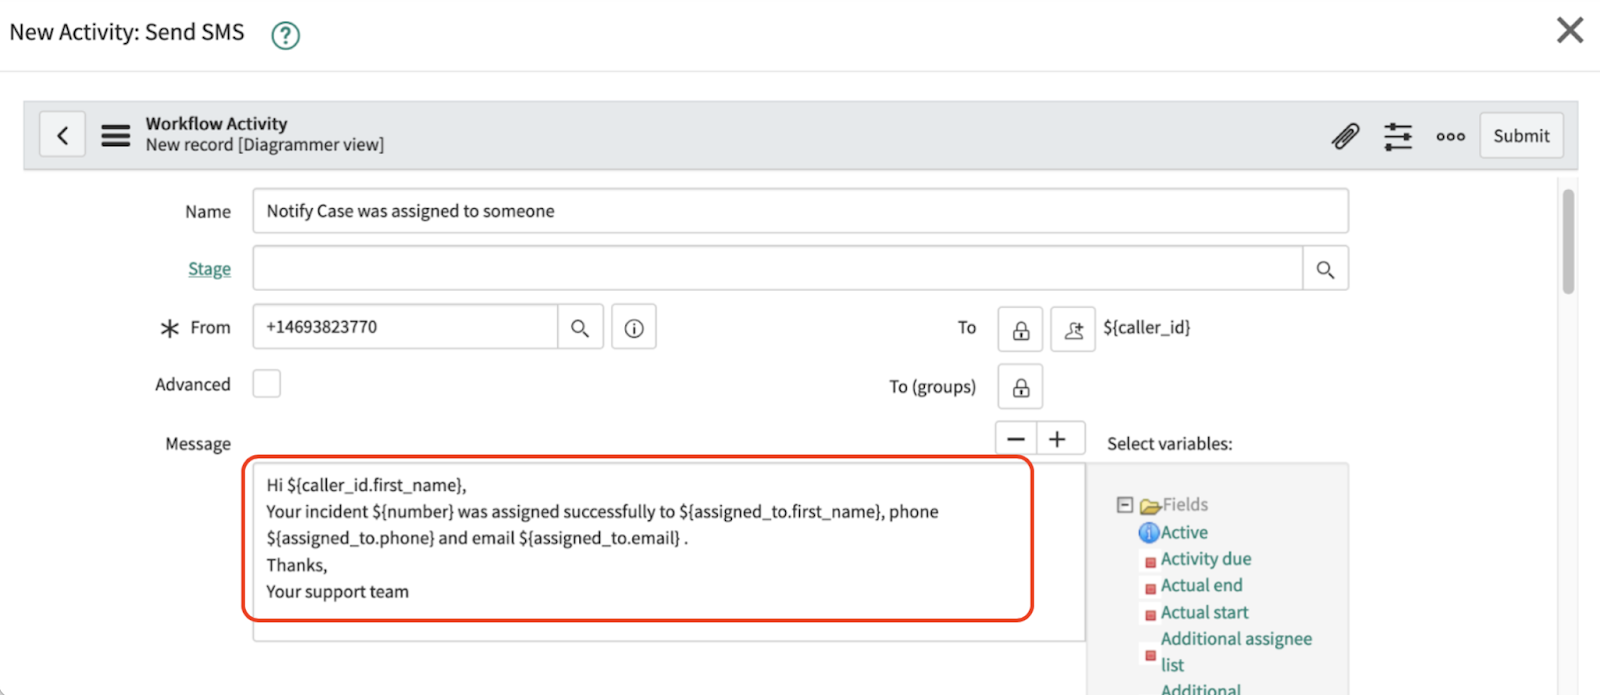
- Enter a Name for this workflow activity (e.g., “Notify Case was assigned to someone”)
- Leave the Stage blank
- Select the “From” number. If you click the search icon to the right of the From text field, it will show you the available Notify numbers if you added them to the “Notify on Task” group.
- Select the To or To (groups) fields depending on who you want to receive the notification
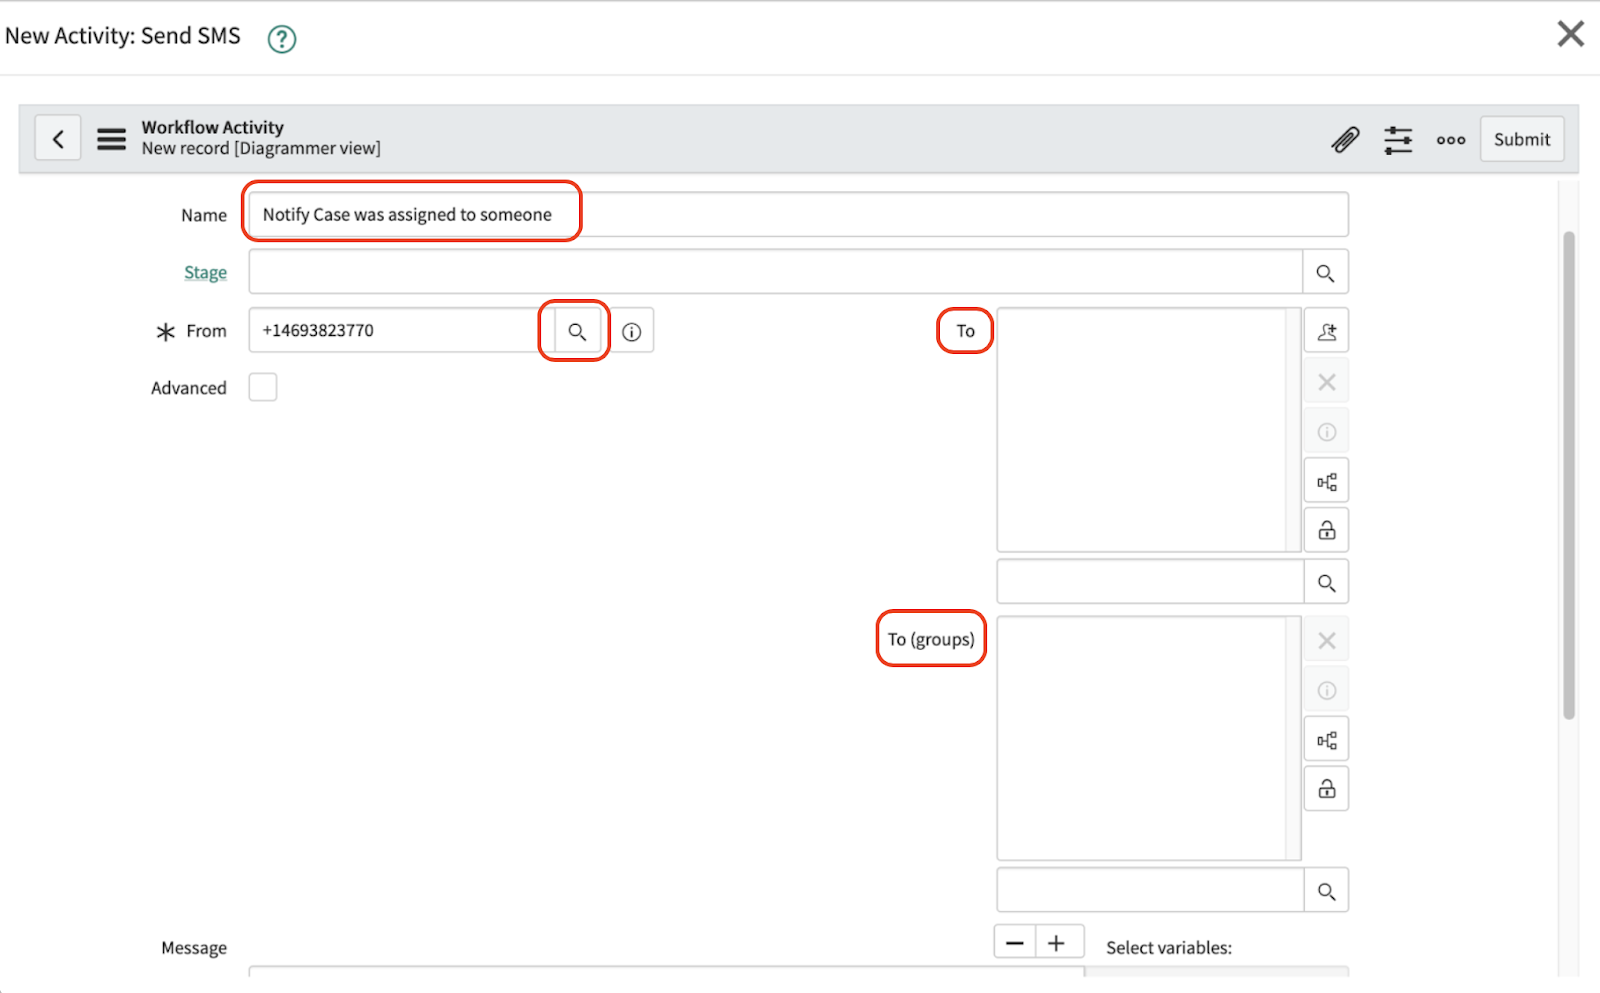
In the “To” area, click on the Select field icon:
Click on Caller, which will select “${caller_id}”.
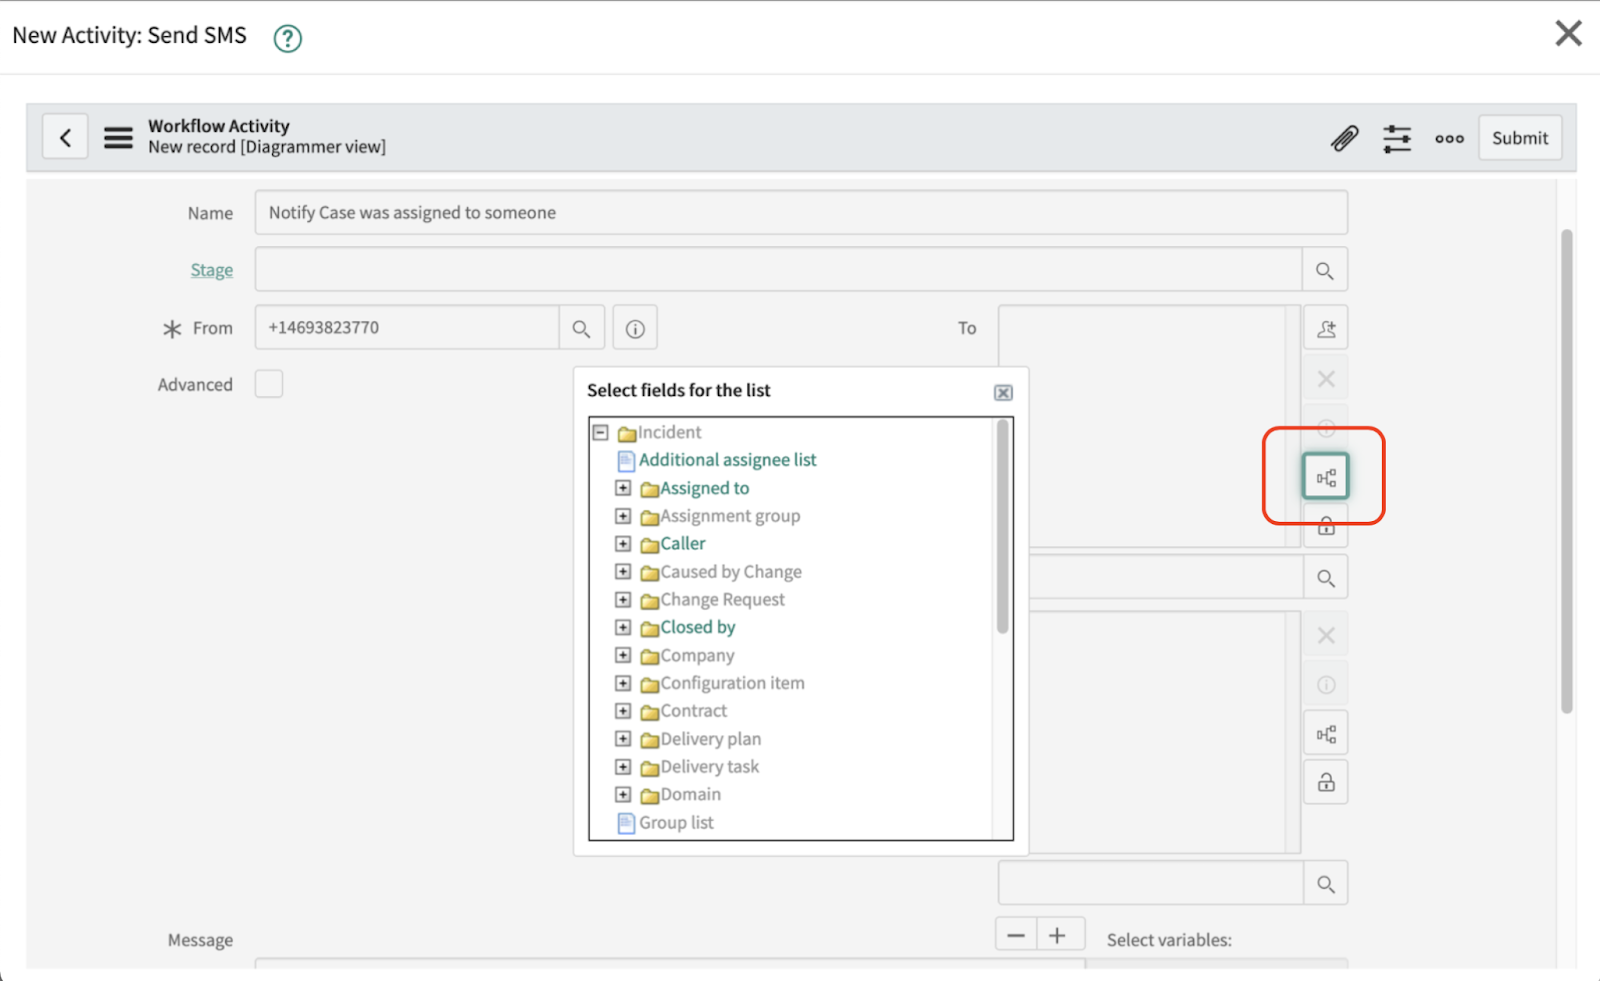
Customize the body of the message in the “Message” field.
Alternatively, you can select any custom fields you want to the right of the “Message” box, to insert dynamic information if needed.
For example, you can use this template:
Click Submit.
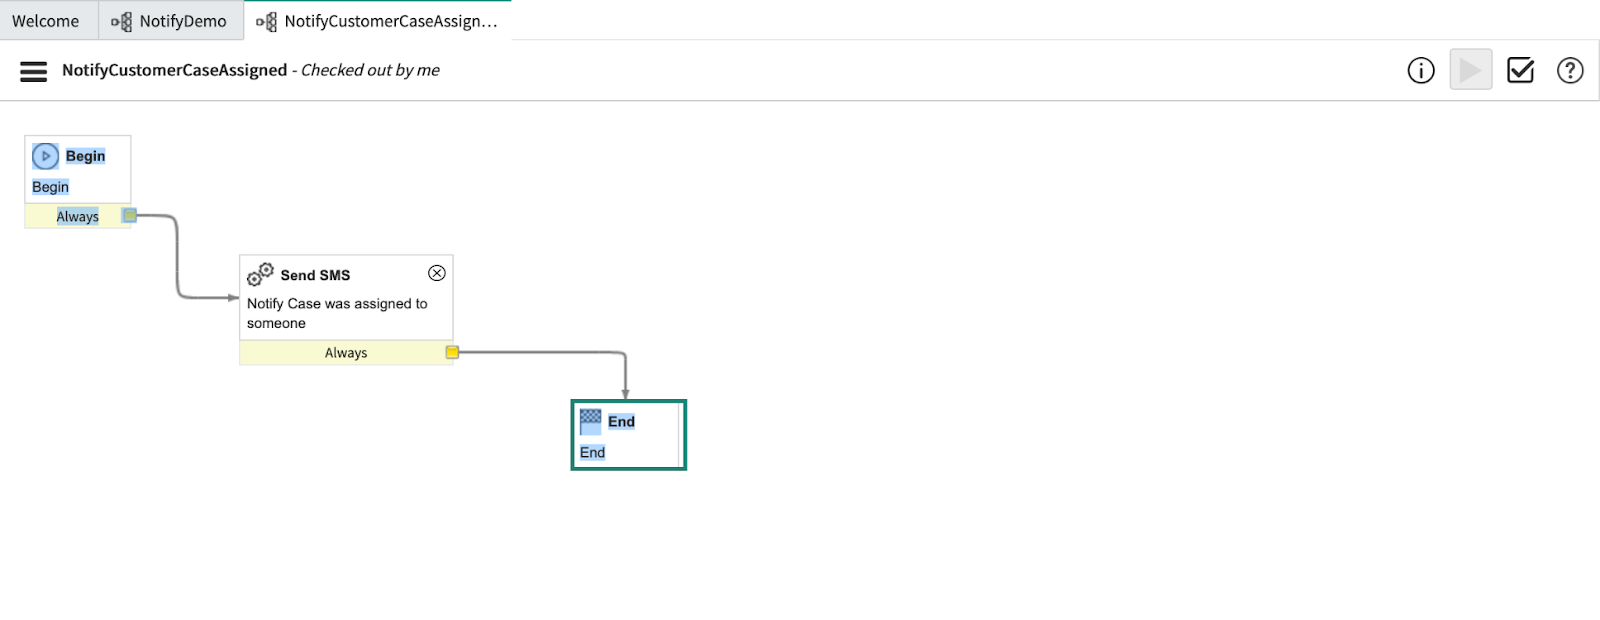
In the ServiceNow Console, click the Begin box and link it to the “Send SMS” box, click the Send SMS box and link it to the End box.
Click the Validate icon, which is the checkbox in the top right corner. A screen will appear like the one shown below:
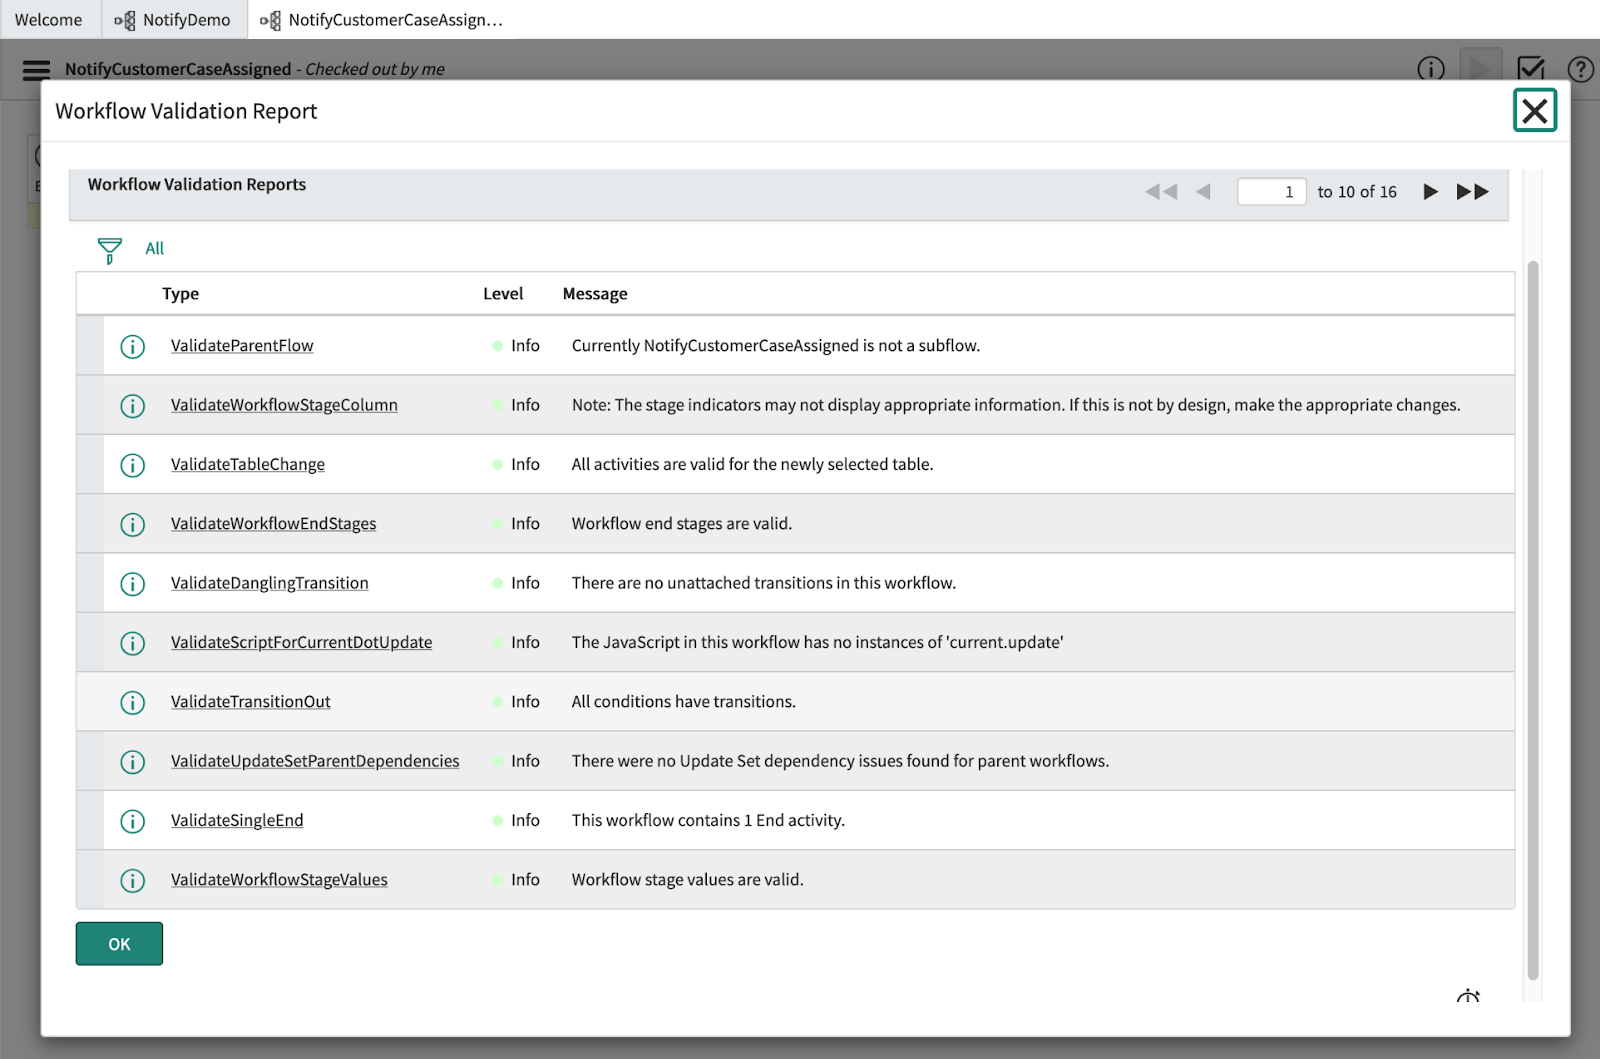
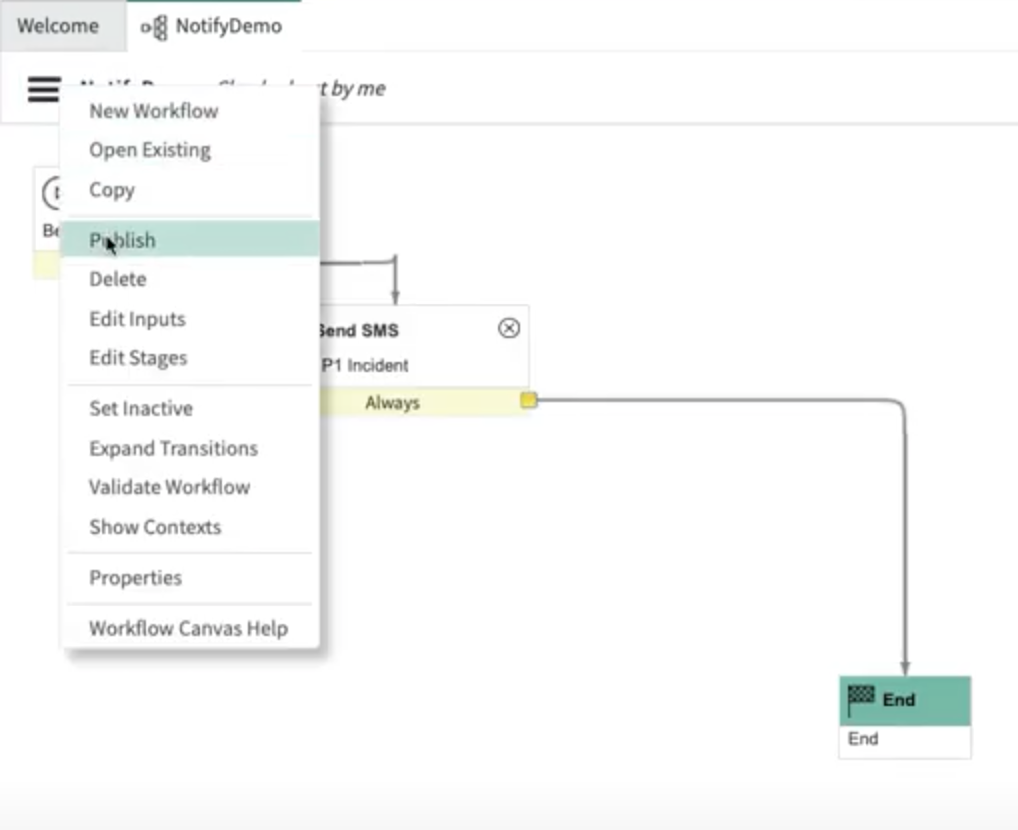
If there are no errors or issues, select Publish from the top menu dropdown:
Test the alert and notification functionality
Let’s verify that this new Workflow functions as we expect. First, open a new incident by clicking on Incident and then Create New:
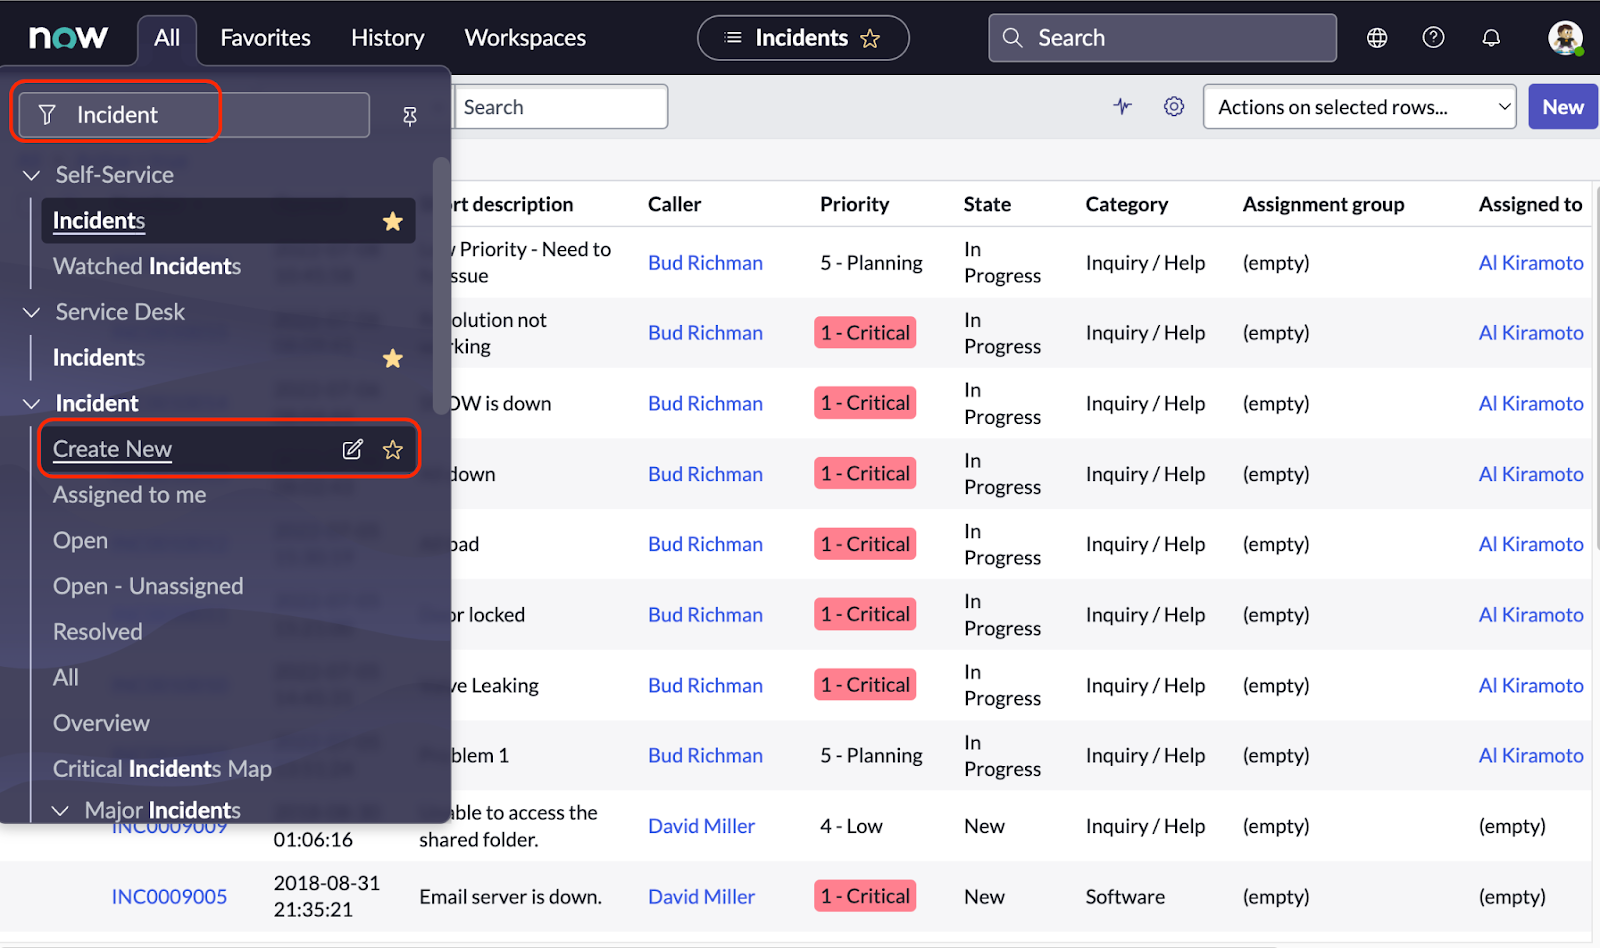
Add information for the “Caller”, “Short Description”, and “Assigned to” fields that you want to test. For example:
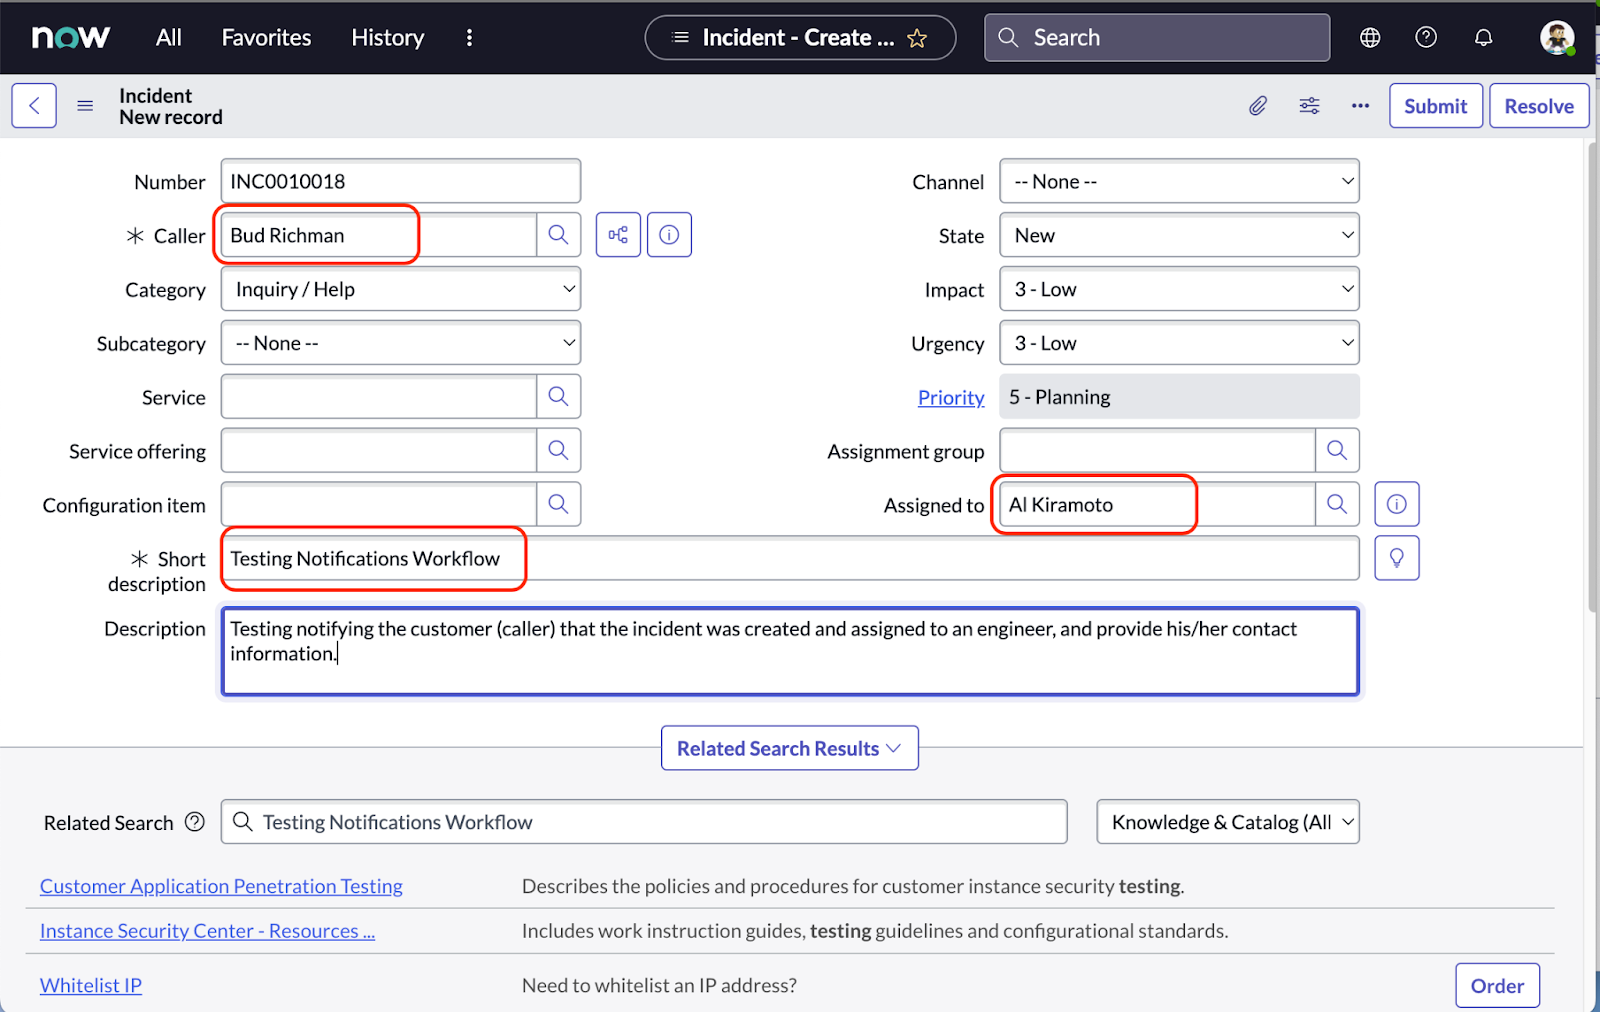
Click the Submit button. Your “Caller” or customer should receive a notification like this:
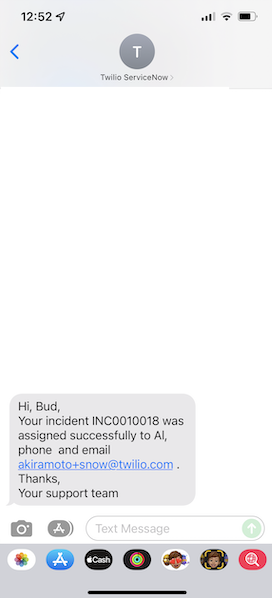
Success!
Configure ServiceNow Business Rules
Our last example will be to configure Alerts and Notifications using ServiceNow Business Rules.
ServiceNow Notify has powerful APIs for you to address business challenges such as sending a notification for high-severity or stale incidents. We’ll use these APIs and the ServiceNow Business Rules to send a notification to the assigned engineer when a High Priority incident is created.
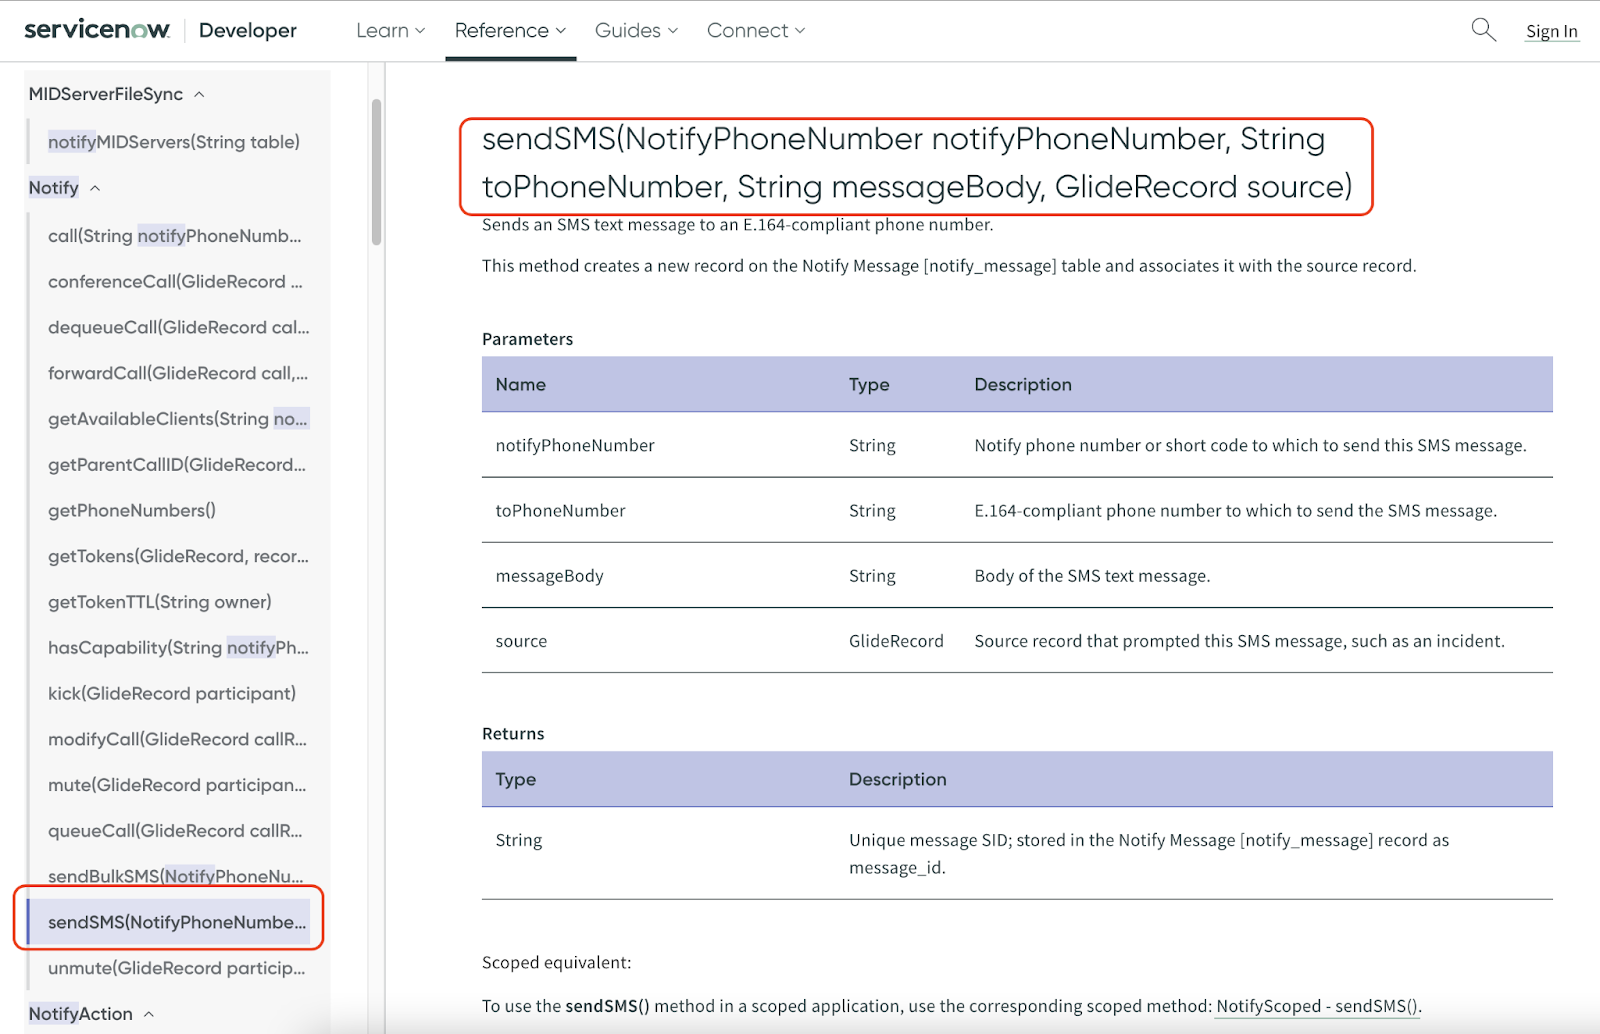
We will will use the following Notify SMS API:
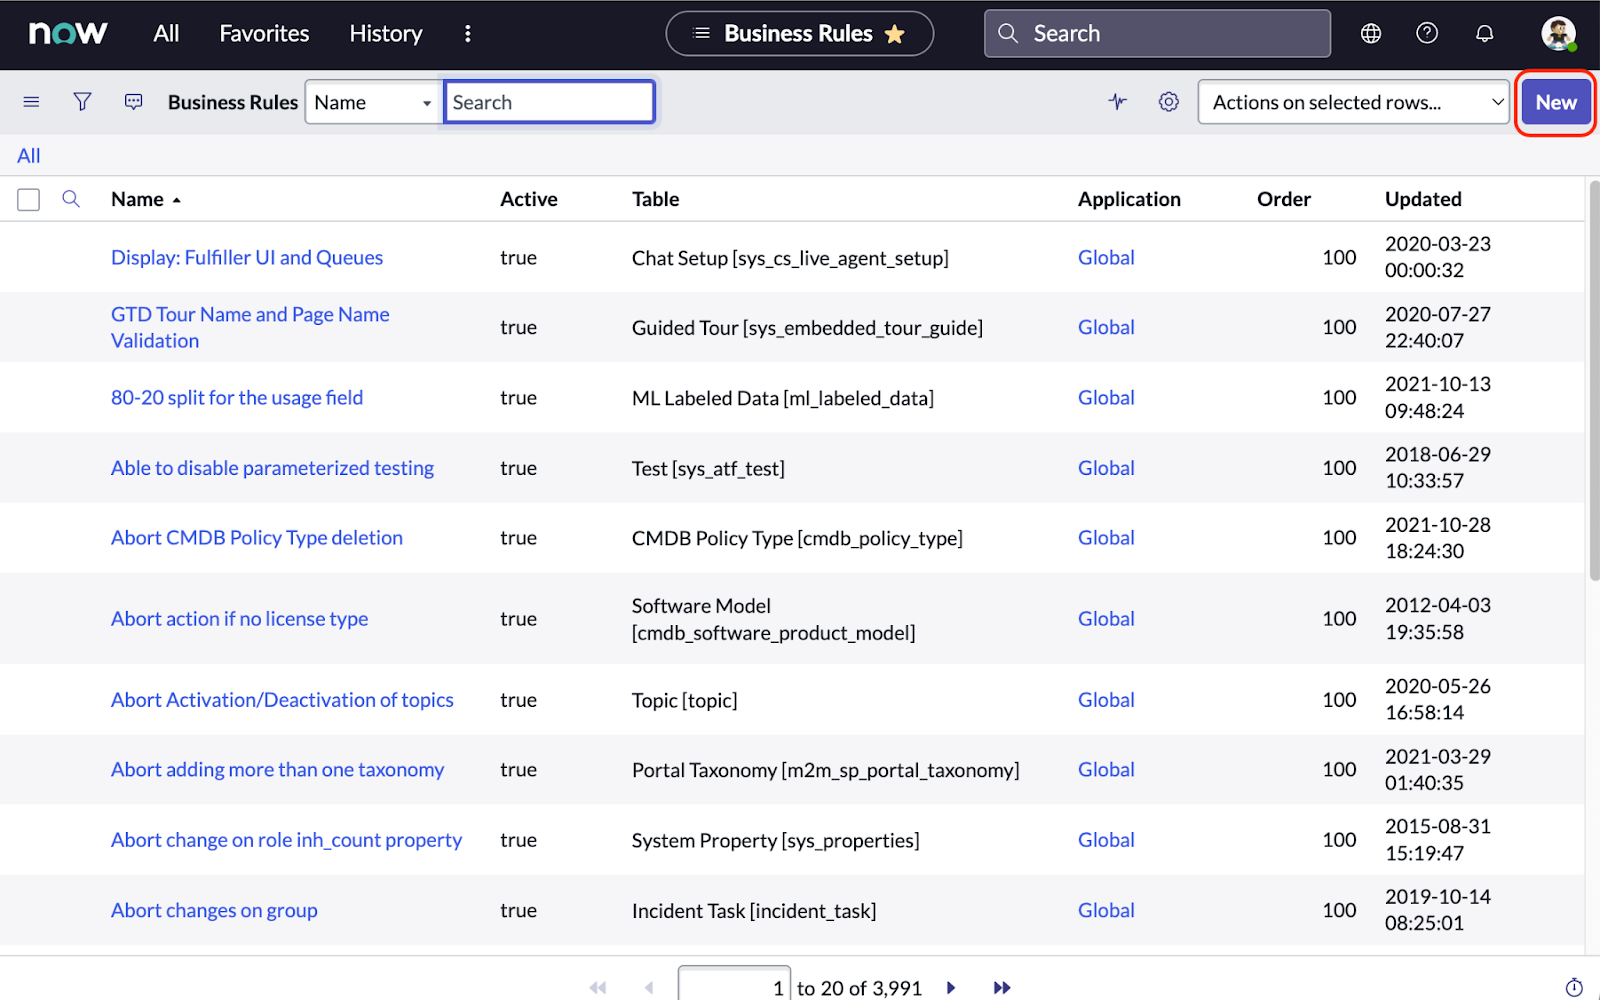
Type “Business Rules” in the Filter navigator of your ServiceNow dashboard:
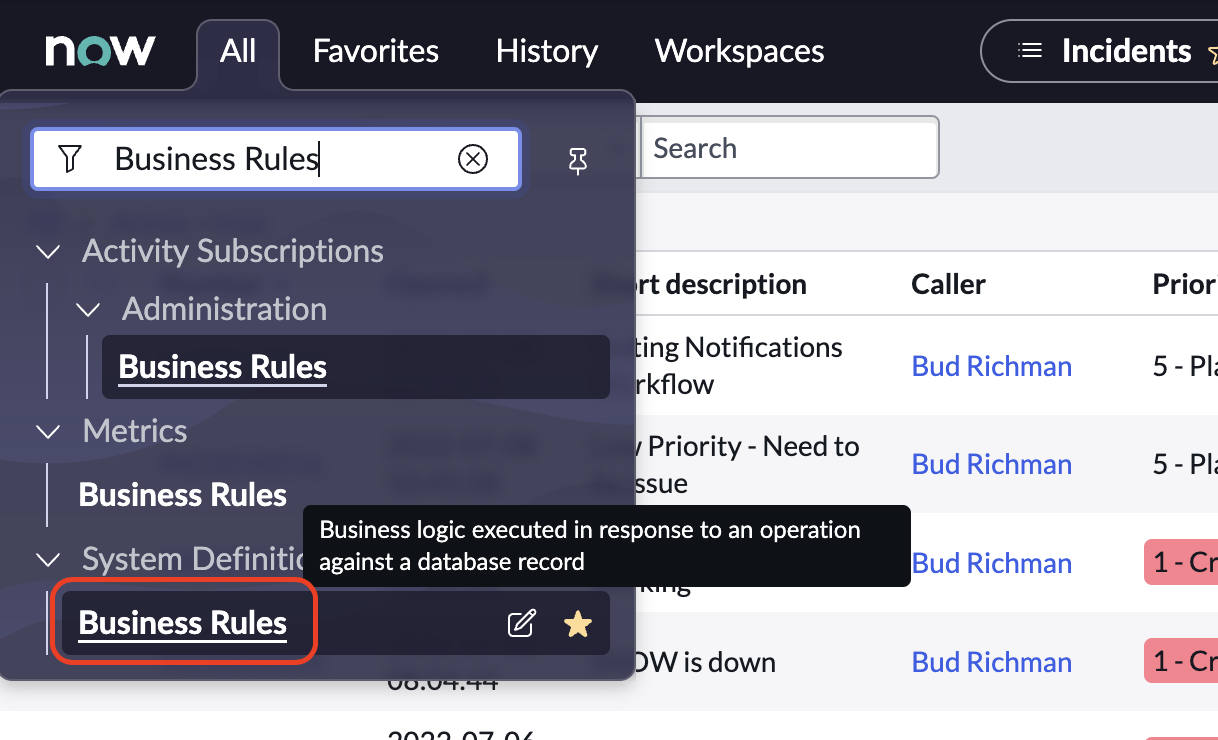
Select New:
- Give the new Business Rule a name (e.g., “NotifyAssigneeHighPriority”).
- Select Incident[incident] under Table
- Check Advanced
- In the dropdown to the right of When, select After
- Check Insert to the right of the When dropdown.
- Under Filter Conditions, click on Add Filter Condition. Set the priority to High and ensure the Assigned to value is is not empty.

Click the Advanced tab, which is to the right of the When to run tab. You’ll see a Script text box which is where we’ll write the script using the SNC.Notify.sendSMS API. Here are the parameters we will need:
notifyPhoneNumber- Your Twilio Number to send messages from.toPhoneNumber- Dynamic number of the user the incident is assigned to (e.g.,+current.assigned_to.mobile_phone).messageBody- Dynamic message (e.g.,'+current.number + ':' + current.short_description,current')GlideRecord source- Glide record (e.g.,current).
For example:
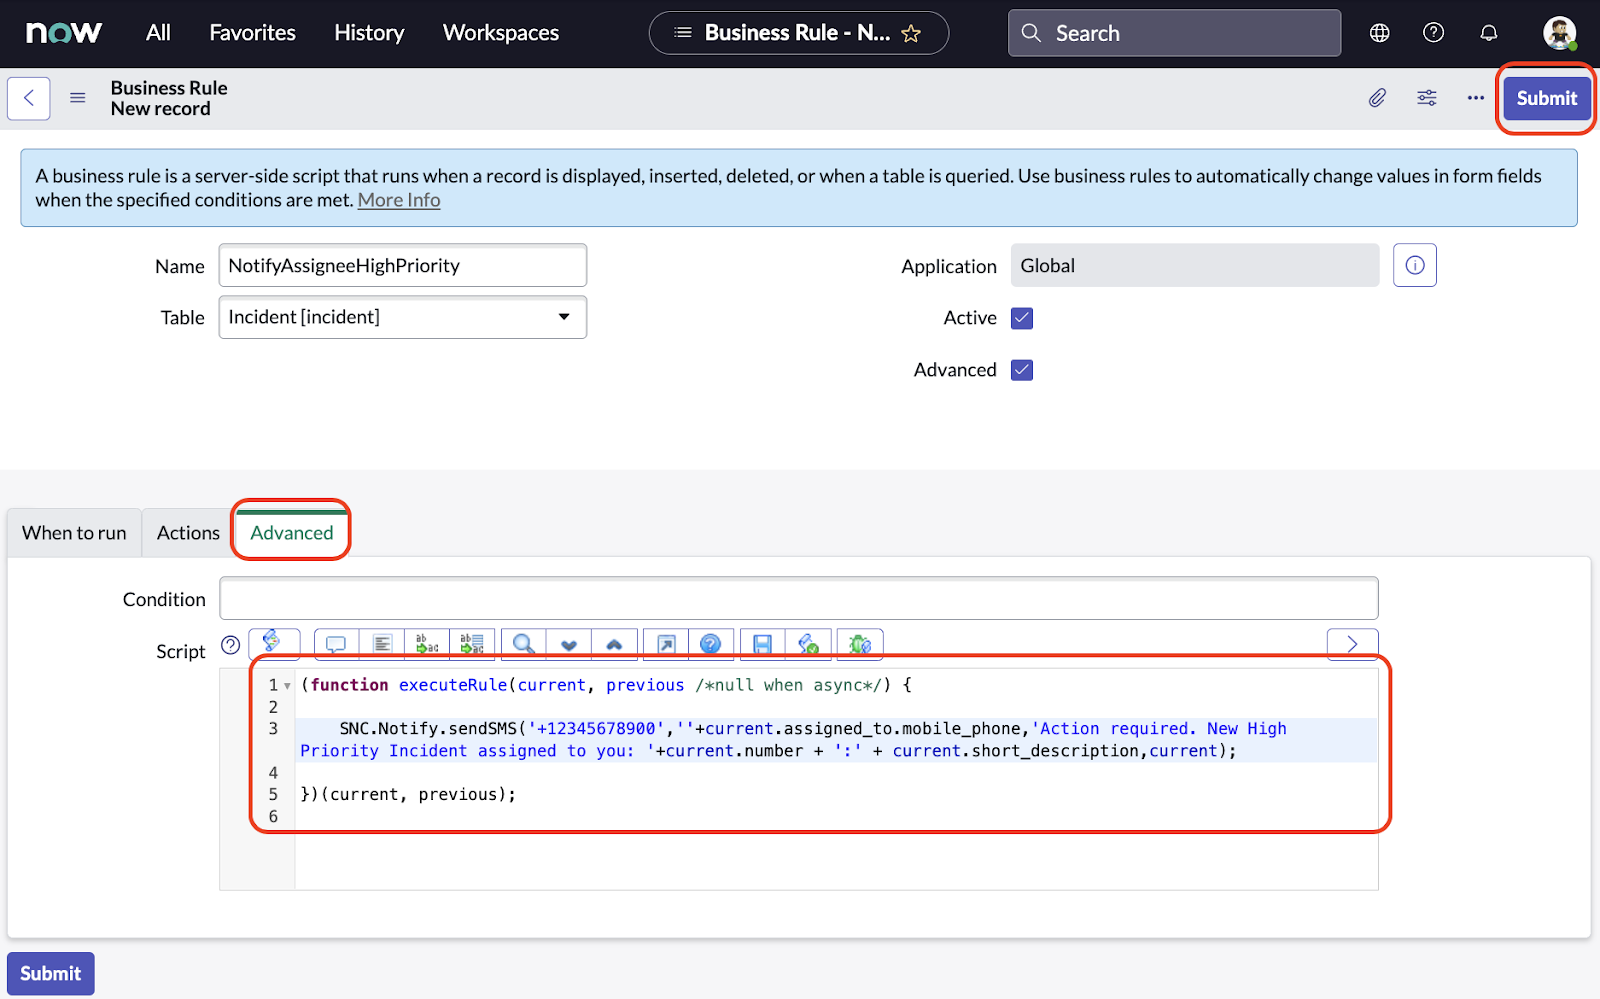
Click Submit.
Test the ServiceNow Business Rules setup
Let's test the setup! Go to Incidents and follow these steps:
- Select New
- Assign a Caller
- Ensure the Impact value is set to 1-High and the Urgency value is set to 2-Medium. This will set the Priority to 2-High
- Assign an engineer
- Provide a Short description
- Click Submit
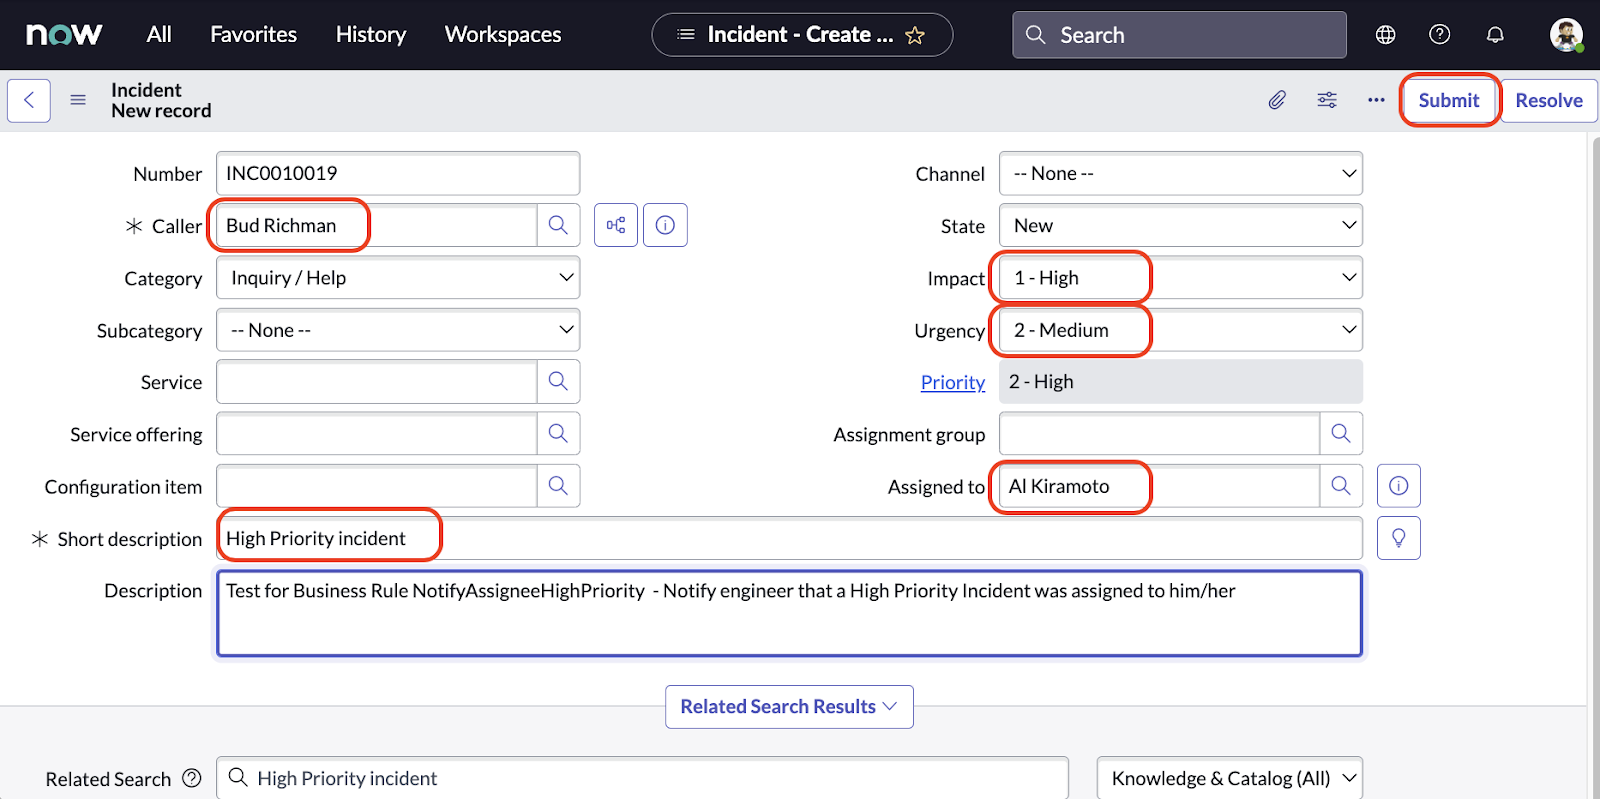
The message will be sent automatically:
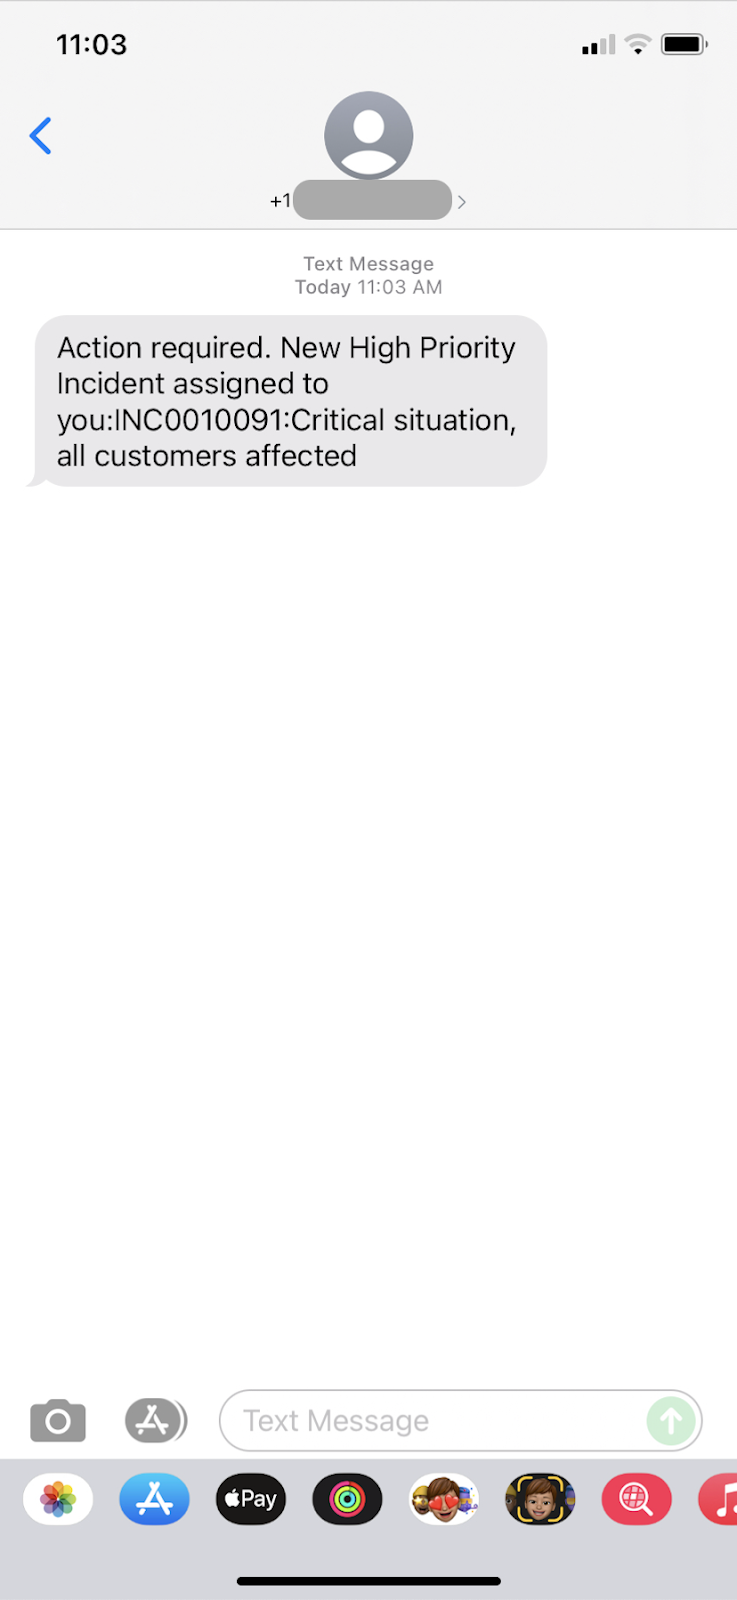
Success!
Conclusion
In this tutorial, you learned how to configure ServiceNow Notify for basic SMS and conference calls, and learned how to configure Alerts and Notifications using the ServiceNow Workflow Designer and ServiceNow Business Rules.
Next steps
The Notify implementation is intuitive and simple to use. However, it is a one-way, outbound-only solution and works only with a single Twilio account or subaccount. If you need more flexibility, check out the other tutorials in the series to see how you can further enhance your ServiceNow integration with Twilio.
Al Kiramoto is a Solutions Engineer at Twilio who enjoys working with customers and solving business problems. He lives in Dallas, TX and enjoys a good barbecue and TexMex food. He can be reached at akiramoto [at] twilio.com.
Additional resources
The following reference resources will provide you with in-depth information on some of the topics mentioned in this post:
- ServiceNow Quebec Notify documentation
- Video: ServiceNow Notify Demo and Training from SAASNow
- Vishal Ingle’s ServiceNow support articles
- Setting up Twilio - How to read the Docs - Twilio Part 1
- Configure Notify with Twilio - How to read the Docs - Twilio Part 2
- Setting up Notify - How to read the Docs - Twilio Part 3
- Testing Notify-Twilio Integration - How to read the Docs - Twilio Part 4
- Using Notify with tasks - How to read the Docs - Twilio Part 5
- Make a call to the Incident Caller - How to read the Docs - Twilio Part 6
- Notify API - allows you to interact with Notify calls and SMS messages using scripts

Related Resources
Twilio Docs
From APIs to SDKs to sample apps
API reference documentation, SDKs, helper libraries, quickstarts, and tutorials for your language and platform.
Resource Center
The latest ebooks, industry reports, and webinars
Learn from customer engagement experts to improve your own communication.
Ahoy
Twilio's developer community hub
Best practices, code samples, and inspiration to build communications and digital engagement experiences.