Create a Peer-to-Peer Payment App With Laravel and Stripe

March 16, 2022
Written by
Lloyd MIller
Contributor
Opinions expressed by Twilio contributors are their own
Reviewed by

Create a Peer-to-Peer Payment App With Laravel and Stripe

Peer-to-Peer (P2P) payment systems have become a huge part of our lives in the past decade. For example, PayPal, Venmo, and Cash App have become a part of internet lingo, just like Google. P2P is so important that social media and communication apps, such as Snapchat, WeChat, and Facebook, have incorporated these features in recent years.

In this tutorial, you'll create a P2P payment app called "Twilmo" that will be based on the RILT architecture (React, Inertia, Laravel, and Tailwind CSS) and backed by Stripe. Even though it's named "Twilmo", it will be very simplistic, and will not incorporate most of the features that are in Venmo.

The beautiful thing about this is that by the end you should have a good idea of how to expand the app to incorporate more advanced features.

Prerequisites

To follow this tutorial, you will need the following:

Laravel application setup

First, make sure you have your database set up and create a database called twilmo. After setting up your database, navigate to the folder where you store your projects and run the following script in your terminal, to generate a new Laravel project and change into the newly generated directory (twilmo):

laravel new twilmo && cd twilmo

Next, install Laravel Breeze, which is a way for us to easily set up basic authentication features for Laravel. These features include registration, login, password, reset, etc. It will also help us to easily add a React frontend to our Laravel application. Run the following command:

composer require laravel/breeze --dev

Then, publish the Breeze library's resources in the project by running:

php artisan breeze:install react
npm install
npm run dev  

Next, add Stripe support. If you don't know what Stripe is, it's a service that provides an API for processing payments on the internet. Developers love using Stripe because of its ease of use and its excellent documentation. To use Stripe in this project, run the following command:

composer require stripe/stripe-php

Once it is installed, you need to set the required environment variables. The most important for this project are the ones for your database and for Stripe.

First, open .env and edit the database configurations, so that they match your database's configuration.

DB_CONNECTION=mysql
DB_HOST=127.0.0.1
DB_PORT=3306
DB_DATABASE=twilmo
DB_USERNAME=root
DB_PASSWORD=********

Then, add the Stripe configurations to the end of .env.

STRIPE_PUBLISHABLE_KEY="pk_test_********"
STRIPE_SECRET_KEY="sk_test_********"
MIX_STRIPE_PUBLISHABLE_KEY="${STRIPE_PUBLISHABLE_KEY}"

Prefixing the STRIPE_PUBLISHABLE_KEY with MIX_ makes it available in our React frontend.

Retrieve Stripe Publishable and Secret keys

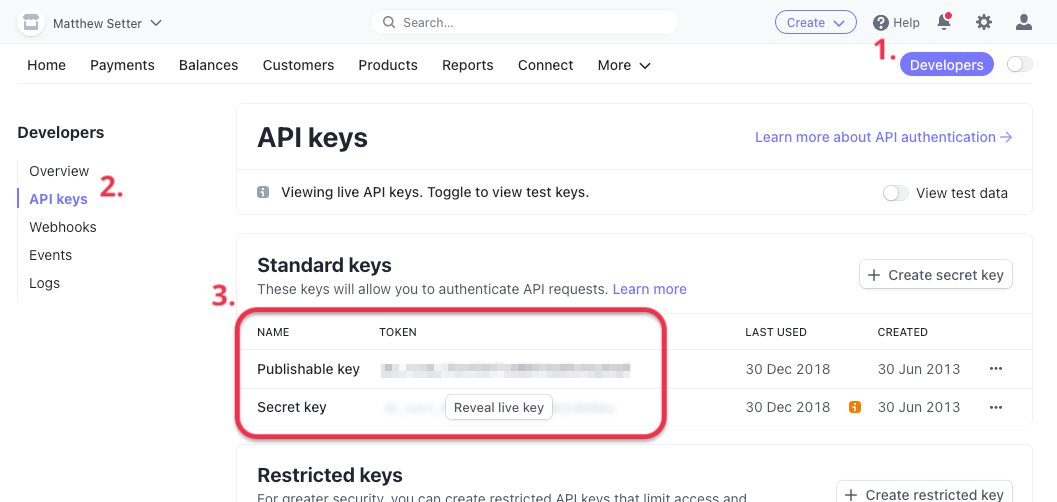
Then, retrieve your Stripe Publishable Key and the Secret Key. You can find these values in the Stripe dashboard under "Developers > API Keys". Then, replace the two Stripe placeholder values at the end of .env with the two keys.

Instead of having to run npm run dev every time to compile the React, Tailwind, and other frontend assets, you can just run the command below (it's best to do so from a new terminal window).

npm run watch

Models and migrations

You'll be creating two models with their related migrations and controllers, Account and Transaction. Create them by running the following, two commands:

php artisan make:model Account -mcr
php artisan make:model Transaction -mcr

The Account model will need fields to denote the balance, the Stripe customer ID (used to access Stripe resources related to the customer such as payment methods), and other details such as street address.

In database/migrations/ open the accounts migration file; the migration file's name will start with a timestamp followed by create_accounts_table. Then, update the up() function to match the code below.

public function up()
{
    Schema::create('accounts', function (Blueprint $table) {
        $table->id();
        $table->bigInteger('user_id')->nullable(false)->unique()->unsigned();
        $table->float('balance', 8, 2)->nullable(false)->default(0);
        $table->string('customer_id')->nullable(false)->unique();
        $table->string('address1')->nullable(false);
        $table->string('address2')->nullable();
        $table->string('city')->nullable(false);
        $table->string('state')->nullable(false);
        $table->string('zip')->nullable(false);
        $table->timestamps();
    });
}

For the Transaction model, you'll need fields to denote the sending user, the receiving user, and the amount being transferred. So, open the migrations file in database/migrations which ends with "create_transactions_table.php", and update its up() function to match the following code.

public function up()
{
    Schema::create('transactions', function (Blueprint $table) {
        $table->id();
        $table->bigInteger('user_from')->nullable(false)->unsigned();
        $table->bigInteger('user_to')->nullable(false)->unsigned();
        $table->float('amount', 8, 2)->nullable(false)->default(0);
        $table->timestamps();
    });
}

Once you're done, run the migrations by running the command below.

php artisan migrate

Now, open the User model (app/Models/User.php) and add the following function to it. This uses Eloquent, to tie it to the Account model (app/Models/Account.php).

public function account() 
{
    return $this->hasOne('App\Models\Account', 'user_id');
}

For the Account model, you need to specify the fields that are mass-assignable. You also need to make sure money is presented in the right way, by using a cast that ensures decimals always have two places. 

To do both of these things, update the body of the Account model to match the code below,

class Account extends Model
{
    use HasFactory;

    protected $fillable = [
        'user_id', 'balance', 'customer_id', 'address1', 'address2',
        'city', 'state', 'zip'
    ];

    protected $casts = ['balance' => 'decimal:2'];
    
    public function user() {
        return $this->belongsTo('App\Models\User', 'user_id');
    }
}

For the Transaction model (app/Models/Transaction.php), all you need to do is define the fields that are mass-assignable (user_from and user_to) which describe the sender and the receiver, respectively.

Do that by updating the body of the Transaction model to match the code below.

class Transaction extends Model
{
    use HasFactory;

    protected $fillable = ['user_from', 'user_to', 'amount'];
}

Register user route

With the default configuration, Laravel redirects users to http://localhost:8000/dashboard when they are logged in. For this app, we'll leave that alone and build a profile page where we see our balance, add a card, and send people money.

First, the redirect URL needs to be changed to http://localhost:8000/profile. You can do this by changing just one line of code in app/Providers/RouteServiceProvider.php, which you can see below.

public const HOME = '/profile';

Once you've done that, you need to add some new routes. In routes/web.php, add the following route definitions before require __DIR__.'/auth.php';. They add a route to handle the user's profile and their transactions.

Route::get('/profile', [AccountController::class, 'index'])
    ->middleware(['auth', 'verified'])->name('profile');
Route::post('/send-money', [TransactionController::class, 'store'])
->middleware(['auth', 'verified'])->name('send-money');

Then, add the following use statements to the top of the file.

use App\Http\Controllers\AccountController;
use App\Http\Controllers\TransactionController;

The auth-related mechanisms aren't ready just yet, as more work needs to be done in the AccountController and the RegisteredUserController, located in app/Http/Controllers.

Starting with the AccountController, the /profile page needs to display information about the user. To do this, replace the existing index method with the following code:

public function index()
{
    $user = User::find(auth()->user()->id);

    return Inertia::render('Profile', [
        'user' => $user,
        'account' => $user->account,
    ]);
}

Then, add the use statements below to the top of the file.

use App\Models\User;
use Inertia\Inertia;

Then, in the store method of the RegisteredUserController, (app/Http/Controllers/Auth/RegisteredUserController.php), add the following code just before event(new Registered($user));. This will create an account, as part of the user creation process.

Account::create([
    'user_id' => $user->id,
    'balance' => 0,
    'customer_id' => 'stripe_customer',
    'address1' => $request->address1,
    'address2' => $request->address2,
    'city' => $request->city,
    'state' => $request->state,
    'zip' => $request->zip
]);

Then, include the use statement below at the top of the file.

use App\Models\Account;

Next, there needs to be a way to create a Stripe customer ID number every time a new account is created, and to store the ID number in the application's database. Luckily, Stripe's excellent API supports this functionality.

To do that, create a trait that will house all the methods related to Stripe. In the app/ directory, create a new directory, named Traits, and in that directory create a new Trait named StripeHelperTrait.php. In the new file, add the code below.

<?php 

namespace App\Traits;

trait StripeHelperTrait 
{
    function __construct()
    {
        \Stripe\Stripe::setApiKey(env('STRIPE_SECRET_KEY'));
    }

    function createCustomer($email, $name)
    {
        $customer = \Stripe\Customer::create([
            'name' => $name,
            'email' => $email
        ]);
        return $customer;
    }
}

The constructor sets the Stripe secret key to use in each of the Trait's methods. The first method that was made here is createCustomer. The customer_id returned from this method will be used for other Stripe methods, such as retrieving payment methods associated with the customer.

Now, let's go back to the store method of the RegisteredUserController and make some changes, so that the Stripe customer ID can be saved to the database.

To do that, replace the existing store method with the version below.

public function store(Request $request)
{
    $request->validate([
        'name' => 'required|string|max:255',
        'email' => 'required|string|email|max:255|unique:users',
        'password' => ['required', 'confirmed', Rules\Password::defaults()],
    ]);

    $user = User::create([
        'name' => $request->name,
        'email' => $request->email,
        'password' => Hash::make($request->password),
    ]);

    $customer = $this->createCustomer($request->email, $request->name);

    Account::create([
        'user_id' => $user->id,
        'balance' => 0,
        'customer_id' => $customer->id,
        'address1' => $request->address1,
        'address2' => $request->address2,
        'city' => $request->city,
        'state' => $request->state,
        'zip' => $request->zip
    ]);

    event(new Registered($user));

    Auth::login($user);

    return redirect(RouteServiceProvider::HOME);
}

Then, add the following use statement to the top of the file.

use App\Traits\StripeHelperTrait;

After that, add the following use statement inside the body of the class.

use StripeHelperTrait;

Now in resources/js/Pages/Auth/Register.js, you need to add a few fields for the account. Replace the return statement in the component with the following code:

return (
    <Guest>
        <Head title="Register" />

        <ValidationErrors errors={errors} />

        <form onSubmit={submit}>
            <div className="pb-4 border-b">
                <Label forInput="name" value="Name" />

                <Input
                    type="text"
                    name="name"
                    value={data.name}
                    className="mt-1 mb-4 block w-full"
                    autoComplete="name"
                    isFocused={true}
                    handleChange={onHandleChange}
                    required
                />

                <Label forInput="address1" value="Address 1" />

                <Input
                    type="text"
                    name="address1"
                    value={data.address1}
                    className="mt-1 mb-4 block w-full"
                    autoComplete="address1"
                    isFocused={true}
                    handleChange={onHandleChange}
                    required
                />

                <Label forInput="address2" value="Address 2" />

                <Input
                    type="text"
                    name="address2"
                    value={data.address2}
                    className="mt-1 mb-4 block w-full"
                    autoComplete="address2"
                    isFocused={true}
                    handleChange={onHandleChange}
                />

                <Label forInput="city" value="City" />

                <Input
                    type="text"
                    name="city"
                    value={data.city}
                    className="mt-1 mb-4 block w-full"
                    autoComplete="city"
                    isFocused={true}
                    handleChange={onHandleChange}
                    required
                />

                <Label forInput="state" value="State" />

                <Input
                    type="text"
                    name="state"
                    value={data.state}
                    className="mt-1 mb-4 block w-full"
                    autoComplete="state"
                    isFocused={true}
                    handleChange={onHandleChange}
                    required
                />

                <Label forInput="zip" value="Zip" />

                <Input
                    type="text"
                    name="zip"
                    value={data.zip}
                    className="mt-1 mb-4 block w-full"
                    autoComplete="zip"
                    isFocused={true}
                    handleChange={onHandleChange}
                    required
                />


            </div>

            <div className="mt-4">
                <Label forInput="email" value="Email" />

                <Input
                    type="email"
                    name="email"
                    value={data.email}
                    className="mt-1 block w-full"
                    autoComplete="username"
                    handleChange={onHandleChange}
                    required
                />
            </div>

            <div className="mt-4">
                <Label forInput="password" value="Password" />

                <Input
                    type="password"
                    name="password"
                    value={data.password}
                    className="mt-1 block w-full"
                    autoComplete="new-password"
                    handleChange={onHandleChange}
                    required
                />
            </div>

            <div className="mt-4">
                <Label forInput="password_confirmation" value="Confirm Password" />

                <Input
                    type="password"
                    name="password_confirmation"
                    value={data.password_confirmation}
                    className="mt-1 block w-full"
                    handleChange={onHandleChange}
                    required
                />
            </div>

            <div className="flex items-center justify-end mt-4">
                <Link href={route('login')} className="underline text-sm text-gray-600 hover:text-gray-900">
                    Already registered?
                </Link>

                <Button className="ml-4" processing={processing}>
                    Register
                </Button>
            </div>
        </form>
    </Guest>
);

Now, create a new JavaScript file, Profile.js, in resources/js/Pages. Then, copy the JavaScript code below, which is a slightly updated version of the React and Tailwind CSS code from Creative Tim's profile page example, into the new file.

import React, { useReducer, useState } from 'react'
import { Inertia } from '@inertiajs/inertia'
import Navbar from '../Components/Navbar'

const formReducer = (state, event) => {
  return {
    ...state,
    [event.target.name]: event.target.value
  }
}

const Profile = ({ account, user, errors }) => {
  const [data, setData] = useReducer(formReducer, {})

  function handleSubmit(e){
    e.preventDefault()

    console.log(data)
    Inertia.post(route('send-money'), data, {
      onSuccess: ({props}) => {
        console.log(props)
      }
    })
  }
  return (
    <>
      <Navbar transparent />
      <main className="profile-page">
        <section className="relative block" style={{ height: "500px" }}>
          <div
            className="absolute top-0 w-full h-full bg-center bg-cover"
            style={{
              backgroundImage:
                "url('https://images.unsplash.com/photo-1499336315816-097655dcfbda?ixlib=rb-1.2.1&ixid=eyJhcHBfaWQiOjEyMDd9&auto=format&fit=crop&w=2710&q=80')"
            }}
          >
            <span
              id="blackOverlay"
              className="w-full h-full absolute opacity-50 bg-black"
            ></span>
          </div>
          <div
            className="top-auto bottom-0 left-0 right-0 w-full absolute pointer-events-none overflow-hidden"
            style={{ height: "70px" }}
          >
            <svg
              className="absolute bottom-0 overflow-hidden"
              xmlns="http://www.w3.org/2000/svg"
              preserveAspectRatio="none"
              version="1.1"
              viewBox="0 0 2560 100"
              x="0"
              y="0"
            >
              <polygon
                className="text-gray-300 fill-current"
                points="2560 0 2560 100 0 100"
              ></polygon>
            </svg>
          </div>
        </section>
        <section className="relative py-16 bg-gray-300">
          <div className="container mx-auto px-4">
            <div className="relative flex flex-col min-w-0 break-words bg-white w-full mb-6 shadow-xl rounded-lg -mt-64">
              <div className="px-6">
                <div className="flex flex-wrap justify-center">
                  <div className="w-full lg:w-3/12 px-4 lg:order-2 flex justify-center">
                    <div className="relative">
                      <img
                        alt="..."
                        src="https://picsum.photos/400"
                        className="shadow-xl rounded-full h-auto align-middle border-none absolute -m-16 -ml-20 lg:-ml-16"
                        style={{ maxWidth: "150px" }}
                      />
                    </div>
                  </div>
                </div>
                <div className="text-center mt-24">
                  <h3 className="text-4xl font-semibold leading-normal mb-2 text-gray-800">
                    { user.name }
                  </h3>
                  <div className="text-sm leading-normal mt-0 mb-2 text-gray-500 font-bold uppercase">
                    <i className="fas fa-map-marker-alt mr-2 text-lg text-gray-500"></i>{" "}
                        <strong>Balance:</strong> ${ account.balance } 
                  </div>
                </div>
                <div className="mt-10 py-10 border-t border-gray-300 text-center">
                    <div className="flex justify-center">
                        <form className="w-full max-w-sm" onSubmit={handleSubmit}>
                            <div className="mb-6">
                                <div className="md:flex md:items-center">
                                  <div className="md:w-1/3">
                                  <label className="block text-gray-500 font-bold md:text-right mb-1 md:mb-0 pr-4" htmlFor="inline-full-name">
                                      Email
                                  </label>
                                  </div>
                                  <div className="md:w-2/3">
                                      <input 
                                        className={`${Object.keys(errors).length > 0 && errors.email ? 'border-red-500' : 'border-gray-200'} bg-gray-200 appearance-none border-2 rounded w-full py-2 px-4 text-gray-700 leading-tight focus:outline-none focus:bg-white focus:border-purple-500`} 
                                        type="text" 
                                        name="email" 
                                        placeholder="person@example.net" 
                                        onChange={setData}
                                      />
                                  </div>
                                </div>
                                {Object.keys(errors).length > 0 ?
                                  (<span className="font-medium tracking-wide text-red-500 text-xs mt-1 ml-1">
                                    { errors.email }
                                  </span>) : null
                                }
                            </div>
                            <div className="mb-6">
                                <div className="md:flex md:items-center">
                                  <div className="md:w-1/3">
                                  <label className="block text-gray-500 font-bold md:text-right mb-1 md:mb-0 pr-4" htmlFor="inline-password">
                                      Amount
                                  </label>
                                  </div>
                                  <div className="md:w-2/3 flex">
                                      <span className="leading-10 mr-2">$</span>
                                      <input 
                                        className={`${Object.keys(errors).length > 0 && errors.amount ? 'border-red-500' : 'border-gray-200'} bg-gray-200 appearance-none border-2 rounded w-full py-2 px-4 text-gray-700 leading-tight focus:outline-none focus:bg-white focus:border-purple-500`} 
                                        type="text" 
                                        name="amount" 
                                        placeholder="3.00"
                                        onChange={setData}
                                      />
                                  </div>
                                </div>
                                {Object.keys(errors).length > 0 ?
                                  (<span className="font-medium tracking-wide text-red-500 text-xs mt-1 ml-1">
                                    { errors.amount }
                                  </span>) : null
                                }
                            </div>
                            <div className="flex justify-center">
                                <button 
                                  className="shadow bg-purple-500 hover:bg-purple-400 focus:shadow-outline focus:outline-none text-white font-bold py-2 px-4 rounded" 
                                  type="submit"
                                >
                                    Send
                                </button>
                            </div>
                        </form>
                    </div>
                </div>
              </div>
            </div>
          </div>
        </section>
      </main>
    </>
  )
}
export default Profile

In the resources/js/Components/ directory, create a new file, named Navbar.js, and paste the code below into it.

import React from 'react'

const Navbar = props => {
  return (
    <>
      <nav
        className={
          (props.transparent
            ? "top-0 absolute z-50 w-full"
            : "relative shadow-lg bg-white") +
          " flex flex-wrap items-center justify-between px-2 py-3 "
        }
      >
        <div className="container px-4 mx-auto flex flex-wrap items-center justify-between">
          <div className="w-full relative flex justify-between lg:w-auto lg:static lg:block lg:justify-start">
            <a
              className={
                (props.transparent ? "text-white" : "text-gray-800") +
                " text-sm font-bold leading-relaxed inline-block mr-4 py-2 whitespace-nowrap uppercase"
              }
              href="https://www.creative-tim.com/learning-lab/tailwind-starter-kit#/presentation"
            >
              TWILMO
            </a>
          </div>
        </div>
      </nav>
    </>
  )
}

export default Navbar

Before you test the auth routes, you need to implement validation for registration by creating a form request. To do that, run the following command in the root directory of the project.

php artisan make:request RegisterRequest

The generated file, RegisterRequest.php, will appear in app/Http/Requests. Replace its contents with the following code:

<?php

namespace App\Http\Requests;

use Illuminate\Foundation\Http\FormRequest;
use Illuminate\Validation\Rules;

class RegisterRequest extends FormRequest
{
    public function authorize()
    {
        return true;
    }

    public function rules()
    {
        return [
            'name' => 'required|string|max:255',
            'email' => 'required|string|email|max:255|unique:users',
            'password' => ['required', 'confirmed', Rules\Password::defaults()],
            'address1' => 'required|string',
            'address2' => 'nullable|string',
            'city' => 'required|string',
            'state' => 'required|string',
            'zip' => 'required|numeric|digits:5'
        ];
    }
}

Then, import the newly generated form request into RegisteredUserController by updating the request validation in the store method, to match the highlighted line in the code below.


public function store(RegisterRequest $request)
{
    $request->validated();

    $user = User::create([
        'name' => $request->name,
        'email' => $request->email,
        'password' => Hash::make($request->password),
    ]);

    $customer = $this->createCustomer($request->email, $request->name);

    Account::create([
        'user_id' => $user->id,
        'balance' => 0,
        'customer_id' => $customer->id,
        'address1' => $request->address1,
        'address2' => $request->address2,
        'city' => $request->city,
        'state' => $request->state,
        'zip' => $request->zip
    ]);

    event(new Registered($user));

    Auth::login($user);

    return redirect(RouteServiceProvider::HOME);
}

Then, add the following use statement to the top of the class.

use App\Http\Requests\RegisterRequest;

Create transactions with Stripe

Now you're at the heart of the tutorial. The P2P app works by enabling the user to send money to another user if their balance has sufficient funds, and from a card attached to their account.

The first thing you need to do is to add more methods to StripeHelperTrait, that you created earlier. By doing this, the user can save a credit or debit card to their account. This saved card will then be used to make a transaction, if needs be.

According to Stripe's documentation, you first need to create a Stripe SetupIntent object. This is an object that creates payment methods for future use. To do this, add the function below to app/Traits/StripeHelperTrait.php.

public function createSetupIntent($customer_id)
{
    $intent = \Stripe\SetupIntent::create([
        'customer' => $customer_id
    ]);

    return $intent->client_secret;
}

From this object, the client secret that the client-side code uses to securely process a transaction is obtained.

Notice that a $customer_id parameter is passed into the method. This parameter's value will be retrieved from the database.

You'll also need a way to get the payment card that is associated with the account. To do this, add the following method to the trait.

public function getPaymentMethods($customer_id)
{
    $payment_methods = \Stripe\PaymentMethod::all([
        'customer' => $customer_id, 
        'type' => 'card'
    ]);
    return $payment_methods;
}

Finally, you'll need a way for the credit card to be charged, if there is a card on file. This is done by creating a Stripe PaymentIntent object and providing the customer ID and payment method ID to it. To do this, add the following method to StripeHelperTrait.

public function useCard($customer_id, $amount)
{
    $card = $this->getPaymentMethods($customer_id);

    try {
        \Stripe\PaymentIntent::create([
            'amount' => $amount * 100,
            'currency' => 'usd',
            'customer' => $customer_id,
            'payment_method' => $card->data[0]->id,
            'off_session' => true,
            'confirm' => true
        ]);
    }
    catch (\Stripe\Exception\CardException $e){
        return response()->back()->with([
            'error' => 'Something went wrong. Error code: ' . $e->getMessage()
        ]);
    }
}

This completes the StripeHelperTrait. It can now be used in a controller. But before that happens, let's work on the FormRequest.

The next thing to do is to create the TransactionRequest, to make sure that:

  1. The user won't be able to send money from their balance, if there are insufficient funds.
  2. The user that the money is being sent to actually exists.
  3. The user isn't sending money to themself.

 To do that, first run the following command.

php artisan make:request TransactionRequest

The generated file, TransactionRequest.php, will be created in app/Http/Requests. Replace the generated file with the code below.

<?php

namespace App\Http\Requests;

use App\Models\User;
use App\Traits\StripeHelperTrait;
use Illuminate\Foundation\Http\FormRequest;
use Illuminate\Validation\Rule;

class TransactionRequest extends FormRequest
{
    use StripeHelperTrait;

    public function authorize()
    {
        return true;
    }

    public function rules()
    {
        return [
            'email' => [
                'required',
                'email',
                'exists:App\Models\User,email',
                Rule::notIn([auth()->user()->email])
            ],
            'amount' => ['required','numeric']
        ];
    }

    public function messages()
    {
        return [
            'email.exists' => 'This user doesn\'t exist.',
            'email.not_in' => 'You can\'t send money to yourself.'
        ];
    }

    protected function withValidator($validator)
    {
        $validator->after(function ($validator) {
            if ($this->lowBalance()){
                $validator->errors()->add(
                    'amount', 
                    'Your balance is too low to send this amount.'
                );
            }
        });
    }

    private function lowBalance()
    {
        $account = User::find(auth()->user()->id)->account;

        if (count($this->getPaymentMethods($account->customer_id)->data) > 0){
            return false;
        }
        else {
            return $account->balance < request('amount') ? true : false;
        }
    }
}

In the code above, the rules method uses Laravel's exists validator to check the submitted email address, email, against the email field in the user table in the database. If it's there, it passes. If it doesn't, the message "This user doesn't exist" is displayed.

With Laravel, you don't have to write out your error messages, but in this case, it adds a more personal touch.

It then uses the not_in rule to ensure that the supplied email address does not match the email of the authenticated user.

It then uses an After Validation Hook, which calls the lowBalance() function, immediately after all the rules have been checked. The function returns false if there is a credit card, or if the account balance is greater than the transaction amount. However, if the account balance is less than the transaction amount, it returns true, and displays an error message.

In the TransactionController (app/Http/Controllers/TransactionController.php), it uses the card on file if the balance is low, or the account balance if it's sufficient. So that this can happen, you need to update the respective balances of the sender and the receiver. To do that, replace the existing store method, with the code below.

public function store(TransactionRequest $request)
{
    $validated = $request->validated();

    $user_from = User::find(auth()->user()->id);
    $user_to = User::firstWhere('email', $validated['email']);

    // If the balance is low, use a card. Otherwise, use balance
    if ($user_from->account->balance < $validated['amount']){
        $this->useCard($user_from->account->customer_id, $validated['amount']);
        $balance_from = $user_from->account->balance;
    }
    else {
        $balance_from = $user_from->account->balance - $validated['amount'];
    }

    Transaction::create([
        'user_from' => auth()->user()->id,
        'user_to' => $user_to->id,
        'amount' => $validated['amount']
    ]);

    // Update balances
    $user_from->account->balance = $balance_from;
    $user_to->account->balance = $user_to->account->balance + $validated['amount'];

    if ($user_from->push() && $user_to->push()){
        return redirect()->back();
    }
}

Then, add the following use statements to the top of the class.

use App\Models\Transaction;
use App\Models\User;
use App\Http\Requests\TransactionRequest;
use App\Traits\StripeHelperTrait;

After that, add the following use statement inside the body of the class.

use StripeHelperTrait;

There's just one more thing on the backend that you need to do. Remember, earlier, when you created the method for making a SetupIntent? Well, you need to return one when the profile is loaded so that you can save the card against the customer.

To do this, update the AccountController's index method to match the following code:

public function index()
{
    $account = User::find(auth()->user()->id)->account;

    $secret = $this->createSetupIntent($account->customer_id);

    $payment_method = $this->getPaymentMethods($account->customer_id);

    return Inertia::render('Profile', [
        'user' => User::find(auth()->user()->id),
        'account' => $account,
        'client_secret' => $secret,
        'payment_method' => $payment_method
    ]);
}

Then, add the following use statement to the top of the file.

use App\Traits\StripeHelperTrait;

After that, add the following use statement inside the body of the class.

use StripeHelperTrait;

Add the frontend code

With the backend functionality just about done, it's time to update the frontend. First, you need to install a few important Stripe libraries for the client. To do this, run the command below.

npm install --save @stripe/react-stripe-js @stripe/stripe-js

In resources/js/Pages/Profile.js, you need to load the Elements component and loadStripe from the newly installed libraries. loadStripe will use your Stripe Publishable Key to create a Stripe Promise. This is then passed into the Elements component, which will wrap the credit card form. Finally, when the card information is entered successfully, the card form needs to disappear.

To do all this, update resources/js/Pages/Profile.js to match the following code:

import React, { useReducer, useState } from 'react'
import { Inertia } from '@inertiajs/inertia'
import {Elements} from '@stripe/react-stripe-js'
import {loadStripe} from '@stripe/stripe-js'
import Navbar from '../Components/Navbar'
import SetupForm from '../Components/SetupForm'

const formReducer = (state, event) => {
  return {
    ...state,
    [event.target.name]: event.target.value
  }
}

const stripePromise = loadStripe(process.env.MIX_STRIPE_PUBLISHABLE_KEY)

const Profile = ({ account, user, errors, client_secret, payment_method }) => {
  const [data, setData] = useReducer(formReducer, {})
  const [success, setSuccess] = useState('')
  const options = {
    clientSecret: client_secret,
  }

  function handleSubmit(e){
    e.preventDefault()

    Inertia.post(route('send-money'), data, {
      onSuccess: ({props}) => {
        setSuccess('Success!')
      }
    })
  }

  return (
    <>
      <Navbar transparent />
      <main className="profile-page">
        <section className="relative block" style={{ height: "500px" }}>
          <div
            className="absolute top-0 w-full h-full bg-center bg-cover"
            style={{
              backgroundImage:
                "url('https://images.unsplash.com/photo-1499336315816-097655dcfbda?ixlib=rb-1.2.1&ixid=eyJhcHBfaWQiOjEyMDd9&auto=format&fit=crop&w=2710&q=80')"
            }}
          >
            <span
              id="blackOverlay"
              className="w-full h-full absolute opacity-50 bg-black"
            ></span>
          </div>
          <div
            className="top-auto bottom-0 left-0 right-0 w-full absolute pointer-events-none overflow-hidden"
            style={{ height: "70px" }}
          >
            <svg
              className="absolute bottom-0 overflow-hidden"
              xmlns="http://www.w3.org/2000/svg"
              preserveAspectRatio="none"
              version="1.1"
              viewBox="0 0 2560 100"
              x="0"
              y="0"
            >
              <polygon
                className="text-gray-300 fill-current"
                points="2560 0 2560 100 0 100"
              ></polygon>
            </svg>
          </div>
        </section>
        <section className="relative py-16 bg-gray-300">
          <div className="container mx-auto px-4">
            <div className="relative flex flex-col min-w-0 break-words bg-white w-full mb-6 shadow-xl rounded-lg -mt-64">
              <div className="px-6">
                <div className="flex flex-wrap justify-center">
                  <div className="w-full lg:w-3/12 px-4 lg:order-2 flex justify-center">
                    <div className="relative">
                      <img
                        alt="..."
                        src="https://picsum.photos/400"
                        className="shadow-xl rounded-full h-auto align-middle border-none absolute -m-16 -ml-20 lg:-ml-16"
                        style={{ maxWidth: "150px" }}
                      />
                    </div>
                  </div>
                </div>
                <div className="text-center mt-24">
                  <h3 className="text-4xl font-semibold leading-normal mb-2 text-gray-800">
                    { user.name }
                  </h3>
                  <div className="text-sm leading-normal mt-0 mb-2 text-gray-500 font-bold uppercase">
                    <i className="fas fa-map-marker-alt mr-2 text-lg text-gray-500"></i>{" "}
                        <strong>Balance:</strong> ${ account.balance } 
                  </div>
                </div>
                {Object.keys(payment_method.data).length === 0 ? 
                  (
                    <div className="mt-10 py-10 border-t border-gray-300 flex justify-center">
                      <div className="w-1/2">
                        <Elements stripe={stripePromise} options={options}>
                            <SetupForm />
                        </Elements>
                      </div>
                    </div>
                  ) :
                  (
                    <div className="mt-10 py-10 border-t border-gray-300">
                      <div className="text-center">Card available</div>
                    </div>
                  )
                }
                <div className="mt-10 py-10 border-t border-gray-300 text-center">
                  <div className="flex justify-center">
                      <form className="w-full max-w-sm" onSubmit={handleSubmit}>
                          {success && <p className="mb-6 text-green-700 font-bold">{ success }</p>}
                          <div className="mb-6">
                              <div className="md:flex md:items-center">
                                <div className="md:w-1/3">
                                <label className="block text-gray-500 font-bold md:text-right mb-1 md:mb-0 pr-4" htmlFor="inline-full-name">
                                    Email
                                </label>
                                </div>
                                <div className="md:w-2/3">
                                    <input 
                                      className={`${Object.keys(errors).length > 0 && errors.email ? 'border-red-500' : 'border-gray-200'} bg-gray-200 appearance-none border-2 rounded w-full py-2 px-4 text-gray-700 leading-tight focus:outline-none focus:bg-white focus:border-purple-500`} 
                                      type="text" 
                                      name="email" 
                                      placeholder="person@example.net" 
                                      onChange={setData}
                                    />
                                </div>
                              </div>
                              {Object.keys(errors).length > 0 ?
                                (<span className="font-medium tracking-wide text-red-500 text-xs mt-1 ml-1">
                                  { errors.email }
                                </span>) : null
                              }
                          </div>
                          <div className="mb-6">
                              <div className="md:flex md:items-center">
                                <div className="md:w-1/3">
                                <label className="block text-gray-500 font-bold md:text-right mb-1 md:mb-0 pr-4" htmlFor="inline-password">
                                    Amount
                                </label>
                                </div>
                                <div className="md:w-2/3 flex">
                                    <span className="leading-10 mr-2">$</span>
                                    <input 
                                      className={`${Object.keys(errors).length > 0 && errors.amount ? 'border-red-500' : 'border-gray-200'} bg-gray-200 appearance-none border-2 rounded w-full py-2 px-4 text-gray-700 leading-tight focus:outline-none focus:bg-white focus:border-purple-500`} 
                                      type="text" 
                                      name="amount" 
                                      placeholder="3.00"
                                      onChange={setData}
                                    />
                                </div>
                              </div>
                              {Object.keys(errors).length > 0 ?
                                (<span className="font-medium tracking-wide text-red-500 text-xs mt-1 ml-1">
                                  { errors.amount }
                                </span>) : null
                              }
                          </div>
                          <div className="flex justify-center">
                              <button 
                                className="shadow bg-purple-500 hover:bg-purple-400 focus:shadow-outline focus:outline-none text-white font-bold py-2 px-4 rounded" 
                                type="submit"
                              >
                                  Send
                              </button>
                          </div>
                      </form>
                  </div>
                </div>
              </div>
            </div>
          </div>
        </section>
      </main>
    </>
  )
}
export default Profile

Now, you need to include the PaymentElement that is needed to build the form in SetupForm.js. To do that, go to resources/js/Components/ and create a new file named SetupForm.js. Then, copy the code below into the newly created file.

import React, { useState } from 'react'
import { useStripe, useElements, PaymentElement } from '@stripe/react-stripe-js'

const SetupForm = () => {
   const stripe = useStripe()
   const elements = useElements()
   
   const [errorMessage, setErrorMessage] =  useState(null)

    async function handleSubmit(event){
        event.preventDefault()

        if (!stripe || !elements){
            // Stripe.js has not yet loaded.
            // Make sure to disable form submission until Stripe.js has loaded.
            return
        }

        const response = await stripe.confirmSetup({
            elements,
            redirect: 'if_required',
            confirmParams: {
                return_url: 'http://localhost:8000/profile'
            }
        })

        if (response.error){
            setErrorMessage(response.error.message)
        }
        else {
            window.location.reload(true)
        }
    }
    return (
        <form onSubmit={handleSubmit}>
            <PaymentElement />
            <button disabled={!stripe}>Submit</button>
            {errorMessage && <div>{errorMessage}</div>}
        </form>
    )
}

export default SetupForm

You don't need to worry about creating custom fields or handling input as Stripe will do that automatically for you. When the card is successfully submitted, JavaScript will reload the page.

Specifically, in the code above, redirect is set to if_required. For many payment methods, Stripe will take the user to different pages on their website to complete the setup and then redirect the user back to the URL set in the redirect property. To keep things simple and prevent redirects, it is set to if_required.

With all of the frontend components created, compile them by running the following command.

npm run dev

Test the app

It's time to play around with your new app. First, start the application by running the following command in the root directory of your project.

php artisan serve

Then, go to http://localhost:8000, where you should see the default Laravel landing page. The links for logging in and registering should be at the top right. Click the register link.

The customized Laravel home page
Register an account

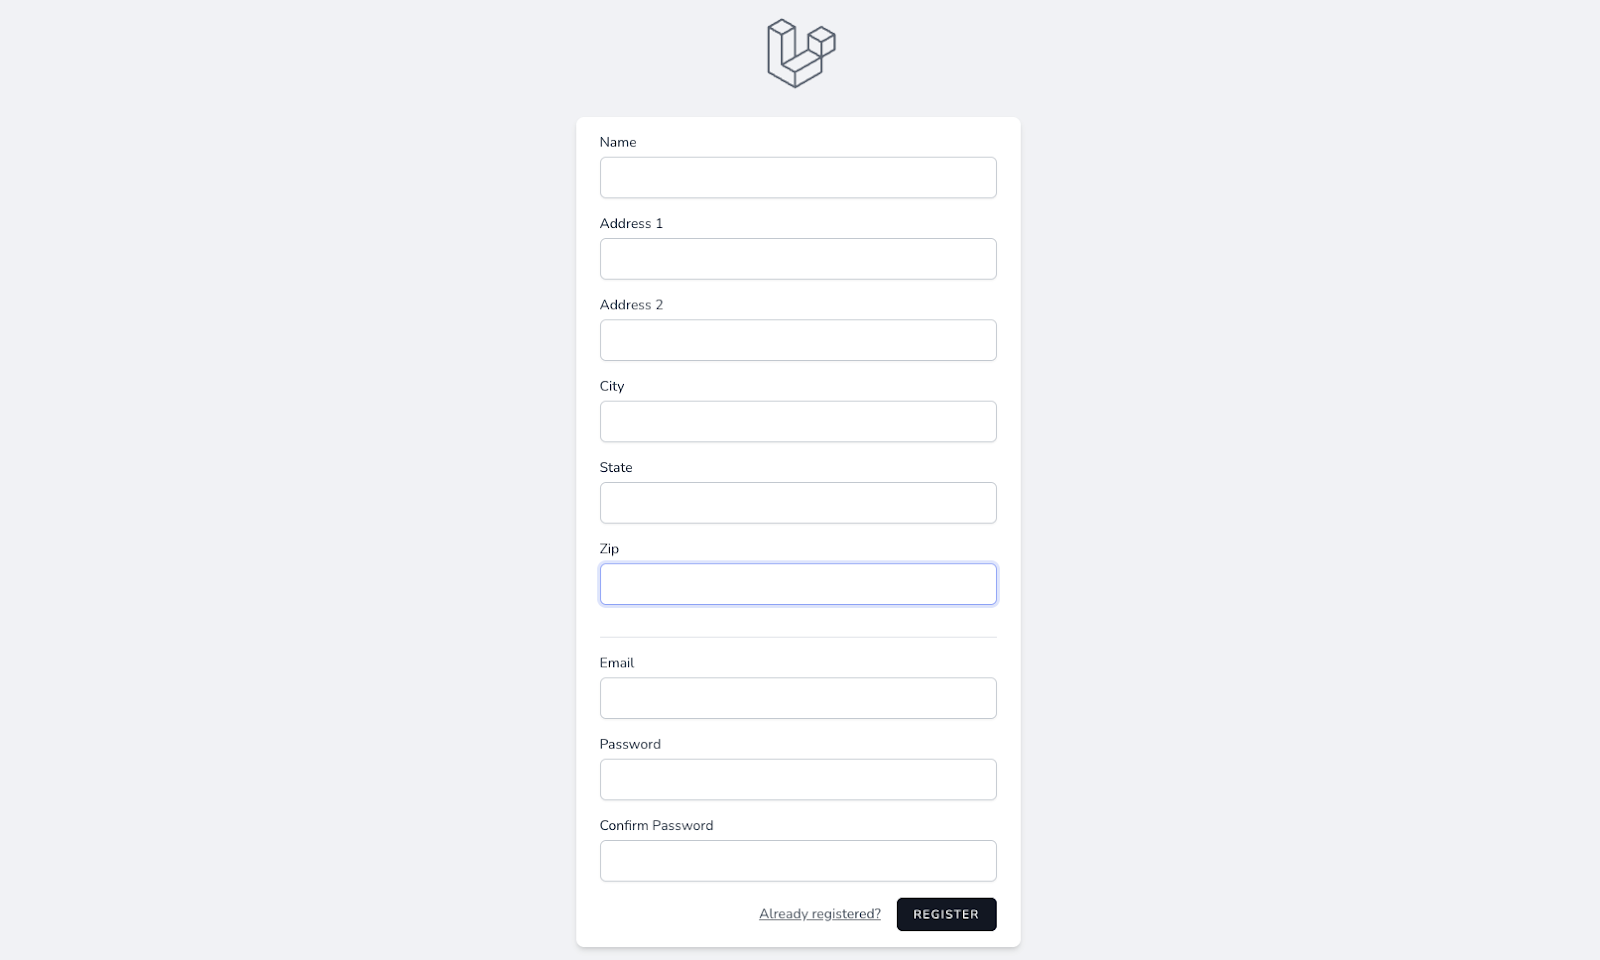
Once you're on the registration page, input information into all the fields. The only field that is optional is Address 2. After successful completion, click on the Register button which will take you to the Profile page.

Register the receiver

Next, using a different browser, or a new Private/Incognito browser tab/window with the same browser, repeat the previous steps to register an account for the receiver.

Register the sender's credit card

Register the sender"s credit card

In the sender's browser window/tab, register a credit card. Stripe offers a myriad of test cards that you can use when testing transactions. However, use 4242 4242 4242 4242 to register a Visa card. For the expiry date and CVC (Card Verification Value/Code) numbers, use whatever values that you like.

Card successfully registered

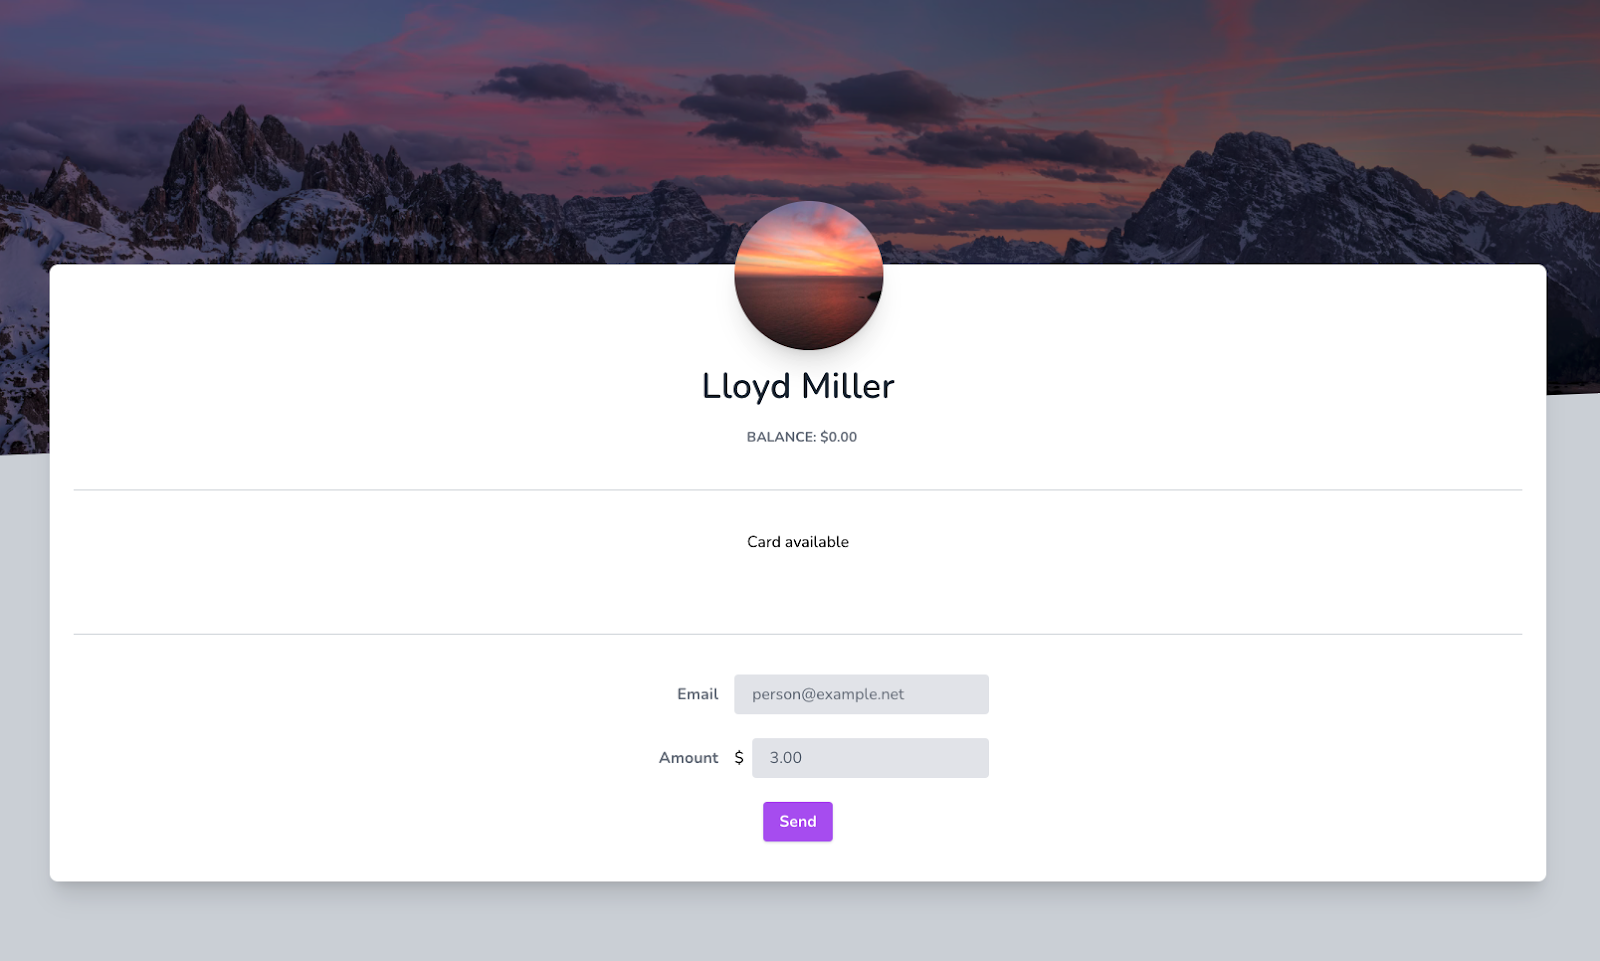
After you've filled in the form, click Submit. After submission, the page should refresh, and it should show "Card available", if successful.

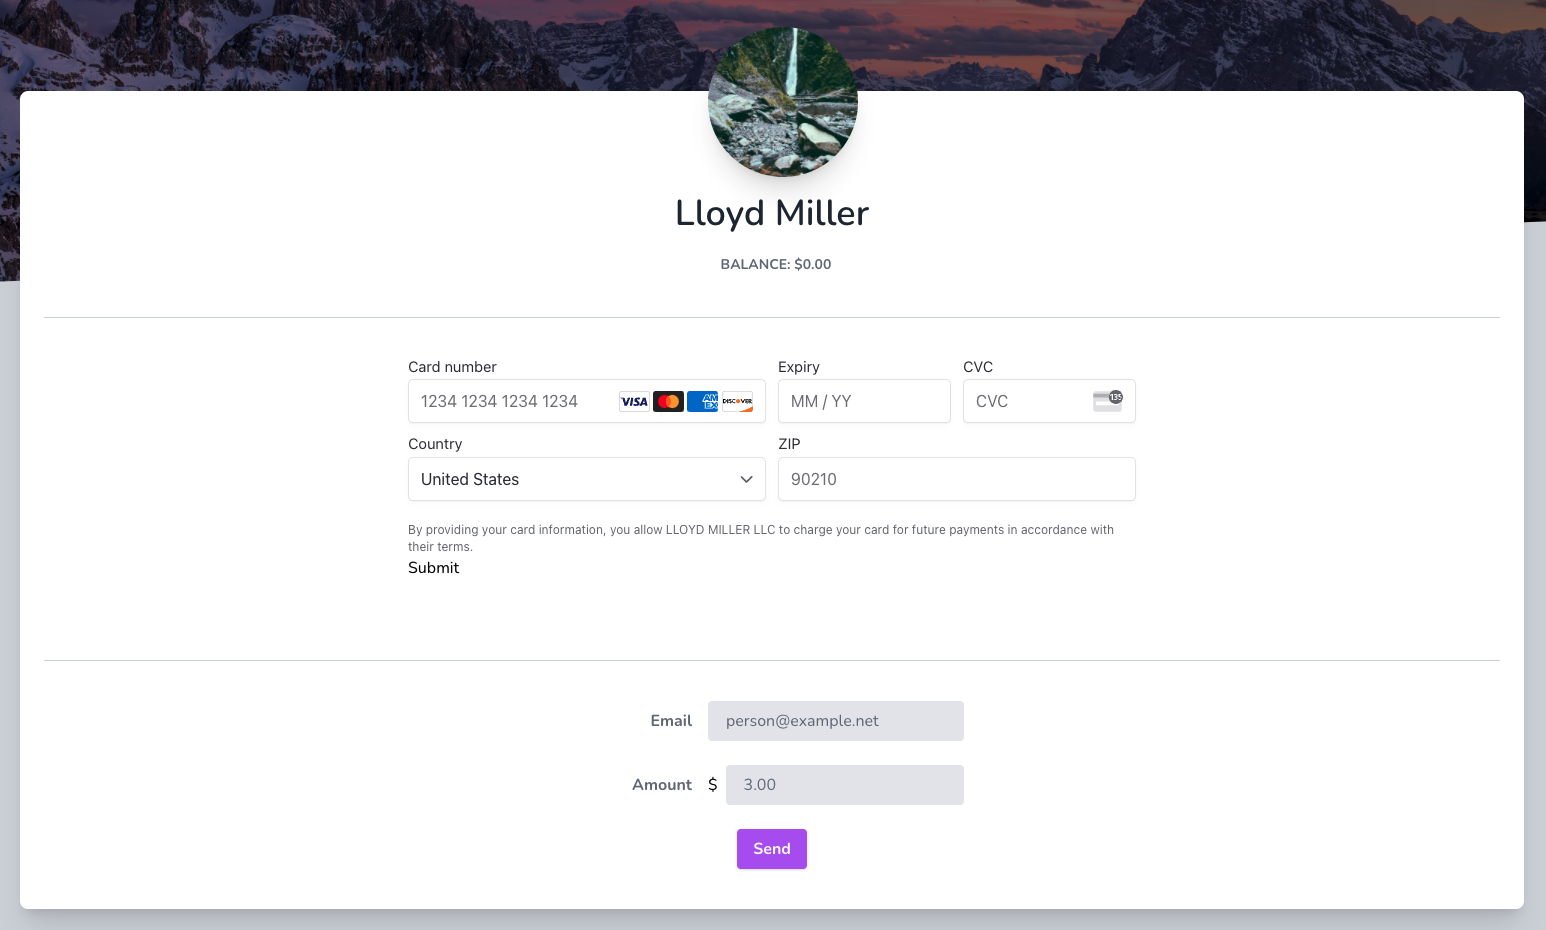
Send funds to the receiver

Successfully sent funds to the receiver

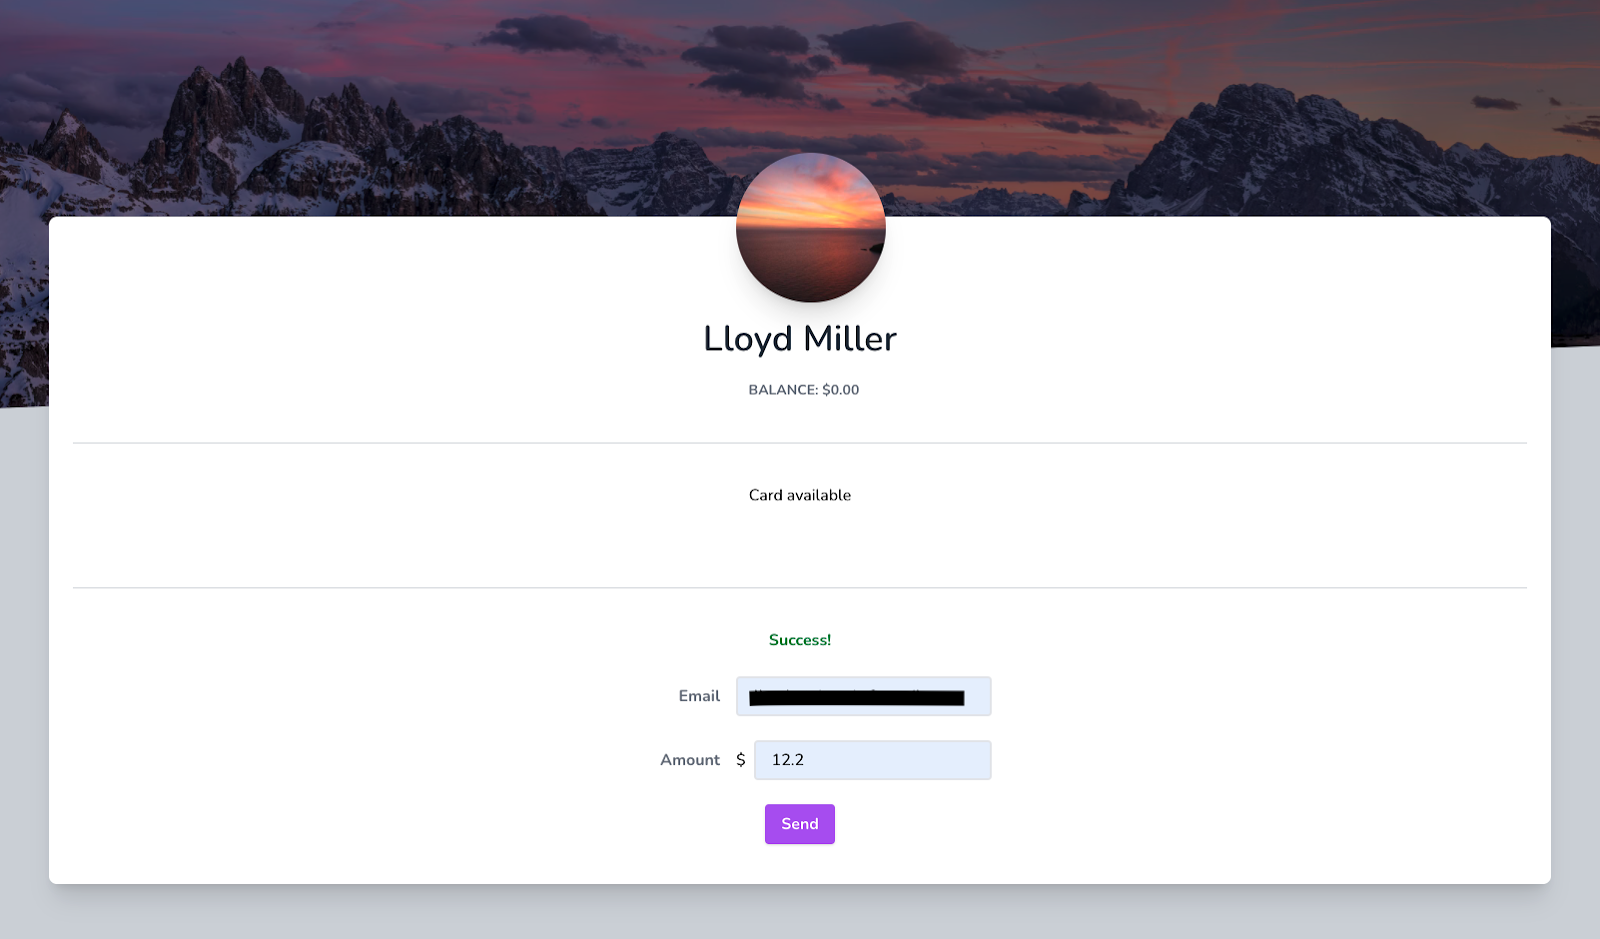
Finally, it's time to send funds to the receiver. Enter the email address of the receiver, set an amount larger than your available Stripe balance for the amount to send, and click Send. The page should refresh and a ‘Success' message should be visible above the form, as you can see in the screenshot below.

If you like, continue playing around with the app by sending money from an account that doesn't have a card set up, or try to send money to an account that doesn't exist. There should be validation errors in both scenarios.

Conclusion

You've just learned the very basics of creating a P2P payment application that can be readily expanded if you want. With Twilio's API, you can send an SMS every time a transaction is made. Of course, you'll need to collect phone numbers to do that. You could also show a history of transactions by creating a hasMany relationship between the User model and Transaction.

What makes coding a huge project like this a Breeze on Laravel is that it takes care of so many authentication issues, setting it apart from many other frameworks out there.

Lloyd Miller is a freelance full-stack web developer based in New York. He enjoys creating customer-facing products with Laravel and React, and documenting his journey through blog posts at https://blog.lloydmiller.dev