How to Create a WebSocket Server in PHP with Ratchet for Real-Time Applications
Time to read:
October 24, 2019
Written by
When WebSockets are discussed, PHP is rarely included in the conversation due to its lack of native support. Additionally, Apache, the HTTP server PHP normally runs on, is not built with persistent connections in mind which forces the responsibility of implementation onto 3rd party libraries.
While there have been great attempts to bring PHP into the discussion of “real-time” development, most have paled in comparison to the Ratchet project; a PHP WebSocket library for serving real-time bi-directional messages between clients and server.
In this tutorial, we will be using Ratchet with PHP to learn how to create a simple WebSocket server that processes messages sent from an HTML form in real time. Our form will display a single <input> and <button> to send a message to all client browsers. Every time the user sends a message their message will be displayed in real time on the other screens.
This sample application is built on the standard basis for modern chat applications and will get you started with building your own WebSocket-based application.
What are WebSockets?
Websockets are low-latency (or fast), persistent connections between a server and one or more clients. Unlike AJAX requests, WebSockets are bi-directional (push-pull), meaning that both the client and server can listen to each other in real-time and respond to any changes.
Tools Needed to Complete This Tutorial
In order to complete this tutorial, the following prerequisites are needed:
- PHP 7+ installed locally
- Composer for storing our application dependencies
- ngrok for creating a tunnel to our client-side application
Create our Application Directory and Files
In your terminal, run the following commands to generate the project directory and all required files:
Be sure to navigate back to the project root directory.
NOTE: If you’d like to skip ahead, the full source code is available here.
Setup the Composer Project and Include Ratchet
Our application will use Composer to manage the dependencies and provide autoloading functionality. We’ve already created the composer.json file needed to store our dependencies for Ratchet. In your favorite IDE, open the file and add the following code to include Ratchet.
Notice that this declaration uses the PSR-4 protocol for our autoloader, and maps MyApp to the app folder that we generated in our project setup. This namespace will be used in subsequent steps to include our project classes. As required by default, our composer.json utilizes the require key to specify the Ratchet package in our project.
Now that our composer.json is set up, we need to actually install the dependencies. Run the following command in your terminal to do so. Make sure that you are inside the project root folder.
Create the WebSocket Class
We’re now ready for some code! Return to your IDE and open app/socket.php. This file will house the class needed to implement how connections to our WebSocket server are handled. Paste the following code as shown below:
The MessageComponentInterface is an abstract class and therefore requires that we implement all four methods onOpen, onMessage, onClose, and onError, whether we actually use them or not. Here’s a brief summation of the responsibilities of each method:
onOpen - This method allows us to respond to when a new connection is made to our server. This could be used to store the connection ID in a database, cross-reference it with another service, or—as in our case—store the connection in a collection of clients.
onMessage - Probably the most important part of our application, this method actually handles the message or data sent to our server. Notice that, in addition to capturing the $msg, it also accepts the $from parameter so our application can decide what to do based on which client is connected. In our example, we’re simply sending each message to every client in real-time. We’re also making sure that we do not send the message back to the client who sent it.
onClose - As the name suggests, this method will fire if a connection is closed by the client.
onError - This method fires if there is an error thrown by our connection.
Create the HTTP Server
At this point, we have successfully created all of the logic needed to process incoming connections to our server. The last piece we need to implement is the HttpServer that will listen to port 8080. Open the file app.php and add the following code:
As you can see above, the $server object contains our HTTP server, generated by our Socket() and a WebSocket server WsServer and is assigned to port 8080. This file is what we’ll execute from the command line to activate our server.
Create the Client Application
The last item we need to create is the actual browser application. This simple page will contain a <textarea> that captures keystrokes and sends them to the WebSocket. Take a look at the code below and paste it into index.html.
Our client-side application is simple. It establishes a WebSocket connection to our server at ws://localhost:8080 and, when the “Send” button is pressed, the message is sent to the server. The cool part is that once the message is received it’s broadcasted back to each client using an alert() containing the contents of the message.
Test the WebSocket Server
In your terminal, start the WebSocket server by running:
In a separate terminal run ngrok to expose the HTTP server to the internet.
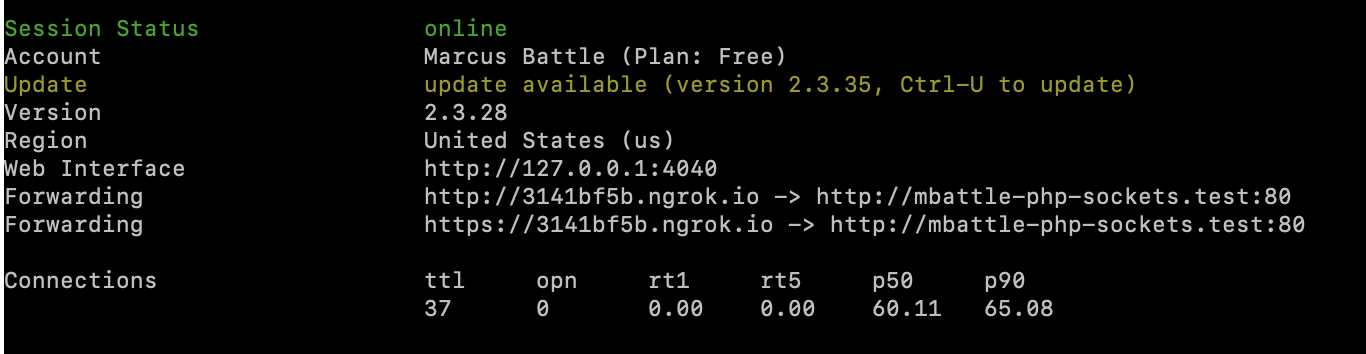
Copy the HTTPS Forwarding address and paste it into two separate browser windows. Type a message in each input and press the “Send” button. It will trigger the alert in each separate window.
Conclusion
I’m pretty excited about what we’ve built—and you should be too! This tutorial proves we can actually implement WebSockets in PHP!
If you’re at all familiar with PHP, you know we can’t leave this script running as-is: Once the connection is closed, the server ceases to exist.
Marcus Battle is the PHP Developer of Technical Content at Twilio. He is committed to prompting and rallying PHP developers across the world to build the future of communications. He can be reached on Twitter at @themarcusbattle and via email.


Related Resources
Twilio Docs
From APIs to SDKs to sample apps
API reference documentation, SDKs, helper libraries, quickstarts, and tutorials for your language and platform.
Resource Center
The latest ebooks, industry reports, and webinars
Learn from customer engagement experts to improve your own communication.
Ahoy
Twilio's developer community hub
Best practices, code samples, and inspiration to build communications and digital engagement experiences.