Create a Real-Time Twitter Stream in PHP using Pusher and Laravel

July 11, 2020
Written by
Ankit Jain
Contributor
Opinions expressed by Twilio contributors are their own
Reviewed by

Create a Real-Time Twitter Stream App in PHP using Pusher and Laravel.png

Introduction

Laravel is one of the most famous PHP MVC frameworks, largely due to its commitment to modern architecture and active community. Laravel 7, the latest release, has added the coolest new features like Blade-X, Stubs, Cache optimization, and much more.

Pusher is the hosted service that enables developers to add real time data and functionality easily and securely by taking care of all the heavy lifting under the hood.

Laravel supports Pusher integration very gracefully, which makes it very easy for developers to add real-time functionality to their application. In this tutorial, we will be using Twitter APIs to fetch tweets based on a specific hashtag, and create a dashboard to display them in real-time using Pusher.

How does Pusher work?

Pusher uses Channels to provide real-time communication between the server and the client. What are these Channels? Pusher Channels are based on the popular Publish/Subscribe Model. In the publish-subscribe model, senders (called publishers) don’t send messages directly to receivers (called subscribers), they send messages into a specific categorized channel without knowledge of the subscribers. Anyone who is a subscriber to that specific channel will get the message.

Pusher acts as a proxy and sits in between the client and the server. It maintains the persistent connection to the clients over WebSockets and HTTP if the browser doesn’t support WebSockets. The server sends data directly to Pusher through HTTP which Pusher then forwards to the client over WebSockets. This is how Pusher accomplishes real-time communication.

Requirements

To complete this tutorial you will need the following:

  1. PHP development environment with Laravel installed
  2. Composer globally installed
  3. Pusher Account
  4. Twitter Developer Account
  5. Passion :D

Set Up a New Laravel Project

If you don’t have Laravel installed in your system, a quick download from the Laravel Official Documentation will get you started. A setup guide can be found in the Laravel docs.

Let’s start with setting up a new Laravel project named pusher-tweets. Remember, you can give your project any name you want. Run the following command in your terminal to begin:

$ laravel new pusher-tweets && cd pusher-tweets

This will install Laravel v7.0, along with all the dependencies required by it. Composer post-create scripts automatically create the .env file for us and set the APP_KEY environment variable. If you’re unaware, the .env provides secure, non-cacheable storage of our application security credentials.

Add the APP_KEY in the .env file by running this command, if it is not configured automatically.

$ php artisan key:generate

Add the Tweets Page

Let’s add the frontend where we will integrate pusher for real-time communication to exchange data related to the latest tweets. I have coded a small frontend for tweets which you can find also find on codepen “Twitter gradient animation card”.

Sample tweet display

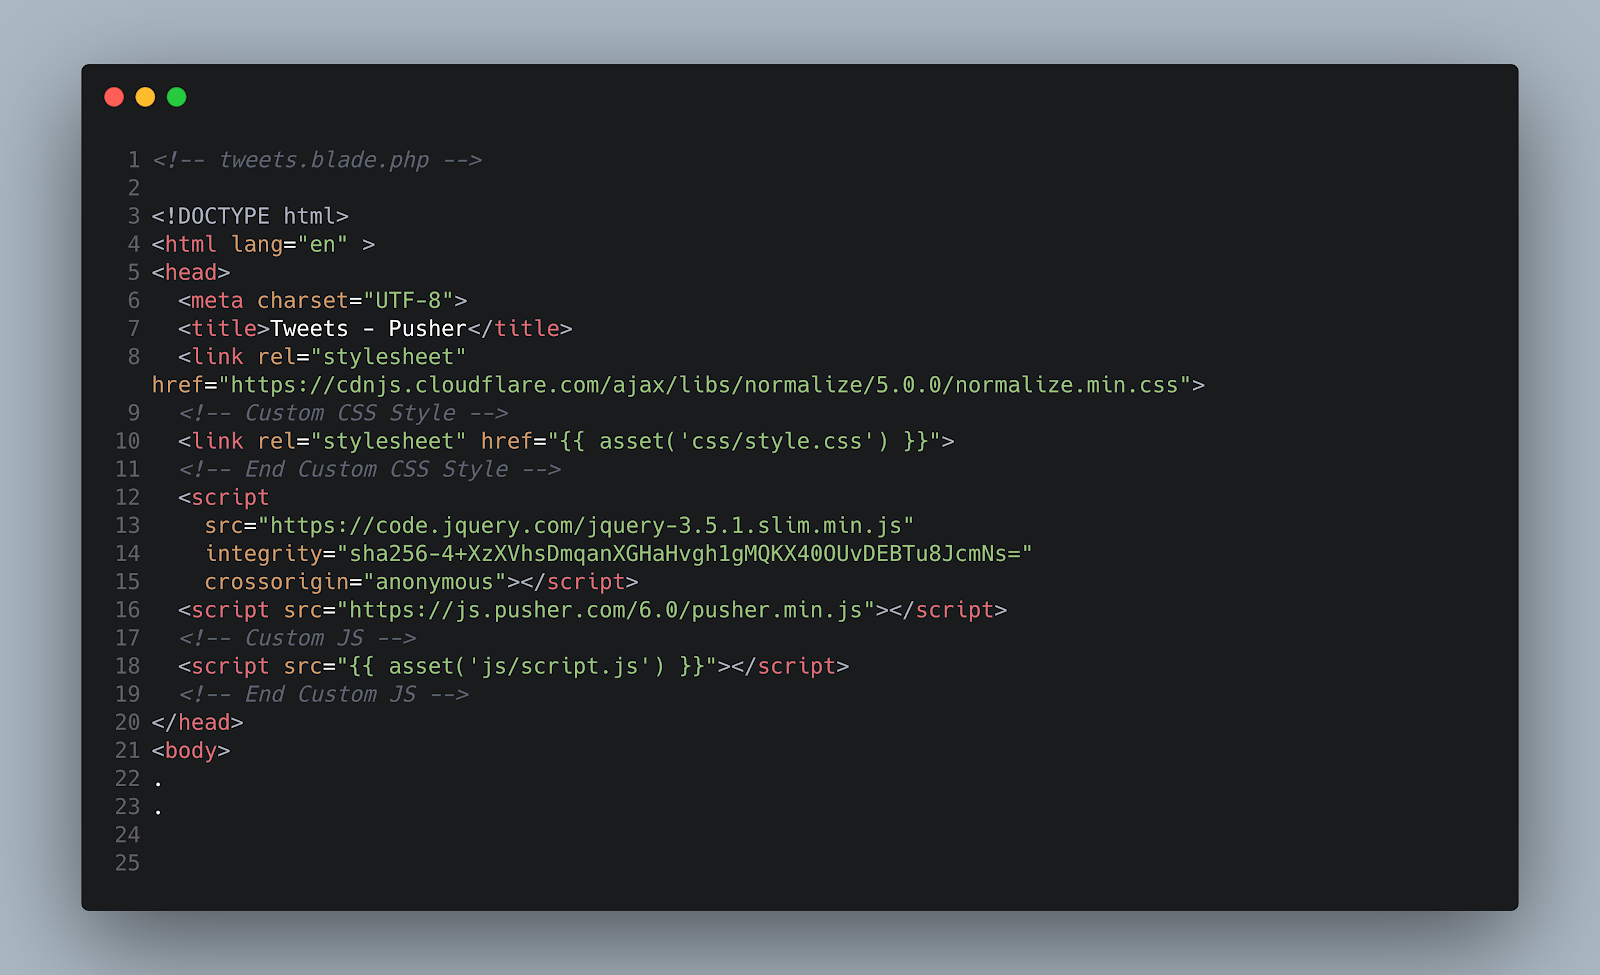
Create a new file tweets.blade.php under resources/views directory and copy and paste the code below.

<!DOCTYPE html>
<html lang="en" >
<head>
  <meta charset="UTF-8">
  <title>Tweets - Pusher</title>
  <link rel="stylesheet" href="https://cdnjs.cloudflare.com/ajax/libs/normalize/5.0.0/normalize.min.css">
  <!-- Custom CSS Style -->
  <link rel="stylesheet" href="{{ asset('css/style.css') }}">
  <!-- End Custom CSS Style -->
  <script
    src="https://code.jquery.com/jquery-3.5.1.slim.min.js"
    integrity="sha256-4+XzXVhsDmqanXGHaHvgh1gMQKX40OUvDEBTu8JcmNs="
    crossorigin="anonymous"></script>
  <!-- <script src="https://js.pusher.com/6.0/pusher.min.js"></script> -->
  <!-- Custom JS -->
  <!-- <script src="{{ asset('js/script.js') }}"></script> -->
  <!-- End Custom JS -->
  <script
    src="https://code.jquery.com/jquery-3.5.1.slim.min.js"
    integrity="sha256-4+XzXVhsDmqanXGHaHvgh1gMQKX40OUvDEBTu8JcmNs="
    crossorigin="anonymous"></script>
  <!-- Custom JS -->
  <script src="{{ asset('js/script.js') }}"></script>
  <!-- End Custom JS -->
</head>
<body>
<!-- partial:index.partial.html -->
<link href="https://stackpath.bootstrapcdn.com/bootstrap/4.5.0/css/bootstrap.min.css" rel="stylesheet" integrity="sha384-9aIt2nRpC12Uk9gS9baDl411NQApFmC26EwAOH8WgZl5MYYxFfc+NcPb1dKGj7Sk" crossorigin="anonymous">

<div class="tweet-box">
  <!-- Tweet Header -->
  <div class="tweet-header">
    <img src="https://pbs.twimg.com/profile_images/1105665448891211776/-iXpFwHB_400x400.jpg" alt="" class="tweet-user-image">
    <div class="tweet-header-info">
      <span class="tweet-user-name"> Ankit Jain</span> <span class="tweet-username grey"> @ankitjain28may </span> <span class="tweet-user-time grey"> · May 25 </span>
      <div class="tweet-body-text" style="width:460px;"></div>
      <div class="tweet-body-text"></div>
      <div class="tweet-body-text"></div>
    </div>
  </div>
  <!-- End Tweet Header -->

  <!-- Tweet Image -->
  <div class="tweet-body-image wrap">
    <div class="tweet-img"></div>
  </div>
  <!-- End Tweet Image -->

  <!-- Tweet Reaction -->
  <div class="tweet-reaction wrap">
    <div class="tweet-reaction-comment">
      <svg viewBox="0 0 24 24">
        <g>
          <path d="M14.046 2.242l-4.148-.01h-.002c-4.374 0-7.8 3.427-7.8 7.802 0 4.098 3.186 7.206 7.465 7.37v3.828c0 .108.044.286.12.403.142.225.384.347.632.347.138 0 .277-.038.402-.118.264-.168 6.473-4.14 8.088-5.506 1.902-1.61 3.04-3.97 3.043-6.312v-.017c-.006-4.367-3.43-7.787-7.8-7.788zm3.787 12.972c-1.134.96-4.862 3.405-6.772 4.643V16.67c0-.414-.335-.75-.75-.75h-.396c-3.66 0-6.318-2.476-6.318-5.886 0-3.534 2.768-6.302 6.3-6.302l4.147.01h.002c3.532 0 6.3 2.766 6.302 6.296-.003 1.91-.942 3.844-2.514 5.176z"></path>
        </g>
      </svg>
      <div class="count">397</div>
    </div>
    <div class="tweet-reaction-retweet mover">
      <svg viewBox="0 0 24 24">
        <g>
          <path d="M23.77 15.67c-.292-.293-.767-.293-1.06 0l-2.22 2.22V7.65c0-2.068-1.683-3.75-3.75-3.75h-5.85c-.414 0-.75.336-.75.75s.336.75.75.75h5.85c1.24 0 2.25 1.01 2.25 2.25v10.24l-2.22-2.22c-.293-.293-.768-.293-1.06 0s-.294.768 0 1.06l3.5 3.5c.145.147.337.22.53.22s.383-.072.53-.22l3.5-3.5c.294-.292.294-.767 0-1.06zm-10.66 3.28H7.26c-1.24 0-2.25-1.01-2.25-2.25V6.46l2.22 2.22c.148.147.34.22.532.22s.384-.073.53-.22c.293-.293.293-.768 0-1.06l-3.5-3.5c-.293-.294-.768-.294-1.06 0l-3.5 3.5c-.294.292-.294.767 0 1.06s.767.293 1.06 0l2.22-2.22V16.7c0 2.068 1.683 3.75 3.75 3.75h5.85c.414 0 .75-.336.75-.75s-.337-.75-.75-.75z"></path>
        </g>
      </svg>
      <div class="count">397</div>
    </div>
    <div class="tweet-reaction-like mover">
      <svg viewBox="0 0 24 24">
        <g>
          <path d="M12 21.638h-.014C9.403 21.59 1.95 14.856 1.95 8.478c0-3.064 2.525-5.754 5.403-5.754 2.29 0 3.83 1.58 4.646 2.73.814-1.148 2.354-2.73 4.645-2.73 2.88 0 5.404 2.69 5.404 5.755 0 6.376-7.454 13.11-10.037 13.157H12zM7.354 4.225c-2.08 0-3.903 1.988-3.903 4.255 0 5.74 7.034 11.596 8.55 11.658 1.518-.062 8.55-5.917 8.55-11.658 0-2.267-1.823-4.255-3.903-4.255-2.528 0-3.94 2.936-3.952 2.965-.23.562-1.156.562-1.387 0-.014-.03-1.425-2.965-3.954-2.965z"></path>
        </g>
      </svg>
      <div class="count">1</div>
    </div>
    <div class="tweet-reaction-comment mover">
      <svg viewBox="0 0 24 24">
        <>
          <path d="M17.53 7.47l-5-5c-.293-.293-.768-.293-1.06 0l-5 5c-.294.293-.294.768 0 1.06s.767.294 1.06 0l3.72-3.72V15c0 .414.336.75.75.75s.75-.336.75-.75V4.81l3.72 3.72c.146.147.338.22.53.22s.384-.072.53-.22c.293-.293.293-.767 0-1.06z"></path>
          <path d="M19.708 21.944H4.292C3.028 21.944 2 20.916 2 19.652V14c0-.414.336-.75.75-.75s.75.336.75.75v5.652c0 .437.355.792.792.792h15.416c.437 0 .792-.355.792-.792V14c0-.414.336-.75.75-.75s.75.336.75.75v5.652c0 1.264-1.028 2.292-2.292 2.292z"></path>
          </g>
      </svg>
    </div>
  </div>
  <!-- End Tweet Reaction -->
</div>
<!-- partial -->
</body>
</html>

We have added the asset reference for custom CSS and JS on line 8 and 16 in the code above. We can also see that on lines 14, 16, reference to JS is commented. We will uncomment that, later on while integrating with Pusher at the client-side.

Let’s now add the assets to the public directory.

In the public/css folder create a new file style.css. Copy the code below into your style.css file. You will need to create the css folder inside of the public directory.

body {
    background: #1d2d3d !important;
  }

  .tweet-box {
    background: #15202b;
    max-width: 650px;
    margin: 0 auto;
    margin-top: 50px;
    border-radius: 3px;
    padding: 30px;
    border-bottom: 1px solid #15202b;
    border-top: 1px solid #15202b;
    color: #fff;
    animation: mymove 5s infinite;
  }

  .wrap {
    margin-top: 20px;
    padding: 0 60px;
  }

  .tweet-header {
    display: flex;
    align-items: flex-start;
    font-size: 14px;
  }

  .tweet-user-image {
    border-radius: 100px;
    width: 48px;
    margin-right: 15px;
  }

  .tweet-user-name {
    font-size: 16px;
    font-weight: 800;
    padding: 0px;
    margin: 0px;
  }

  .grey {
    color: #83888D;
  }

  .tweet-body-image img {
    max-width: 100%;
  }

  .tweet-body-text {
    animation-duration: 1s;
    animation-fill-mode: forwards;
    animation-iteration-count: infinite;
    animation-name: animate;
    animation-timing-function: linear;
    background: #15202b;
    background: linear-gradient(to right, #1d2d3d 8%, #15202b 38%, #1d2d3d 54%);
    background-size: 1000px 640px;
    height: 12px;
    max-width: 470px;
    position: relative;
    border-radius: 1px;
    margin: 5px 0;
  }


  .tweet-body-image div {
    height: 280px;
    max-width: 470px;
    animation-duration: 1s;
    animation-fill-mode: forwards;
    animation-iteration-count: infinite;
    animation-name: animate;
    animation-timing-function: linear;
    background: #15202b;
    background: linear-gradient(to right, #1d2d3d 8%, #15202b 38%, #1d2d3d 54%);
    background-size: 1000px 640px;
    position: relative;
    border-radius: 2px;
  }

  .tweet-reaction div {
     display: inline-block;
  }

  .tweet-reaction svg {
    width: 20px;
    height: 20px;
    fill: white;
  }

  .tweet-reaction .count {
    color: white;
    display: inline;
    padding-left: 3px;
  }

  .mover {
    margin-left: 15%;
  }

  @keyframes animate {
    0% {
      background-position: -468px 0;
    }
    100% {
      background-position: 468px 0;
    }
  }

Awesome, let’s now add the route for the tweets.

Create Route for Tweets

Implementing Authentication in Laravel is very simple, as everything is already configured for us out of the box. We are not putting this route behind Authentication for demo purposes, so we don’t need to set up the database.

NOTE: I highly recommend using authentication for production, or before making the application live to keep the data safe.

Open the web.php file under the routes folder and add the following code:

Route::get('/tweets', function() {
    return view('tweets');
});

We can check whether everything is working perfectly or not by running our application with a simple Artisan command. Make sure that you’re in the project root and run this command to start your local server:

$ php artisan serve

The Laravel development server will run at http://localhost:8000. Open the browser and navigate to this URL http://localhost:8000/tweets. You should see something similar to the screenshot below:

Sample tweet placeholder

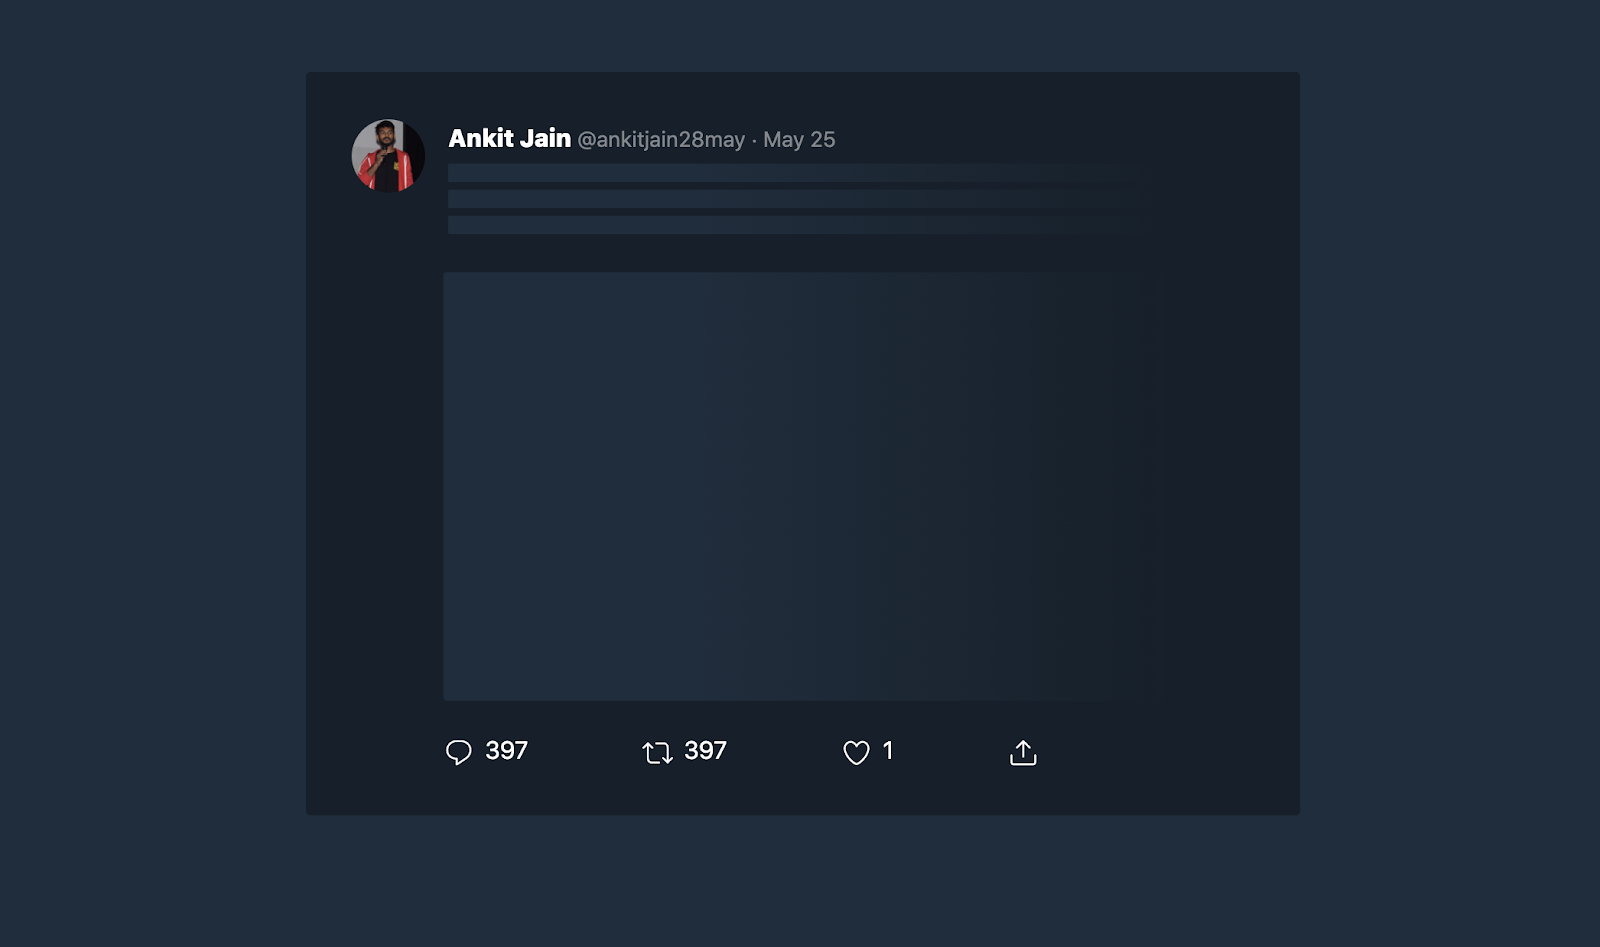
Our client-side is almost ready and working fine. Let’s add the next part; fetching tweets from Twitter using Twitter APIs.

Setting up the Twitter API

We will be using the laravel-twitter-streaming-api composer package to easily integrate Twitter Streaming API with Laravel.

Install the package by running the following command inside the pusher-tweets directory.

composer require spatie/laravel-twitter-streaming-api

php artisan vendor:publish --provider="Spatie\LaravelTwitterStreamingApi\TwitterStreamingApiServiceProvider" --tag="config"

Once the Composer package is installed and the config has been created, we need to add the following environment variables in the .env file.

TWITTER_ACCESS_TOKEN=
TWITTER_ACCESS_TOKEN_SECRET=
TWITTER_CONSUMER_KEY=
TWITTER_CONSUMER_SECRET=

In order to obtain the credentials above, we need to create a new developer app called “Pusher Tweets” in the Twilio Developer dashboard. You can read more about creating an app from the Twitter Official Page.

The “Consumer API keys” and “Access token & access token secret” will be generated after your app is created, as shown in the image below:

Twilio Access token

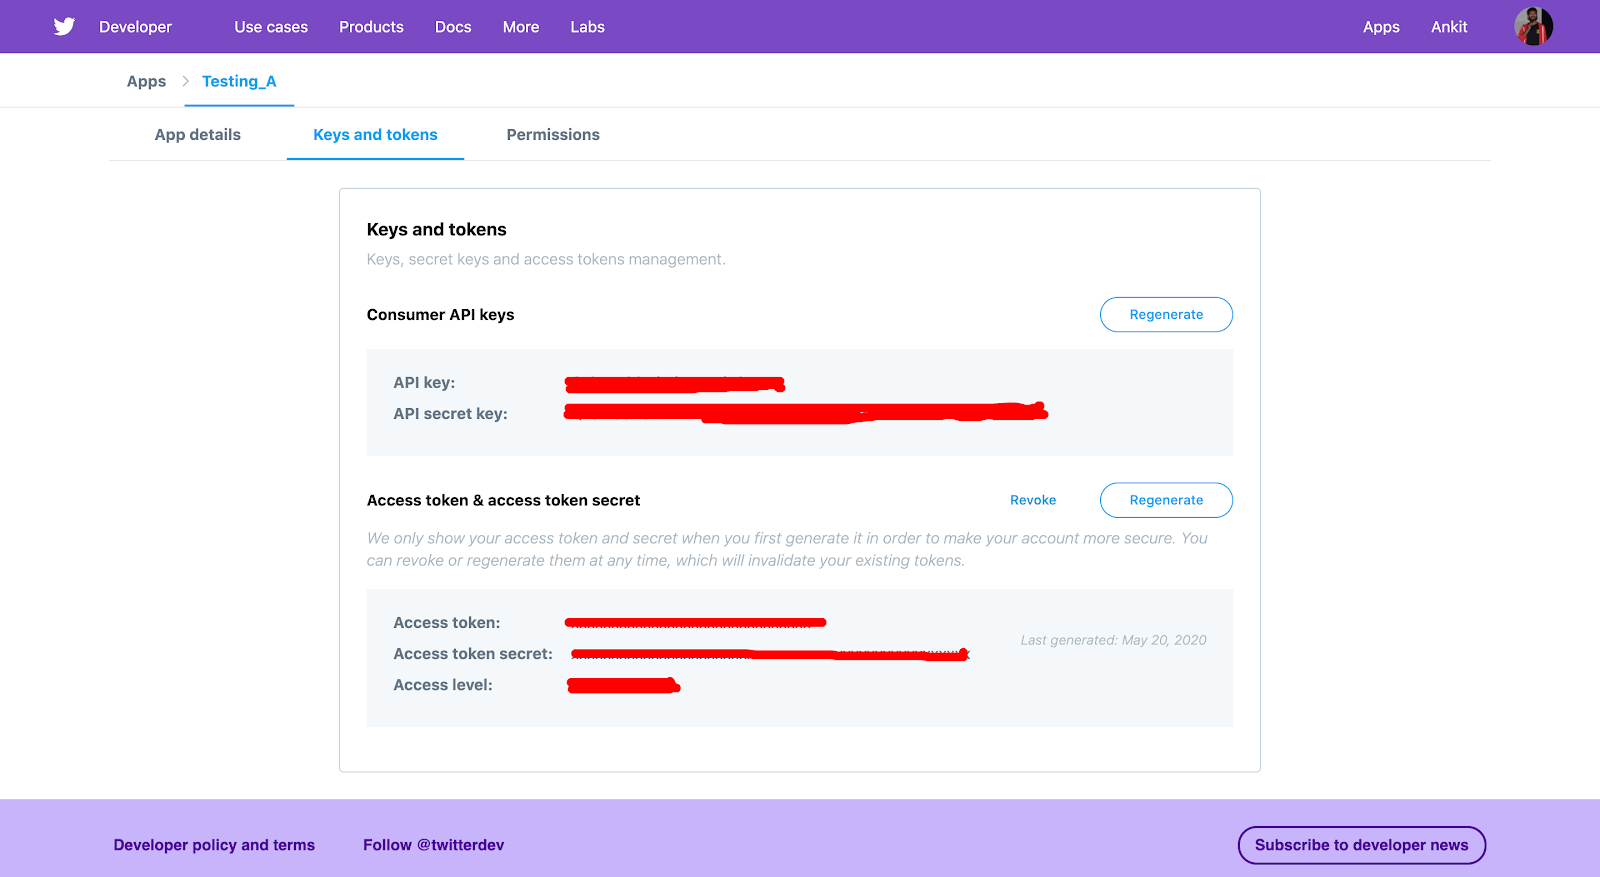
Now that these credentials have been generated, copy their values to the .env as outlined in the previous step.

Let’s continue to the next part of writing functionality to fetch tweets in real-time using the above composer package. For this, we will be creating a console command to run independent to our Laravel application.

Creating a Console Command

By default, all of the console commands for our application are stored in the app/Console/Commands directory. If the app/Console/Commands directory doesn't exist, it will be created when we run the make:command Artisan command. We can generate the TweetStream Class using the following Artisan CLI:

$ php artisan make:command TweetsStream

Let’s add the code to stream the tweets in real-time in the TweetsStream.php file created in the app/Console/Commands directory.


<?php

namespace App\Console\Commands;

use Illuminate\Console\Command;
use TwitterStreamingApi;

class TweetsStream extends Command
{
    /**
     * The name and signature of the console command.
     *
     * @var string
     */
    protected $signature = 'tweets:stream';

    /**
     * The console command description.
     *
     * @var string
     */
    protected $description = 'Stream the tweets';

    /**
     * Create a new command instance.
     *
     * @return void
     */
    public function __construct()
    {
        parent::__construct();
    }

    /**
     * Execute the console command.
     *
     * @return mixed
     */
    public function handle()
    {
        TwitterStreamingApi::publicStream()
            ->whenHears('#twilio', function(array $tweet) {
                $tweet_data = [
                    'text' => $tweet['text'],
                    'user_name' => $tweet['user']['screen_name'],
                    'name' => $tweet['user']['name'],
                    'profile_image_url_https' => $tweet['user']['profile_image_url_https'],
                    'retweet_count' => $tweet['retweet_count'],
                    'reply_count' => $tweet['reply_count'],
                    'favorite_count' => $tweet['favorite_count'],
                ];
                if (isset($tweet['extended_tweet'])) {
                    $tweet_data['text'] = $tweet['extended_tweet']['full_text'];
                }

                if (isset($tweet['created_at'])) {
                    $tweet_data['date'] = date("M d", strtotime($tweet['created_at']));
                }

                if (isset($tweet['extended_entities']['media'][0]['media_url'])) {
                    $tweet_data['image'] = $tweet['extended_entities']['media'][0]['media_url'];
                }
                var_dump($tweet_data);
            })
            ->startListening();
    }
}

In the code above, we will be listening for hashtag “#twilio”, we can listen to as many hashtags as we want and pass them as a comma (,) separated string into the TwitterStreamingApi::publicStream()->whenHears() function.

When we generate any console command using Artisan, it adds our command to the php artisan usage list. Run the console command to test:

$ php artisan tweets:stream

I made the dummy tweet “Hello World #twilio” to test it out. Write your own tweet using the #twilio hashtag and monitor the output. You should see something similar to what is shown in the image below:

Twitter stream

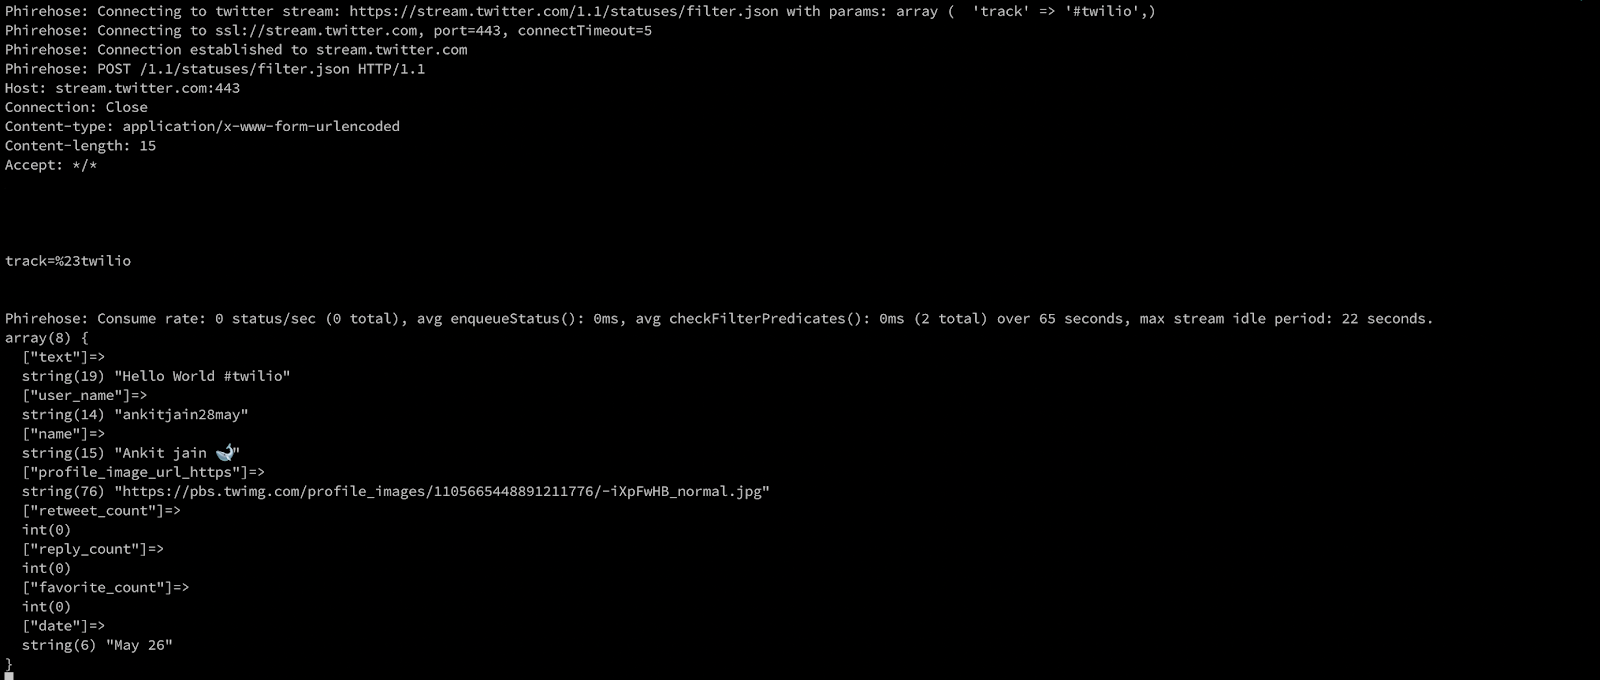
If this is working then everything is going as expected. Now let’s integrate Pusher within our application to render tweets in real time.

Create a Pusher Channel

As a reminder to our introduction,Pusher uses channels for real-time data communication. We will leverage this logic to build out the next steps.

Login to Pusher and create a new pusher channel app as shown in the image below:

Pusher dashboard

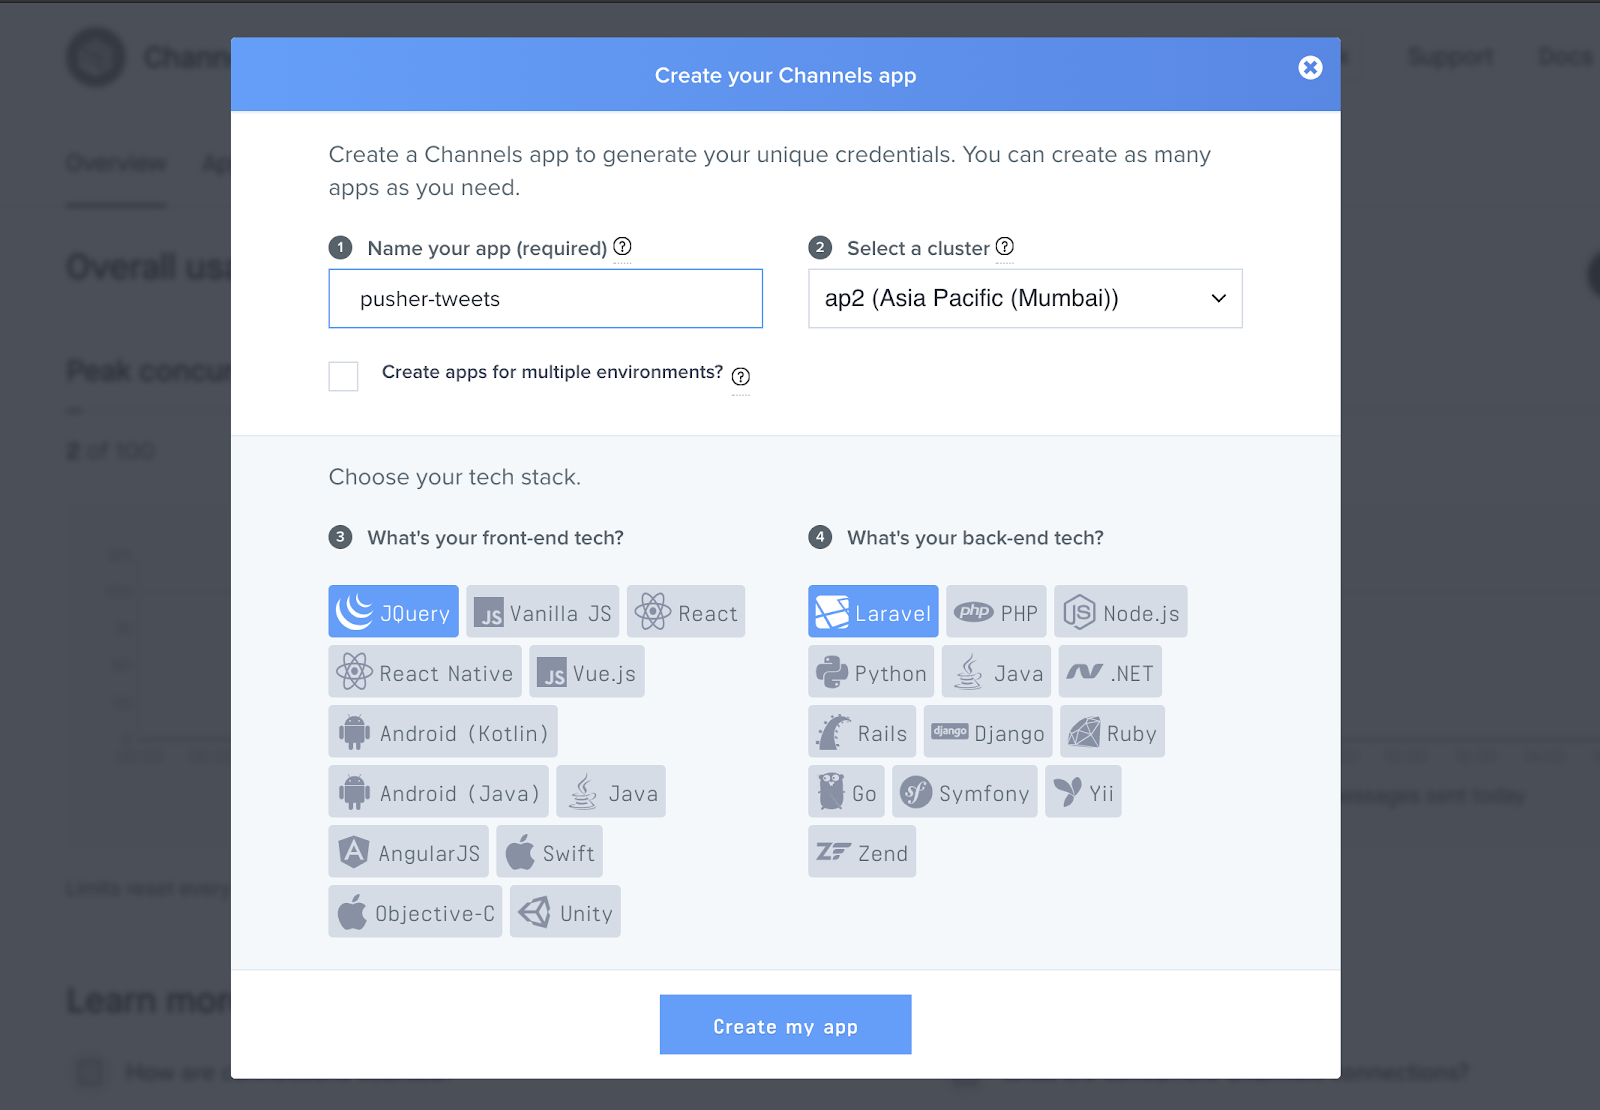
Once we create a channel app, we will get the “Pusher App ID, App Key, App Secret, and App Cluster”. Open your .env file and replace the values respectively.

PUSHER_APP_ID=
PUSHER_APP_KEY=
PUSHER_APP_SECRET=
PUSHER_APP_CLUSTER=

Let’s go back to our tweets.blade.php where we have commented lines 14 and 16. Uncomment those lines and subscribe to “tweets” event in “pusher-tweets” channel as shown in the image below:

Code example

Next in the public/js folder create a new file script.js. Copy the code below into your script.js file.

// Enable pusher logging - don't include this in production
Pusher.logToConsole = true;

var pusher = new Pusher('PUSHER_APP_KEY', {
    cluster: 'PUSHER_APP_CLUSTER'
});

var channel = pusher.subscribe('pusher-tweets');
channel.bind('tweets', function(data) {
    $(".tweet-header img").prop("src", data['tweet']['profile_image_url_https']);
    $("span.tweet-user-name").text(data['tweet']['name']);
    $("span.tweet-username").text("@" + data['tweet']['user_name']);
    $("span.tweet-user-time").text(". " + data['tweet']['date']);

    // Removing the elements
    $(".tweet-header-info p").remove();
    $(".tweet-body-text").remove();
    $(".tweet-body-image div").remove();

    ele = $("<p></p>");
    $(ele).text(data['tweet']['text']);
    $(".tweet-header-info span").last().append(ele);

    $(".tweet-reaction-comment .count").text(data['tweet']['reply_count'])
    $(".tweet-reaction-retweet .count").text(data['tweet']['retweet_count'])
    $(".tweet-reaction-like .count").text(data['tweet']['favorite_count'])

    if (data['tweet']['image']) {
        $(".tweet-body-image").html("");
        image = $("<img>").addClass('tweet-img');
        $(image).prop("src", data['tweet']['image']);
        $(".tweet-body-image").append(image);
    } else {
        $(".tweet-body-image").html("");
    }
});

Make sure to replace the PUSHER_APP_KEY and PUSHER_APP_CLUSTER placeholders with the appropriate values as seen in your .env.

In JavaScript, we have subscribed to the channel “pusher-tweets” and bound the “tweets” event so that any data sent to this channel with this particular event will be available to us directly at client-side in real-time.

With the data, we will be doing some DOM (Document Object Model) manipulation like updating the image, username, name, date, and user reaction.

Awesome! We have now integrated the Pusher channel at the client-side. We will also need to do the same in our Laravel Application in order to broadcast our tweet data.

Broadcasting Tweets Data

Laravel supports the integration of Pusher using Events out of the box. Let’s install the Composer package for Pusher by running the following command:

$ composer require pusher/pusher-php-server

If we check the config/broadcasting.php file, we can see that multiple drivers like "pusher", "redis", "log", "null" are supported by Laravel for the broadcasting of events. Let’s set the driver to Pusher by setting this environment variable as follows:

BROADCAST_DRIVER=pusher

Let’s create an event class named “Tweets”. We can generate the Tweets Class using the following Artisan CLI command:

$ php artisan make:event Tweets

Open the newly created Tweets.php file, located in the directory app/Events. Add the following code:

<?php

namespace App\Events;

use Illuminate\Broadcasting\Channel;
use Illuminate\Broadcasting\InteractsWithSockets;
use Illuminate\Broadcasting\PresenceChannel;
use Illuminate\Broadcasting\PrivateChannel;
use Illuminate\Contracts\Broadcasting\ShouldBroadcast;
use Illuminate\Foundation\Events\Dispatchable;
use Illuminate\Queue\SerializesModels;

class Tweets implements ShouldBroadcast
{
    use Dispatchable, InteractsWithSockets, SerializesModels;

    /**
     * Contains the tweets data
     *
     * @var array
     */
    public $tweet;

    /**
     * Create a new event instance.
     *
     * @return void
     */
    public function __construct($tweet)
    {
        $this->tweet = $tweet;
    }

    /**
     * Get the channels the event should broadcast on.
     *
     * @return \Illuminate\Broadcasting\Channel|array
     */
    public function broadcastOn()
    {
        return new Channel('pusher-tweets');
    }

    /**
     * Broadcasting with the name of event
     *
     * @return void
     */
    public function broadcastAs()
    {
        return 'tweets';
    }
}

In the Events Class above, we have defined the channel which our application will publish the events to, the name of the events, and the data that we will be broadcasting. In Laravel, we can broadcast the message simply by using the broadcast() function.

The next important step is to modify the console command to broadcast the Tweet data.

Open the TweetsStream.php file in app/Console/Command directory and add the following code in place of var_dump at line 63.

.
.
broadcast(new Tweets($tweet_data))->toOthers();
.
.

Our file TweetsStream.php will look like this:


<?php

namespace App\Console\Commands;

use Illuminate\Console\Command;
use TwitterStreamingApi;
use App\Events\Tweets;

class TweetsStream extends Command
{
    /**
     * The name and signature of the console command.
     *
     * @var string
     */
    protected $signature = 'tweets:stream';

    /**
     * The console command description.
     *
     * @var string
     */
    protected $description = 'Stream the tweets';

    /**
     * Create a new command instance.
     *
     * @return void
     */
    public function __construct()
    {
        parent::__construct();
    }

    /**
     * Execute the console command.
     *
     * @return mixed
     */
    public function handle()
    {
        TwitterStreamingApi::publicStream()
            ->whenHears('#twilio', function(array $tweet) {
                $tweet_data = [
                    'text' => $tweet['text'],
                    'user_name' => $tweet['user']['screen_name'],
                    'name' => $tweet['user']['name'],
                    'profile_image_url_https' => $tweet['user']['profile_image_url_https'],
                    'retweet_count' => $tweet['retweet_count'],
                    'reply_count' => $tweet['reply_count'],
                    'favorite_count' => $tweet['favorite_count'],
                ];
                if (isset($tweet['extended_tweet'])) {
                    $tweet_data['text'] = $tweet['extended_tweet']['full_text'];
                }

                if (isset($tweet['created_at'])) {
                    $tweet_data['date'] = date("M d", strtotime($tweet['created_at']));
                }

                if (isset($tweet['extended_entities']['media'][0]['media_url'])) {
                    $tweet_data['image'] = $tweet['extended_entities']['media'][0]['media_url'];
                }
                broadcast(new Tweets($tweet_data))->toOthers();
            })
            ->startListening();
    }
}

Congratulations!. You have completed integrating Pusher with your Laravel Application to communicate Tweet data in real-time. Let’s test it out.

Testing

Open two terminals. One for running the Laravel development server and one for running the console command. Run these commands in each terminal respectively.

# Development Server
php artisan serve

# Console command
php artisan tweets:stream

Laravel Development server will run at http://localhost:8000 so let’s open the browser and browse http://localhost:8000/tweets.

Let’s add more hashtags so we can have more data before running our console command. In TweetStream.php, replace #twilio with  #covid19.

It will look similar to this:

Tweet stream example

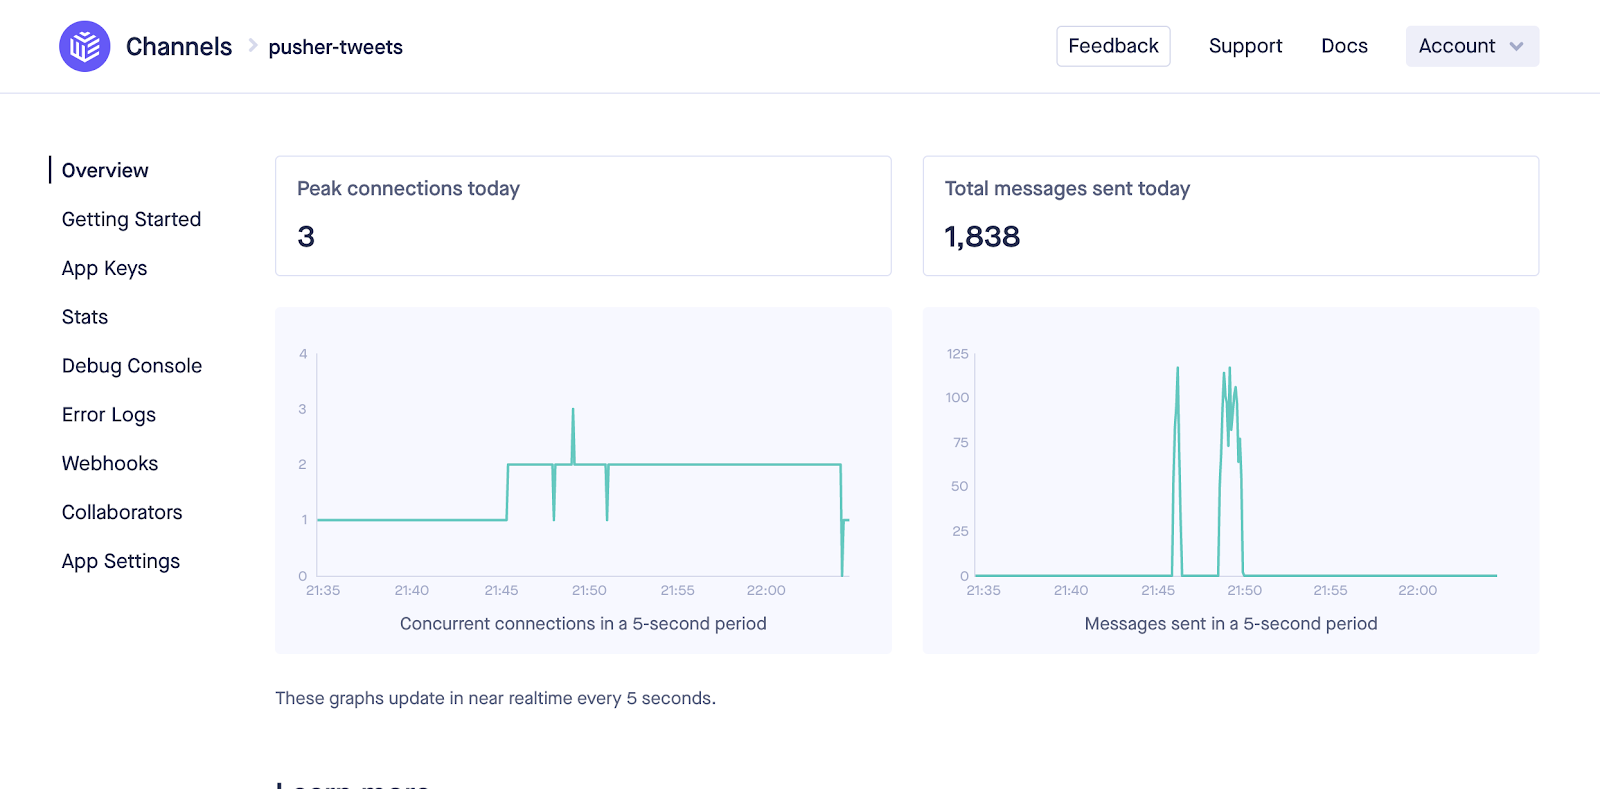
As you can see, our page is now updating with the latest tweets in real-time. We can check the overview page on the Pusher Dashboard for the messages/data that we have sent using pusher.

Pusher data

Conclusion

In this article, we learned how to use Pusher for real-time data communication with Laravel. With Pusher, we can do more like add some visualizations and update the graph in real-time, sending messages. We can also extend this to add features like sentimental analysis of user tweets to predict something based on user’s tweets and generate reports.

The complete code for the tutorial can be found on GitHub repo → pusher-tweets

Feel free to comment and ask me anything.

You can reach me at ankitjain28may77@gmail.com and follow me on Twitter @ankitjain28may. You can also read more of my articles on Medium @ankitjain28may.

Thanks for reading!