Do you like scary movies? Build a Halloween Project with Twilio
Time to read: 5 minutes
October 28, 2022
Written by
Reviewed by

Halloween is right around the corner, which means it's time to prepare a costume, stock up on treats, create fun DIY projects with Twilio, and think of ways to scare friends and family.
In this blog post, I will teach you how to build a spooky Halloween IVR (Interactive Voice Response) project using Twilio Studio, our low-code/no-code application builder with drag and drop widgets.

After you’ve built this program, you can use it to scare your friends & family. I’m sure you’ll get some reactions like this:

Want to try it out yourself? Make sure your phone isn’t set to Do Not Disturb, then send a text message to +1(844) 497-3678. But beware, it’s creepy.
This blog post is structured as follows:
- Prerequisites: Things you need before continuing
- Twilio Studio Flow: Create a Flow, then build our project with drag and drop widgets
- Twilio Assets: Upload static files for our Studio Flow
- Twilio Studio Widgets: Continue building our project with Studio Widgets
Prerequisites
Before getting started, it’s important to have the following before moving on:
- A free or paid Twilio account. If you haven’t yet, sign up for a free Twilio account.
- A Twilio phone number.
- A phone that can receive phone calls.
Twilio Studio Flow
Twilio Studio is a visual tool you can use to build communication projects with little or no code. Within Studio, we will create a Flow, which represents workflows that you build.
To create a new Flow:
- Log into your Twilio account in the Twilio Console.
- Navigate to the Studio Flows section in the Console.
- Click Create new Flow or the + icon underneath the Flows heading to create a new Flow.
- Name your Flow. For this project, let’s name it Do you like scary movies? Then, click Next.
- Select the Start from scratch option. Then click Next.
Now we can start building our project by dragging and dropping Widgets onto the Canvas.
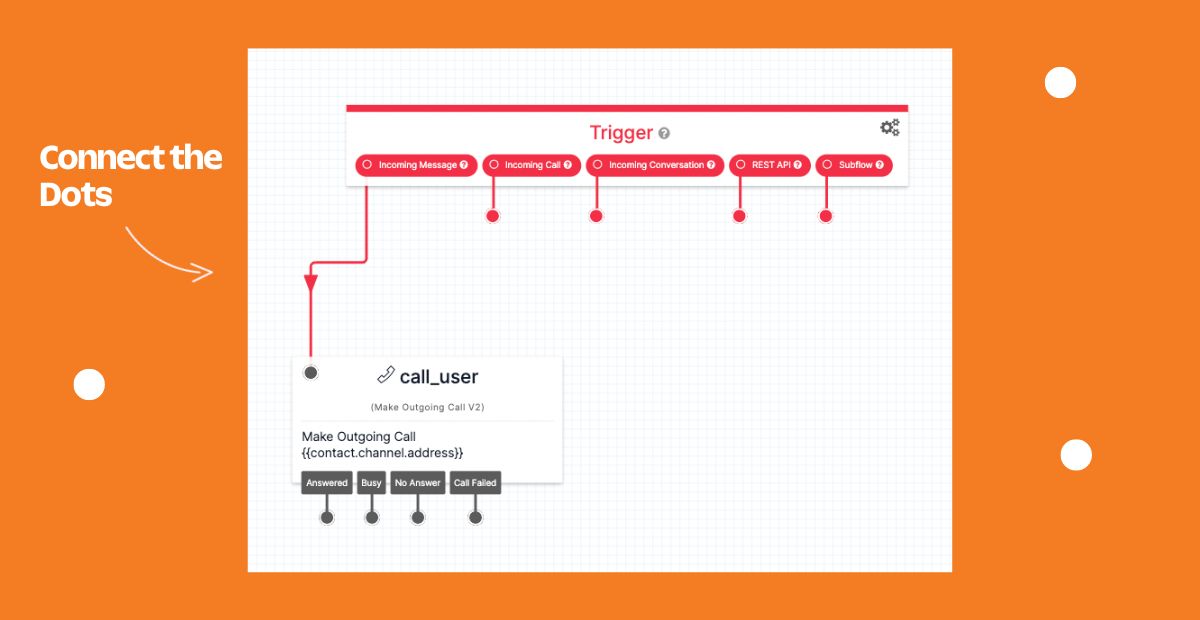
We want our project to make a phone call to the user after they send a text message to our Twilio phone number. To build this, drag and drop the Make Outgoing Call Widget onto the Canvas. Then, from the Trigger Widget, draw the Transition from Incoming Message to the Make Outgoing Call Widget.
At this stage, if we Publish the Flow to test our changes, things wouldn’t work immediately. We’d need to configure a Twilio phone number to connect to this Studio Flow.
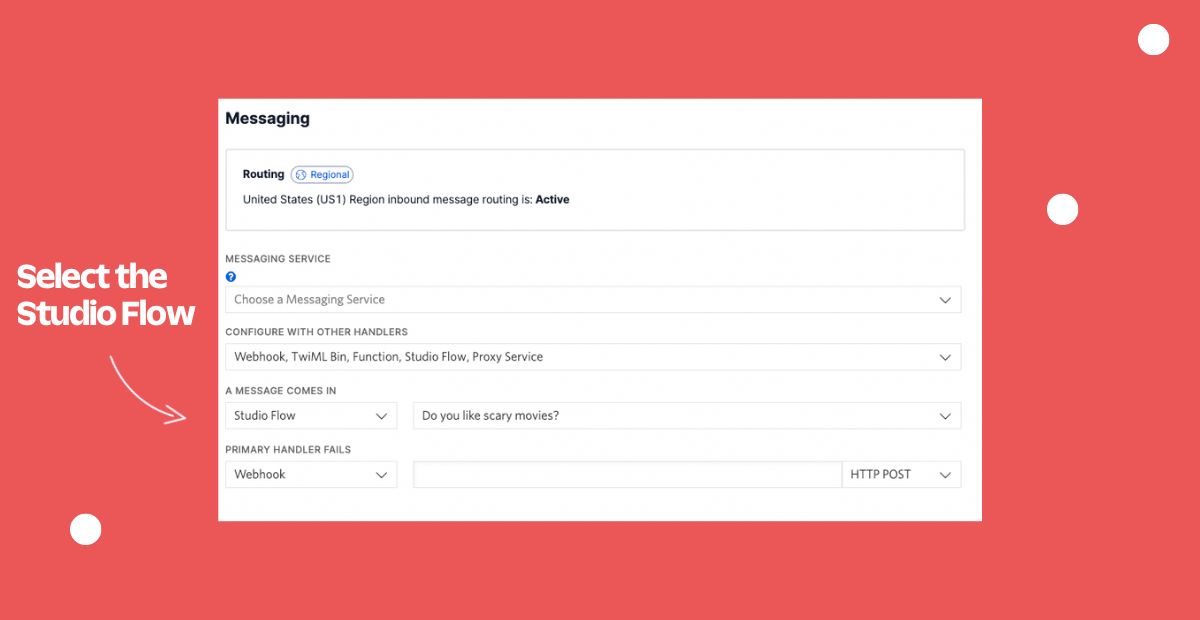
Navigate to the Active Numbers section of the Twilio Console and click on your Twilio number. Scroll down to the Messaging section and configure your number to when A Message Comes In, by selecting the dropdown option “Studio Flow”. You'll see another dropdown menu appear where you can select the Studio Flow you'd like to connect to when a message comes in to this number, in this case Do you like scary movies?
When texting the Twilio phone number you just configured, it should now make an outgoing call to the same phone number.
From here, we’d like for our program to listen to the caller and interact with them. To start, within our Flow we can drag and drop another Widget onto the Canvas. Let’s use the Gather Input on Call Widget and have it connect from the Answered option from our Make Outgoing Call Widget.
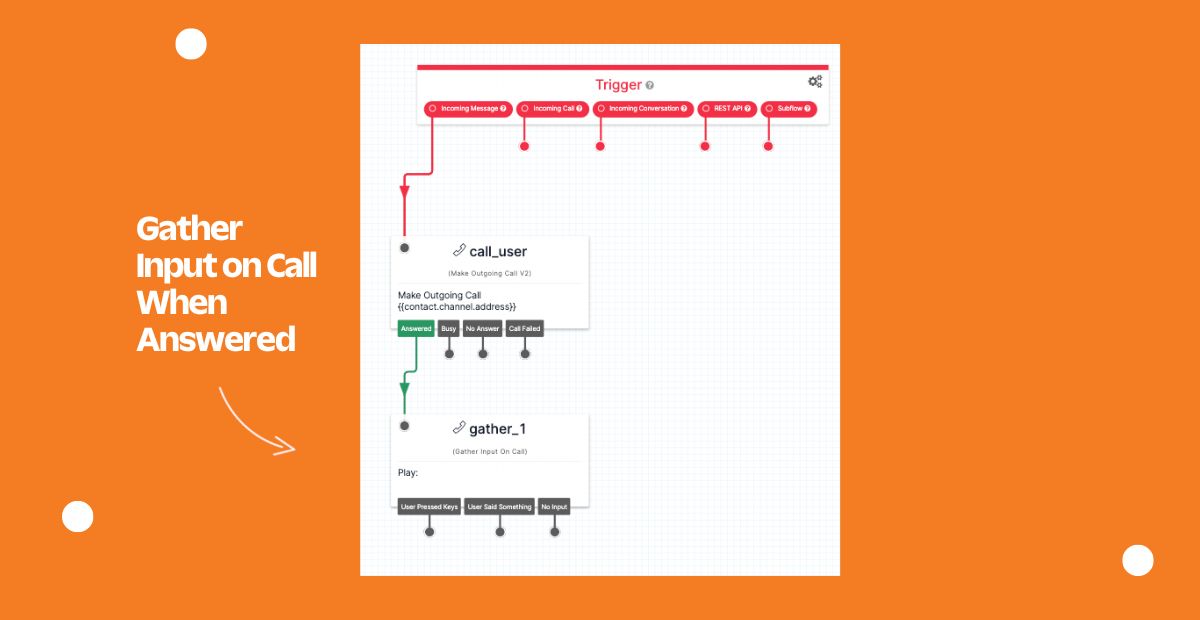
The Gather Input On Call Widget (which we just used) allows you to gather a user’s input while they are on a call. This data can then be shared to another Widget for other operations.
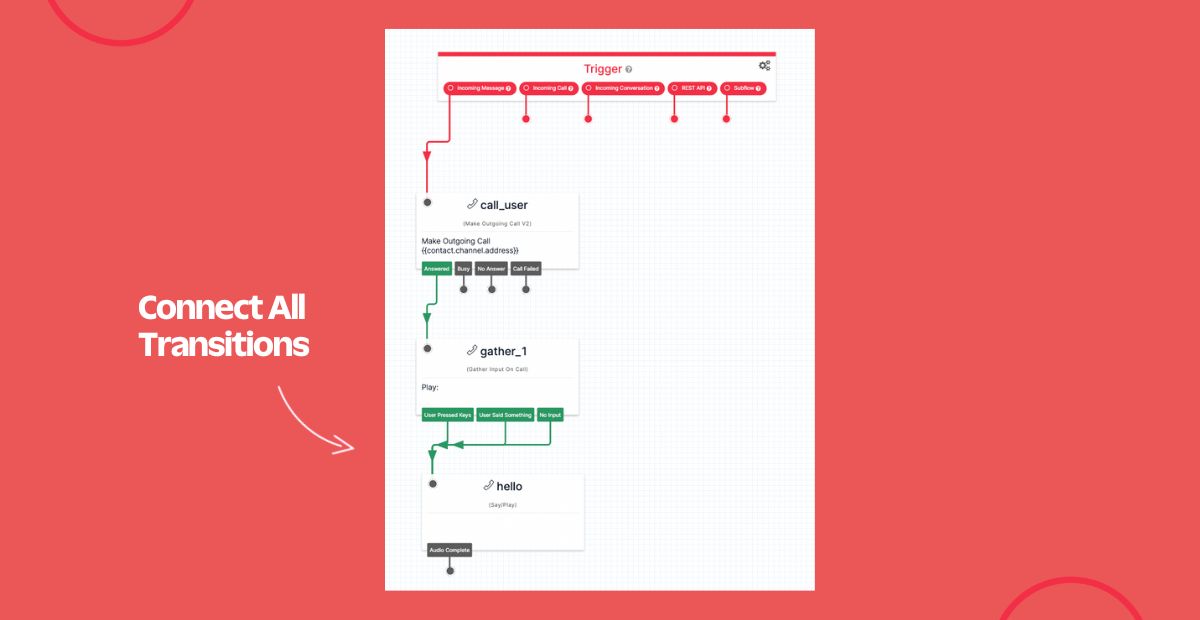
We expect some caller input, now we want our call to say “hello”. We’ll use another Widget called Say/Play and drag and drop that onto the Canvas. With that Widget selected, rename it to “hello” in the Widget Inspector Panel. For our Transition, we will connect all three options from our Gather Input On Call Widget to our “hello” Say/Play.
Say/Play can say text messages with text-to-speech or play recorded messages from a URL of an audio file. For this project we want the latter. Let’s use Twilio Assets to upload a media file and have it deployed to a URL.
Twilio Assets
Twilio Assets allows you to upload static files to use with Twilio projects. For our use case, we’ll upload a media file and Assets will serve that file over HTTPS. Before we use Assets, we’ll need to create a Twilio Service, a container for Functions.
Create a new Service:
- Navigate to the Services section in the Console.
- Click Create Service.
- Name your Service. For this project, let’s name it do-you-like-scary-movies. Then, click Next.
Assuming you already have an audio file on your computer that says “hello” in a creepy voice, you can upload your file. If you don’t, I recommend searching the interwebs for a similar file or using your own voice recording.
Click the Add+ button and select Upload File from the dropdown menu. Browse your file system and locate your audio file. Change the visibility to Public. Then, click Upload to begin uploading your file.
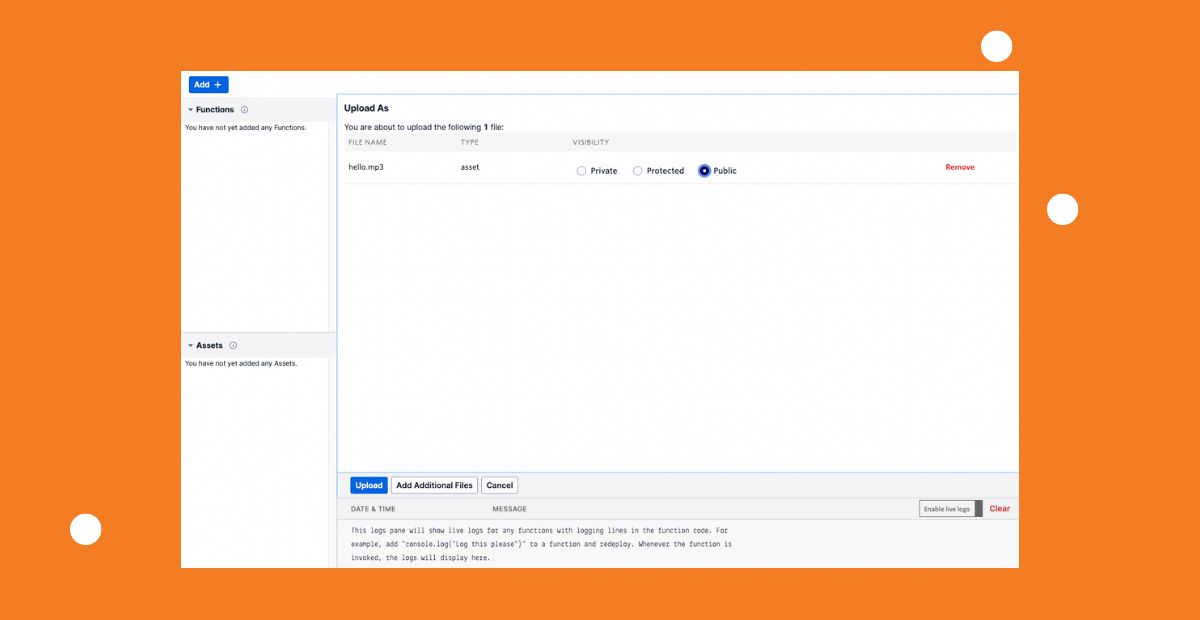
While the Asset has been uploaded, it will not be immediately accessible via a URL. This will be indicated by the gray circle next to the Asset's name. To deploy the Asset (and the rest of your Service), click the Deploy All button. After a brief period, the deployment will finish, and you should see a green check appear next to all deployed Assets.
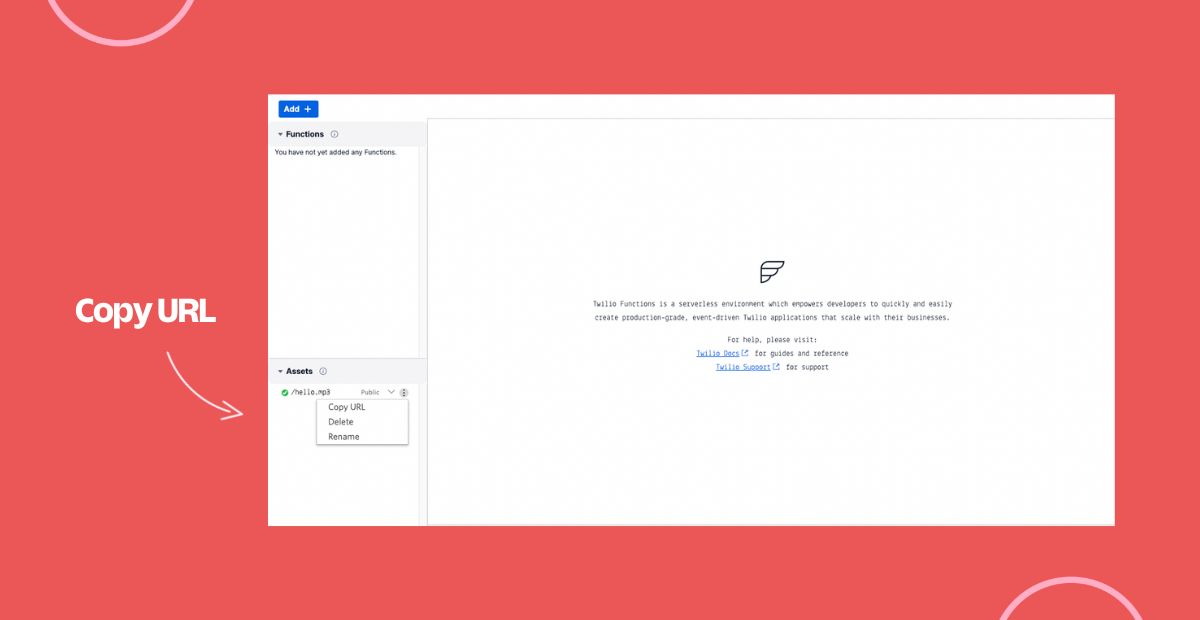
Click on the 3 dots next to your Asset, which opens up a context menu. Then click Copy URL.
Twilio Studio Widgets
With our Asset’s URL copied, go back to the Studio Flow: Do you like scary movies? Select the “hello” Widget we created earlier, and under Say or Play Message or Digits select the Play a Message option. Paste the URL of our asset into the URL of Audio File field. Click Save and Publish the project.
Use a second Gather Input on Call Widget and place that after the “hello” Widget.
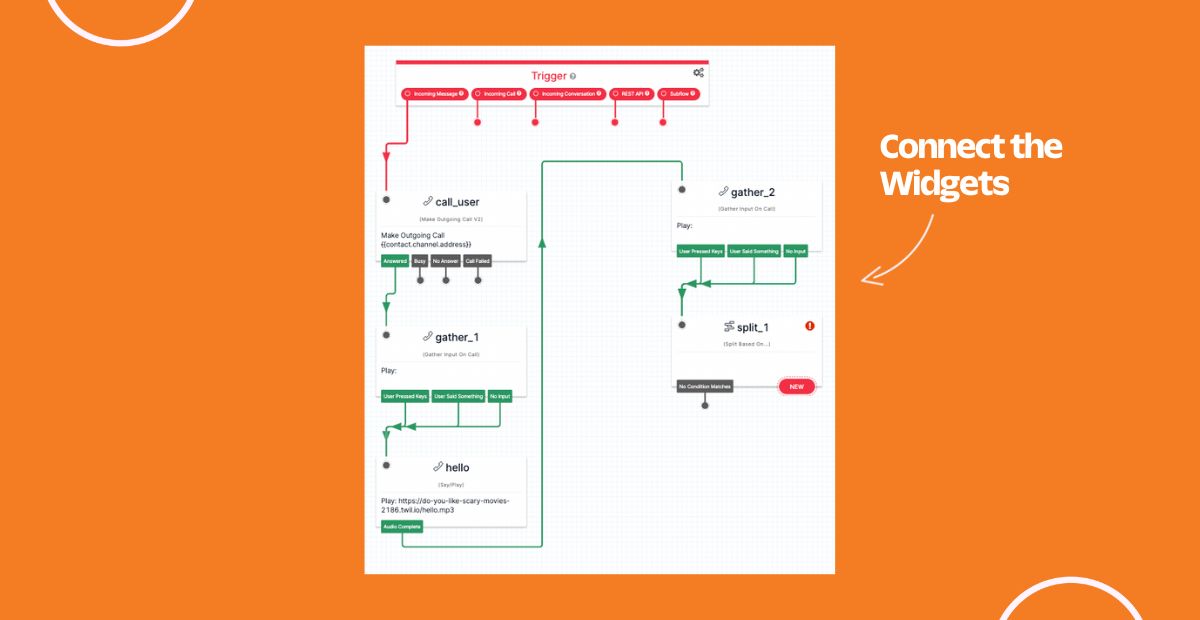
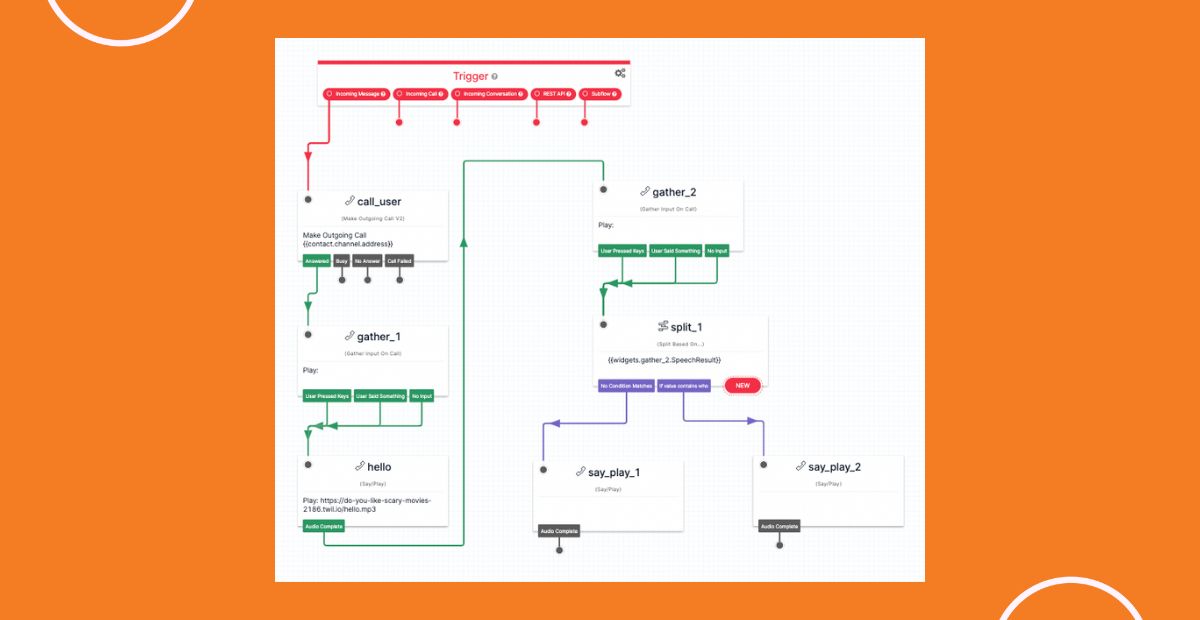
Drag and drop a Split Based On… Widget after the second Gather Input On Call Widget. Connect the widgets so that the Transition flows from User Pressed Keys, User Said Something, and No Input and into the Split Based On… Your Flow should now look like this:
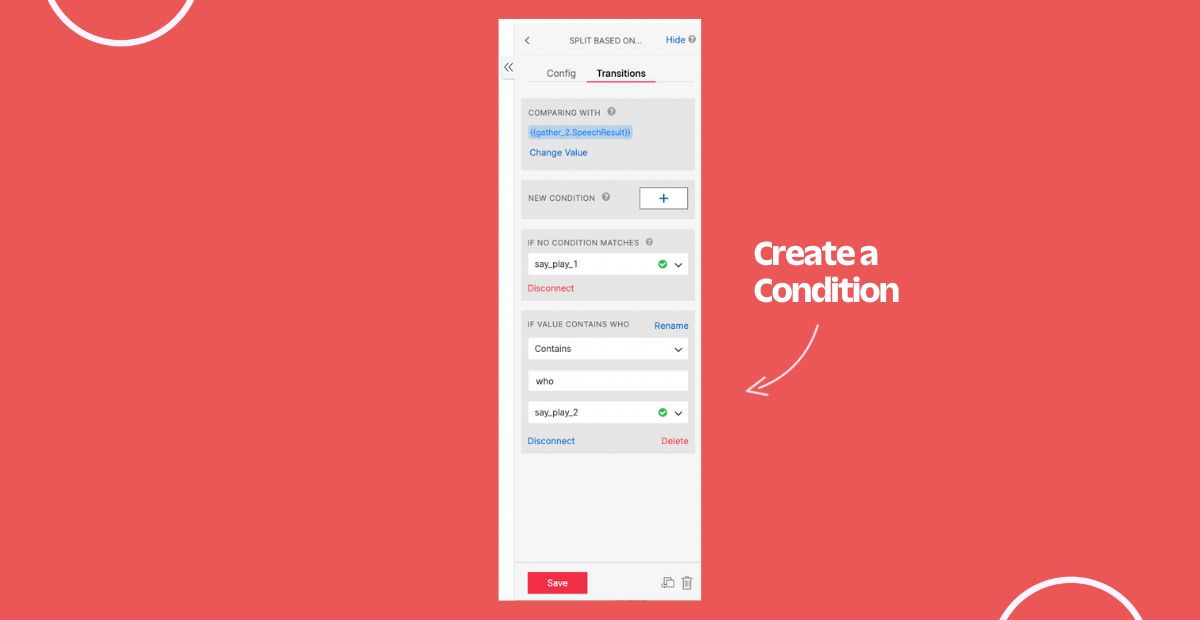
The Split Based On… Widget allows you to split your Flow based on user conditions. But first, it needs to reference a variable, or value that is being tested. Set the Variable to Test to widgets.gather_2.SpeechResult. This references the caller input gathered from the second Gather Input On Call Widget.
Next, with the Split Based On… Widget selected, navigate to the Transitions tab where you can configure user conditions (which split your Flow). Click the + button, set the selection to If Value Contains, and enter the value “who”.
Create two additional Say/Play Widgets. Connect one of these Widgets to the No Condition Matches of the Split Based On… and connect the other to the If value contains who. Your Flow should now look like this:
If the user says the word “who”, we want our call to respond with “you tell me your name I’ll tell you mine”. If there is no match, we want our call to respond with “do you like scary movies?”
Similar to previous steps, when we used Twilio Assets to upload audio files, we’ll do the same thing here. Try and find those clips online or record your own voice to spook potential callers.
Iterate on the project to add your own interactions, then click the Publish button to publish the Twilio Studio Flow.
Have Fun on Halloween
You have the tools to build this spooky project, now go ahead and use it to scare your friends on Halloween! Customize it to your liking or use my project by texting +1 (844) 497-3678.
Thanks so much for reading! For other Halloween themed tutorials, search for “Halloween” on the Twilio Blog. If you found this tutorial helpful, have any questions, or want to show me what you’ve built, let me know online. And if you want to learn more about me, check out my intro blog post.

.png)

Related Resources
Twilio Docs
From APIs to SDKs to sample apps
API reference documentation, SDKs, helper libraries, quickstarts, and tutorials for your language and platform.
Resource Center
The latest ebooks, industry reports, and webinars
Learn from customer engagement experts to improve your own communication.
Ahoy
Twilio's developer community hub
Best practices, code samples, and inspiration to build communications and digital engagement experiences.