How to End-to-End Test SMS Applications with C# .NET and Twilio
Time to read:
April 25, 2023
Written by
Reviewed by

Testing your software is an important part of the software development lifecycle. Unfortunately, it is sometimes skipped because it takes a lot of work, it is hard, and its value isn't always evident to stakeholders. There are many different types of tests you can do, and the most well known types are unit, integration, and end-to-end (E2E) testing.
E2E tests will simulate how a real user interacts with your application, so in the case of a web application, which is the most common, the E2E test will click links, buttons, fill out forms, etc. This is also considered a UI test because the UI of the application is being tested. The popularity of E2E tests have increased because tools like Cypress and Playwright are making it easier to develop E2E and UI tests for web apps.
However, not all applications are web based. What if your application doesn't have a conventional UI to test, like applications built on top of SMS or Voice? Messaging and voice calling is, in my opinion, another way of users interfacing with your application, so you should test the "UI" of these applications too, right? Unfortunately, there are no official testing tools for SMS or voice applications, but with Twilio you can build your own.
In this tutorial, you will learn how to test SMS applications by developing an intuitive virtual phone that can send and receive text messages inside your tests. Let's go! 👏
Prerequisites
Here’s what you will need to follow along:
- .NET 7 SDK (earlier and newer versions may work too)
- A code editor or IDE (I recommend JetBrains Rider, Visual Studio, or VS Code with the C# plugin)
- A free Twilio account (sign up with Twilio for free)
- A Twilio phone number
- The ngrok CLI and, optionally, a free ngrok account
- The git CLI
- Experience with sending and receiving SMS using Twilio with .NET
You can find the source code for this tutorial on GitHub. Use it if you run into any issues, or submit an issue if you run into problems.
Project Overview
The goal of this tutorial is to write tests that will follow the commonly used arrange, act, and assert (AAA) pattern:
- Arrange: Set up the virtual phone (to be developed) that can send and receive SMS from a Twilio phone number, number A.
- Act: Send SMS messages from number A, to a phone number which may or may not be a Twilio number, number B, and receive SMS messages from number B. Number B is the phone number that you are testing.
- Assert: Verify that the response messages from number B are the expected body.
The virtual phone, that you will develop, will use the Twilio SDK to send SMS and the Twilio SMS webhook to receive SMS. To receive incoming messages via the SMS webhook, you'll need to spin up an ASP.NET Core web application that receives Twilio's HTTP webhook requests and then find a way to deliver those back to the running test.
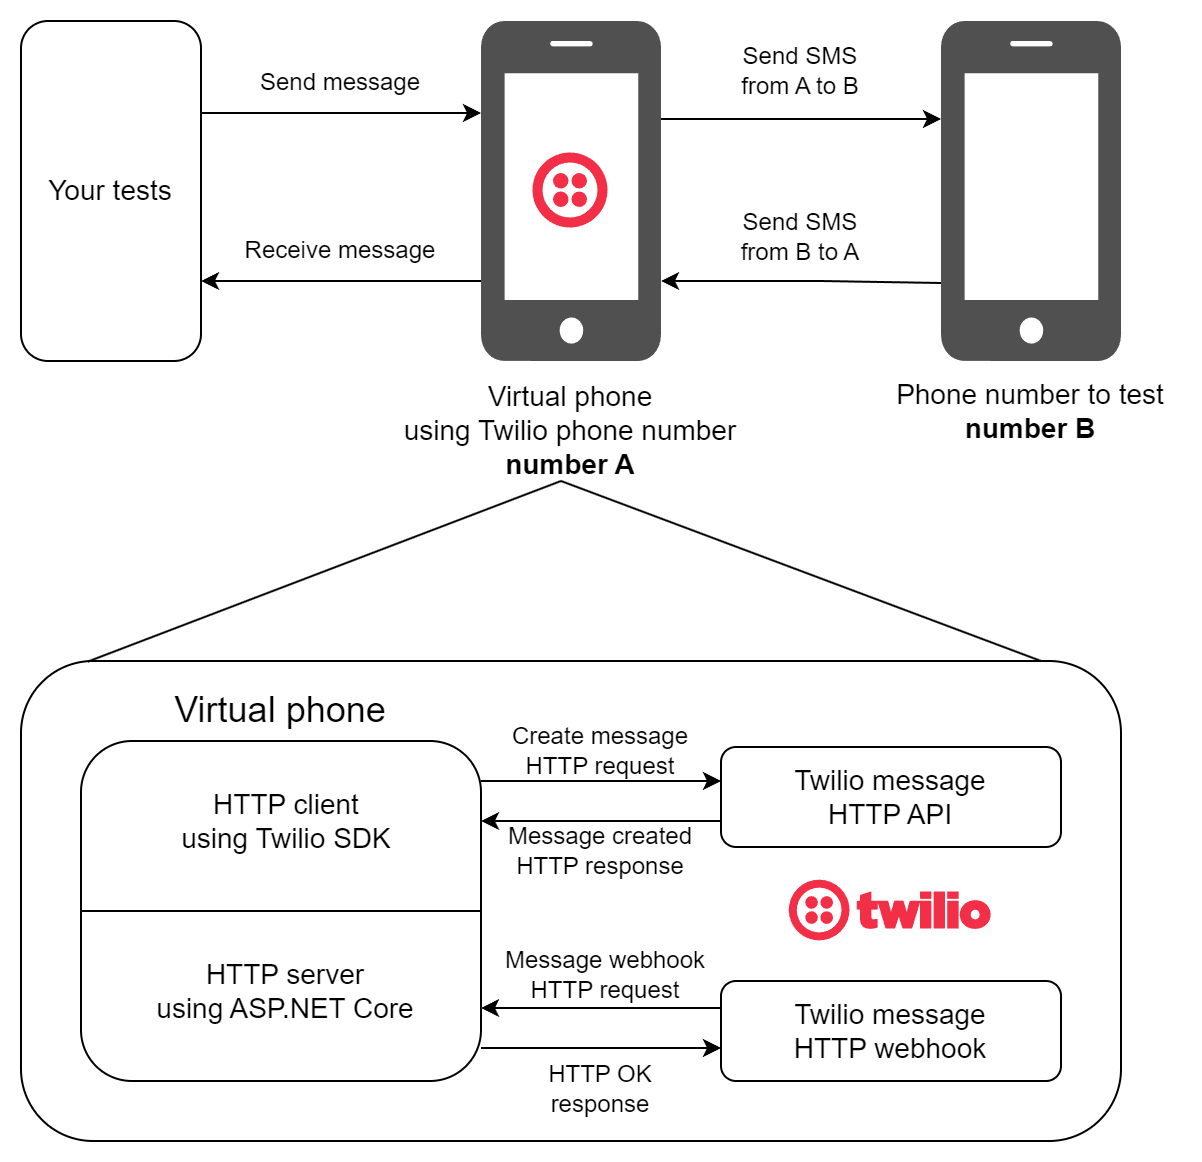
In the diagram above, you can see that your tests instruct the virtual phone number to send and receive messages between the Twilio phone number (number A) and the phone number to test (number B).
The virtual phone consists of two parts:
- The HTTP client using the Twilio SDK creates the messages in the Twilio API by sending HTTP requests, which in turn sends the SMS's out from your Twilio phone number.
- The HTTP server using ASP.NET Core that receives the HTTP requests sent by Twilio's SMS webhook when your Twilio phone number receives an SMS. What's not pictured here in the diagram is that you'll tunnel the locally running ASP.NET Core server to the public using ngrok.
The virtual phone, consisting of the HTTP client and server, will run inside the test project itself, but you could refactor the code to a separate application that you can communicate with from your tests.
The end goal of this virtual phone is to be able to write tests as intuitively as this:
The arrange-step sets up the virtual phone and creates a conversation, then the act-step sends a message and waits 10 seconds for a response, finally, the assert-step validates that the response body says "Ahoy!".
Set up your test project
Open a shell and run the following command to create an xUnit test project:
Add the following NuGet packages:
- Twilio: The Twilio SDK which will let you send SMS without manually writing the HTTP calls to the Twilio APIs.
- Twilio.AspNet.Core: The Twilio helper library for ASP.NET Core which helps you integrate Twilio into ASP.NET Core applications.
- Microsoft.Extensions.Configuration: .NET's configuration system which you'll use in favor of runsettings-files.
- Microsoft.Extensions.Configuration.UserSecrets: User secrets let you store sensitive configuration like API keys, secrets, auth tokens, etc. using the secret manager.
Next, create a file named appsettings.json and add the following JSON:
Update the following placeholders:
- Replace
[YOUR_TWILIO_PHONE_NUMBER]with the Twilio phone number you want to send SMS from, in E.164 formatting. - Replace
[PHONE_NUMBER_TO_TEST]with the phone number you want to test SMS interactions with, also in E.164 formatting. You can put your own personal phone number here if you don't have a phone number to test. - Leave
[USE_USER_SECRETS_OR_ENV_VARS]as is because you'll configure these settings using user-secrets instead.
The appsettings.json file needs to be placed along the binaries when the project is compiled, therefore you need to update the E2eSmsTest.csproj file by adding the following <ItemGroup> inside the <Project> node:
Now, enable user-secrets for your project and configure the following secrets using the .NET CLI command below:
Before running these commands, be sure to update the placeholders as follows:
- Replace
[TWILIO_ACCOUNT_SID]with your Twilio Account SID, which you can find in the Twilio console. - Replace
[TWILIO_AUTH_TOKEN]with your Twilio Auth Token, which you can find in the Twilio console.
Now let me explain what these settings will do:
VirtualPhoneis a section that holds all the configuration relating to the virtual phone.VirtualPhone:Urlsconfigures the URL that ASP.NET Core will run on and listen to for HTTP requests.VirtualPhone:PhoneNumberconfigures which Twilio phone number to send messages from and receive messages at.VirtualPhone:Twilio:Clientis a section that configures Twilio's API client. You can learn more about this configuration in the Twilio.AspNet README file.VirtualPhone:Twilio:RequestValidationis a section that configures the ASP.NET Core application to validate that HTTP request originate from Twilio. You can learn more about this configuration in the Twilio.AspNet README file.
Create the virtual phone
Now that your app’s been configured, create a new file called VirtualPhone.cs and add the code from this C# file.
Let's break down the code step by step:
The VirtualPhone class is responsible for sending and receiving SMS, but it uses an inner class Conversation to keep track of the ongoing conversations.
A conversation represents a conversation between the Twilio phone number used by the VirtualPhone and the phone number to converse with. While the VirtualPhone class is responsible for actually sending and receiving messages, the Conversation class is the class you will interface with from your tests.
The VirtualPhone class has three fields:
WebApplication webApplication: The running ASP.NET Core application.PhoneNumber fromPhoneNumber: The Twilio phone number to send and receive SMS, number A.Dictionary<string, Conversation> conversations: A dictionary to keep track of the ongoing conversations between the virtual phone and other phone numbers. The virtual phone uses this dictionary to forward incoming messages to the right conversation.
The static VirtualPhone.Create method:
- Accepts a configuration object as a parameter. This configuration will be the
VirtualPhoneconfiguration section. - Runs a new ASP.NET Core web application configuring the Forwarded Header middleware, the Twilio API client, and Twilio request validation. The web application maps HTTP requests going to path /message to the
VirtualPhone.MessageEndpoint. Later, you will configure the Twilio SMS webhook to send HTTP requests to /message. - Creates a new
VirtualPhoneobject and returns it.
The VirtualPhone.CreateConversation creates a new conversation between the virtual phone and to phone number, adds it to the conversations dictionary, and finally, returns the created conversation.
The VirtualPhone.RemoveConversation will remove the conversation from the conversations dictionary.
This method is private because the Conversation object will invoke this method when it is disposed.
Twilio will send HTTP requests to the MessageEndpoint when your Twilio phone number receives an SMS. The endpoint extracts the sender’s phone number that is stored in the From form parameter. Using the sender’s phone number, the corresponding conversation is retrieved from the conversations dictionary. Then, finally, the message is forwarded to the Conversation.OnMessageReceived method.
The VirtualPhone.SendMessage method retrieves the Twilio client from the DI container and uses the MessageResource.CreateAsync method to create a new message resource in Twilio's API, which will send an SMS.
The VirtualPhone.DisposeAsync class will stop the running ASP.NET Core application.
Next, I’ll break down the Conversation class.
The Conversation class has three fields:
VirtualPhone virtualPhone: The virtual phone is stored in a field so the conversation can call its methods to send messages.Channel<MessageResource> incomingMessageChannel: A channel to write incoming messages to and read incoming messages from. Channels lets you pass data between producers and consumers.PhoneNumber to: The phone number that messages are sent to and messages are received from, number B.
The Conversation.SendMessage method passes the body parameter and the to field to the VirtualPhone.SendMessage method.
The Conversation.OnMessageReceived method is called by the virtual phone when a message comes in for this conversation. The Conversation.OnMessageReceived method writes the message to the incomingMessageChannel channel, so it can be read elsewhere.
The Conversation.WaitForMessage accepts a TimeSpan timeToWait which is the amount of time the application will wait for an incoming message. The CancellationTokenSource and its Token will take care of cancelling the operation when the timeToWait has passed.
Next, the method will wait for a message and read the message from the incomingMessageChannel.
The WaitForMessages method is just like the WaitForMessage method, but instead you can wait for multiple messages, which will read the specified amount of messages from the incomingMessageChannel.
Lastly, the Conversation.Dispose method will tell the virtual phone to remove the conversation.
Add xUnit fixtures
Every testing framework has different APIs for running setup and cleanup code before and after tests are run. In xUnit, you can add setup and cleanup code for a collection of tests by using Collection Fixtures. You'll use Collection Fixtures to set up the virtual phone before all tests and clean it up when all tests have run.
Create a new file Fixtures.cs and add the following code:
The ConfigurationFixture will load configuration from different sources, and store the configuration in a property to make it accessible to the test collection.
The VirtualPhoneFixture will also load configuration, but only pass the VirtualPhone configuration section to the VirtualPhone.Create method. The newly created virtual phone is then stored in a property to make it accessible to the test collection.
The TestCollectionFixture class tells xUnit which fixtures will be part of the "VirtualPhoneTests" collection, and by setting the DisableParallelization property to true, all tests within the collection will run without parallelization.
First, rename the file UnitTest1.cs to E2eTest.cs and rename the class inside to E2eTest too.
Now, add the tests in the E2eTest class to the "VirtualPhoneTests" collection by applying the Collection attribute to the class, inside E2eTest.cs:
Now you can add a constructor which accepts fixtures objects that are part of the collection.
Add a constructor for E2eTest and accept the VirtualPhoneFixture and ConfigurationFixture as parameters, and store the virtual phone and the phone number to test in fields, so the tests can use them.
Fantastic, after all that setup, you can finally start testing SMS applications!
Write an end-to-end test
Remove the test method Test1 and add the following test inside the E2eTest class:
Before this test runs, the virtual phone will be created and reused for all tests in this test collection, then the test will:
- Create a new conversation between the virtual phone using the Twilio phone number, number A, and the phone number to test, number B.
- Send a message saying "Ahoy!".
- Wait for a response message for 10 seconds.
- Verify that the response body says "Hi".
Configure the Twilio SMS webhook
While you can already send text messages using the virtual phone, to receive messages, you need to configure the webhook on your Twilio phone number.
In a separate shell, create a ngrok tunnel for http://localhost:5000 using the following command:
ngrok will print the Forwarding URL, which you'll need to publicly access your locally running ASP.NET Core web server.
Now, go to the Twilio Console in your browser, use the left navigation to navigate to Phone Numbers > Manage > Active Numbers, and then select the Twilio phone number you want to test with. (If Phone Numbers isn't on the left pane, click Explore Products and then on Phone Numbers.)
Then, on the phone number configuration page, locate the "A message comes in" section. Underneath that:
- set the first dropdown to Webhook,
- set the text box next to it to the ngrok forwarding URL — adding on the /message path,
- and set the dropdown after the text box to "HTTP POST".
Then, click Save.
Run the end-to-end test
Now you're finally ready to run the test. If you're testing your own personal phone number, simply respond with the expected response, or not if you want to make the test fail.
Run the tests using the .NET CLI:
Feel free to add more tests. Here's an example of a test where the phone number should respond with multiple messages:
And here is a test verifying the flow of an SMS survey:
Next steps
With the virtual phone in your tests, you can now intuitively write E2E tests for SMS applications. There are a couple of ways you could improve this solution:
- As mentioned before, you could refactor the virtual phone to support multiple Twilio phone numbers, so you could run tests in parallel.
- You could automatically start the ngrok tunnel and configure the SMS webhook from .NET as shown in this tutorial.
Curious how you could build your own SMS applications with Twilio? Check out this tutorial on responding to incoming SMS from ASP.NET Core.
We can't wait to see what you build. Let us know!
Niels Swimberghe is a Belgian American software engineer and technical content creator at Twilio. Get in touch with Niels on Twitter @RealSwimburger and follow Niels’ personal blog on .NET, Azure, and web development at swimburger.net.

Related Resources
Twilio Docs
From APIs to SDKs to sample apps
API reference documentation, SDKs, helper libraries, quickstarts, and tutorials for your language and platform.
Resource Center
The latest ebooks, industry reports, and webinars
Learn from customer engagement experts to improve your own communication.
Ahoy
Twilio's developer community hub
Best practices, code samples, and inspiration to build communications and digital engagement experiences.