Forward Voicemails with Transcript to your Email using C# and ASP.NET Core
Time to read: 8 minutes
August 22, 2022
Written by
Reviewed by

Whether you like it or not, phone calls are essential to our daily communications. However, sometimes nobody is available to take the call right there and then. Luckily, Twilio Programmable Voice lets you record voicemail so the caller can leave a message. But what if instead of having to call into a voicemail box, you could receive the voicemail and transcript in as an email instead? In this article, you will build a Twilio Voice app that sends voicemails and the call transcript to your email address using SendGrid.
Prerequisites
You'll need the following things in this tutorial:
- A free Twilio account (sign up for a free Twilio account and get trial credit to try out Twilio products)
- A Twilio Phone Number
- A free or paid SendGrid account. Sign up for a SendGrid account here to send up to 100 emails per day completely free of charge.
- SendGrid API Key (See Manage SendGrid API Keys)
- A verified Sender email or domain to send emails from (See Adding a Sender)
- An OS that supports .NET (Windows/macOS/Linux)
- .NET 6.0 SDK (newer and older versions may work too)
- A code editor or IDE (Recommended: Visual Studio Code with the C# plugin, Visual Studio, or JetBrains Rider)
- ngrok (A free ngrok account is sufficient for this tutorial)
Project Overview
Before jumping into the code, let's take a look at how the application will work.
Take a look at this diagram of the application flow:

- Someone calls your Twilio Phone Number. Twilio picks up the call and forwards the details via HTTP to your Web API.
- Your Web API responds with TwiML instructions. These instructions tell Twilio what to do with the phone call. You'll learn more about TwiML later. Your TwiML instructions tell Twilio to record a voicemail and to send the recording transcript back to your Web API.
- The caller leaves a message which Twilio records and transcribes.
- When Twilio is done transcribing the recording, Twilio sends the transcription via HTTP to your Web API.
- Your Web API will download the voicemail audio file (as MP3) and then use SendGrid to send an email with the phone number of the caller, the transcript of the voicemail, and the voicemail audio file itself.
- SendGrid will deliver the email to your email inbox.
When Twilio receives a phone call, Twilio will send the details as an HTTP request to a URL that you configure and expect instructions as an HTTP response. This concept is called a webhook and is commonly used across Twilio products.
However, Twilio can only send HTTP requests to publicly available URLs, and you'll be developing your application locally. To solve this, you'll tunnel your localhost publicly using the free ngrok service. This wouldn't be necessary in production, but is necessary for Twilio to reach your locally running web application. More on this later!
To instruct Twilio what to do with the phone call, you need to respond to the webhook HTTP request using a specific set of instructions called the Twilio Markup Language, or TwiML for short. TwiML is a specific set of XML tags that you can use to tell Twilio how to respond to voice calls and text messages. In this application you will use these two TwiML verbs: <Say> and <Record>.
<Say> will convert text to speech and send the audio to the caller. <Record> will record the audio of the phone call which you will use to implement voicemail functionality. These TwiML verbs can also have attributes and nested noun-tags. To instruct Twilio to transcribe the recording and send the transcription to your web application, you'll be using the transcribe and the transcribeCallback attribute. Using these TwiML verbs and attributes, you'll generate TwiML that looks like this:
This is all the TwiML you'll be using in this application, but I recommend learning more about TwiML for Voice in the docs, and specifically to look deeper into the Say-verb and the Record-verb.
Now that you understand how the application will work, let’s get started.
Create the ASP.NET Core Web API
The first step is to create a new Web API project to handle the Twilio webhooks and send the emails. You can do this by opening a terminal and running these commands:
Run the application to confirm everything is in good order:
Your output should look like this:
This project template comes with a WeatherForecast controller. Open a new browser tab and browse to your HTTP URL with the /WeatherForecast path (in this example: http://localhost:5162/WeatherForecast). You should see results like this:
This setup works fine in your local environment, but for Twilio to be able to send HTTP requests to your endpoints, your API needs to be publicly accessible over the internet.
You can achieve that with ngrok, which tunnels public requests to your local machine.
Leave your .NET app running, then open a separate terminal and run ngrok with the following command:
You should see some random URL generated for you which is forwarding to your local API:
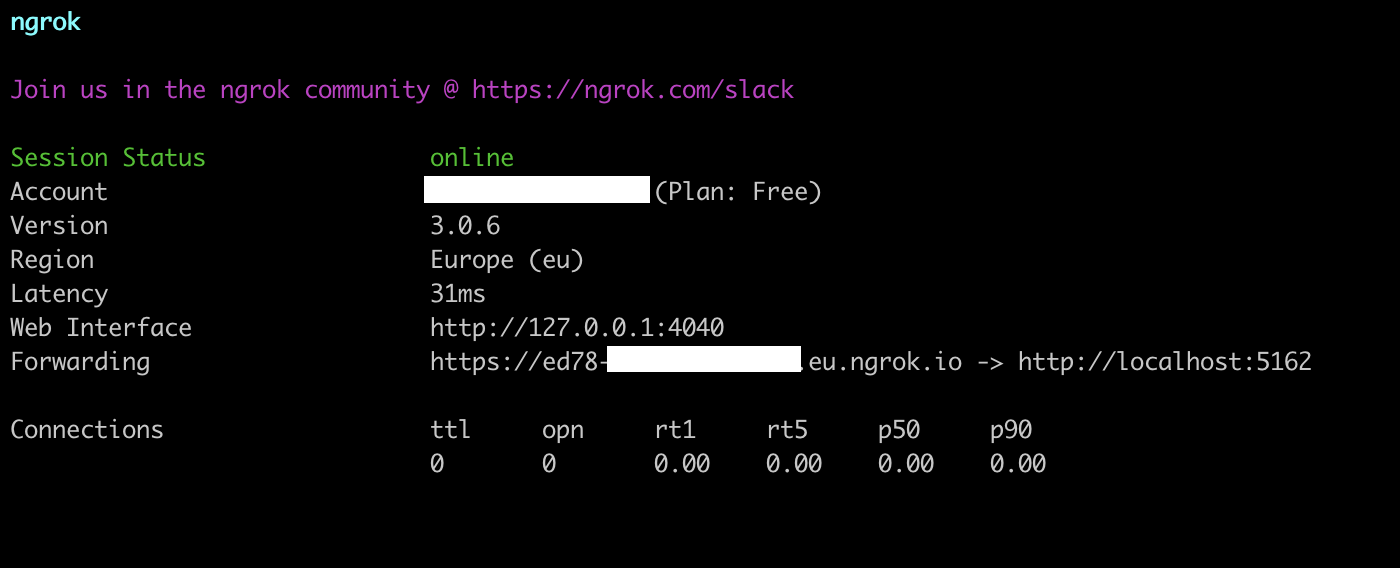
Now append the endpoint path /WeatherForecast to the Forwarding URL and open it in a browser tab.
You may see a warning message from ngrok:
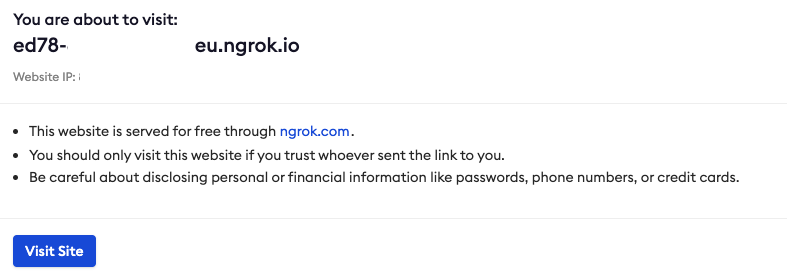
Click Visit Site to proceed.
You should see similar results to before, but now via ngrok's public forwarding URL. This means that your API is publicly accessible and Twilio can send HTTP requests to it.
Receive Incoming Calls
Twilio provides libraries to make it easier to build Twilio applications. You will use two of those in this tutorial: The Twilio .NET SDK and the helper library for ASP.NET. You'll use the SDK to generate TwiML and the helper library to respond to webhook requests.
Back in the terminal where your app is running, stop the application using ctrl + c and add the SDK and helper library for ASP.NET Core via NuGet:
Open the project in your IDE and add a new file in the Controllers folder called IncomingCallController.cs. Update the controller with the code below:
When Twilio sends an HTTP POST request to /IncomingCall this action will generate TwiML including the Say-verb which will instruct Twilio to say "So far, so good!" to the caller.
For Twilio to know where to send webhook requests, you need to update the webhook settings on your Twilio Phone Number.
Go to the Twilio Console. Select your account, and then click Phone Numbers → Manage → Active Numbers on the left pane. (If Phone Numbers isn't on the left pane, click on Explore Products and then on Phone Numbers.)
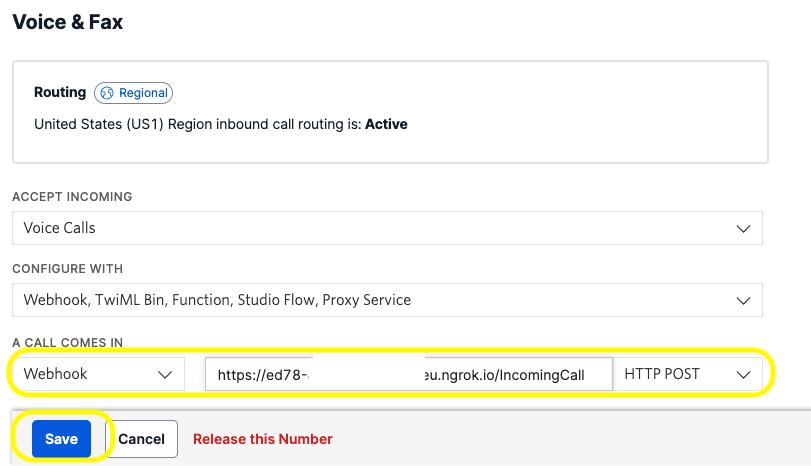
Click on the phone number you want to use for your project and scroll down to the Voice section.
Under the “A Call Comes In” label, set the dropdown to Webhook, the text field next to it to the ngrok Forwarding URL suffixed with the /IncomingCall path, the next dropdown to HTTP POST, and click Save. It should look like this:
Now, run the application (dotnet run) and call your Twilio number, and you should hear the message “So far, so good” on your phone. Great job if this is working. If not, there are a couple of places where you can go to debug:
- You may see errors in the output from your .NET application in the terminal
- Check the output of the ngrok command in the other terminal, or browse to the ngrok dashboard (http://127.0.0.1:4040) where you can inspect HTTP requests and responses.
- You can find errors and call details in the Twilio Console under the Monitor tab.
Now that you verified the webhook is working, let's update the TwiML so the caller can leave a voicemail. To do this, update the Say-verb to prompt the user to leave a message, and use the Record-verb to record the call.
Update your Index method as below:
The timeout attribute tells Twilio to end the recording after a number of seconds of silence has passed. The default is 5 seconds. You can change this to your liking.
By setting the transcribe attribute to true, you'll instruct Twilio to transcribe the recording. Twilio will also store the transcription so you can retrieve the transcription later via the Twilio API.
The transcription process happens asynchronously. Twilio can send the transcript data to your application when it is ready. Use the transcribeCallback attribute to tell Twilio to which URL to send the transcription data when it is ready.
Now move on to handle the transcription webhook.
Receive Transcription Text and Recording Info
Twilio returns the transcription text and the recording URL in the transcribe callback message. So you can gather everything you need by handling the transcribe callback.
Add a new file under the Controllers folder named TranscribeCallbackController.cs. Update its contents as below:
To test your changes, restart your .NET application, then call your Twilio number again and leave a message. After a few seconds, you should see a new log line like this in your terminal:

Download the call recording
The next step is to get the recording audio. The audio is available in two formats: WAV and MP3. WAV files are uncompressed and have larger file sizes. Since they will be sent as attachments, in this example, you will download the MP3 version for efficiency.
First, you will need an HttpClient to download the file. Add the highlighted line below to your Program.cs file:
Update TranscribeCallbackController.cs so that the constructor and the private variables look like below:
Now you can instantiate an HttpClient and download the file at recordingUrl by adding the following code to your Index() method in the TranscribeCallbackController:
By default, the recording URL doesn’t have a file extension. If you call the URL as is, Twilio returns the WAV version of the recording. To get the MP3 version, you need to append the .mp3 extension to the URL as shown above.
Restart your application, call your Twilio number again and leave a message. Once Twilio sends the transcription to your application, you should see an MP3 file appear in your project folder. You won't actually need to save the file to disk for this tutorial, but you can do this to quickly test that it works so far.
Send the Voicemail via Email
Now that you have the transcribed text and the call recording audio, the final step is to create an email and send these to your email address.
To achieve this, you’re going to use SendGrid SDK.
Stop the application and add the following packages via NuGet:
To send emails via SendGrid, you will need to use your API key and store it somewhere. You can use environment variables or a vault service, but for local development you can use dotnet user secrets. First, you need to initialize user secrets by running
Then, create a new user secret called SendGrid:ApiKey and set your API key:
Replace {YOUR SENDGRID API KEY} with your SendGrid API Key (see prerequisites).
Now apply the following code changes. First, update Program.cs as shown below:
And add the following using statement to the top of the Program.cs file:
Then, update your TranscribeCallbackController to inject the ISendGridClient and store it in a private field:
Also, add these using statements to the top of the TranscribeCallbackController.cs file:
Finally, update the Index method of the TranscribeCallbackController controller so that the final version looks like this:
Before running the application, replace {your verified sender email}, {your sender display name}, {your recipient email} and {your recipient display name} with actual values. Display names can be anything you choose. The sender email address needs to be a verified sender in SendGrid (see prerequisites).
Start your application again as before:
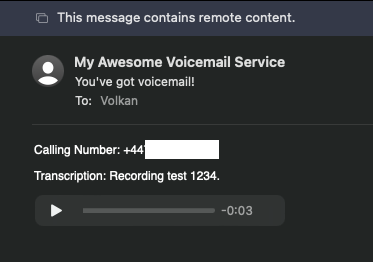
The code above creates a new email with the MP3 file as an attachment, and the phone number and transcribed text as the body of the email.
Test your application one last time by calling your Twilio number and leaving a voice message. After a few seconds, you should receive an email that looks like this:
Conclusion
The email you send may not look pretty, but it does the job. You can use SendGrid Dynamic Email Templates and create beautiful HTML email templates. If you are interested in sending templated emails with SendGrid, take a look at these articles:
- How to send RSS feed digest email with C# and SendGrid Dynamic Email Templates
- Send Emails with C#, Handlebars templating, and Dynamic Email Templates
To find out more about using voicemails with Twilio, tunneling, and ngrok, here are some of the articles to read:
- How to Handle No-Answer/Pickup Scenarios with Voicemail and Callback using Twilio Voice
- Using Ngrok in 2022
Volkan Paksoy is a software developer with more than 15 years of experience, focusing mainly on C# and AWS. He’s a home lab and self-hosting fan who loves to spend his personal time developing hobby projects with Raspberry Pi, Arduino, LEGO and everything in-between. You can follow his personal blogs on software development at devpower.co.uk and cloudinternals.net.
Related Resources
Twilio Docs
From APIs to SDKs to sample apps
API reference documentation, SDKs, helper libraries, quickstarts, and tutorials for your language and platform.
Resource Center
The latest ebooks, industry reports, and webinars
Learn from customer engagement experts to improve your own communication.
Ahoy
Twilio's developer community hub
Best practices, code samples, and inspiration to build communications and digital engagement experiences.