Generate an Access Token for Twilio Chat, Video, and Voice using Twilio Functions
Time to read:
November 19, 2020
Written by
Reviewed by

Twilio offers client-side software development kits (SDKs) for several of its products including Programmable Video, Programmable Voice, Programmable Chat, and Conversations.
To make use of these SDKs, you need to generate Access Tokens. As described in the Twilio docs, Access Tokens are short-lived tokens to authenticate Twilio Client SDKs like Voice, Chat and Video. You create them on your server to verify a client's identity and grant access to client API features.
In this article you’ll learn how to generate an Access Token using Twilio Functions. You’ll be able to replicate this setup again and again in your future projects, allowing you to save time and focus on the fun stuff!
Prerequisites
- Node.js v10
- npm or another package manager for Node.js
- The Twilio Serverless Toolkit plugin for the Twilio CLI
- A Twilio account
Install dependencies
Your first goal is to get setup with Twilio Functions. Twilio Functions is a serverless environment that lets you deploy backend services without the overhead of setting up a server. Functions can be managed through either a plugin for the Twilio CLI or the user interface in the Twilio Console, but for the purposes of this tutorial, you’ll use the CLI.
If you don’t have it already, install the Twilio CLI:
After installing the CLI, you can add the Twilio Serverless Toolkit plugin:
Login into the Twilio CLI by running the command twilio login.
This will prompt you for your account credentials including your Account SID and your Auth Token, both of which are available on your Twilio Console dashboard.
Now that you’re logged in, you’re ready to get started!
Create your Twilio Function
Initialize a new Twilio Function Service:
This command creates a new folder called token-service. Inside this folder you’ll find several subfolders and sample files provided by the CLI. Be sure to keep the folders themselves and delete any and all contents inside of assets and functions.
Create a new file inside the functions folder called token.js.
This file is where you’ll write the code to generate the Access Token.
Inside your new file, create the shell for the Twilio Function:
Gather your credentials
Inside your new function, you’re going to need access to the environment variables that store your Twilio account credentials. Luckily, when you initialized the new Function Service, a .env file was created for you inside token-service with variables for your Account SID and Auth Token already inside.
Open up the .env file in the token-service folder and verify that the pre-populated Account SID and Auth Token match the credentials that you used to login to the CLI.
In addition to these two credentials, you’ll need an API key.
Visit the API Key section of the Twilio Console. Once there, click the red plus sign to create a new API key. Give your key a recognizable name that represents the project you’re working on in the Friendly Name text field and leave the Key Type as Standard. Click the button that says Create API Key.
On the following screen you’ll be shown several pieces of data, including an SID and SECRET. The SID is your API key.
Copy the SID and paste it into your .env file as the value for a new API_KEY environment variable. Then, copy the value for the SECRET into your .env file as the value for a new API_SECRET environment variable.
You may want to make an additional backup of these values because once you leave this screen, you won’t be able to access your SECRET again.
Once your environment variables are set, add the highlighted lines inside your new function in token.js:
Any environment variables stored inside your .env file are available on the context object provided by Twilio Functions. Likewise, any URL parameters passed on an API call to a Twilio Function are available on the event object.
Whenever you call this endpoint, you’ll be passing to it a user identity. This identity is required to generate the Access Token, and its value will be accessible through event.identity. Think of the identity as a sort of username, and consider carefully how you verify this identity before issuing an Access Token to the client.
Generate the token
Inside your function, beneath the existing code, add the highlighted lines:
This code obtains the AccessToken object from Twilio. You automatically have access to the Twilio client inside a Twilio Function.
It then initializes a new Access Token with your account credentials and the identity that’s been passed to the Function. Each Access Token has a maximum lifespan of twenty-four hours. Beyond that, tokens will need to be updated or renewed.
Add a grant to the token
The next step is adding a grant to your Access Token. The grant indicates that the holder of the Access Token is allowed to access the given API service. Without a grant, the Access Token is meaningless.
The implementation of this step differs slightly depending on whether you’re using the Video, Chat, or Voice SDKs. Jump to the section relevant to your needs.
Add a grant: Programmable Video
After creating your token, you’ll need to obtain the VideoGrant object from the AccessToken object you already have.
Beneath the existing code, inside your function, add the following:
This code initializes a new instance of the VideoGrant object and adds it to your Access Token.
This is the simplest implementation and allows the holder of this Access Token access to any Programmable Video services in your client-side app, including any and all rooms created there. You can limit the holder’s access to only a specific room by specifying this on the grant. In this case, the code above becomes:
You can hardcode the value for the room name or pass it from the client. In the latter case, the room name, like the identity, would be available on the event object.
Add a grant: Programmable Chat and Conversations
To add a Chat Grant to your Access Token, you need to create a new Chat Service in the Twilio Console or CLI and obtain its Service SID.
To do this via a UI, in the Chat Service area of the Console, click the plus button under Chat Services to initialize a new Chat Service. You’ll be prompted for a friendly name, and then on the next screen you can configure your new service and see its Service SID. Copy this value and paste it into your .env file as the value for a new environment variable SERVICE_SID.
Then back in token.js add the following code inside your function beneath the existing code:
This code initializes a new instance of the ChatGrant object with the Service SID you just obtained and then adds the chat grant to your token.
Add a grant: Programmable Voice
When using the Programmable Voice API in the context of a client-side app, you’ll need to create a TwiML App that serves as the bridge between your client-side Twilio Device and your server side code, including your Access Token.
To create the TwiML App, navigate to the TwiML Apps section of the Programmable Voice dashboard in your Twilio Console.
Click the plus sign to create a new TwiML App. Provide a friendly name, fill in the other fields as necessary or leave them blank for now, and then hit the Create button.
Clicking the Create button will take you back to the TwiML Apps dashboard. Click on the app you just created to find your app’s SID immediately beneath its name. Copy this value and paste it into your .env file as the value for a new OUTGOING_SID environment variable.
Back in token.js, add the following code beneath the existing code inside your function:
This code initializes a new instance of the VoiceGrant object with your TwiML App’s SID and the incomingAllow key sets permissions for whether or not your client-side Twilio Device can receive calls as well as make them. This key is optional.
Send the response
With the Access Token ready to go, create a new Response object and send it back to the caller (your client-side application):
This code sets CORS headers so that your client-side is able to receive the response.
Save and close your token.js file. It’s time to deploy your token function!
Run the following command:
Upon successful deployment you’ll be shown a list of URLs to all the different assets and functions in your Twilio Function Service.
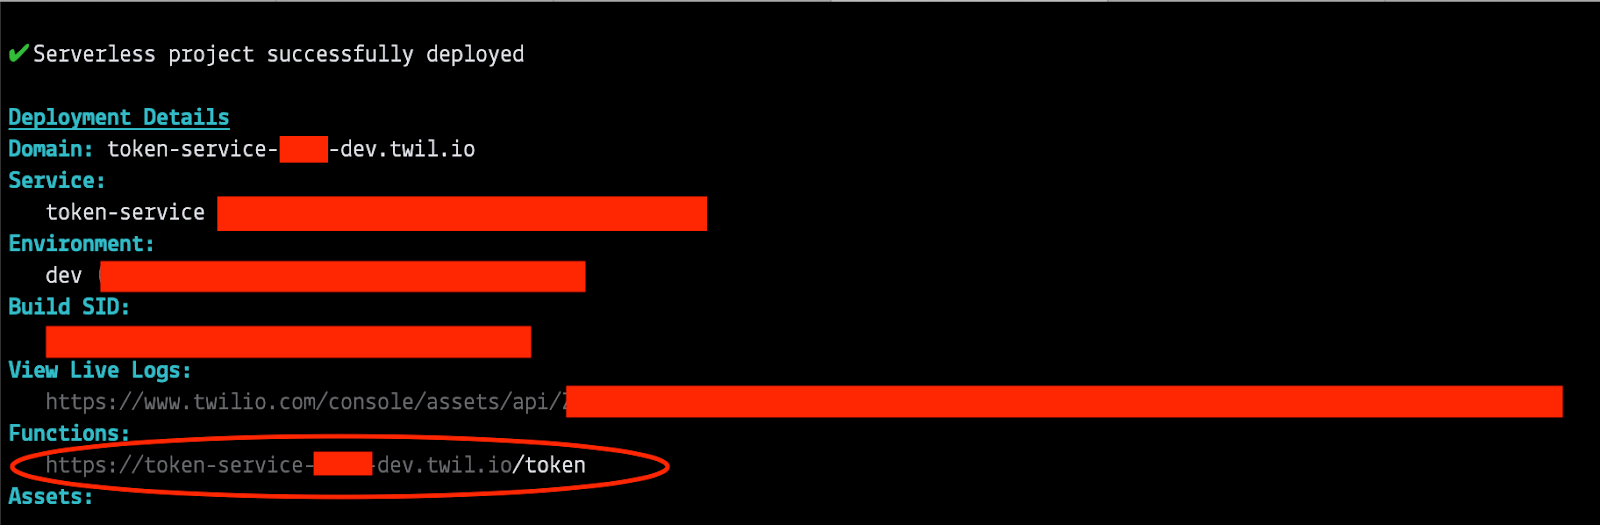
Under the Functions heading you should see a URL that looks similar to this: https://token-service-XXXX-dev.twil.io/token. This is the endpoint you’ll fetch from in your client-side application when you need to get your Access Token - hang onto it!
In your command prompt or terminal, you can use curl to verify your response (be sure to use your specific URL and not the placeholder URL shown below):
Congratulations, you’ve now developed and deployed the code you need to generate Access Tokens for your client-side Twilio apps!
If you’d like to test drive what you’ve done in a real project, check out some other tutorials that use client-side SDKs like this Build a Browser-Based Walkie Talkie post.
Ashley is a JavaScript Editor for the Twilio blog. To work with her and bring your technical stories to Twilio, find her at @ahl389 on Twitter. If you can’t find her there, she’s probably on a patio somewhere having a cup of coffee (or glass of wine, depending on the time).


Related Resources
Twilio Docs
From APIs to SDKs to sample apps
API reference documentation, SDKs, helper libraries, quickstarts, and tutorials for your language and platform.
Resource Center
The latest ebooks, industry reports, and webinars
Learn from customer engagement experts to improve your own communication.
Ahoy
Twilio's developer community hub
Best practices, code samples, and inspiration to build communications and digital engagement experiences.