Get Horror Movie Suggestions with Twilio and the TMDB API
Time to read:
October 10, 2022
Written by
Reviewed by

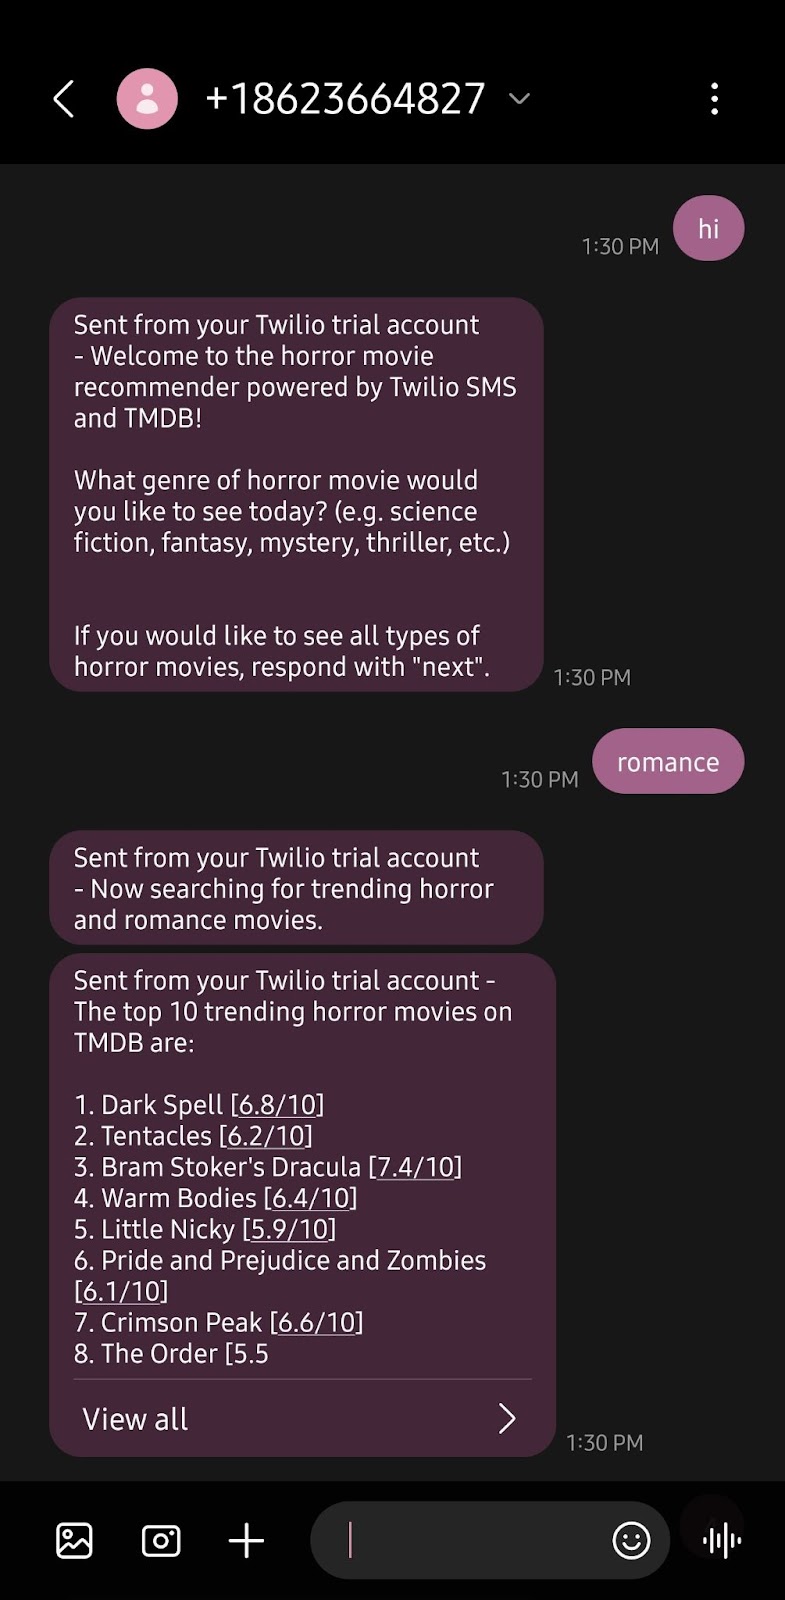
The month of October brings along many festivities—dressing up in costumes, going trick-or-treating, stopping by a pumpkin patch, or visiting a festival! For those who enjoy a good scare, maybe check out a haunted house and settle down at home with a nice, spooky movie. But what if you don’t know what to watch? Searching through the thousands of movies on IMDB can take a lot of time, and sometimes your favorite streaming service isn’t recommending the movies for you.
With the help of TMDB’s API and both Twilio’s Programmable Messaging API and Functions, you can set up your own horror movie recommendation bot after doing a bit of coding.
Prerequisites
For this tutorial, you will need:
- A free Twilio Account.
- A Twilio phone number.
- A personal phone number.
- A phone that can make and receive messages.
Set up your developer environment
Before you can write your code, you will first need to get your API key from TMDB. Create an account on the TMDB signup page and then verify your account by clicking the blue button labeled Activate My Account in the verification email you receive. Log in to your account and then request an API key by clicking the link under Request an API Key on this page.
Register as a Developer, then read through and accept the terms of usage. Fill out the API request form completely and then click submit. Once you’ve done so, you should land on a page that contains your API Key.
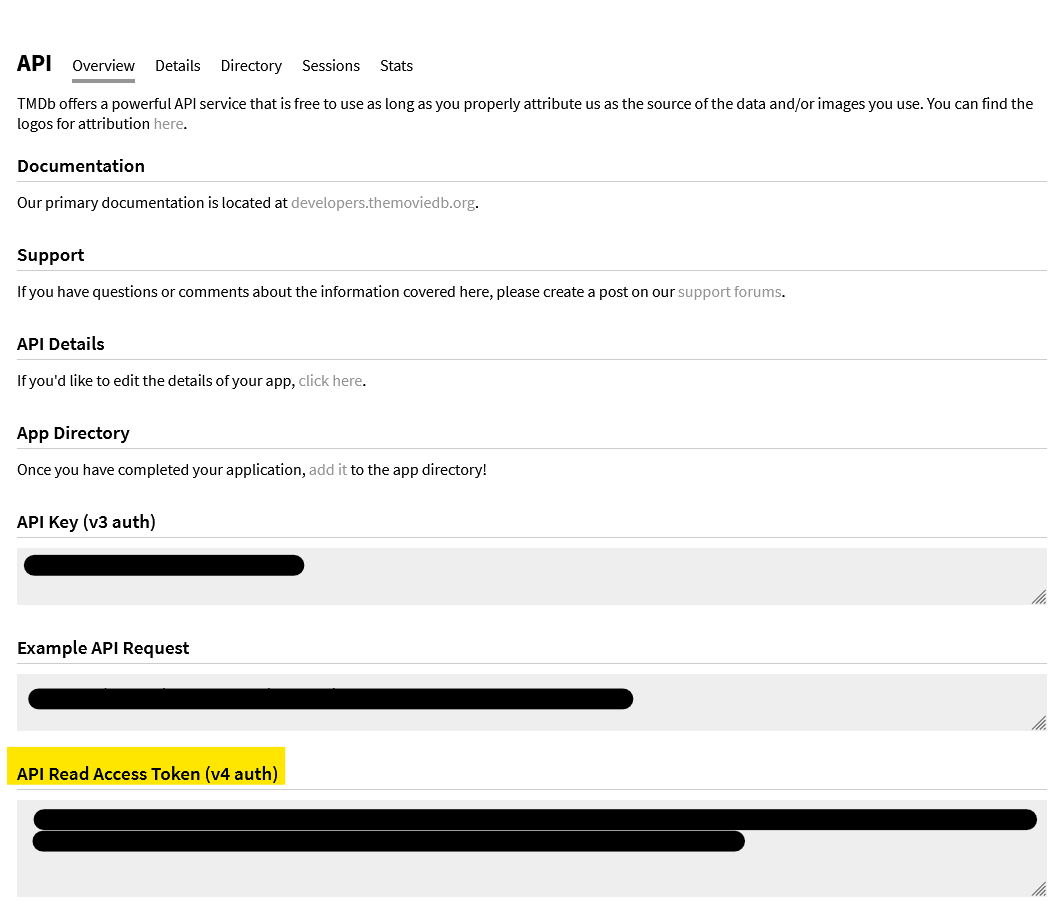
For this tutorial, you will be using the API Read Access Token located below the highlighted header in the image above. This token will need to be sent in the request header of every request to verify your identity.
With that, you’ve now gathered all you need to start searching for movies! Head over to your Twilio Console and get ready to code.
Set up your Twilio Function
From your Twilio Console, click the Explore Products label on the left-hand sidebar. Then, click on Developer tools in the menu on the left, and then click on the Function and Assets card label. Click on the blue button labeled Create Service, enter a suitable Service Name (I named mine horror-movies), and then hit the blue button labeled Next. You should end up on a page like the one below.
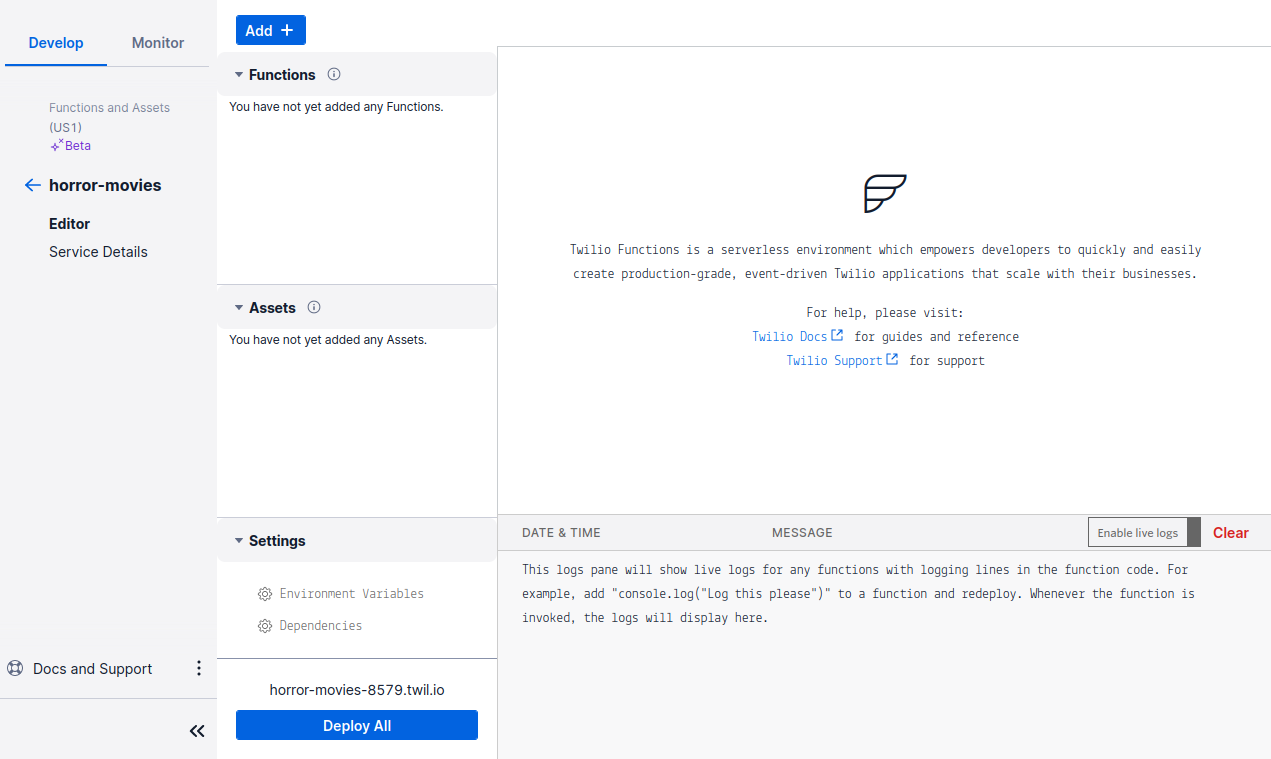
Click the blue button labeled Add on the top of the screen, and rename the path to /main.
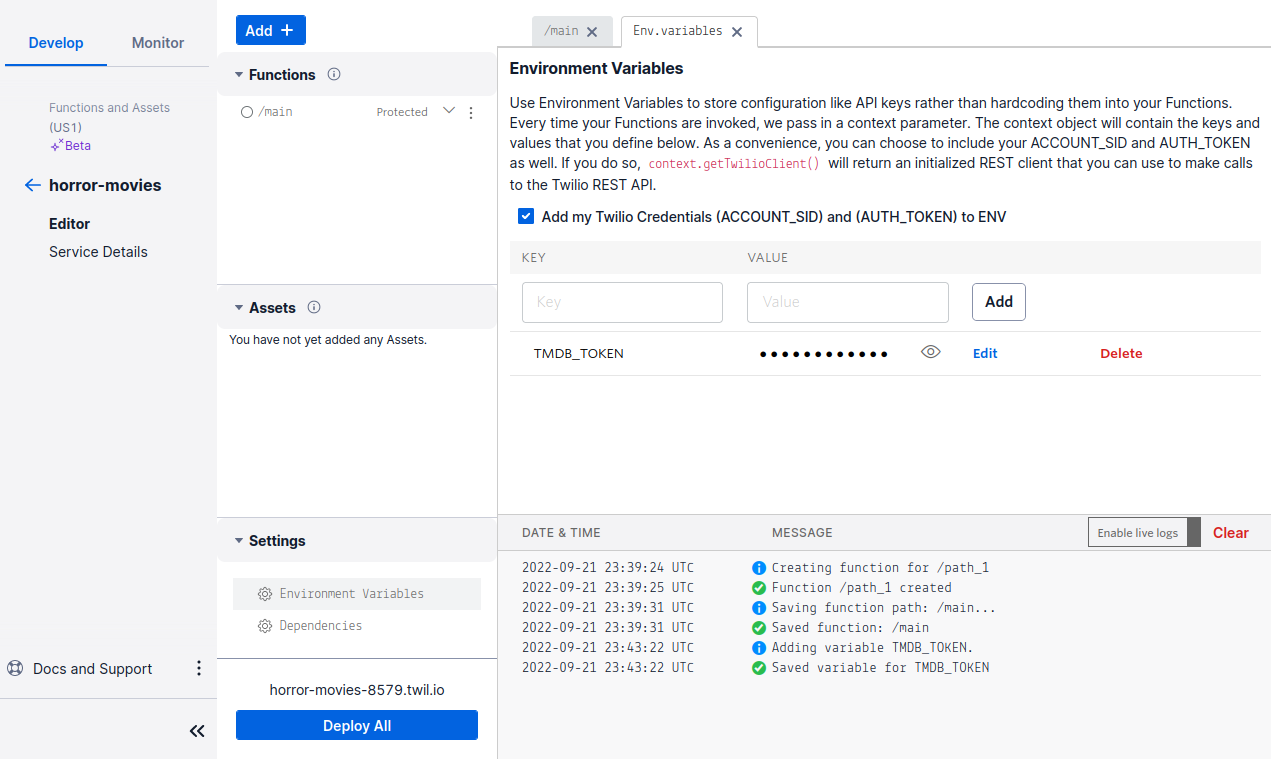
Next, click on the button labeled Environment Variables under the Settings header in the bottom left of the screen. Copy and paste your TMDB v4 API Read Access Token into the Value input box. Then, click the Key input box and enter TMDB_TOKEN, then click the button labeled Add.
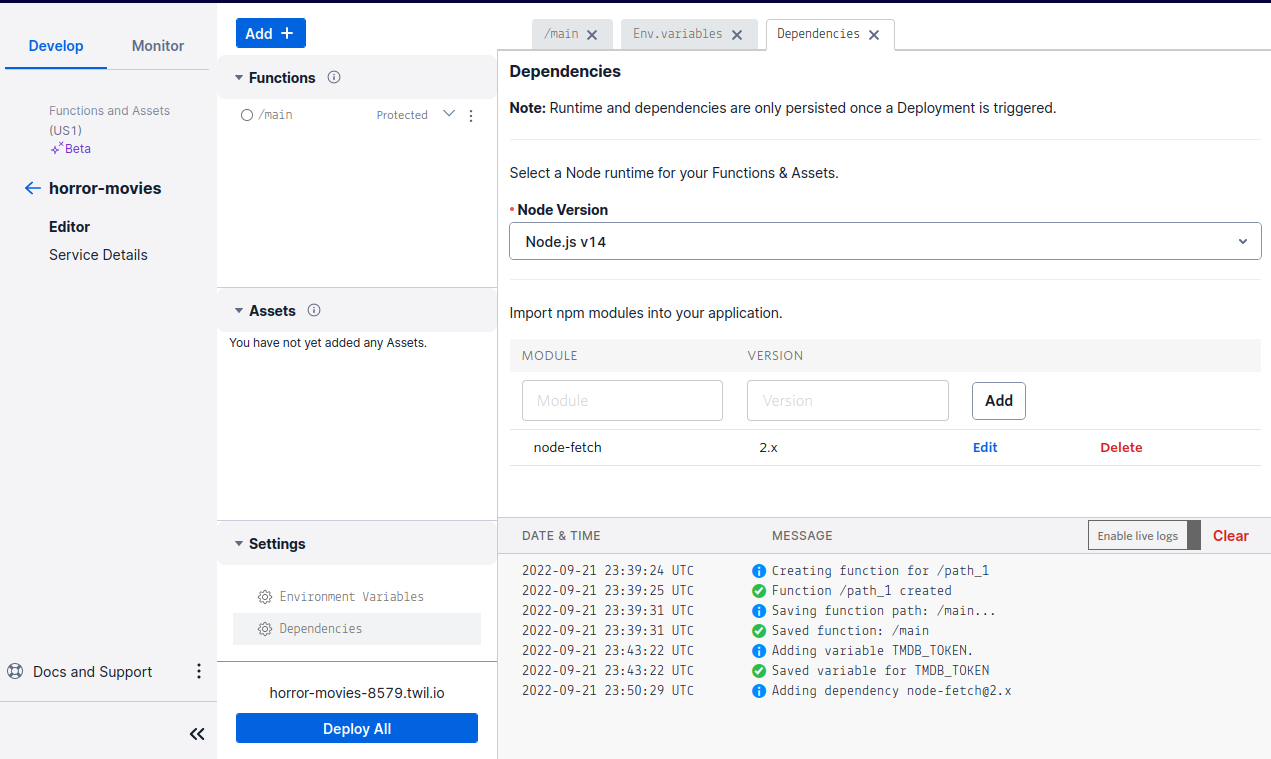
Finally, click on Dependencies, located below Environment Variables. You will need to add the node-fetch module, specifically version 2.x.
Enter node-fetch in the Module input box and enter 2.x in the Value input box. Then, click the button labeled Add.
You’re now ready to start implementing your code.
Write your code
The code will consist of four main parts:
- Give the user instructions on how to get movie recommendations
- Prompt the user for movie genres
- Search for movies using the TMDB API
- Provide details for a selected movie
Give the user instructions and prompt the user for movie genres
Click the /main path and then, in the provided code editor, replace the prewritten code with the following:
This code changes the function into an asynchronous function and initializes both the response and twiml variables that you will be using to respond back to the user. The stage variable tracks the user’s progress through the application and will be stored in a cookie that will persist on the server as the user sends text messages.
If there are no cookies (i.e. the user has texted the number for the first time or cookies have been cleared prior to texting), then stage is set to “intro”. The response variable then has the text message body set using the .setBody() function and the proper header is set using the .appendHeader() function. Finally, the response variable is sent through the callback function.
Next, you will need to create and send the messages that will guide your users through the movie recommendation bot.
In-between the initialization of the stage variable and the line where you set the response (highlighted in the code block above), copy and paste the following lines of code:
There will be two other paths besides the /main path in this application: the /search path and the /details path.
Users will be sent to the corresponding path depending on the value of the stage variable thanks to the switch statement.
In the “intro” case, the user is greeted with a message telling them to respond with the genre of movie they wish to see. The response variable is then set similarly to the previous step, but this time the “stage” cookie (not the variable) is initialized and set to “search”.
Before moving on, be sure to hit the blue button labeled Save!
Search for movies using the TMDB API
Next, you will need to implement the code that will perform the search. Click the blue button labeled Add on the top of the screen, and rename the newly created path /search. Replace the preexisting code with the lines of code below:
The first line of code will initialize the fetch variable which will utilize the node-fetch module. Then, the exported function is turned asynchronous and the response and twiml variables are initialized just like in the /main path.
The words variable is then initialized and set to the body of the text message which has been transformed into lower case and split into an array. The codes variable is then initialized with all the corresponding genre codes that you will use for the TMDB API.
The query and genres variables have been initialized and set to ensure that all searches will be for horror movies only. The response variable also has a new cookie attached that you will be implementing later - the “ids” cookie. The “ids” cookie will store the ids of the movies that were found in the search.
Above the setting of the response variable and below the genres variable, add the following code:
Using the text message the user sends, the query and genres variables are added on, depending on what genres the user searches. If the user searches for multiple movie genres, then all of them will be included.
The user is then notified of the genres that will be included in the search criteria. Finally, the fullMessage, movies, and idArray variables are initialized. The fullMessage variable will be added on, similarly to the query and genres variables, once a fetch is performed. The movies and idArray variables will be populated once a fetch is performed as well.
You will now need to fetch the data utilizing the TMDB API. Add this final bit of code below the code you just added, but above the setting of the response variable:
The API call is performed in a try-catch block for better error handling. Utilizing the node-fetch module, a GET request is performed on the movie discover endpoint of the TMDB API. The query value is passed in for the with_genres= parameter, and the TMDB_TOKEN environment variable you set earlier is used in the header for authorization.
The results of the fetch request in the res variable are then converted into JSON and stored in the data variable, then the first ten movies are stored in the movies variable you initialized earlier. In case there is an error when performing the API call, then the user will be sent the message “An error occurred when discovering movies from TMDB.”
Properties from the movies that are found (specifically the title and voting average) are then added onto the fullMessage variable. Their corresponding ids are stored into the idArray variable for use later when users wish to look up details about a movie. Finally, a message notifying the user they can learn more about a movie is added onto fullMessage and then the entire fullMessage variable is added onto the twiml variable.
Don’t forget to hit the Save button before moving on!
Provide details for a selected movie
Finally, you will need to perform another search that will show the details of whichever movie the user selects. Click the blue button labeled Add on the top of the screen, and rename the final path to /details.
Replace the preexisting code with the lines of code below:
Most of this code is similar to the /search path, except that the final portion of the code where you set the response variable is missing (you’ll see why shortly!). The only new portion is the initializing of the ids variable, which will pull from the ids cookie that you set in the last step.
The final pieces of code will look complicated, but don’t be intimidated! Copy and paste the following code into the highlighted line below the ids variable and above the return:
To make this easier, you can break this code into three separate cases based on the user response:
- A single number from 1 through 10
- “finish” or “finished”
- An invalid input
Regardless of case, the movie variable is initialized. If the user responds with a number from 1 through 10, then details on the selected movie will be searched and sent back to them. The id of the movie the user wants to know more about is stored in the selectedId variable and then used in the API call in the try-catch block, similar to the API call in the previous step.
The data received is then transformed into JSON and then used in the movie variable. The genres variable is initialized and formatted, then the movie’s genres are added onto it. Finally, the movie details are sent in a single message, a link to the movie’s page on TMDB is provided, and instructions to look at another movie or perform another search are provided. The response variable is then set.
If the user replies with “finish” or “finished”, then the bot sends “Goodbye!” and the “stage” and “ids” cookies are removed from the response variable. This allows the user to start back again from the beginning and perform another search if they wish.
Finally, if there is no valid input (not a number from 1 through 10 nor “finish” or “finished”), then nothing is sent back to the user (as the twiml variable has no text).
Now hit the Save button and then hit the blue button labeled Deploy All. After the code is built and deployed to Twilio’s servers (this may take a while), you can now add the Function to your Twilio number.
Add the Function to your Twilio number
Navigate to your Active Numbers page, and then click on the Twilio phone number that you are using for this tutorial.
Scroll down to the Messaging section. Under the heading that says A MESSAGE COMES IN, click the dropdown menu and select Function. Next, select your Service in the dropdown menu under the SERVICE header, then select ui in the dropdown menu under the ENVIRONMENT header, and finally the function path you named earlier under the FUNCTION PATH header.
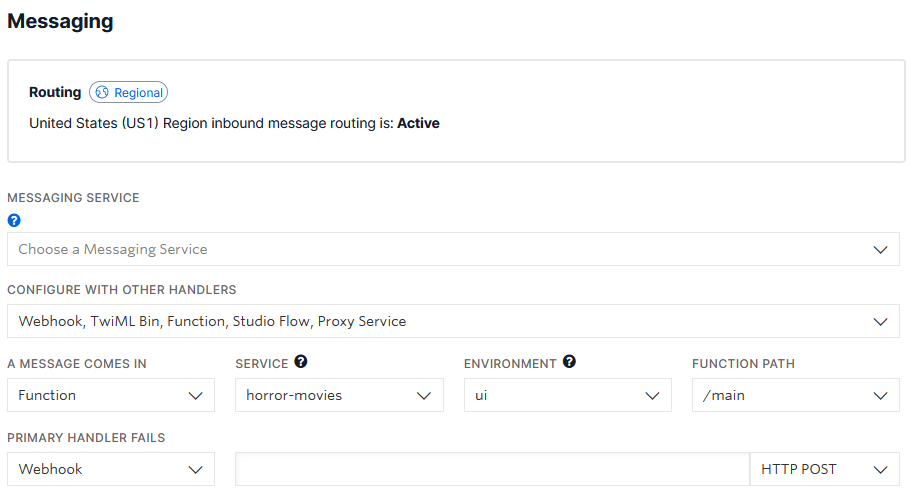
After that, hit the blue button labeled Save at the bottom of the page. Your Twilio phone number should now be set up and you can now get some spooky recommendations!
Conclusion
Though this tutorial only searches for horror movies, you can take a look at the TMDB API documentation and see what else you can come up with. Perhaps you could even send movie recommendations via email by using Twilio SendGrid? Maybe utilize Twilio’s WhatsApp API in case that’s your primary form of communication? Regardless, I hope you have a great time during the spookiest month of the year!

I can’t wait to see what you build next!
Dainyl Cua is a Software Engineer who loves helping others code. They would love to talk at any time and help you out. They can be reached through LinkedIn.
Related Posts
-
 Building a Greeting Card Generator with the Lovable Twilio ConnectorChiara Massironi
 -
 How to Approve Real Users and Block Fake Accounts at Sign Up with Lookup and VerifyKelley Robinson
 -
 How to Handle No-Answer/Pickup Scenarios with Voicemail and Callback using Twilio VoiceAmanda Lange Niels Swimberghe
Related Resources
Twilio Docs
From APIs to SDKs to sample apps
API reference documentation, SDKs, helper libraries, quickstarts, and tutorials for your language and platform.
Resource Center
The latest ebooks, industry reports, and webinars
Learn from customer engagement experts to improve your own communication.
Ahoy
Twilio's developer community hub
Best practices, code samples, and inspiration to build communications and digital engagement experiences.