Getting Started with Arduino on the LinkIt ONE
Time to read:
May 20, 2016
Written by
This post is part of Twilio’s archive and may contain outdated information. We’re always building something new, so be sure to check out our latest posts for the most up-to-date insights.

Arduino is an amazing platform for building interactive hardware projects. In the next ten minutes we’ll get our first program running on the SeeedStudio LinkIt ONE development board.

If you’re coming to SIGNAL (you are coming to SIGNAL right? – use promo code BSCHOOLEY20 for 20% off your ticket) you’ll be receiving a LinkIt ONE in the Hackpack we’re giving to every attendee. Stop by the Hackpack station and we’ll help you get it up and running.
What is the LinkIT ONE?
The LinkIt ONE is a development board that is made by the collaboration of SeeedStudio and MediaTek. It features an ARM7 EJ-S™ processor on a board that is pin-out compatible with Arduino. Onboard you’ll find support for:
- GSM/GPRS radio for cellular connectivity
- Wi-Fi radio
- GPS radio
- Bluetooth radio 2.1 / 4.0
- AAC/MP3 support with built-in codecs
- SD card slot
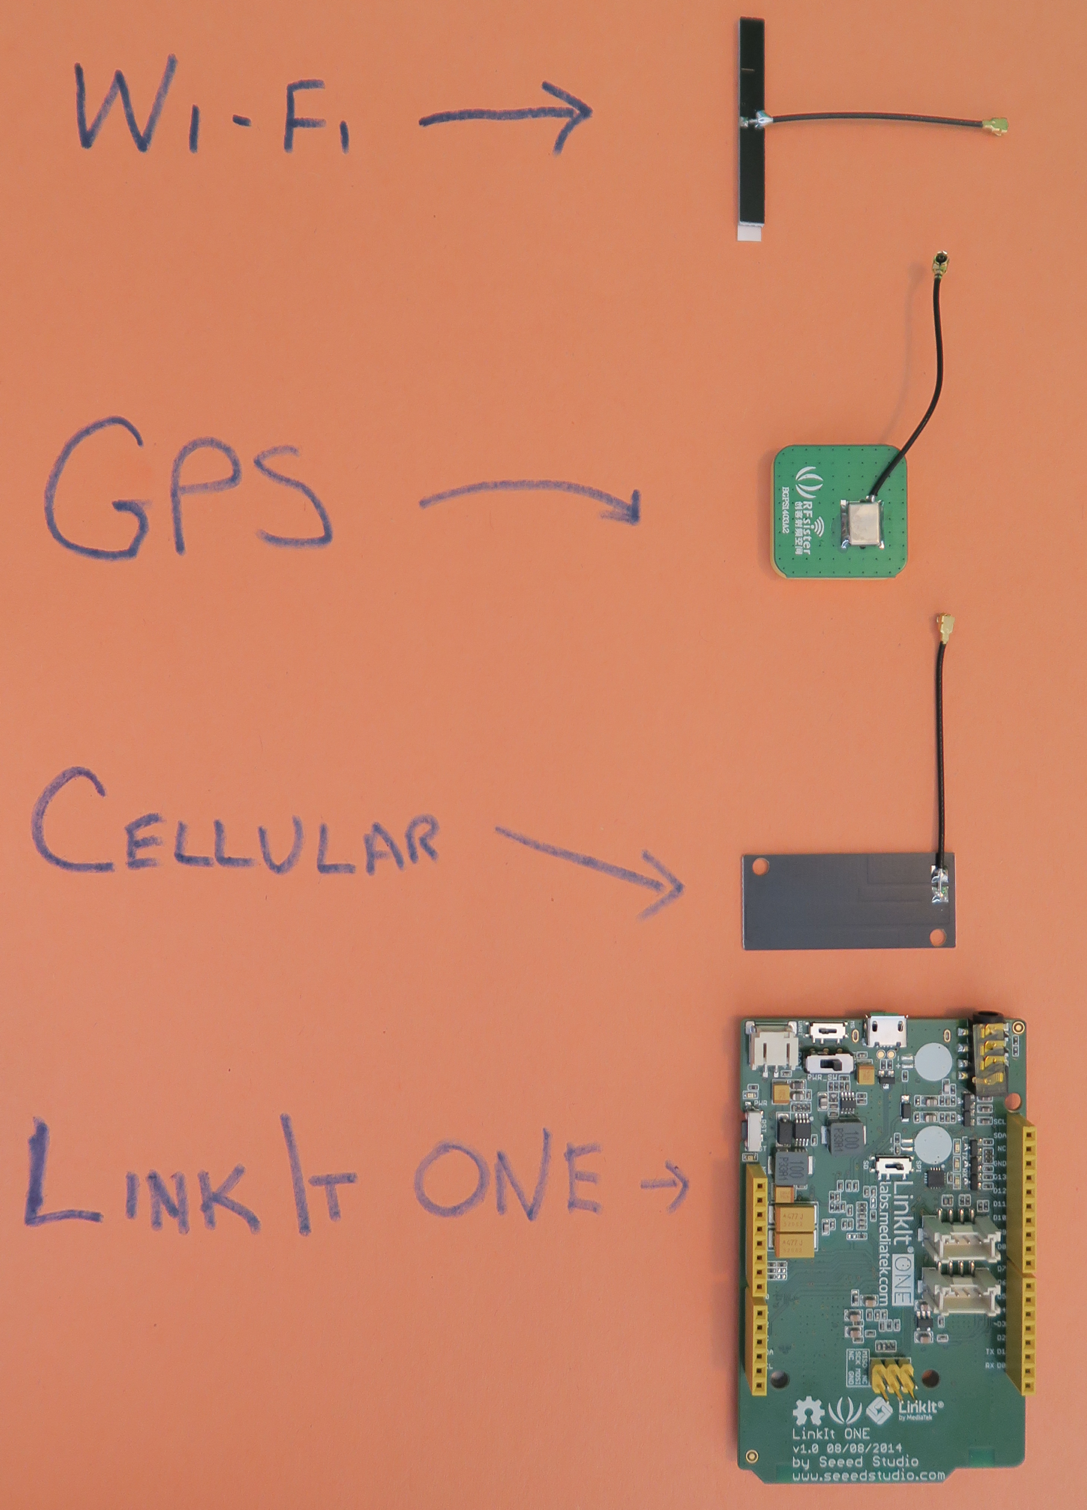
It comes with all of the antennae you need for the radios in the device. Here’s what they look like:
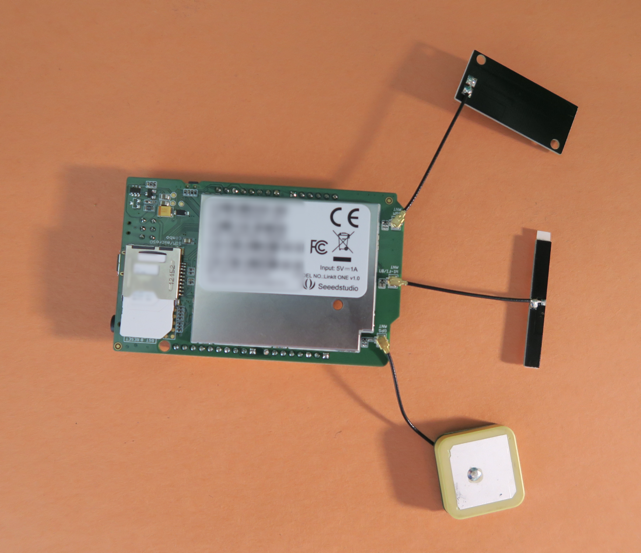
Once assembled the completed package looks like this:
We won’t be using the Wi-Fi, cellular or GPS in this tutorial but with this setup you’ll be ready to go for any hacking you do involving these capabilities.
Now that we have the hardware sorted out, let’s install the software we need to build an app.
Getting Ready for Development
Here’s everything we need to install to program the LinkIt ONE:
- Arduino IDE
- Mediatek USB COM port driver for LinkIt ONE
- Mediatek LinkIt ONE SDK
Let’s start by installing the Arduino IDE. You can find the latest version here. The current version at the time this blog post is being written is 1.6.9. On Windows you can choose the installer if you have admin access to the machine or the zip file if you do not. If you need help installing the Arduino IDE, you can find guides for your OS of choice here:
- Windows
- Mac OS X
- Linux: MediaTek does not offer support for Linux. For the super ambitious, here’s the installation guide for the Arduino IDE. Then you’ll want to follow this Instructables post if you want to get the LinkIt ONE working on Linux.
To communicate with the LinkIt ONE over USB we need to install a USB COM port driver. Download and install the USB COM port driver for your OS from the links below:
MediaTek says to reboot at this point (and several other points) but I’ve found it unnecessary during my installation. Your mileage may vary.
The last step in our installation phase is installing the MediaTek LinkIt ONE SDK. This step is done entirely in the Arduino IDE so open that now.
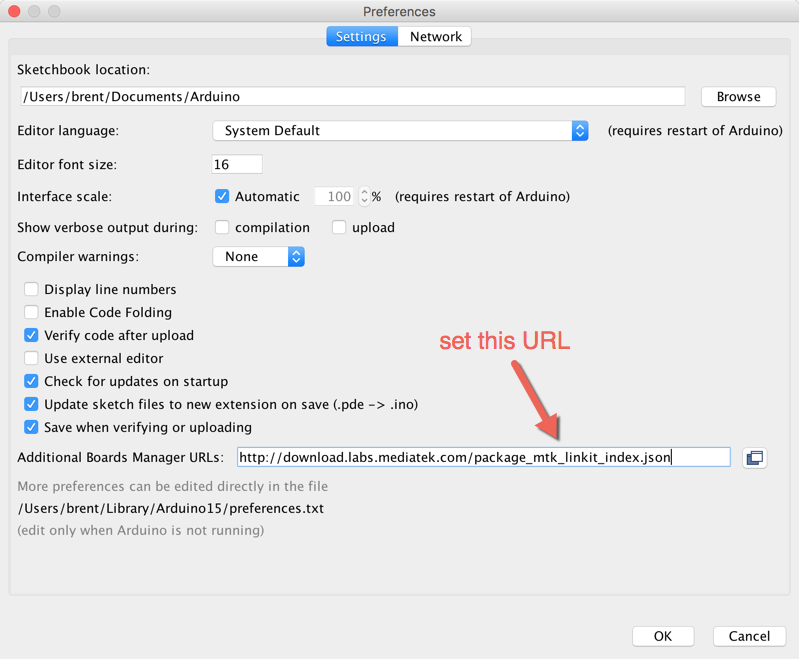
In the IDE, open the Preferences dialog. On Windows this is in the File menu. On the Mac it is under the Arduino menu item. The dialogs in Arduino IDE look almost identical between Windows and Mac so I’ll just show the Mac version in the following screenshots.
Set the Additional Boards Manager URLs field to http://download.labs.mediatek.com/package_mtk_linkit_index.json and then click OK:
Under the
Tools menu choose Board->Boards Manager…: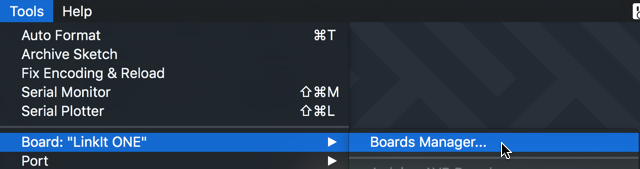
When the dialog opens it will download the latest list of compatible boards and one of them will be the LinkIt ONE. Search for “link” in the search box at the top, click the row for
LinkIt ONE and press the Install button: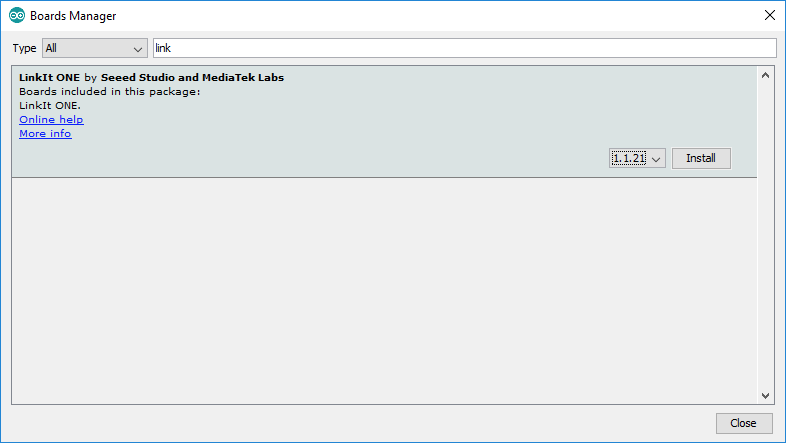
Next, let’s update the firmware on the LinkIt ONE board. Set the LinkIt ONE board into
Mass Storage/Firmware Update mode by setting the outer switch to the up position. Here’s what that should look like: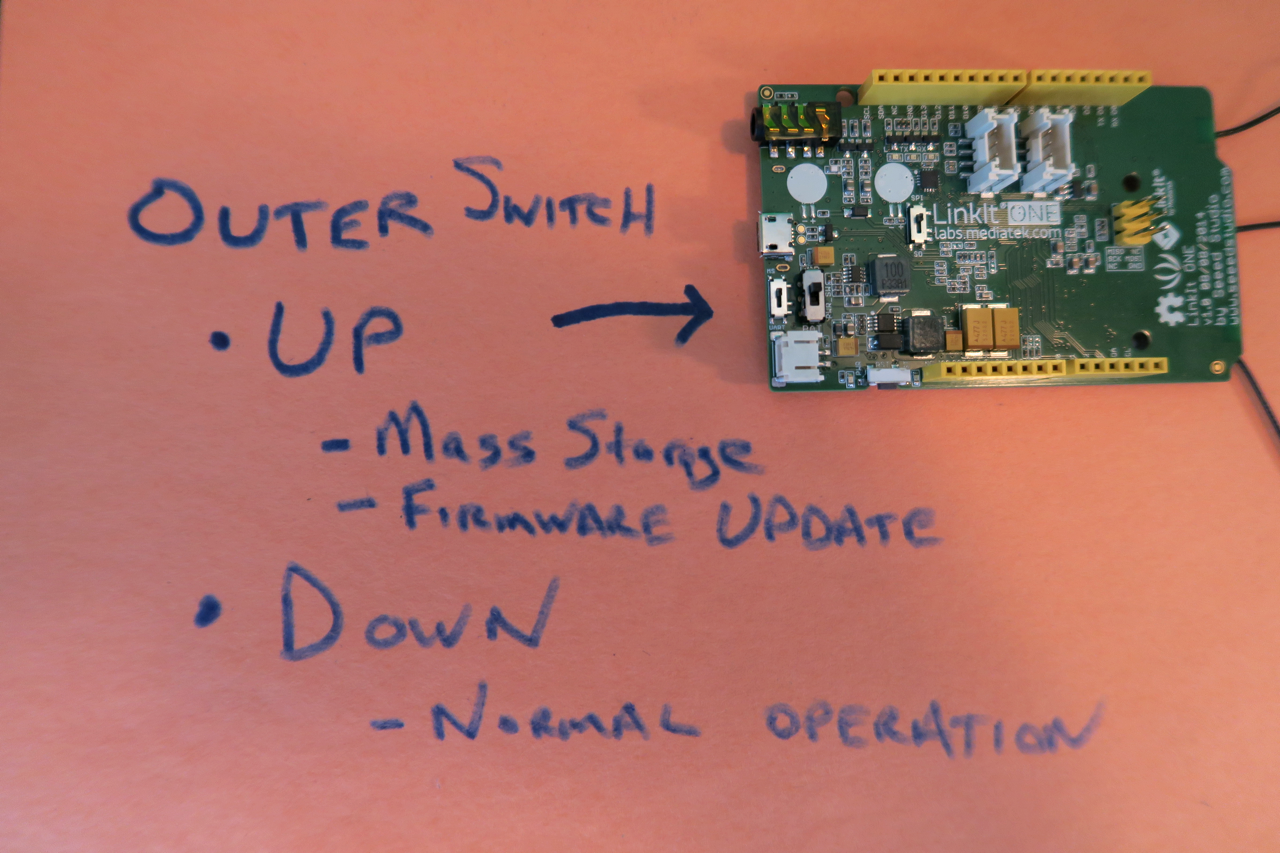
Once you have that switch set correctly, plug the LinkIt ONE into your computer using a micro USB cable.
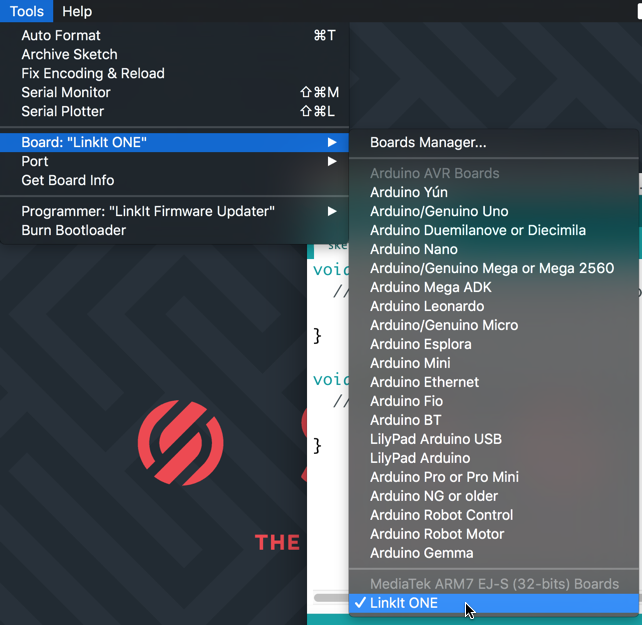
In the Arduino IDE select Tools->Board->LinkIt ONE:
Next, select
Tools->Programmer->LinkIt Firmware Updater: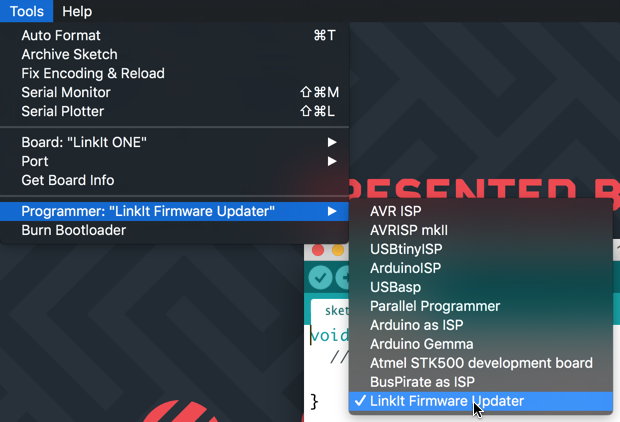
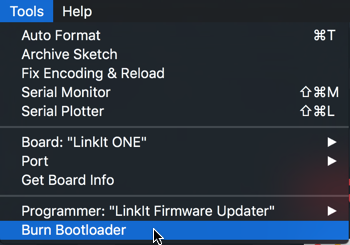
Select Tools->Burn Bootloader to launch the LinkIt ONE Flash Tool:
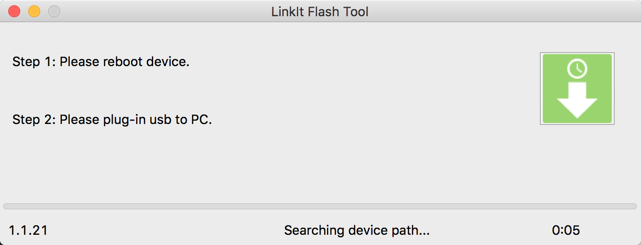
Click the download button in the Flash Tool:

When the following screen appears, unplug your USB cable and replug it in again and the upgrade will begin automatically:
When it’s done, flip the outer switch back to the down position for normal operation mode. That’s all for configuration. Let’s write our first Arduino program for the LinkIt ONE.
Make the LED Blink
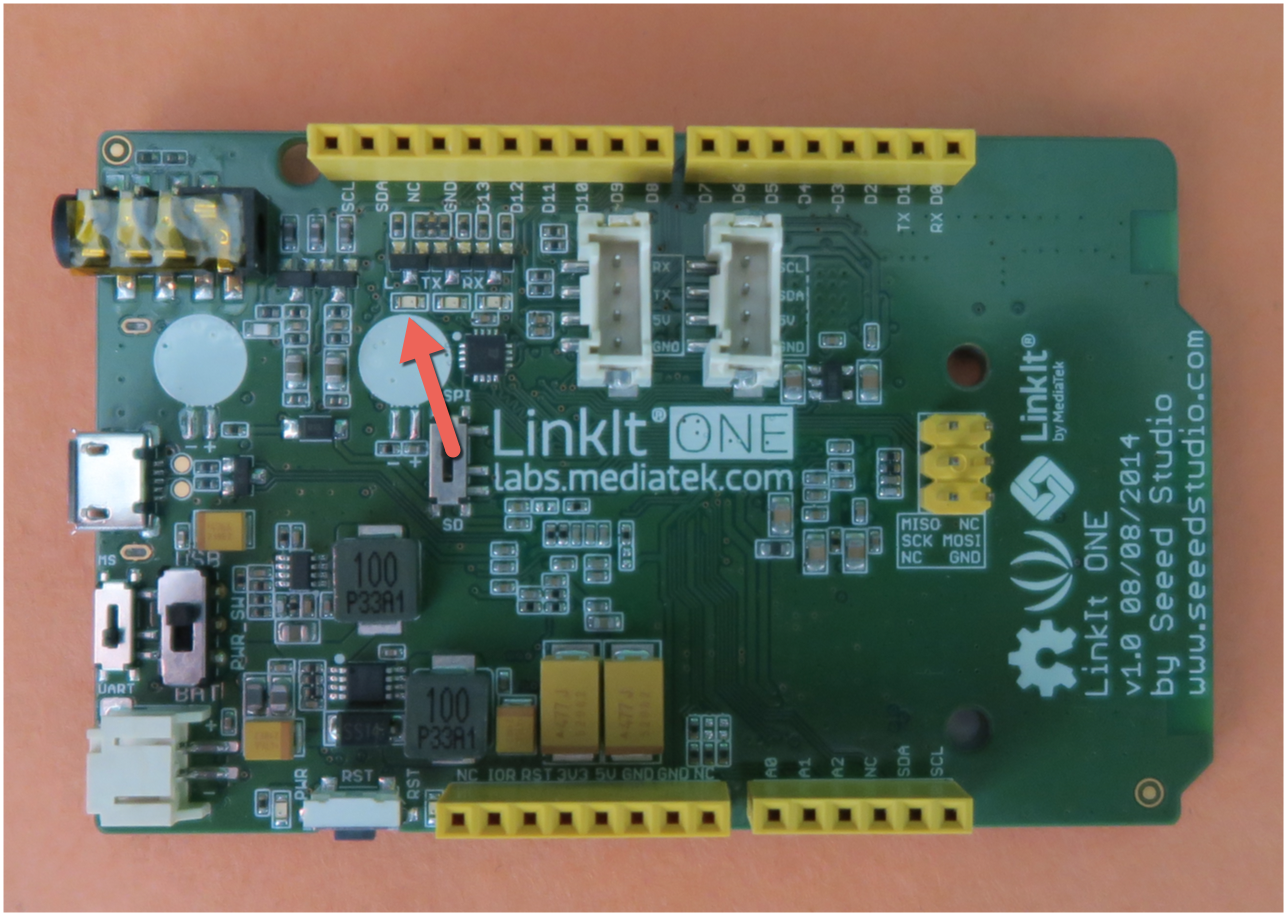
In the Arduino world there’s a canonical ‘Hello World’ that is the simplest program you can write to show physical output. The program is called Blink and running it on an Arduino board makes the onboard LED connected to digital pin 13 blink on and off. On the LinkIt ONE you can find that LED here:
Arduino programs, referred to as Sketches with a .ino file extension, are written using two functions:
setup() and loop(). The setup function is used to, as you probably guessed, set up anything that needs to be configured before the main program runs. This is where you’d configure your input and output pins, set up network connectivity, initialize values, etc. The loop function is the main program and it repeats indefinitely.
Our setup function will set pin 13 as an output pin. We can write the value HIGH to that pin to turn the LED on and LOW to turn it off. Create a new Sketch if you haven’t already and replace the setup function with the following code:
The loop function for our Sketch will use the digitalWrite function to toggle pin 13 from HIGH to LOW with a one second delay between each. The effect is that the LED will turn on for one second and turn off for a second and repeat until the device is powered off. Replace the loop function in your Sketch with this code:
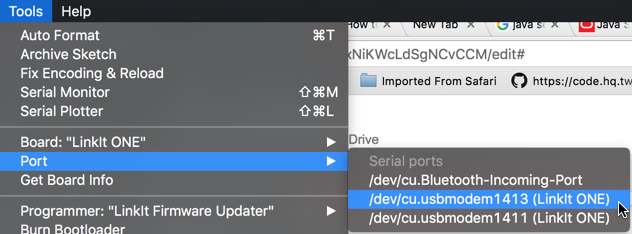
We’re ready to upload our Sketch to the LinkIt One. Under the Tools menu select Port and then choose one of the ports that ends with “(LinkIt ONE)”:
Click the
Upload button to compile and load your Sketch onto the LinkIt ONE. If everything is configured correctly the Sketch will start running on the board and you should see the LED blink off and on.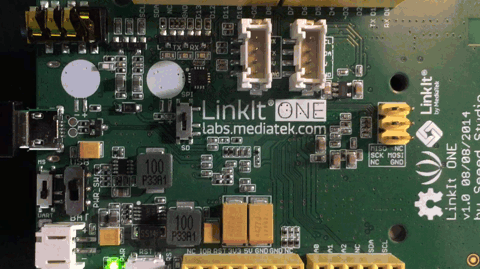
Congratulations on writing your first program on the LinkIt ONE!
What’s Next?
Now that you have your LinkIt ONE board up and running, feel free to use your imagination on what to build next. Here’s some things you might consider doing next:
- Use the GPS and cellular functionality to make a car tracker
- Get some Grove sensors (like the accelerometer, touch sensor, temperature sensor, etc.) and program something cool with them. There’s a starter kit on Amazon that has a bunch of sensors to try out.
I’m really excited to see what you build with this device. If you’re coming to SIGNAL you’ll be receiving one of these devices. Come say hi at the Hackpack station and let’s talk about what you might build with it. If you have any questions or comments you can find me on Twitter @brentschooley or email me at brent@twilio.com.


Related Resources
Twilio Docs
From APIs to SDKs to sample apps
API reference documentation, SDKs, helper libraries, quickstarts, and tutorials for your language and platform.
Resource Center
The latest ebooks, industry reports, and webinars
Learn from customer engagement experts to improve your own communication.
Ahoy
Twilio's developer community hub
Best practices, code samples, and inspiration to build communications and digital engagement experiences.