Getting Started with gRPC in .NET Core
Time to read:
May 29, 2020
Written by
Reviewed by
.png")
As a developer in the 21st century, you are often faced with addressing communications between various modules of your project. Internal, or “intra-process” communications, are often handled with loosely coupled messages, but forging beyond the process boundary can often be challenging. Adding to this requirements for scalability, testing, and security can often leave you scratching your head in search of a better way.
Over the years Microsoft has often revealed various technologies to handle this niche. Remote Procedure Calls (RPC), DCOM, Named Pipes, and Windows Communication Foundation (WCF) are examples of technologies that have fit the bill in the past. A new technology is now making the scene, this time with the assistance of Google.
For over 10 years now, Google has implemented an infrastructure to interface the vast number of microservices it oversees. In 2015, they set out to create the next version of this technology and shared what they had learned with others in the community. This technology came to be called gRPC.
What is gRPC?
In short, gRPC is Google’s version of RPC, or Remote Procedure Calls. It is a language-agnostic framework designed to provide high performance communication between services. gRPC supports four different communication types:
Unary – which is the simplest form of RPC where a request is made and a reply is provided
Server Streaming – where a client sends a request and the server responds with a stream of data
Client Streaming – in which the client sends a stream of data and the server responds with a single response
Bidirectional Streaming – where the client and the server both stream data back and forth
The streaming capabilities built into the framework make gRPC stand out and add great flexibility.
In layman's terms, gRPC lets you call methods on a remote machine or service. Pretty cool huh? In this tutorial you’ll put together a gPRC solution in Visual Studio and see how it works.
Understanding the case study project
The tutorial in this post will guide you through creating a solution with 3 projects: a server project, a client project, and a shared common code project. You will create a Weather service that will simulate temperature data and weather conditions for a fictitious area. You’ll also build a client app that will request weather data. You will learn the basics of the gRPC technology and create a foundation for experimenting further.
Prerequisites
You’ll need the following tools to build and run this project:
- .NET Core SDK 3.1 (includes the APIs, runtime, and CLI)
- Visual Studio 2019 (the Community edition is free) with the ASP.NET and web development workload
- GitHub extension for Visual Studio (optional, for cloning the companion repository)
You should have a general knowledge of Visual Studio and the C# language syntax. You will be adding and moving files amongst projects, changing component properties, and debugging code.
There is a companion repository for this post available on GitHub. It contains the complete source code for the tutorial project.
Verifying your .NET CLI version
Before we get started, test your environment to make sure you have everything set up. Open a Windows Command Prompt or Powershell console window and execute the following command-line instruction:
If all goes well, it should come back with the version of the .NET SDK that is installed. At the time of this writing, the latest version is 3.1.300.
Understanding Protocol Buffer files
The crux of gRPC is Protocol Buffer files. These files implement a contract-first approach for defining the communications across the wire. It doesn’t matter if you are talking to a service on your local machine or one across the globe. The implementation is the same. These are text files with a .proto file extension which are compiled by the Grpc.Tools library using the protocol buffer compiler. The output is generated code (.cs files), similar to how WCF produces proxy code or the code-behind generated portions of WinForms. The idea is the same and these files should never be altered manually.
Here’s an example:
The file starts with a declaration specifying the syntax in use. In this case, it is proto3.
Following this an option specifying the namespace where the generated code classes will be placed. If the namespace option is absent the package name will be used as the namespace.
Next, the code defines a RPC service interface. The compiler will use this to generate code for the interface and stubs. In this case, a class named Greeter will be generated with a method called SayHello. The parameters for this method will be a HelloRequest object, defined in the next code block, and returns a HelloReply object, also defined in the following code:
Lastly, the message objects are defined. These are basically data transfer objects that the compiler will use to construct POCOs (“plain-ol’ class objects). In the example, HelloRequest and HelloReply each have a single field of type string. Calling code passes in a name to the first object and the second replies with a message.
Protocol messages can only understand certain data types. Some of the common ones are:
|
Proto Type |
C# Type |
|
string |
string |
|
int32 |
int |
|
int64 |
long |
|
bool |
bool |
The layout of each field is the type, name, and field number, which is a unique number within the message. This field number is used to define the sequence of the field within the message and is usually sequential (1 for the first field, 2 for the second, …).
Message fields can either be singular entities, meaning the message can have 0 or 1 instances of the field, or it can be repeated, where there are 0 or more instances of that field. A common use of repeated is when a list or collection is returned.
There are many features and aspects of protocol buffers beyond the scope of this post. You can find more information in the Additional Resources section at the end of this post.
Creating the solution structure
You’ll be creating one Visual Studio solution with three projects. The first will be the gRPC Service or server component. The others will be a client and a shared library. The shared library will provide code that is used in both the server and the client. Each project requires access to the proto files and keeping them in sync can become a nightmare.The solution is to have it one one place that both projects can access.
Creating the Server project
Begin creating the solution structure by creating a new project using the gRPC Service template. You will only see this template if the prerequisites are in place. If you can’t find it type grpc in the search box and it will narrow your search.
In the Configure your new project window, name the project Server. Specify gRpc-Getting-Started for the Solution name and pick a folder where you’d like to keep your solution. Because you’ll be adding additional projects to the solution, it’s a good idea not to put the solution and the project in the same folder.
In the Create a new gRPC Service window, don’t make any changes to the defaults. You won’t need authentication or Docker support. Go ahead and create the project.
This is a good point to add your solution to source code control.
Open the greet.proto file in the Protos folder. Change the option for the namespace to:
Creating the Shared project
With the Server project in place, you can reorganize things a bit. Both the Server and Client projects are going to need access to the files generated by the protobuf compiler. Many examples of gRPC project design suggest copying the .proto file(s) from one project to the other(s). That approach is prone to error, so it’s better to have the protos and their generated files in one place and share them.
Add a new C# Class Library (.NET Core) project named Shared and add it to the solution.
You need to add a few NuGet packages to this project so it can process the protos. Add the following packages. If you’re using the Package Manager Console, take care that the Shared project is selected in the Default project list.
Look in the Solution Explorer and find the Protos folder in the Server project. Cut the folder and paste it into the Shared project. Yup, you are moving the greet.proto file to another project.
You have to modify the properties of the greet.proto file so it knows it needs to be compiled. Select the file, right-click, click Properties on the context menu, and change the Build Action to Protobuf compiler. Also ensure the value for gRPC Stb Classes is set to Client and Server. This specifies how the Protobuf compiler will generate code.
The Properties panel should look like the following screenshot:

If you don’t find these options, you may have forgotten to add the NuGet packages.
Back in the Server project, add a reference to the Shared project by right-clicking on the Dependencies node, clicking Add Project Reference, selecting the Shared project, and clicking OK.
Creating the Client project
Finish the solution architecture by adding the gRPC client project. The template for this one is a C# Console App (.NET Core). Specify the Project name as Client and add it to the solution.
Modify the language version for this project so you can implement some of the new C# 8.0 syntax. Double-click the Client project in the Solution Explorer. This will open an XML format .csproj project file. In the PropertyGroup node, add an element so the file looks like the following:
You can now use the latest bells and whistles in C# 8.0!
Add the Grpc.Net.Client NuGet package to the Client project.
Also add a project reference dependency to both the Server and Client projects.
Open the Program.cs file in the Client project.
Add the following using directives to the existing code:
Replace the Main method with the following C# code:
You’ll see that GreeterClient lints.
The new code changes the signature of the method so that it can be async. gRPC calls can be either synchronous or asynchronous. The async option is a good choice when there is potential for blocking.
A channel will provide communication and enable you to instantiate a GreeterClient on the channel. Since you are using the default project template for the Server project, the sample .proto file is being used.
Remember the greeting service definition, service Greeter, in the greet.proto file in the Shared project? The var client = new Greeter.GreeterClient(channel); statement will access the code that the Protocol compiler generates from it. These files will be generated when you build the Server project, so ensure you build the project before you try to access these. Otherwise, these classes would not have been generated yet and you would be scratching your head, wondering why. With the client we now have access to the SayHelloAsync method. Pass it a new HelloRequest, and just like a function local to the Client project, you’ll get a reply which the first Console.WriteLine statement sends to the console.
Right-click on the Server project and click Build. The project should build without errors and you should see a new folder, Services, in the project. In the Services folder you should see a new C# class file, GreeterService.cs.
Open the class file. You’ll see the GreeterService class, and you’ll see that a number of objects are linted. Add the following directive to the existing list of using directives:
This should resolve any outstanding errors.
Testing the application
When you have two executable projects in the same solution it is necessary to start each project separately. There are several ways of doing this. Here’s one: Start the Server project in debug mode and once it is running detach it by going to the Debug menu and selecting Windows > Processes. In the Processes window, right-click the Server.exe process and click Detach Process. The program will continue to run while freeing Visual Studio so you can debug the Client project.
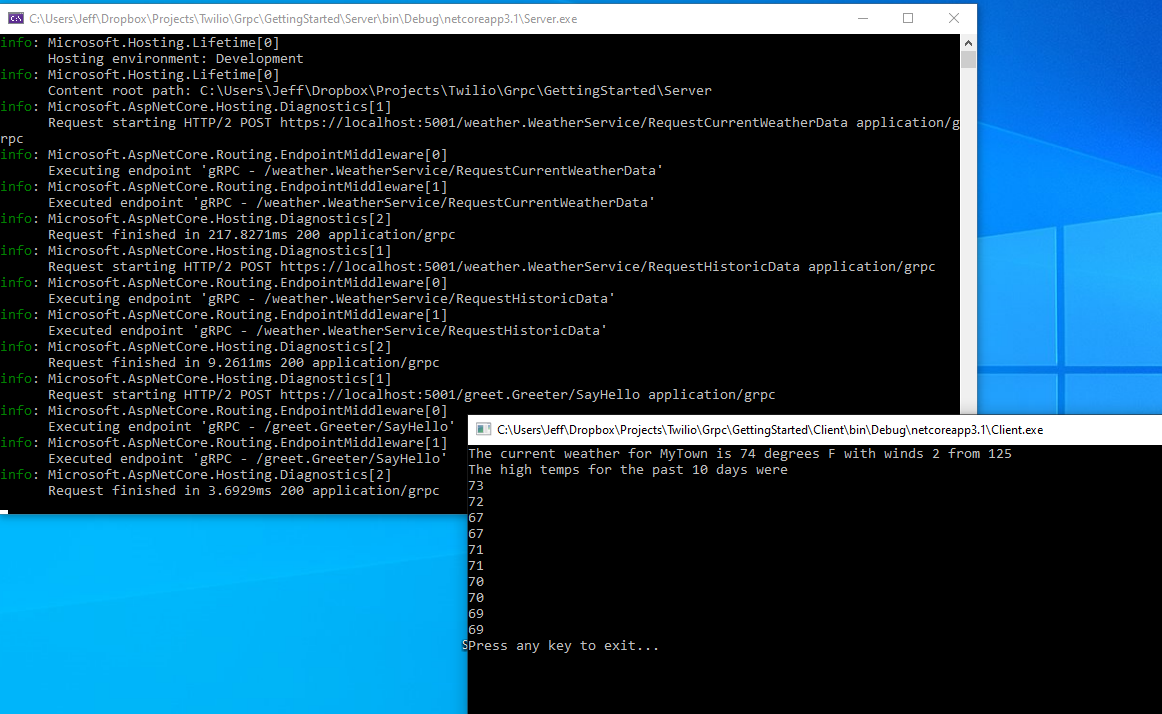
Give it a try. Build the solution and start the Server project without debugging. You should see a console window which will display output similar to the following after a brief pause:
Next, start the Client project. You should see a second console window for the Client console project containing:
The Server console should show something like this:
Adding a protocol buffer
Up to this point you have been doing a lot of foundational work: setting up the environment, adding projects, adding packages, and ensuring dependencies and references are set up. Now you can start adding more functionality to the application.
A protocol buffer is a good place to start. Many applications need to take structured data and send it through a communication channel. That’s what a protocol buffer does. In this project, you’ll create a mockup of a simple weather service and pass it through your gRPC channel.
If you recall, when you created the Server project, you specified a gRPC service as the template. That template also added an item template of type Protocol Buffer.
Go to the Protos folder in the Shared project and add a text file named weather.proto.
The file is empty, so add the following code:
The code starts with the familiar syntax, namespace, and package statements. Next you have a block that will be generated as a class WeatherService. This class will have two methods:
RequestCurrentDatawhich takes aWeatherRequestparameter and returnsWeatherDataReplyRequestHistoricDatawhich takes aWeatherRequestparameter and returnsWeatherHistoricReply.
It is really that simple.
Look at the data types or messages: The WeatherRequest message is just a wrapper for a string where we specify a location.
As when you moved the greet.proto file from the Server project to the Shared project, change the file properties of the weather.proto file so Build Action is set to Protobuf compiler and gRPC Stub Classes is set to Client and the Server. See the image above for reference.
In the Server project, create a new C# class file in the Services folder named WeatherService.cs and replace the existing contents with the following C# code:
This is the class and methods that you defined in the weather.proto file. Notice how the class is based on the MyWeather.WeatherService.WeatherServiceBase generated class. Overriding the two methods specified in the weather.proto file will add the functionality that needs to be provided. A common GetWeatherData() function is used in both the current weather and historical weather calls. This will streamline things a bit. The RequestHistoricData method returns a list of weather data, while the RequestCurrentWeatherData method returns a single data point.
Just one more thing: You have to inform the server routing of the added service. Open the Startup.cs file in the Server project. Add the following directive to the existing list:
Note that this using directive correlates to the namespace option in the weather.proto file we added. The code uses a separate namespace to clearly show the relationship between the proto and the generated classes.
In the Configure method, find where the GreeterService mapping is done with the MapGrpcService method. You need to add a similar line for the WeatherService. This will register the class with gRpc.
Now you are good to go with a gRPC process that returns information.
Testing the completed application
Testing the application is simply a matter of starting the Server and Client projects as you did before. The console window outputs are descriptive, so they’ll give you a feel for what is happening. When all is well, the Client application console window will show the current weather data (fictious of course) along with the made-up historic weather data we generated.
You should see two console windows looking something like the following screenshot:
Potential enhancements
This post only just touched the surface of the capabilities of gRPC. Starting from this foundation, you could add a method to report weather alerts. You could also implement bidirectional communication from the Client application console window, perhaps to request additional weather information. The historic weather data could also be provided in a stream rather than a list. gRPC could also be added to a more realistic application with security features, authentication, and metadata to monitor for lost or timed-out connections and more.
Summary
gRPC is a great addition to interprocess communications. Its tight data size makes transmissions fast while minimizing bloat. It has the flexibility to fit into many different languages while maintaining endpoint-to-endpoint security.
This post introduced you to gRPC and the basic elements of using gRPC in a C# .NET project. It also showed you how to consolidate your gRPC protocol buffer definitions in a shared .NET assembly. In testing the solution, you gained some experience running multiple projects from Visual Studio by detaching one of the programs.
Consider adding gRPC to your toolbox.
Additional resources
Protocol Buffers Developer’s Guide – The canonical Google documentation is a great place to continue your training on working with gRPC.
Why we recommend gRPC for WCF developers – Microsoft recommends gRPC for Windows Communication Foundation developers who are migrating to .NET Core. This article explains why.
gRPC – Microsoft’s introduction to gRPC is a good companion piece for this post. Read it after you’ve built this project.
Cloud Native Computing Foundation – gRPC started at Google, but it’s open source and part of the CNCF.
TwilioQuest – Looking to improve your programming skills while having some fun? Join the TwilioQuest team and help defeat the forces of legacy systems!
gRPC-Getting-Started – This post’s companion repository on GitHub is available for your use under an MIT open source license.
Jeffrey Rosenthal is a C/C++/C# developer and enjoys the architectural aspects of coding and software development. Jeff is a MCSD and has operated his own company, The Coding Pit since 2008. When not coding, Jeff enjoys his home projects, rescuing dogs, and flying his drone. Jeff is available for consulting on various technologies and can be reached via email, Twitter, or LinkedIn.


Related Resources
Twilio Docs
From APIs to SDKs to sample apps
API reference documentation, SDKs, helper libraries, quickstarts, and tutorials for your language and platform.
Resource Center
The latest ebooks, industry reports, and webinars
Learn from customer engagement experts to improve your own communication.
Ahoy
Twilio's developer community hub
Best practices, code samples, and inspiration to build communications and digital engagement experiences.