Integrate Twilio Flex and Calendly

Time to read: 6 minutes
October 13, 2022
Written by
Reviewed by
In this article, I'll demonstrate how to integrate Calendly with Twilio Flex. This integration will allow you to allow customers to schedule callbacks from your call center agents by using Calendly’s API V2 within Flex. The resulting union of the two is an effective tool for improving the experience of your contact center agents and building enduring relationships with customers.
This tutorial will teach you:
- A way for clients to schedule callbacks from contact center representatives using the appointment scheduling service in Calendly
If you want to jump ahead and grab the full working code for this, visit the github repositories for this project
- Twilio Function: https://github.com/somtoeluwa/calendly-webhook-handler-twilio-function
- Twilio Flex Plugin: https://github.com/somtoeluwa/plugin-calendly-attributes
Let's get started!
Solution: Integrating Calendly’s V2 API with Flex
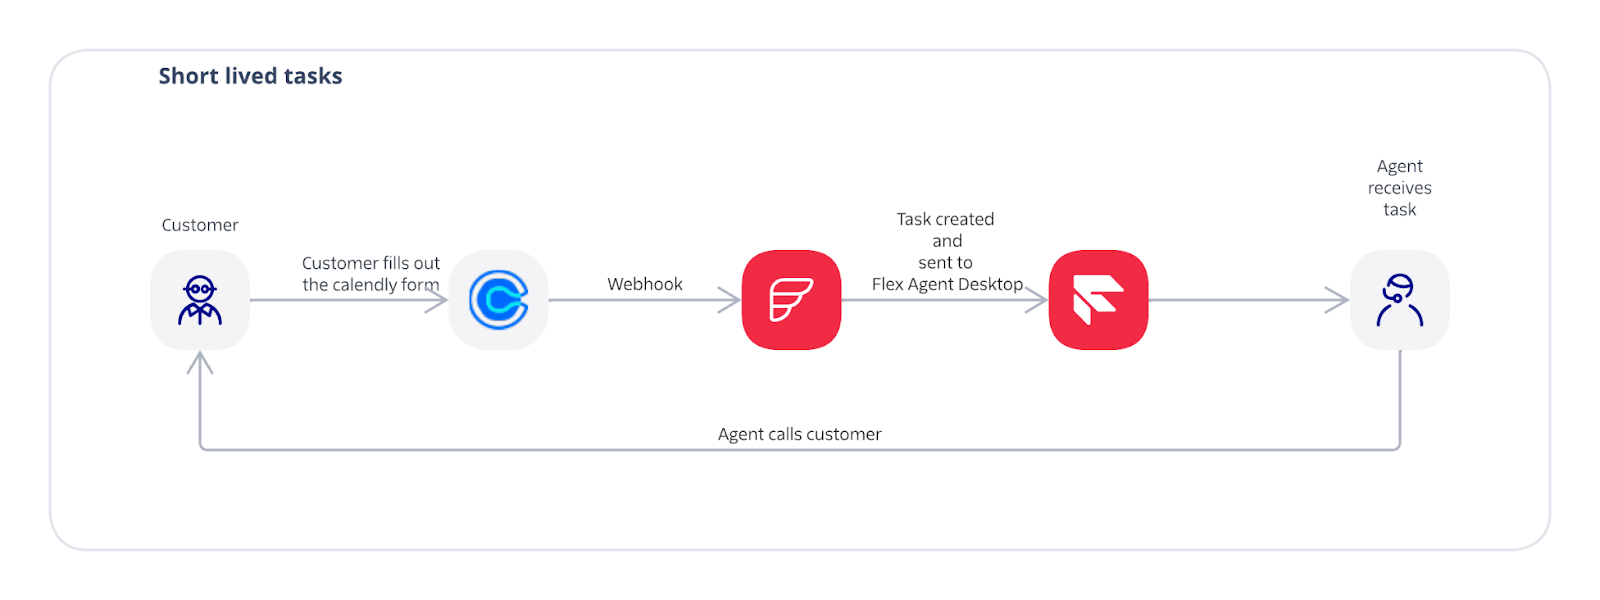
This integration will allow you to automate the ability for your contact center agents to call back customers. Before an integration of this kind, an event was added to either the agent's calendar or a shared calendar whenever a customer scheduled a callback, implying a manual step in which the agent checks to see which calls have been scheduled before bringing that information back into the contact center application to initialize it. This is a limited solution that depends on the skill and availability of the agent. The Calendly API V2 upgrade has made it possible to integrate Twilio Flex with the strength of Calendly's scheduling features.
The solution has the following components:
- A Calendly webhook subscription setup to trigger any time an event is scheduled.
- A Twilio Function used to ingest and parse webhooks.This will also create an agent task, which is passed to our Flex Agent Desktop.
- A Flex plugin that renders the event information for the agent.
Prerequisites
You will need:
- A Calendly Account with at least a professional subscription
- A basic understanding of Twilio Functions, Twilo Flex and Twilo Flex Plugins
- Twilio CLI installed to test and deploy the plugin.
- A Twilio Flex UI 2.0 instance created.
- A tool like Postman to make requests to an API. (Learn how to use Postman here)
Get Started
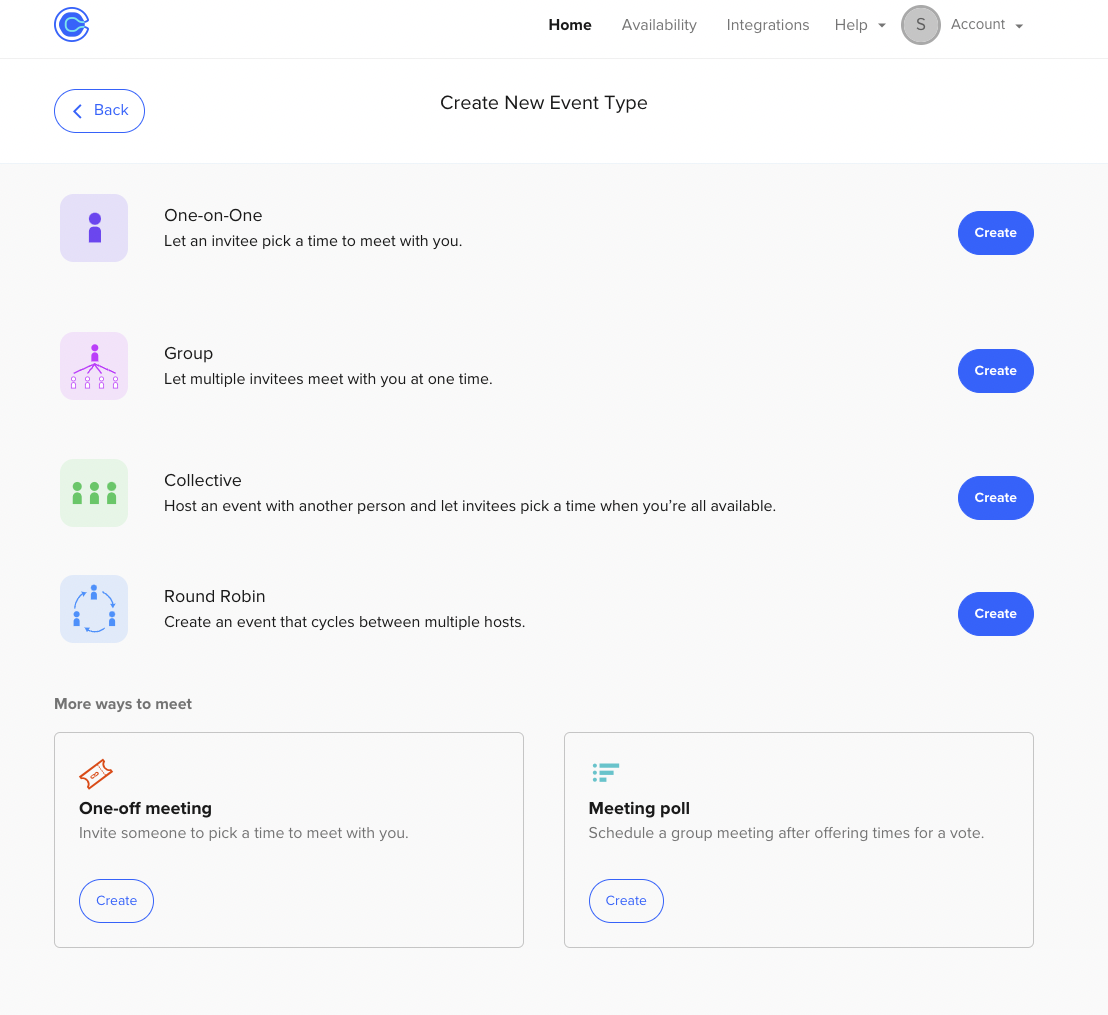
Create the event type
First, sign into your Calendly account and, from the dashboard, create a new One-on-One event type.
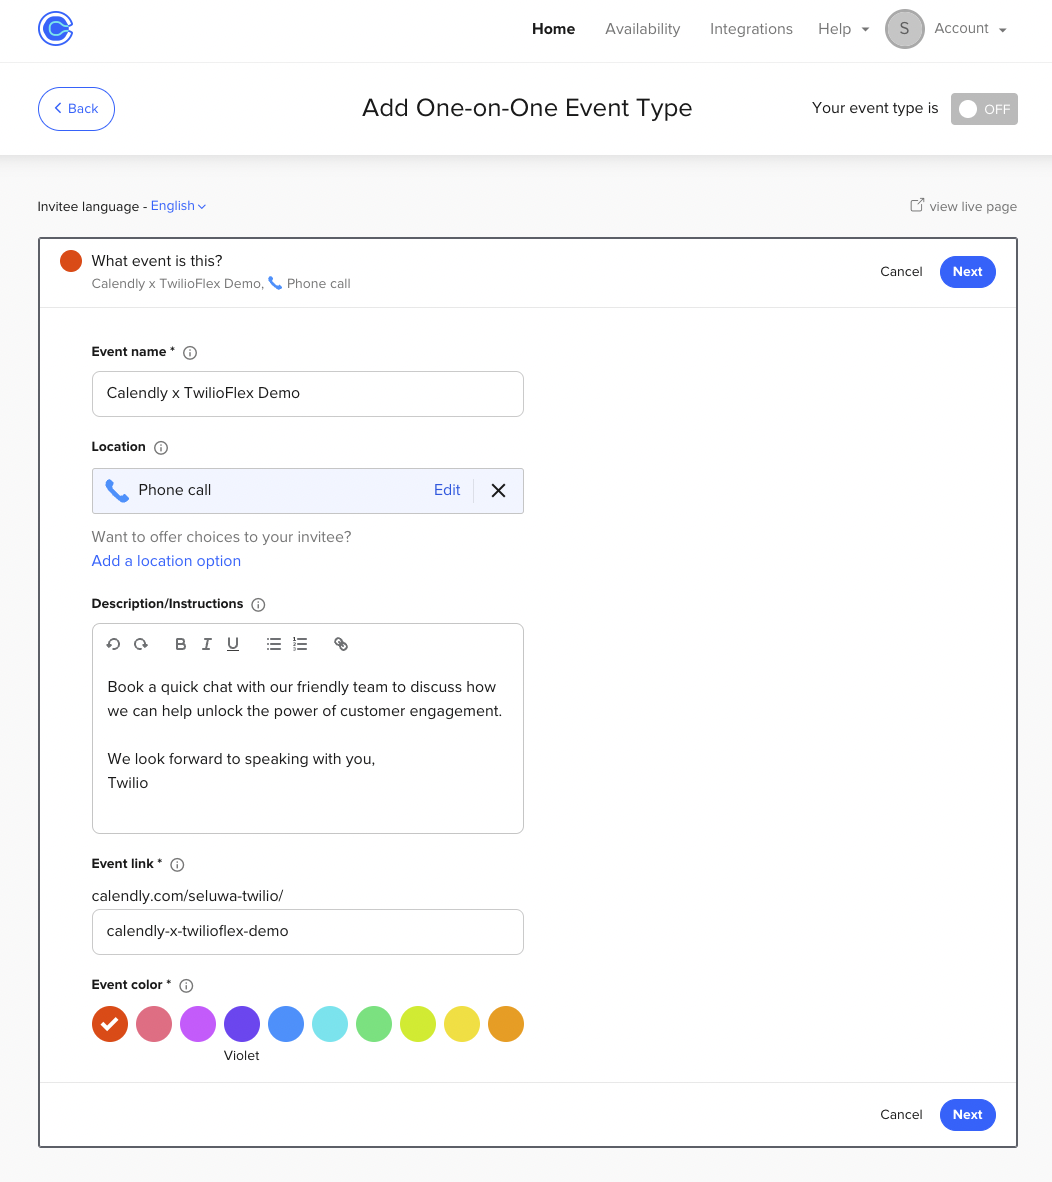
Enter the details required for your event. Here are some example details I used, but feel free to change them:
- Event name -
Calendly x TwilioFlex Demo - Location -
Phone call - Description/Instructions -
Book a quick chat with our friendly team to discuss how we can help unlock the power of customer engagement. We look forward to speaking with you. Twilio - Event link -
calendly-x-twilioflex-demo - Event color -
Red
You can also see the input below for an example:
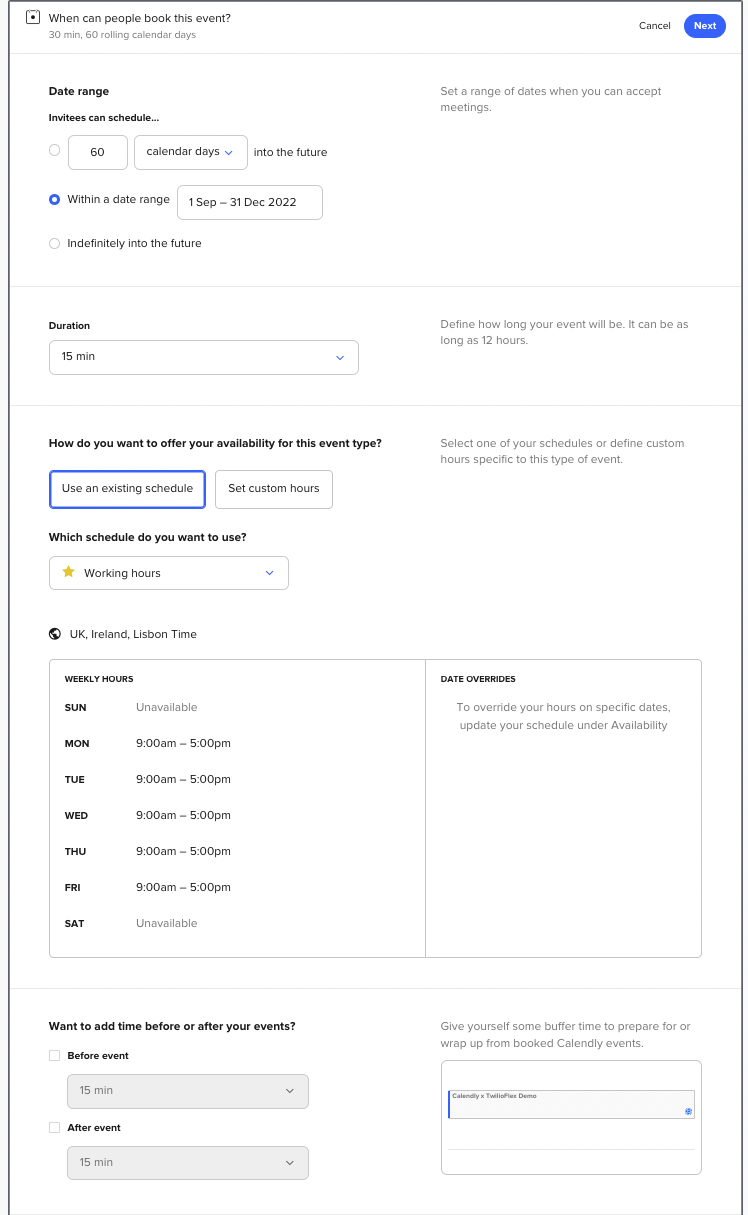
Set up the timing for your event. Let’s assume 15 minutes is long enough for your agents to wrap up with each customer.
Utilize these additional choices to include some additional inquiries about their call-in. Select the Invitee Questions option and add in a few questions. I used the inputs below but feel free to use whatever you like:
- Question 1
- Question -
Are you a new or existing Twilio user? - Answer Type -
Radio Buttons - Answers -
New; Existing - Required -
Yes
- Question -
- Question 2
- Question -
What Twilio products do you currently use? - Answer Type -
Checkboxes - Answers -
Twilio Flex; Twilio Engage; Twilio Conversations; None of the above - Required -
No
- Question -
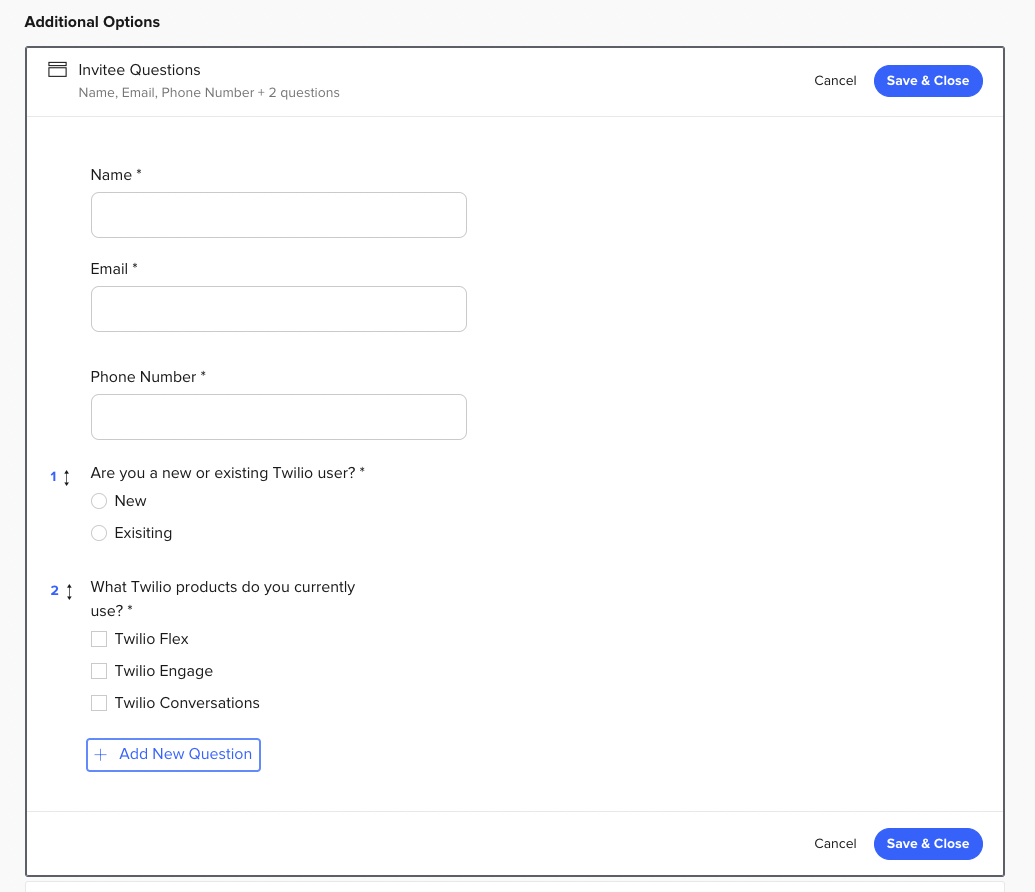
Now that your event type has been created, you can share it with your clients. Remember to click Save & Close once you're finished.
Create Webhook Subscription
To have Calendly notify Twilio of any new events that are scheduled, you must configure a webhook subscription in your account.
Get your personal access token for the Calendly API first by following these instructions. This is crucial because as we go along, we'll be making a few web requests to Calendly that require authentication using this token.
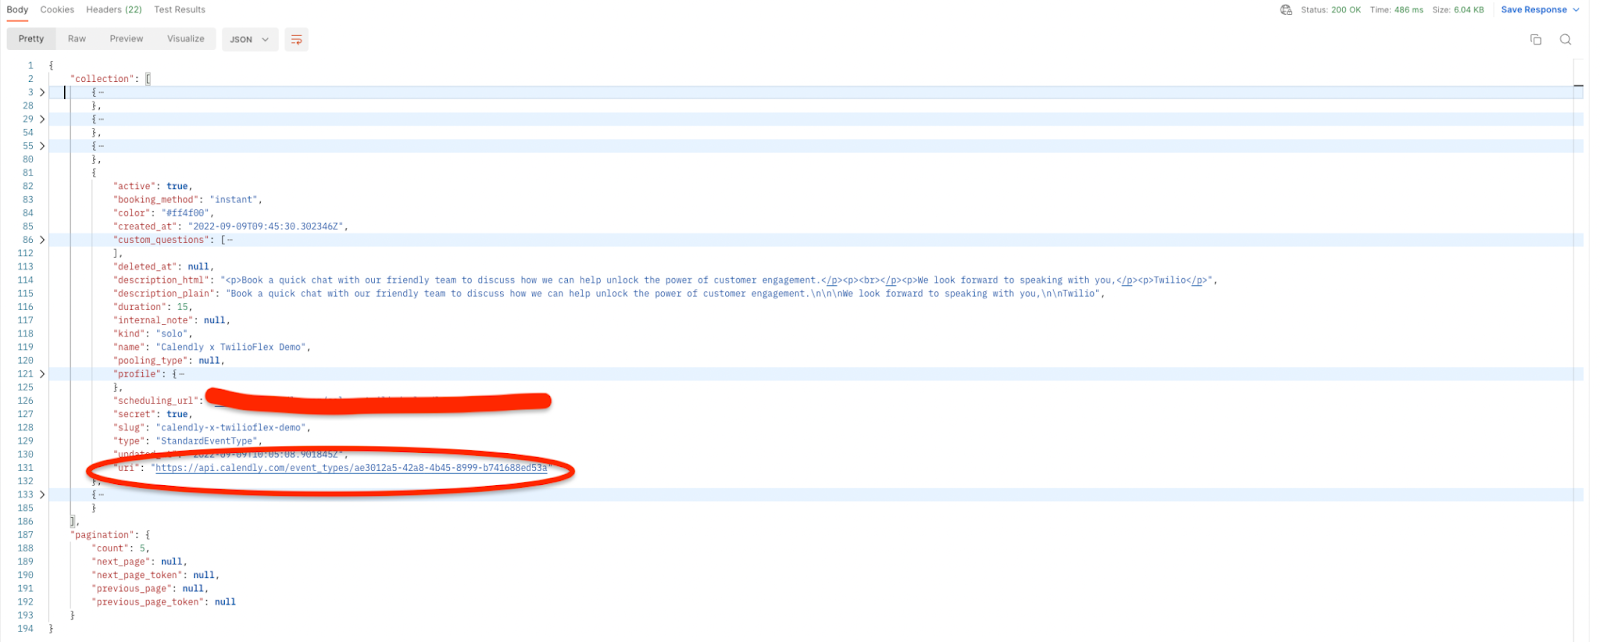
Next, you need to grab your organization and user URI from Calendly by following these instructions.
Using the organization and user URIs you collected, make another GET request to Calendly using Postman, this time for the URI of the event type we just created.
The Calendly response will be a collection of event types created by your user. Go through this list and retrieve your created event type URI. It should look like the example below
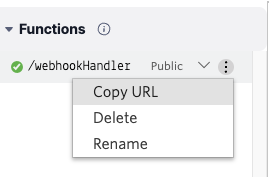
Finally, you need to create a publicly addressable function where the Calendly webhooks will be sent. Going back to your Twilio Console, go here and create a service named Calendly. Next, add a new function named webhookHandler. Once that is done, get the functions URL by clicking on the 3 dots beside it and selecting the copy URL option
You now have all the prerequisites to set up the webhook subscription. Going back to Postman, you want make to following request:
Once this is successful you get a 201 response with the body looking like this:
Awesome! Every time an event is scheduled, you will get a webhook sent to your function.
Add functionality to our function
Only a few values are needed from the webhook payload. These values are going to be used to give as much information as needed to the agent when the task gets to them. Take a look at an example of a webhook below, within the payload section:
The values you’ll be extracting from the payload are name, email, event, and questions_and_answers.
The payload does not give you the event specific information such as start time, the customer number to be called, or the event type that this is created for. It does give you the URI for the event, so we can get the information from there. This means you are going to have to make one more call to the API. This time you’ll make the request from inside the function.
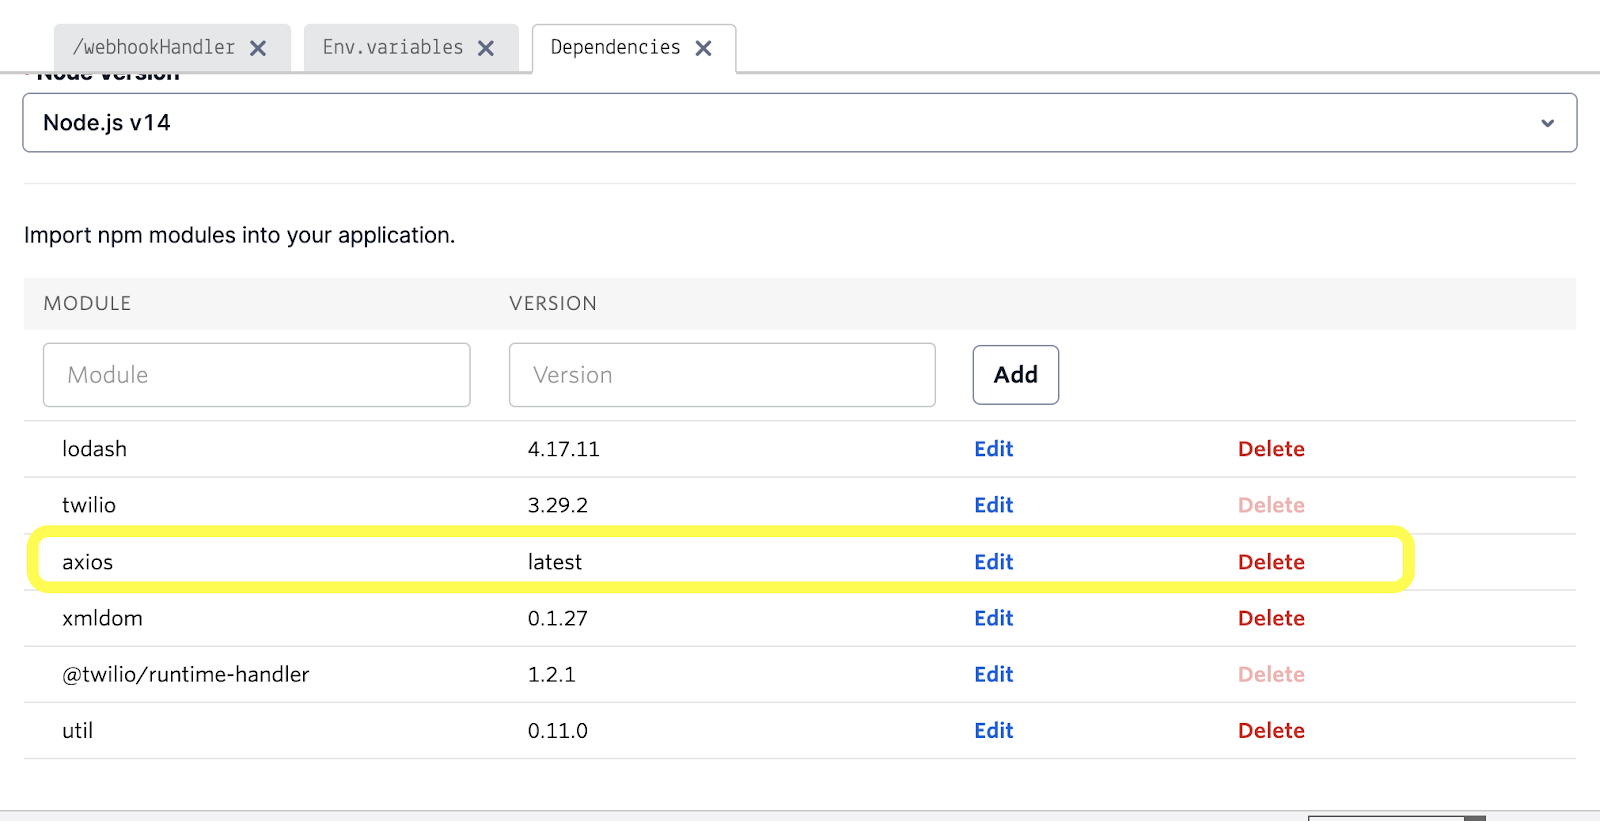
Axios is going to be used in the function to make requests, so you need to add a dependency for it and add the following required line in our function.
And add in the dependencies section Module axios with version latest. The modules you see there for lodash, xmldom, and util are all added in by default and no need to modify them. You can see an illustration below.
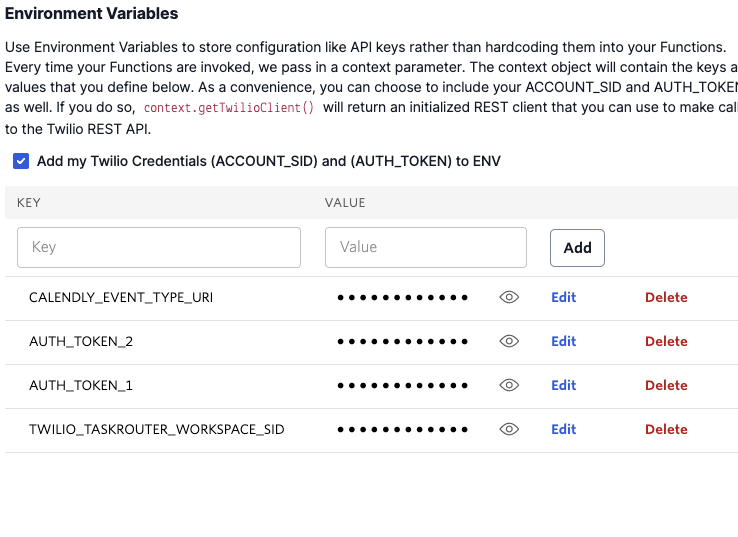
Set and get Environment Variables
Next, you will add in your environment variables. As a refresher, here are what they are:
AUTH_TOKEN_1andAUTH_TOKEN_2- The split (more on that in a second) of the Calendly auth token.TWILIO_TASKROUTER_WORKSPACE_SID-Your Taskrouter Workspace SID, which you can retreive from the Taskrouter workspace in the console.CALENDLY_EVENT_TYPE_URI- Your event type's URI, which you retreived in the Create Webhook Subscription section, above.
Remove the rest of the initial boilerplate code from the webhookHandler function and add in the following:
That initial code allows you to make a GET request to the Calendly API using the event URI in the eventWebhookPayload.event field.
Limit processing to certain event types
Now that you have the event information, you need to make sure that you are only processing webhooks for this specific event type relating to this integration by doing a comparison with the event type URI you collected and stored in your environment variables. If it matches, then the task for the agent can be created using a combination of the information collected. See the code below to do this. Add this code right after the line with the event information.
You are done with your function, and now every time an event is created, you’ll get a new task initiated in our workspace ready to be picked up by an agent.
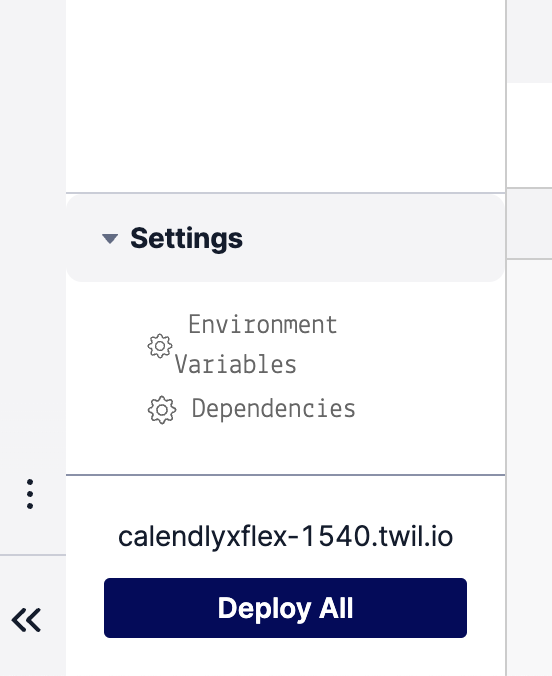
Save and deploy, ready for the next step.
Twilio Flex plugin and Testing
You are going to need a plugin added to your Flex instance to allow your agents to see the details of the call back you've passed along on the screen.
You can grab the plugin from this repo here. Run this plugin locally by opening a terminal or command line window, navigating to the plugin-calendly-attributes folder, and running the following commands:
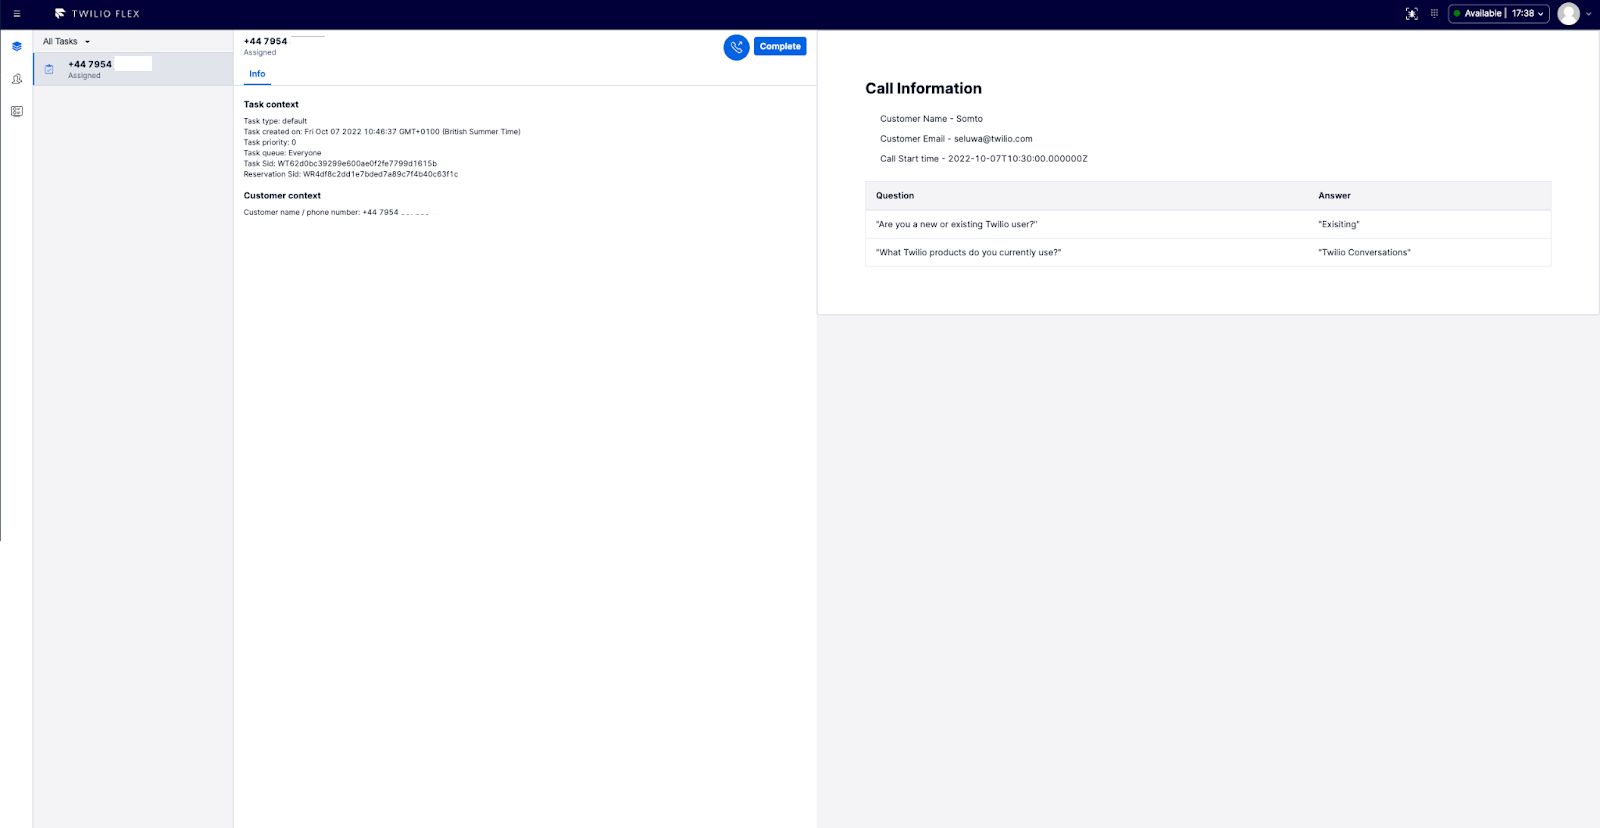
To test that it all works with the local instance of the plugin up and running, create a new Calendly meeting from the event link you created. Once you’re done filling out the form, head back to your local Flex instance, make your agent available, and you should see a new task available on screen like in the examples below:
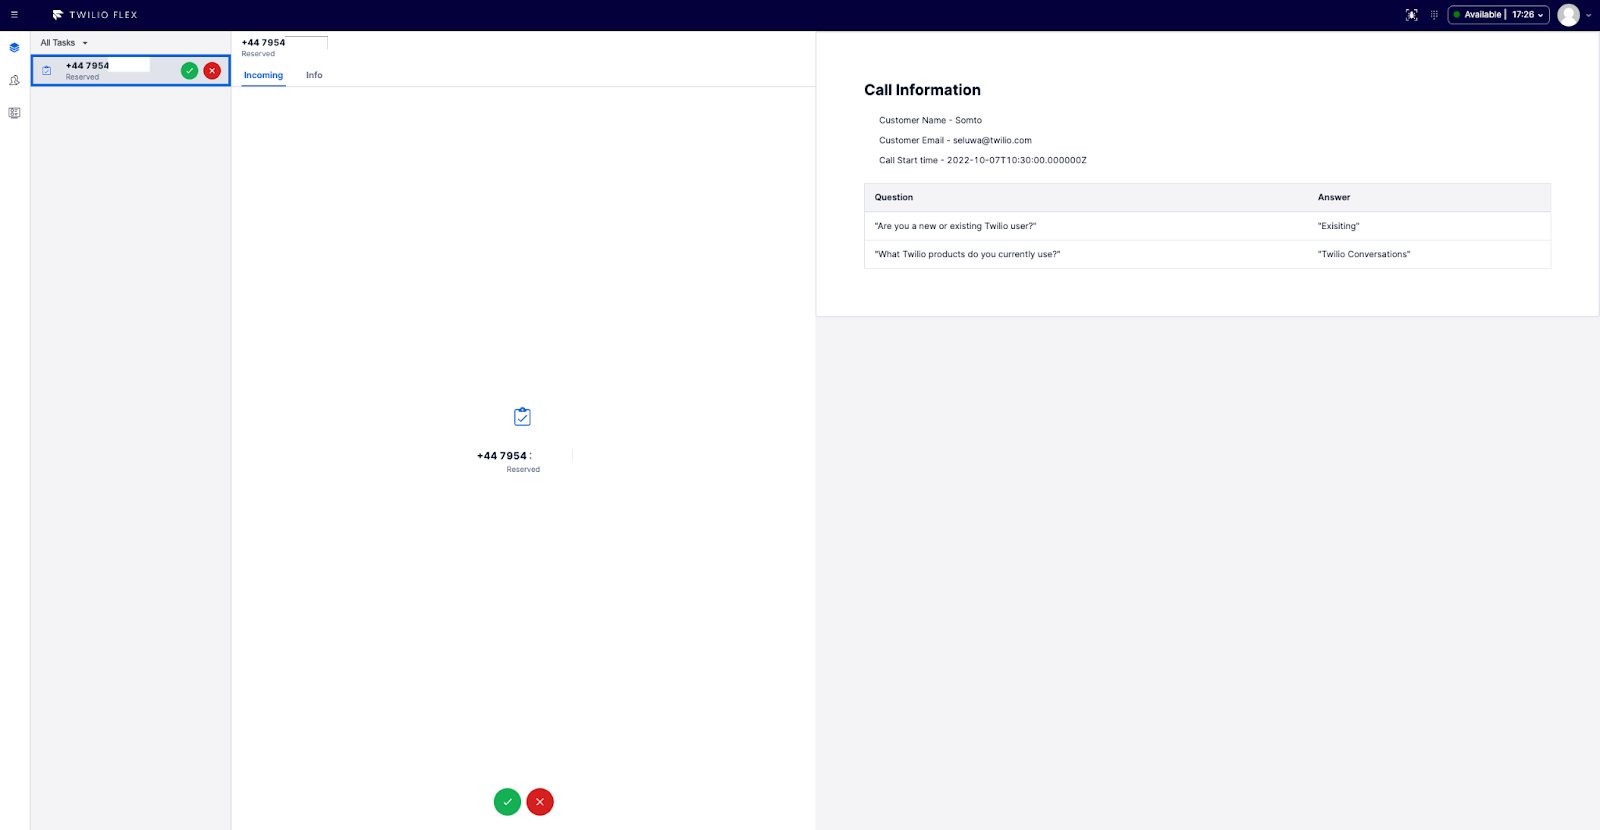
Beautiful!
After testing the plugin locally, you can deploy the plugin to your account using the Flex Plugins CLI.
Now that the agent has all the necessary information, they can call the client back from their Flex desktop and provide a wonderful customer experience.
So what comes next?
Congrats! Your callbacks have been automated using Twilio Flex and Calendly. This solution can be enhanced in a variety of ways. You could take advantage of Calendly webhook signatures to enhance the security of the data coming into Twilio. Use Twilio's Task Router, a skill-based routing system, to match tasks to the appropriate agents and make sure the right agents are returning the customer's calls. You can learn more about using Taskrouter with Twilio Flex here.
Can you think of any more? We can’t wait to see what you build.
Somto Eluwa is a Senior Solutions Consultant at Twilio. He enjoys speaking with customers and finding ways for them to get the most value out of Twilio. He can be reached at seluwa[at]twilio.com or on LinkedIn.
Related Resources
Twilio Docs
From APIs to SDKs to sample apps
API reference documentation, SDKs, helper libraries, quickstarts, and tutorials for your language and platform.
Resource Center
The latest ebooks, industry reports, and webinars
Learn from customer engagement experts to improve your own communication.
Ahoy
Twilio's developer community hub
Best practices, code samples, and inspiration to build communications and digital engagement experiences.