Integrate OpenAI's ChatGPT with Twilio Programmable Voice and Functions
Time to read: 11 minutes
March 23, 2023
Written by
Reviewed by

Using ChatGPT to power an interactive voice chatbot is not just a novelty, it can be a way to get useful business intelligence information while reserving dedicated, expensive, and single-threaded human agents for conversations that only humans can help with. These days people talk to, listen to, and collaborate with robots all the time, but you know what's cooler than interacting with one robot? Interacting with three!
In this post, we'll show you how to use Twilio's native speech recognition and Amazon Polly Neural text-to-speech capabilities with ChatGPT to create a voice-activated chatbot, all hosted entirely on Twilio's serverless Functions environment. You'll also use the Call Event API to parse what callers are asking about and view the responses from the bot which allows us to unlock the rich first-party data captured in these interactions and send the data to customer engagement platforms like Segment where you can use it to build customer profiles, understand customer preferences, and create the personalized experiences customers expect.
Want to give this a demo a whirl before diving in? Call 1-989-4OPENAI (467-3624) to test it out!
Robot #1: Decoding the human voice using Speech Recognition
Twilio's speech recognition using the TwiML <Gather> verb is a powerful tool that turns words spoken on a phone call into text. It offers excellent accuracy, low latency, and support for numerous languages and dialects. Historically, Twilio developers have used speech recognition as a way to navigate interactive voice response (IVRs) and other self-service automation workflows, but with the release of new experimental speech models, the only limit is ✨your imagination ✨.
Robot #2: Giving your robot a voice with Amazon Polly Neural Voices
With the TwiML <Say> verb, Twilio provides a text-to-speech (TTS) function that uses Amazon Polly voices which leverage deep learning to synthesize human-like speech. Polly's neural voices offer a more natural and lifelike sound, providing an engaging listening experience for users. With support for multiple languages, a wide range of voices, and SSML support, Twilio text-to-speech allows you to customize your chatbot's voice to match your brand's identity.
Robot #3: OpenAI's ChatGPT Conversational Companion
ChatGPT is an advanced language model developed by OpenAI, capable of generating human-like text based on given input. It can understand context, provide relevant responses, and even engage in creative tasks like writing stories or poems. By leveraging the OpenAI API, developers can integrate this AI directly into their applications, offering users a more interactive and engaging experience.
Secret Sauce: Twilio Functions
How will you get these three robots to talk to each other, and to your callers? By using Twilio Functions. Beyond merely giving you the ability to get a proof of concept up and running without needing to spin up a server of your own, Functions provide auto scaling capabilities, enhanced security, and reduced latency by running your code inside Twilio. Of course, if you've got your own server rattling around someplace you can make a couple small edits to the Javascript and it will run in your node.js environment, no sweat.
Now that you've got the ingredients, let's check out the recipe in two flavors: CLI and GUI.

Pre-req yourself before you wreck yourself
Before diving into the integration process, you'll need the following:
-
A Twilio account - Sign up for free using this link and receive $10 in credit when you upgrade your account
-
A Twilio phone number - Click here to see how to get your first Twilio number with your trial account
-
An OpenAI API key on a premium plan or with available credits
-
Twilio CLI with the Serverless Toolkit installed
Next Day's Function
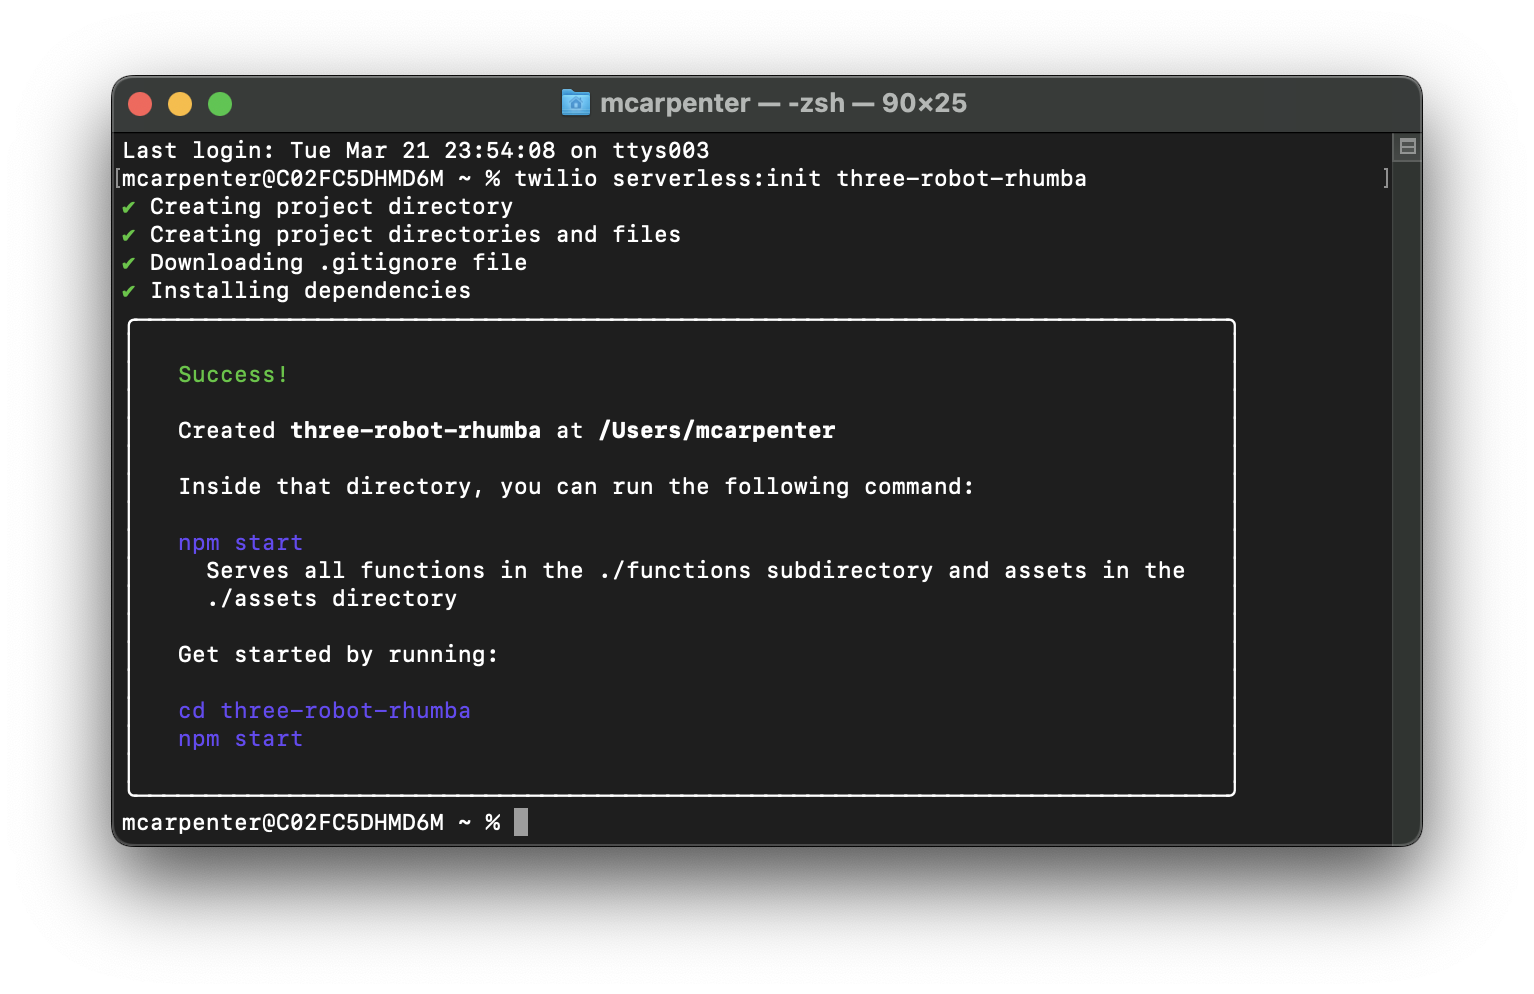
First let's get our backend in order. You'll start by creating a new Serverless project. Since you installed the awesome open-source Serverless Toolkit, you can do this in one line by passing the command into your terminal:
Replace <project-name> with a name of your liking; I'm naming mine three-robot-rhumba.
Go ahead and cd into the directory for your project and let's update the .env file to provide your Twilio auth token as AUTH_TOKEN, and your OpenAI API Key as OPENAI_API_KEY. Your Twilio account SID should be auto populated. Ensure your .env file looks like the following (with the XXXXX placeholders replaced with its respective keys):
Since Twilio Serverless Functions are just Node.js apps, you can add dependencies using any package manager that writes to package.json; I'm using npm because I'm basic. Navigate back to your terminal and enter the following to install the OpenAI NPM package:
With your environment variables set and your dependencies added you can get down to business. You're going to create two Functions: a /transcribe Function that uses Twilio speech recognition to turn your spoken words into text that ChatGPT can understand using the TwiML <Gather> verb, and a /respond Function that takes the text generated by the speech recognition, sends it over to the OpenAI API, and passes the response to Twilio's Amazon Polly Neural-powered text-to-speech engine using the TwiML <Say> verb.
To create a new Function, open up the functions folder in your project directory and create a JavaScript file. Create the /transcribe and /respond Functions by creating a transcribe.js and respond.js file in the folder.
Lost in Transcription
Now let's open up transcribe.js and add the following code:
If you're new to Functions let me walk you through what's happening here. The /transcribe Function creates a TwiML generating voice response based on Twilio's Node.js helper library, starts a conversation if none exists, listens for user input, and passes that input along with the conversation history to the /respond endpoint for further processing.
In line 6 the application checks to see if a cookie called convo exists. If it doesn't, or if it does but it's empty, you can take that to mean the conversation hasn't started yet, so you will kick off an initial greeting using the TwiML <Say> verb.
Next, the twiml.gather method is used to capture user input. The parameters for gather are:
speechTimeout: 'auto': Automatically determines when the user has stopped speaking, can be set to a positive integer, but auto is best for this use casespeechModel: "experimental_conversations":Uses a speech recognition model optimized for conversational use casesinput: 'speech': Sets the input type to speech and ignores any keypresses (DTMF)action: '/respond': Pass the user's speech input along with the conversation history to the/respondendpoint
Now, you need to create a way to create the convo cookie so the /respond Function has a place to store the conversation history which will get passed between the OpenAI API and our Polly Neural Voices, and that means the app needs need to initialize a Twilio.Response(); object, and does so on line 25.
You can't pass both the Twilio.twiml.VoiceResponse(); and the Twilio.Response(); back to the handler, so you'll need to use the response you just created to append a header to our requests and set the TwiML you generated via <Gather> to the body on lines 28 and 31 respectively.
Once that's done you can set the cookie using response.setCookie(); on line 35 before you pass the response back to the handler for execution by our Serverless infrastructure on line 39. Go ahead and save this file and close it.
Call and Response
Next, let's open up respond.js and add the following code:
As with above, here's a guided tour as to what exactly is going down in this code. It starts by importing the required modules (line 2) and defining the main function to handle requests (line 5).
Lines 7-8 set up the OpenAI API with the API key, while line 11 creates the Twilio Voice Response object that will generate TwiML for turning the ChatGPT responses into speech for callers. Line 14 initiates the Twilio Response object to update the conversation history cookie and set the headers and body so the TwiML is passed in the response.
Lines 17-20 parse the cookie value if it exists, and line 23 retrieves the user's voice input from the SpeechResult event received from the /transcribe Function. Lines 26-27 create a conversation variable to store the dialog and add the user's input to the conversation history.
Line 30 generates the AI's response based on the conversation history.
Lines 36-39 limit the conversation history to the last 20 messages to improve performance and keep the cookie a reasonable size while also giving the chatbot enough context to deliver useful responses. You can increase (or decrease) this if you'd like, but remember the stored history is getting passed to the OpenAI API with every request, so the larger this gets, the more tokens your application is chewing through. Lines 42-46 generate the <Say> TwiML using the cleaned AI response, and lines 49-53 redirect the call to the /transcribe function where the <Gather> is capturing the caller's speech.
As with /transcribe we need to use response to deliver the TwiML and lines 56-57 set the appropriate header and return the TwiML in the body of the response. Lines 60-63 update the conversation history cookie with the response from the OpenAI API, and line 66 returns the response to the handler.
The generateAIResponse function (lines 69-72) formats the conversation and creates a chat completion using the OpenAI API. The createChatCompletion function (lines 75-104) sends a request to the OpenAI API to generate a response using the GPT-4o model and specified parameters. If we get a 500 from the OpenAI API, we will handle an error from the API on lines 100-103.
Now your code is updated, your dependencies set, and your environment variables are configured, you're ready to deploy. With Twilio Serverless, it couldn't be easier… it's just a single command!
Once the deployment wraps up you can now use the Functions you created to capture spoken input from a caller, convert it to text which is sent to the ChatGPT API, and play the response back to the caller in the form of AI-generated speech. Three robots, working together, just for you!

The Model
The example above uses the gpt-4o model from OpenAI. This is a good (and cheap!) model for development purposes and proof-of-concepts, but you may find that other models are better for specific use cases.
Rikki Don't Lose That Number
Now that you have your Function deployed and ready to party you can test it by making a call, but first, you'll need to configure a phone number to use the Functions you just created, and the CLI provides a quick and easy way to do so. Type the following into your terminal to list the phone numbers on your account (we are assuming you followed the pre-req and acquired a number beforehand).
You'll get back a list of the phone number SIDs, phone numbers, and friendly names on your account. You can use either the SID or the full E.164-formatted phone number for your request:

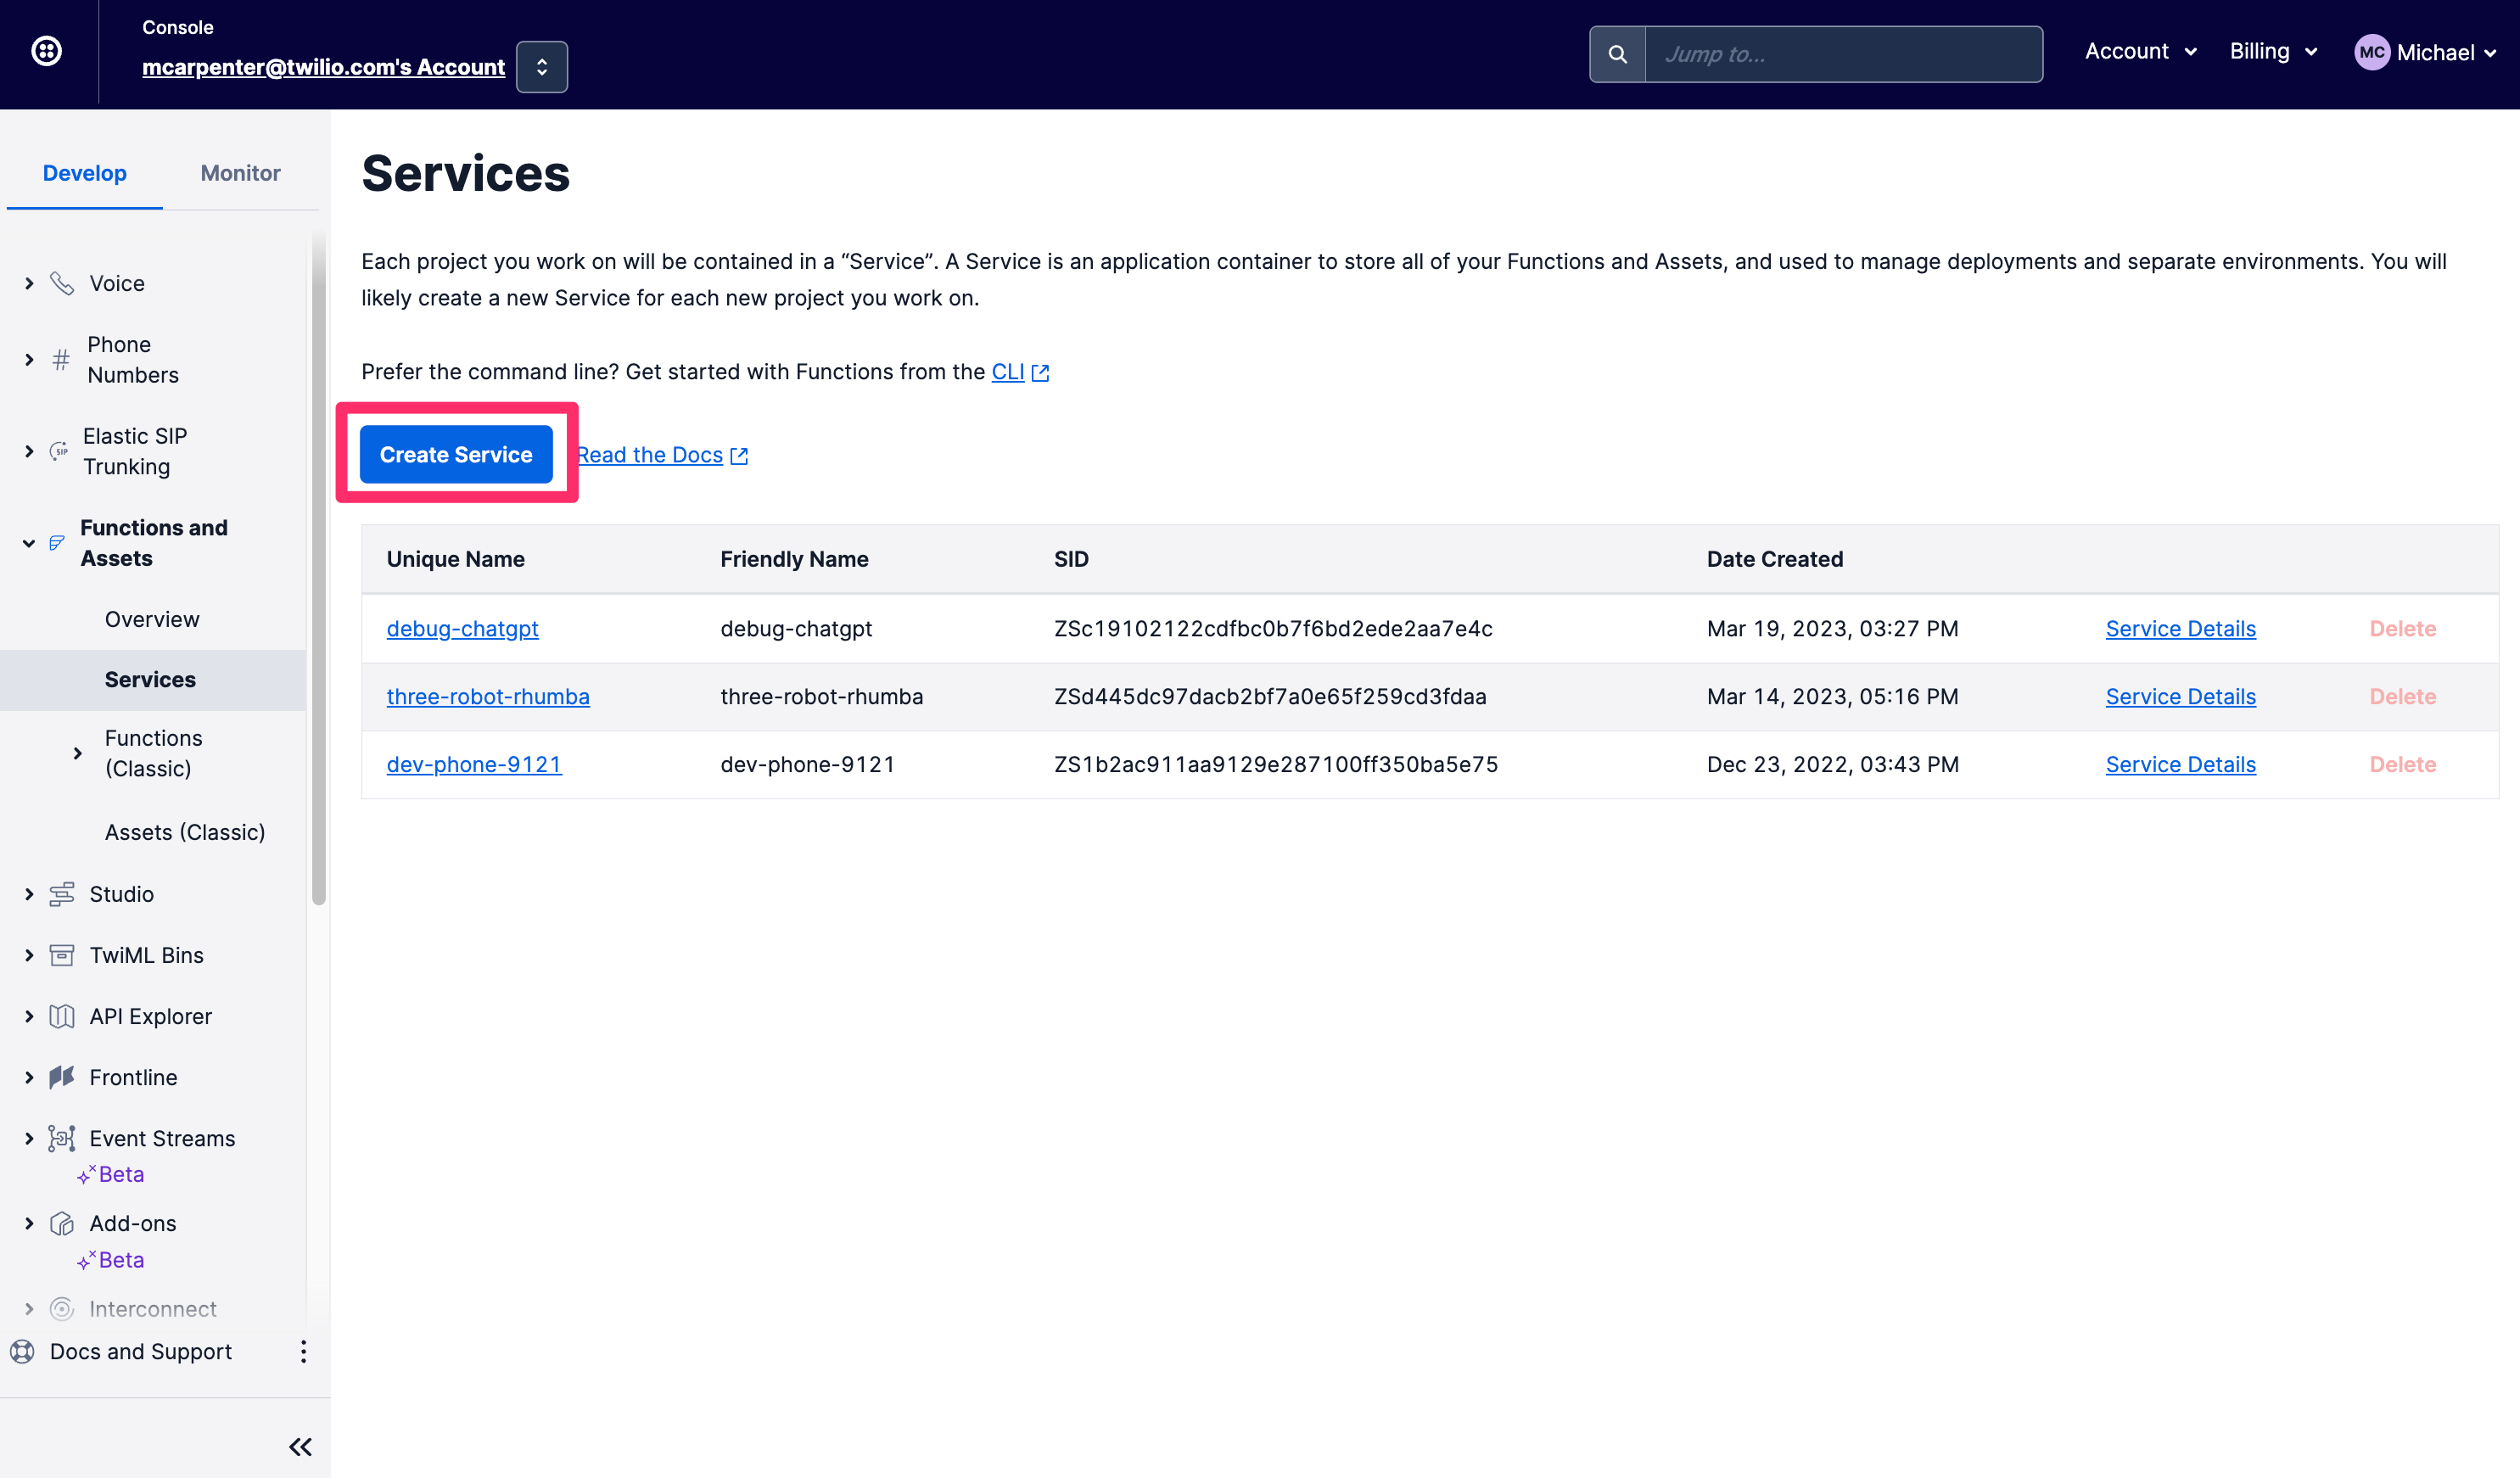
If CLIs don't pass the vibe check, you can do all of the things we describe above directly in Twilio Console. First, in the left hand nav on the Develop tab go to the Functions and Assets section and click on Services. Click Create Service.
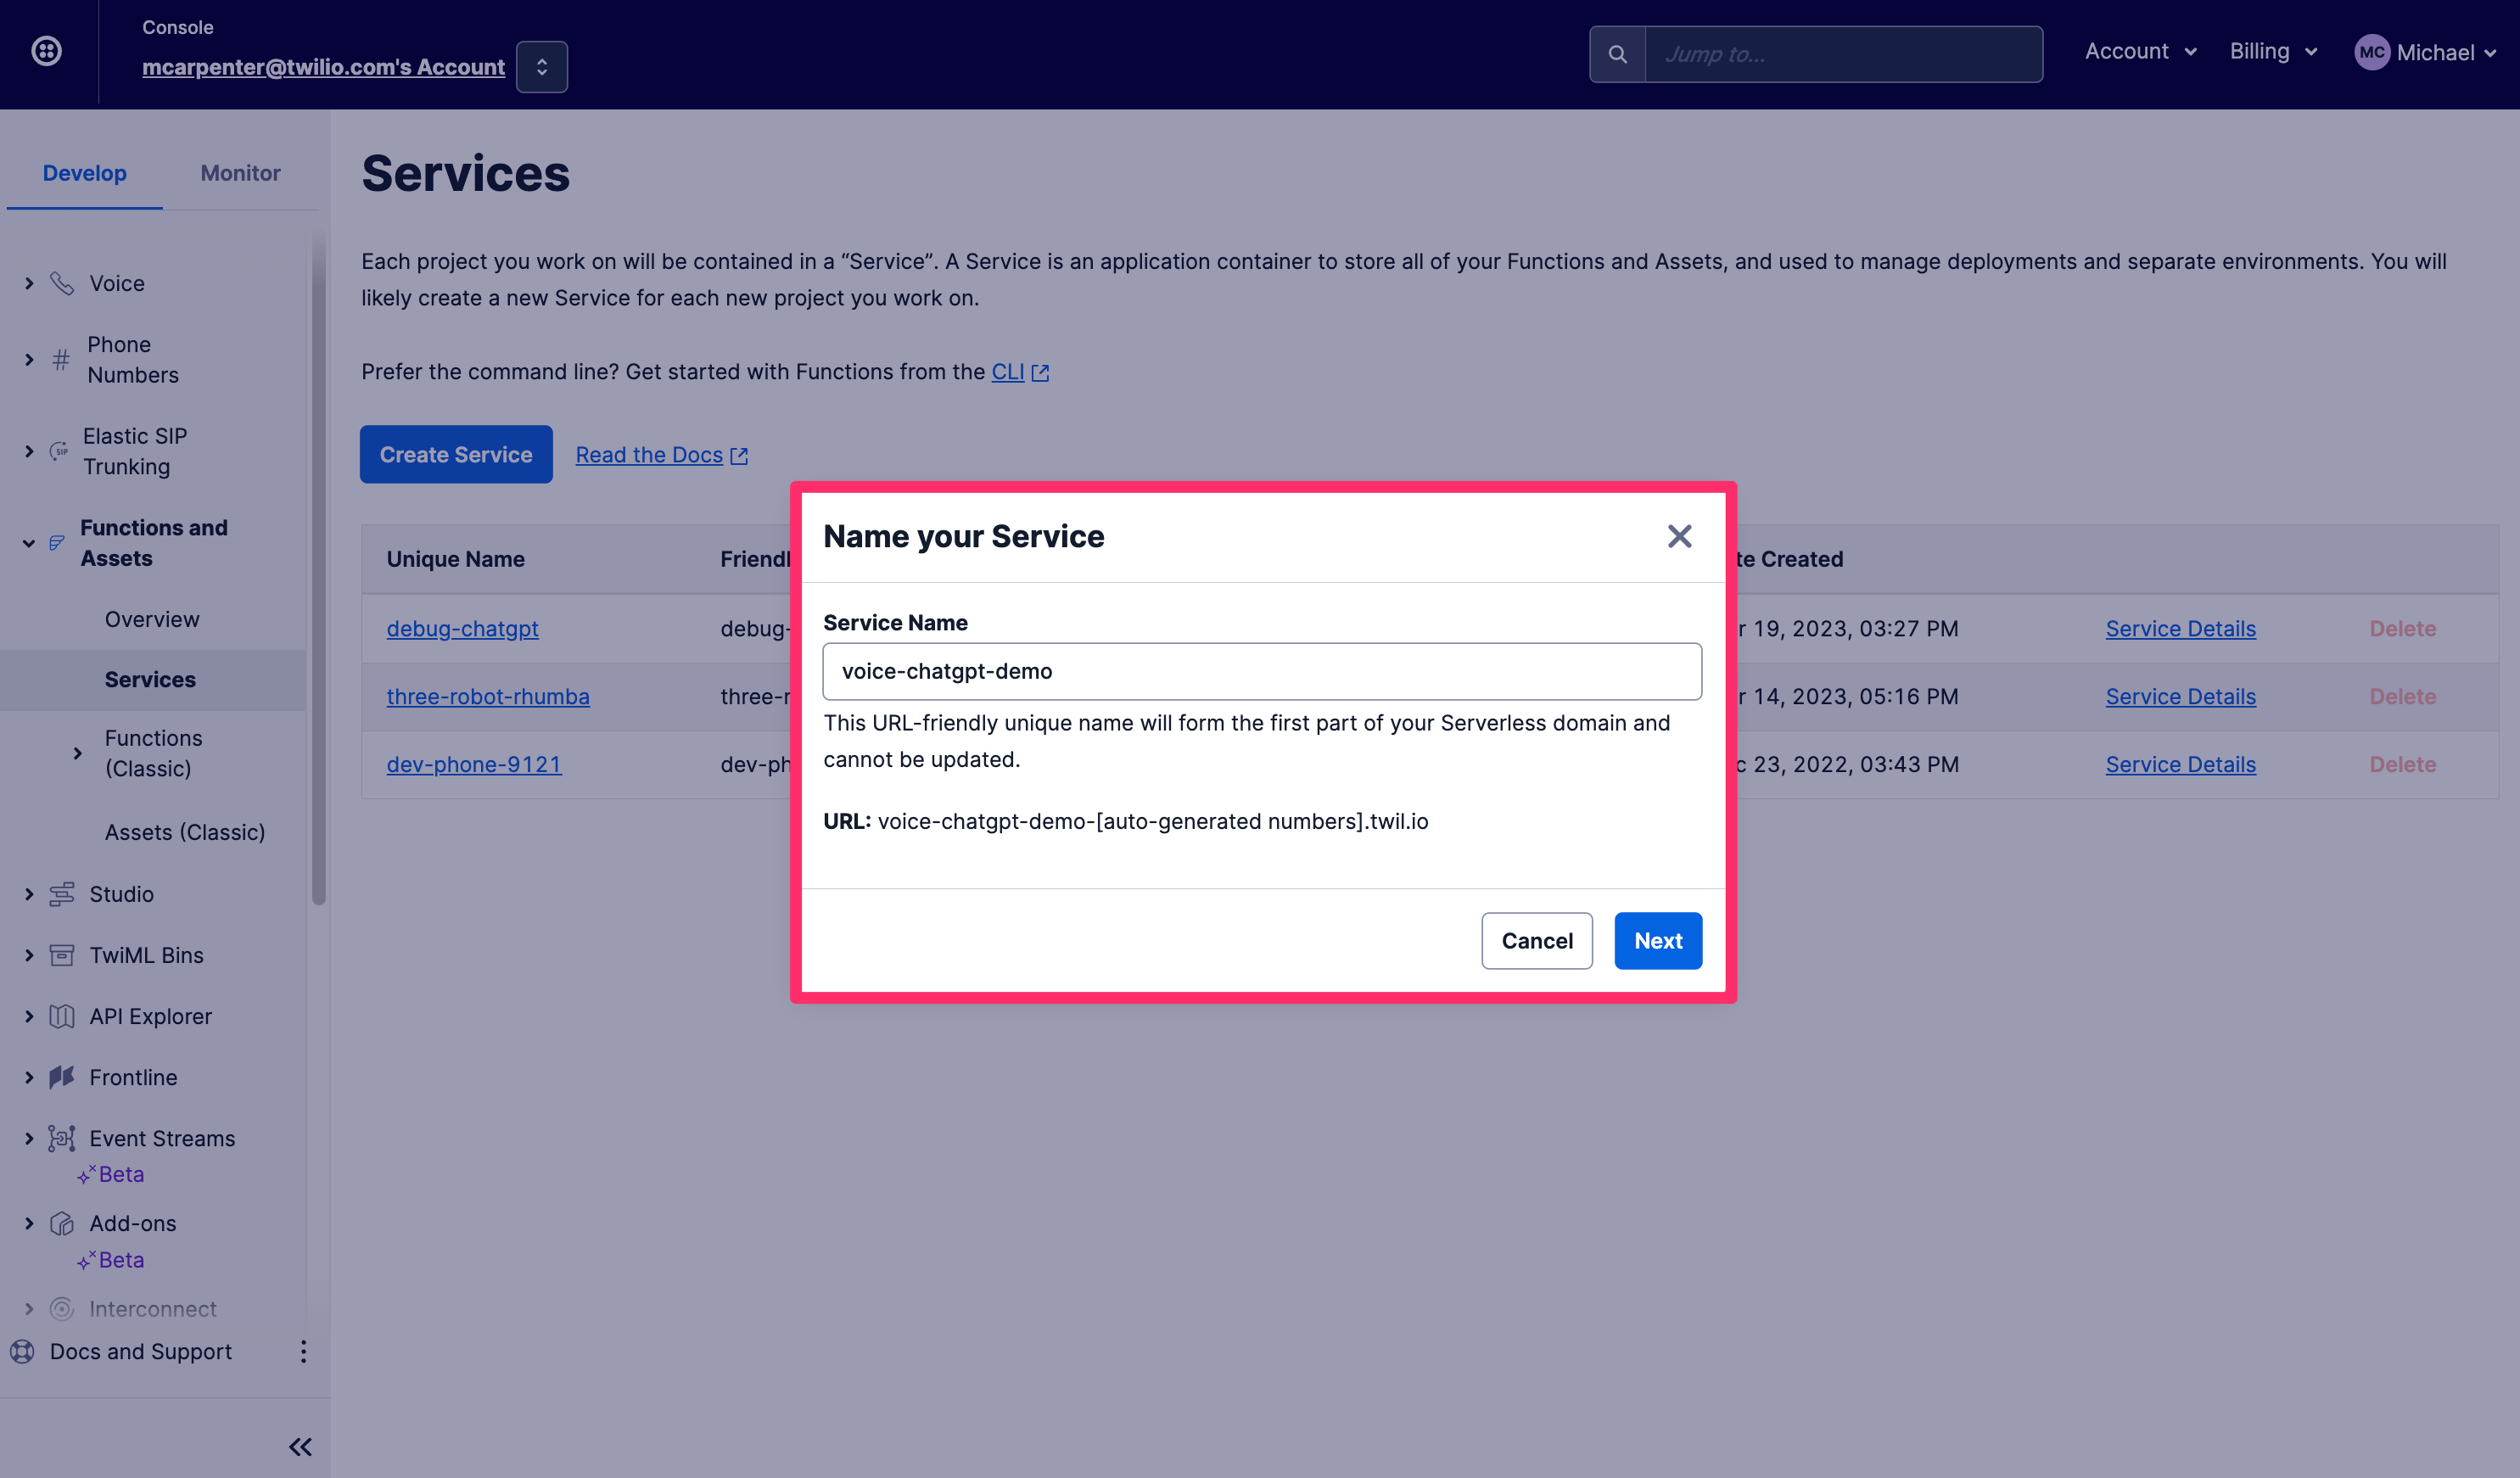
Give your Service a name, I'll call mine voice-chatgpt-demo and click Next.
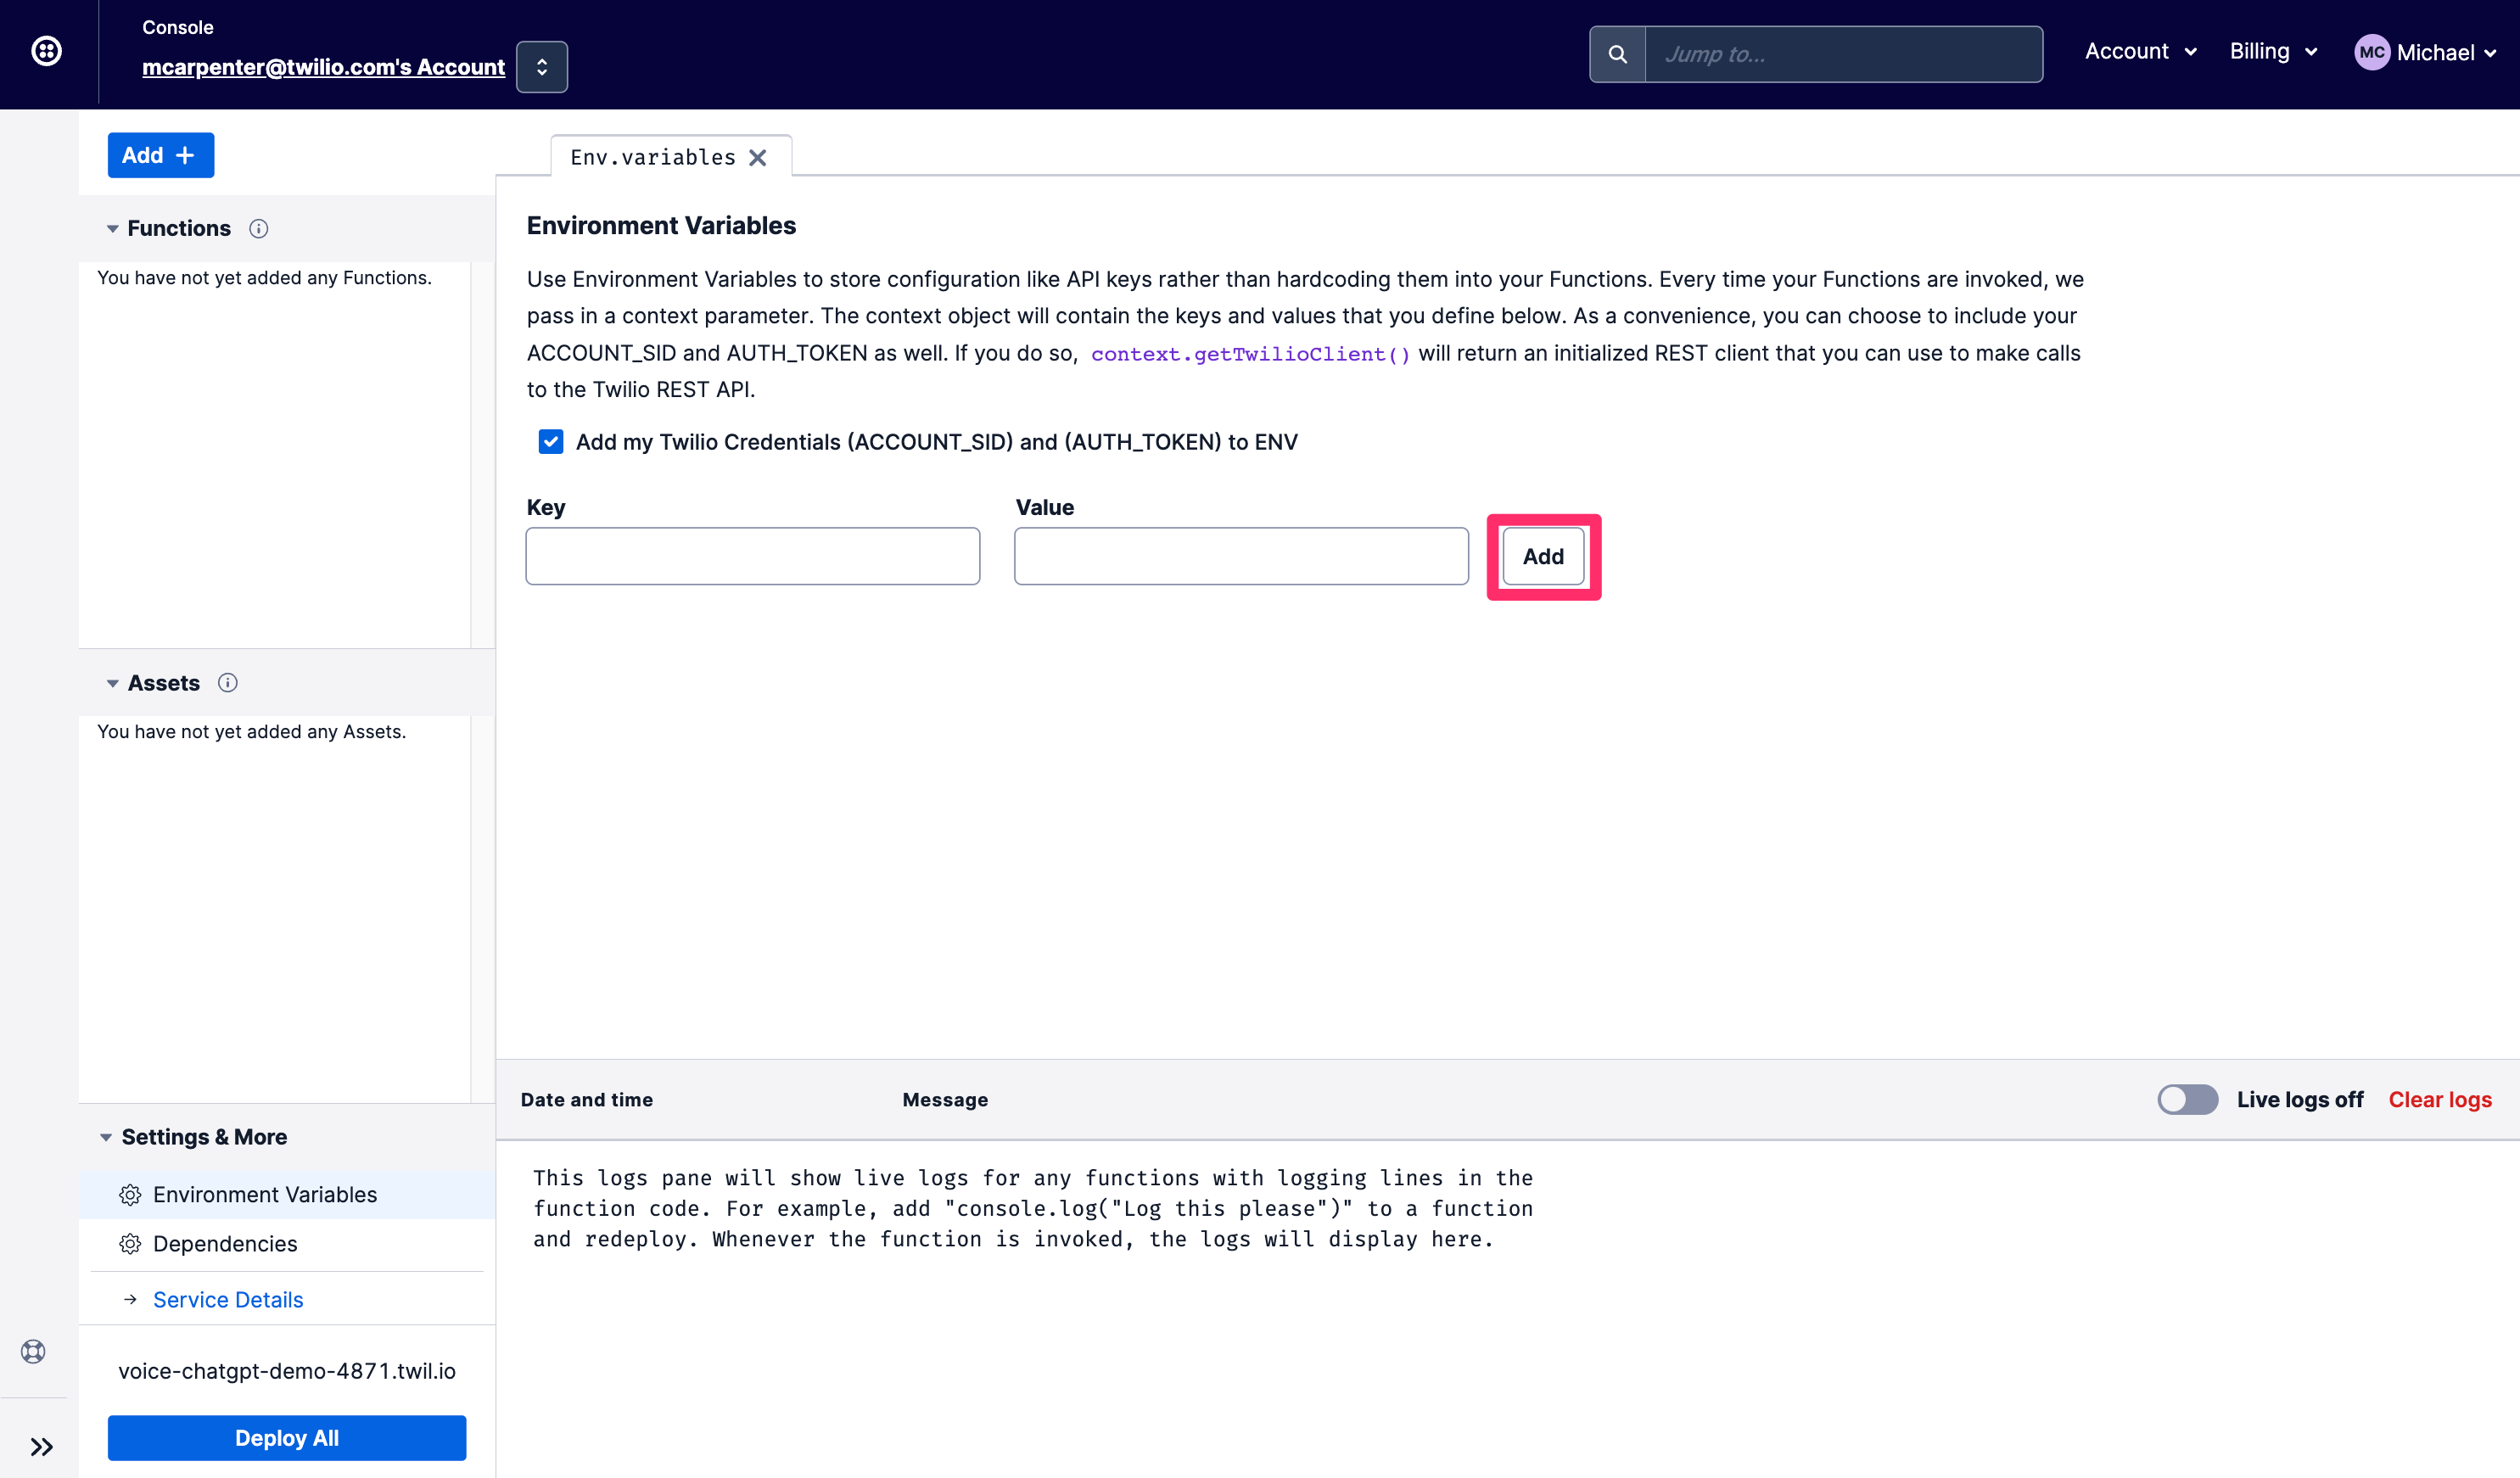
You'll now see the Console view for your Service, with Functions, Assets, Environment Variables, and Dependencies in the left hand nav, and a text editor and console for editing your code and monitoring the logs. First thing you'll want to do is get your environment variables configured, so click on Environment Variables in the bottom right corner.
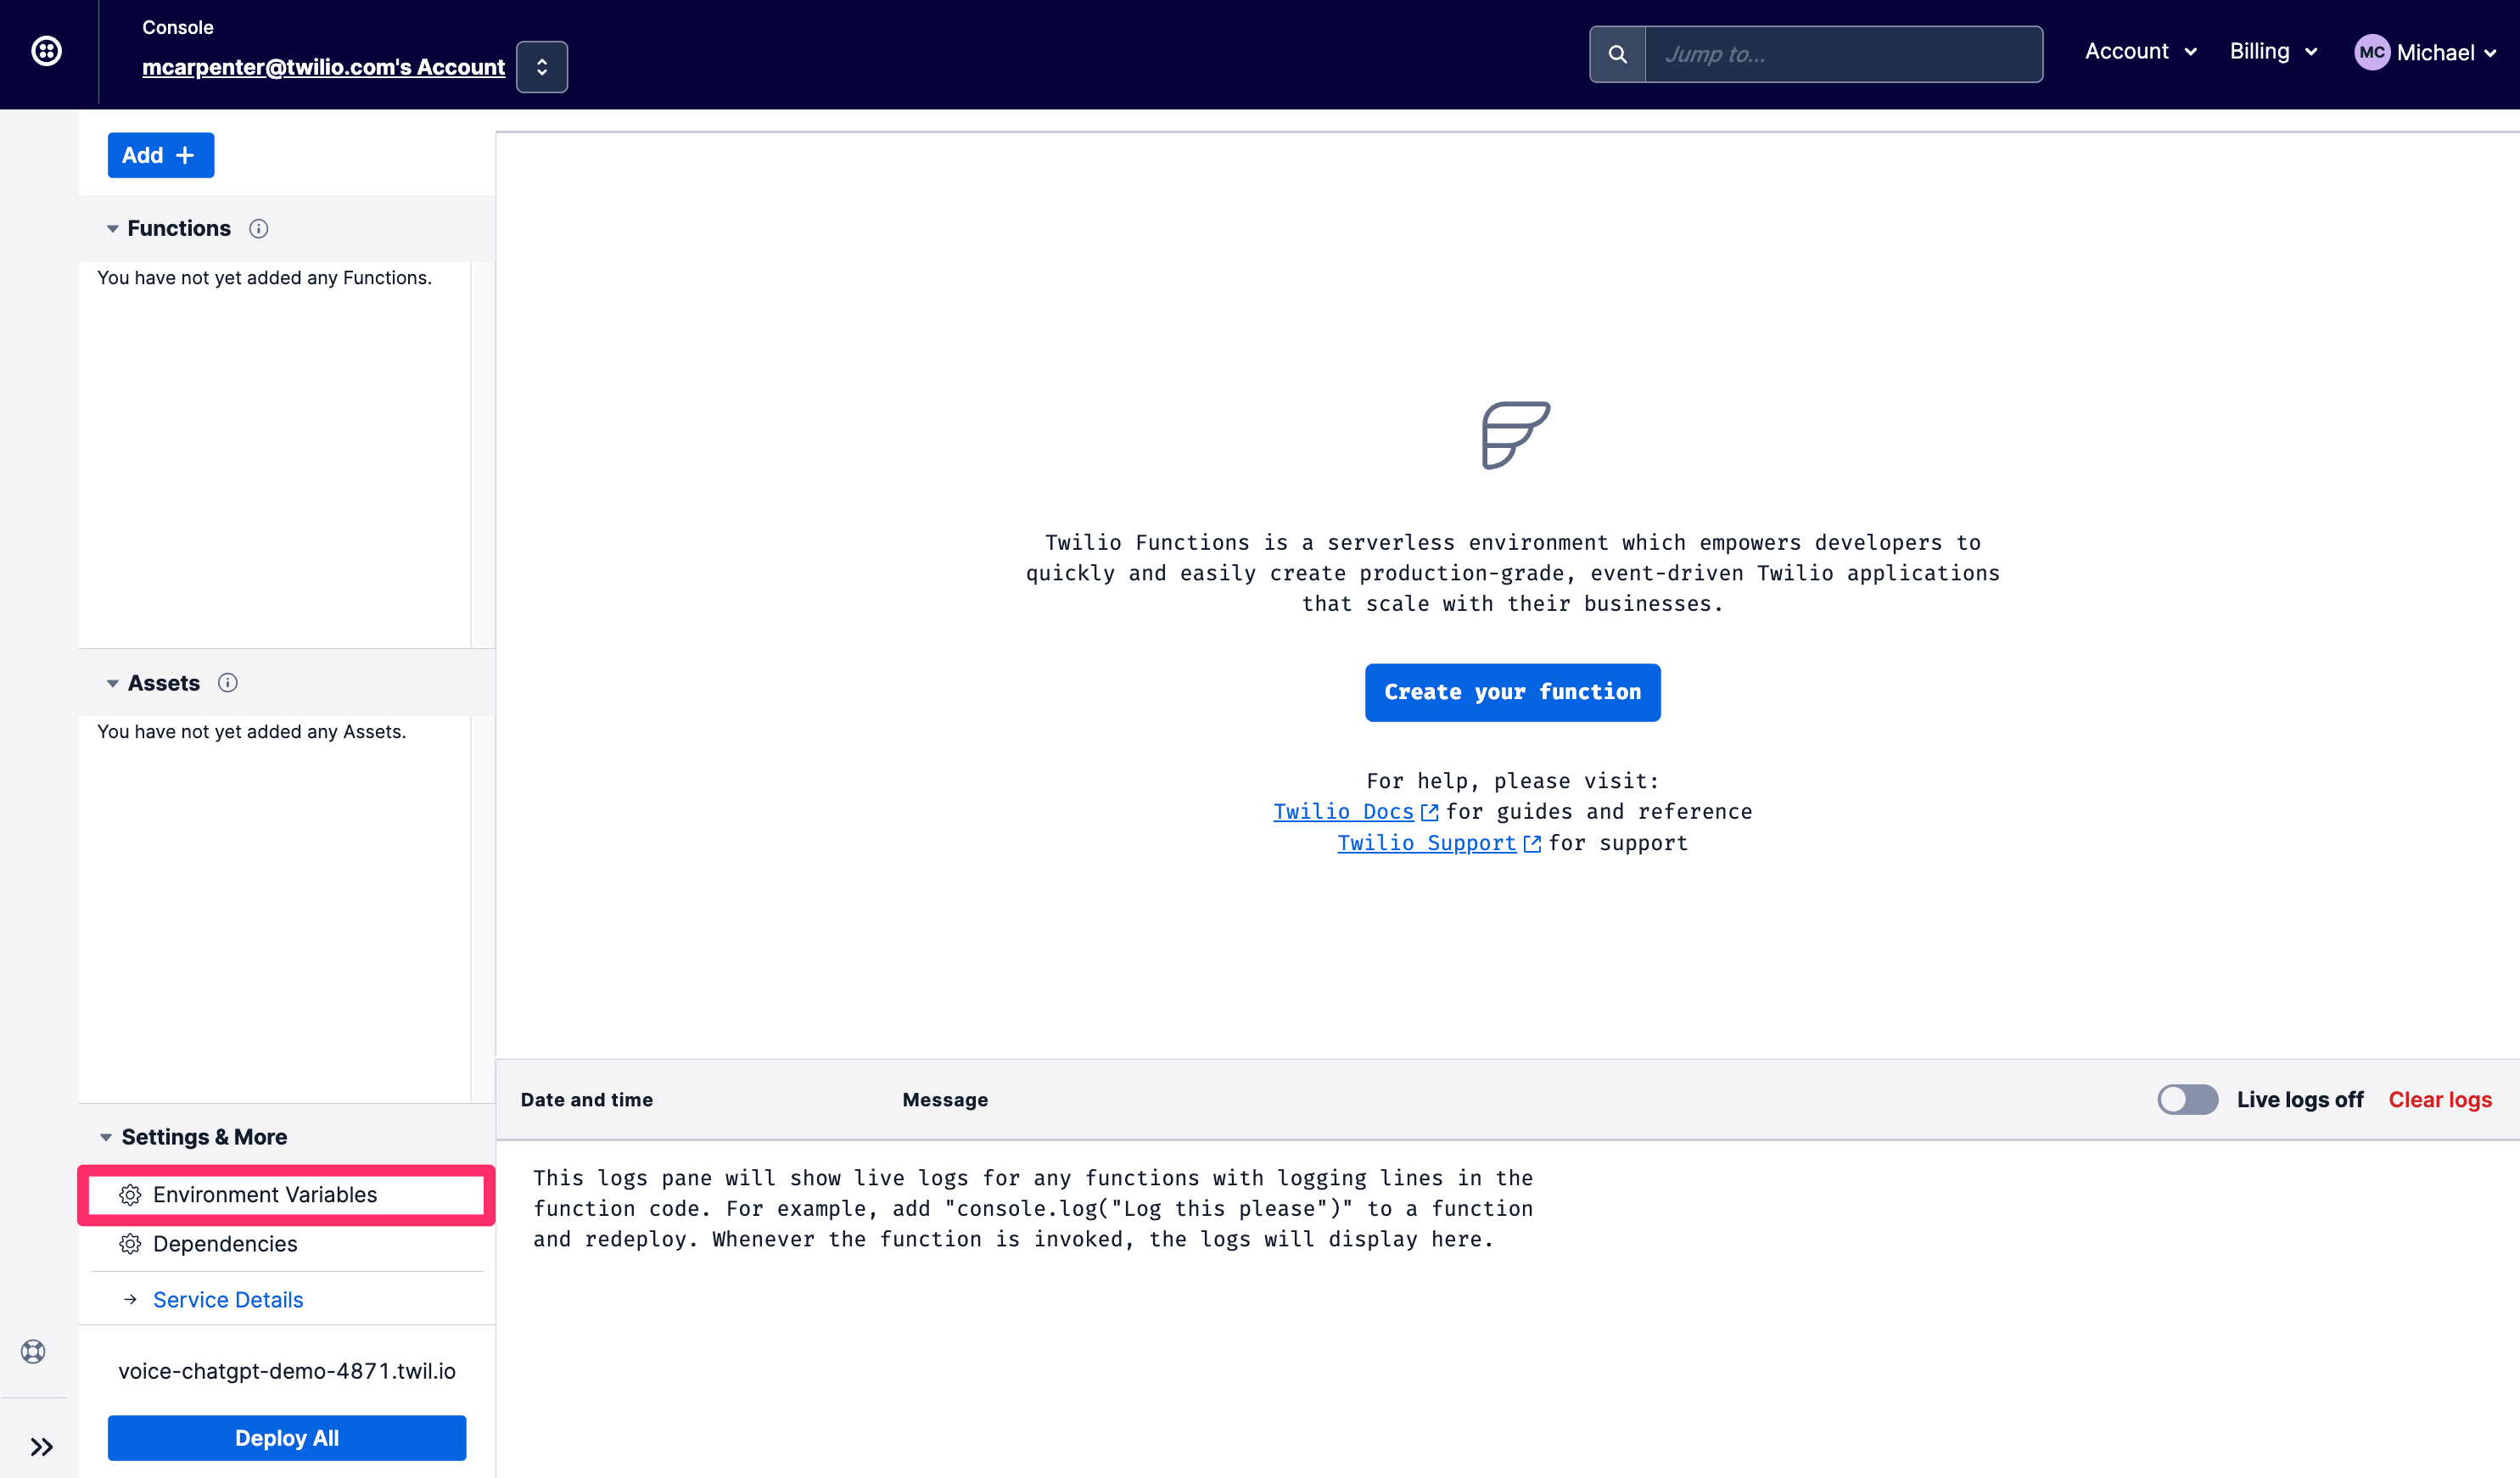
Your Twilio account SID and auth token are pre-populated as env variables, so all you need to is add your OpenAI API key; the sample code will refer to it as OPENAI_API_KEY so if you're looking for a zero edit copy/paste experience, make sure you name it the same. Click Add when you're done.
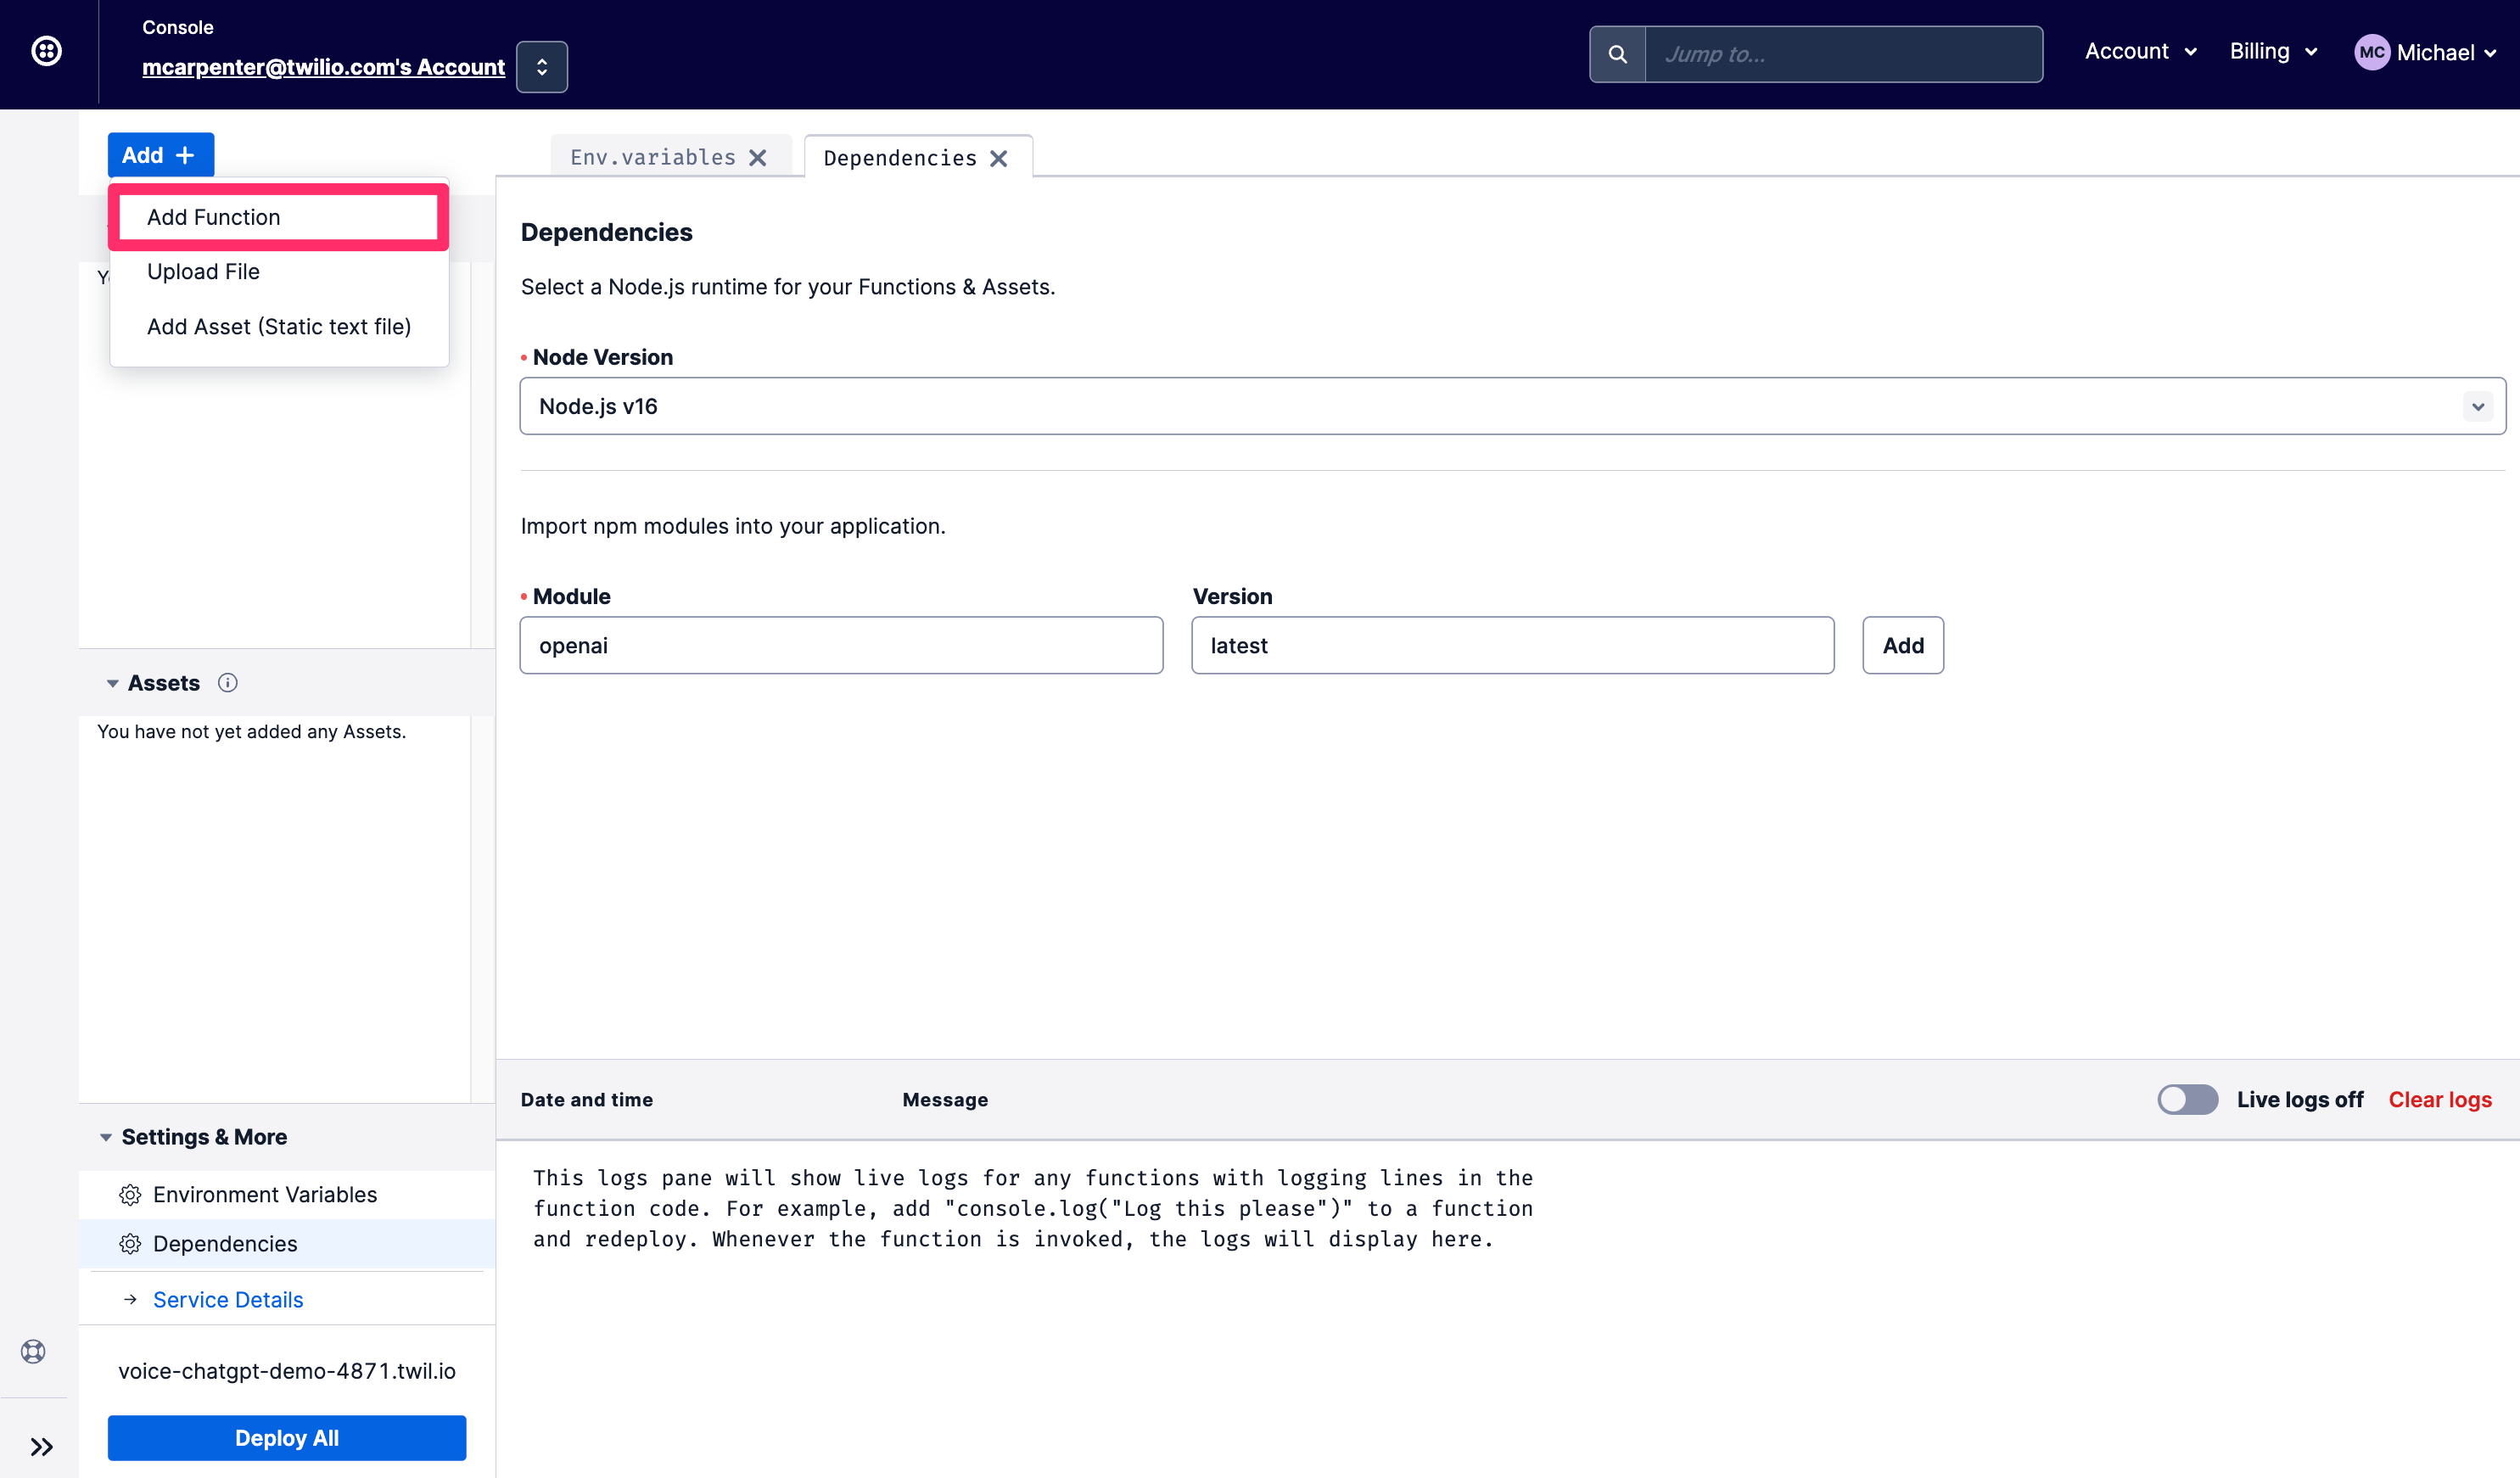
Next, you will need to update our dependencies to include the OpenAI npm module so you can make requests to the OpenAPI API. Click Dependencies, and enter openai in the Module textbox and 3.3.0 in the Version textbox. Don't forget to click Add.
Now you can get cracking with creating the Functions. You're going to create two: /transcribe which will do all the heavy lifting from a speech recognition perspective, and /respond which will pass the transcribed text to the ChatGPT API and read the response to the caller using an Amazon Polly Neural text-to-speech voice.
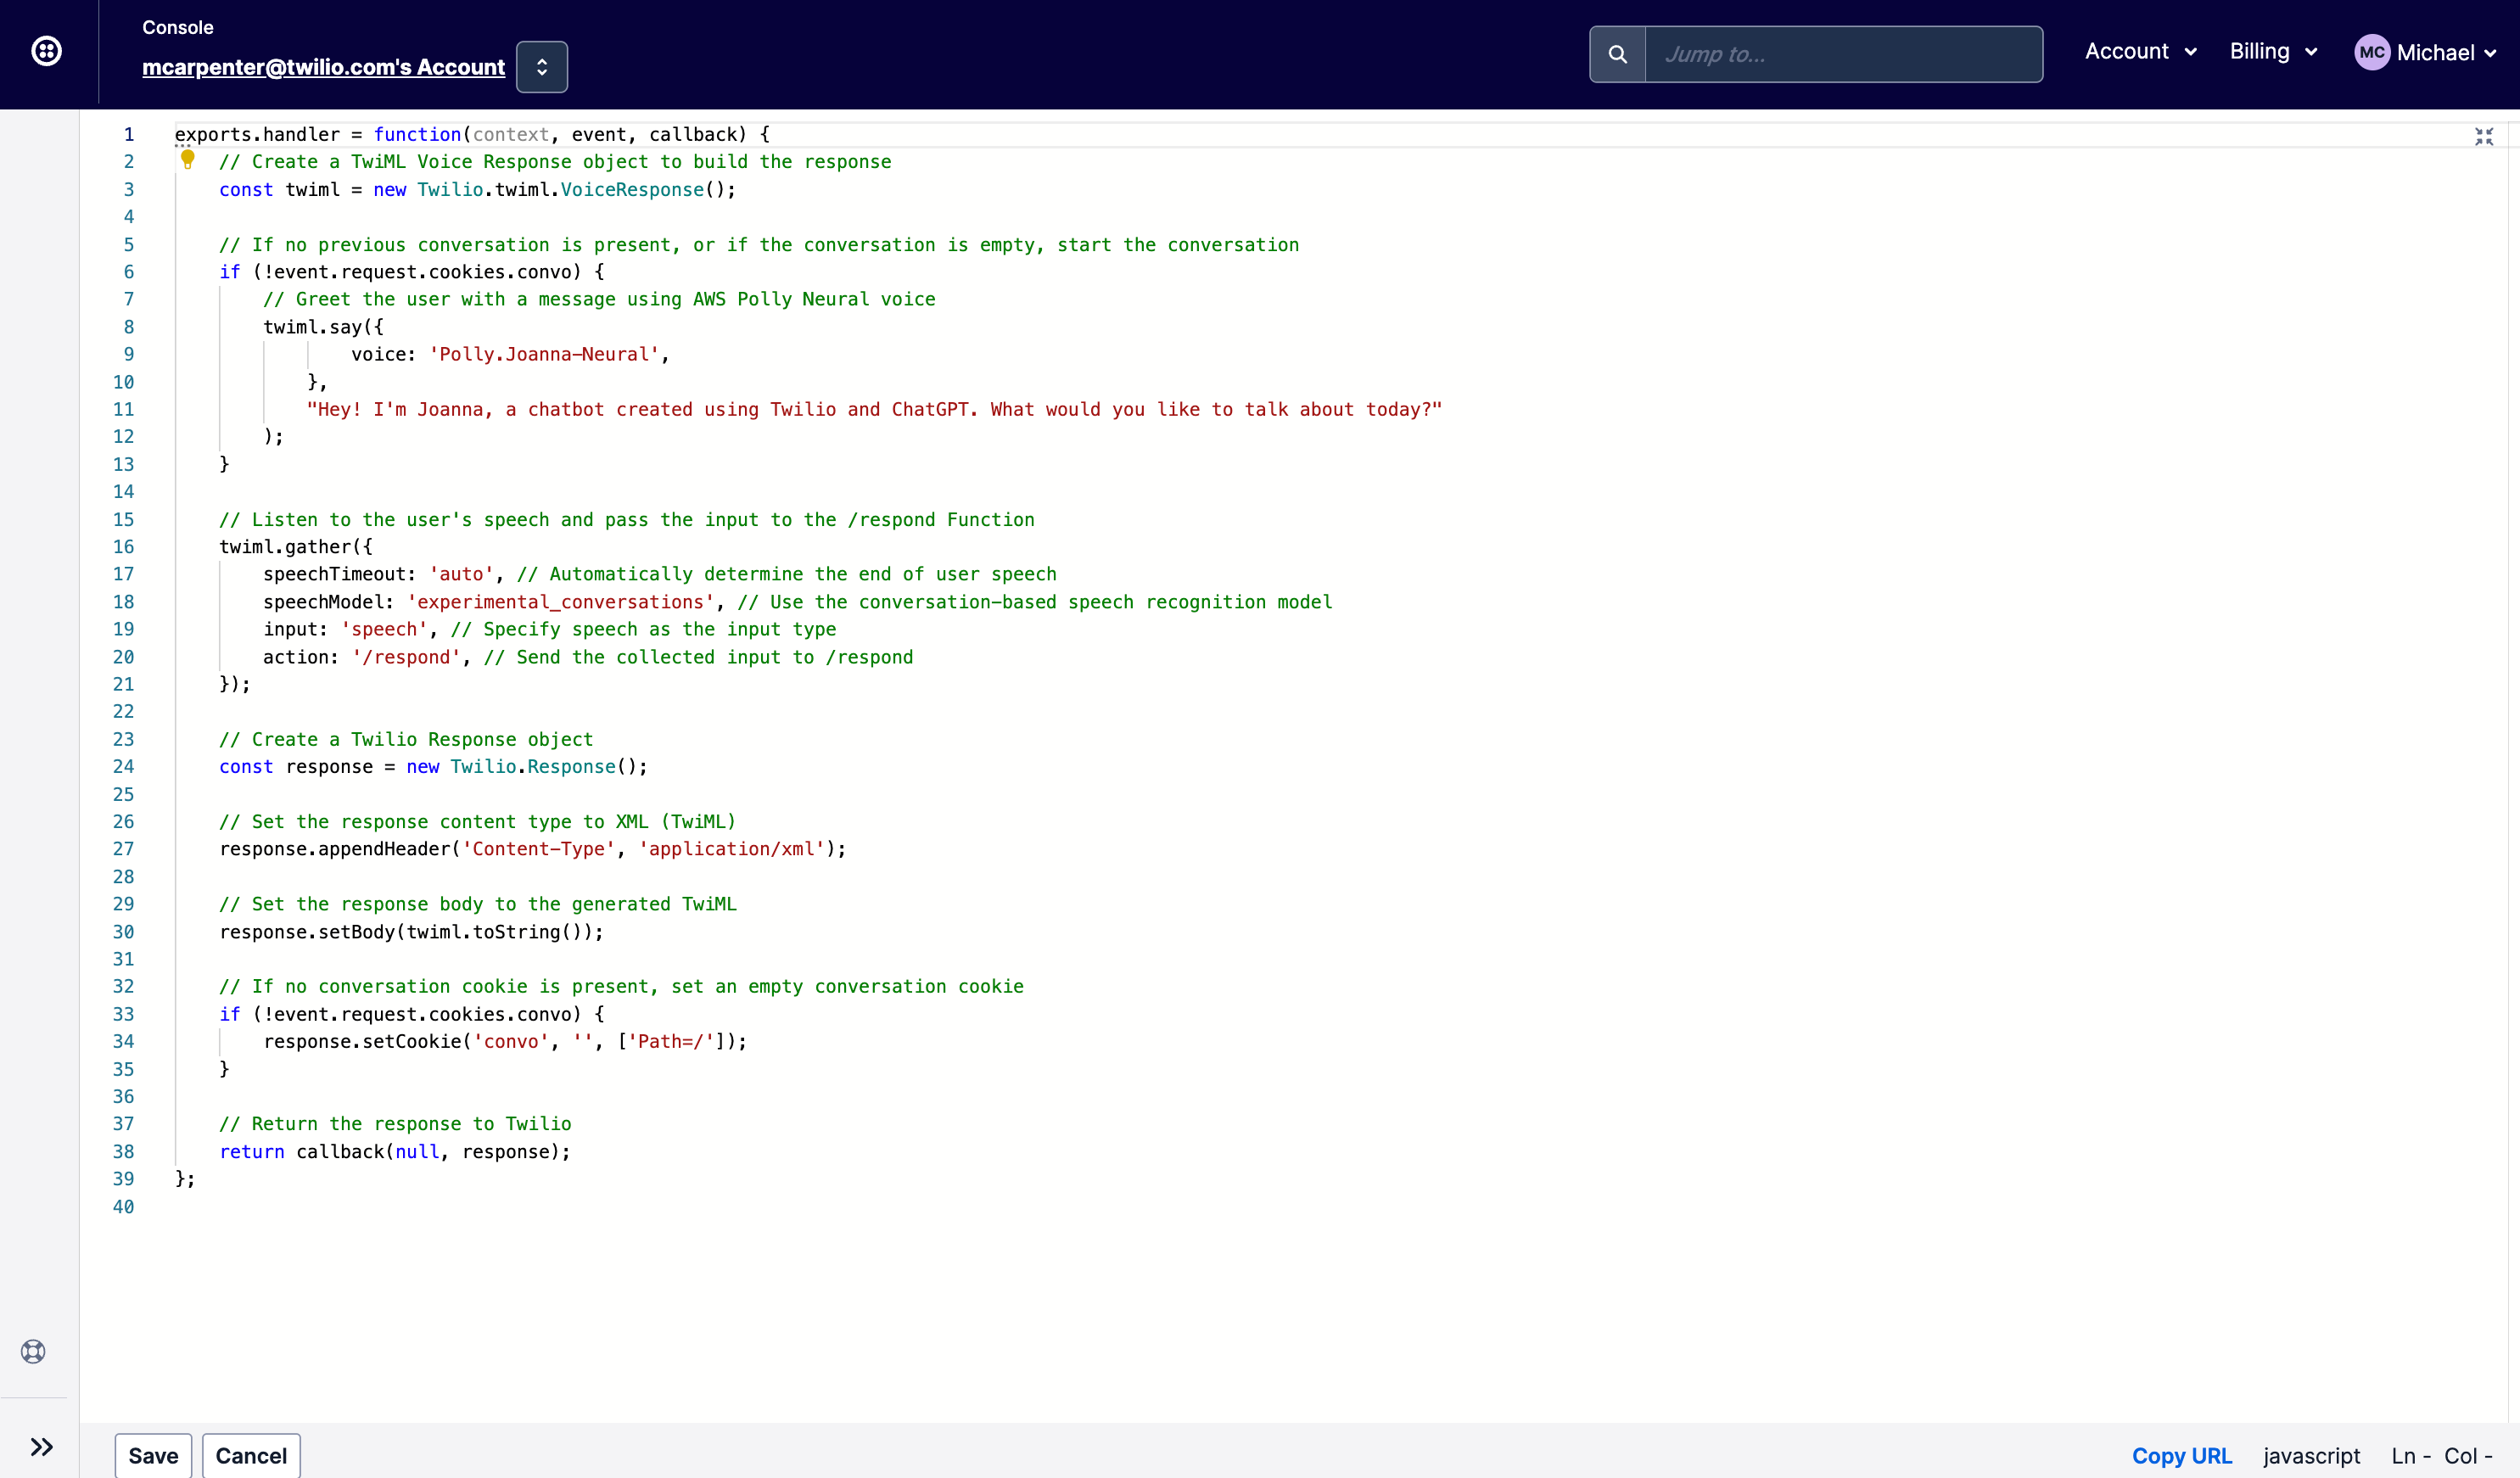
Click the Add button and select Add Function from the dropdown to create a new Function and name it /transcribe.
Replace the contents of the new function with the code snippet here and hit Save. Your factory fresh Function should look like this when complete:
Next create another Function and call this one /respond. Replace the contents of this new Function with the code snippet here and hit Save again. If you'd like a guided tour of what precisely is going on in these examples, check out the CLI section of this post where we walk through the code in greater detail.
Next click the Deploy button, and your saved Functions will be deployed and can now be used in your incoming phone number configuration. Click the three vertical dots next to /transcribe to Copy URL. We will need this in a second.
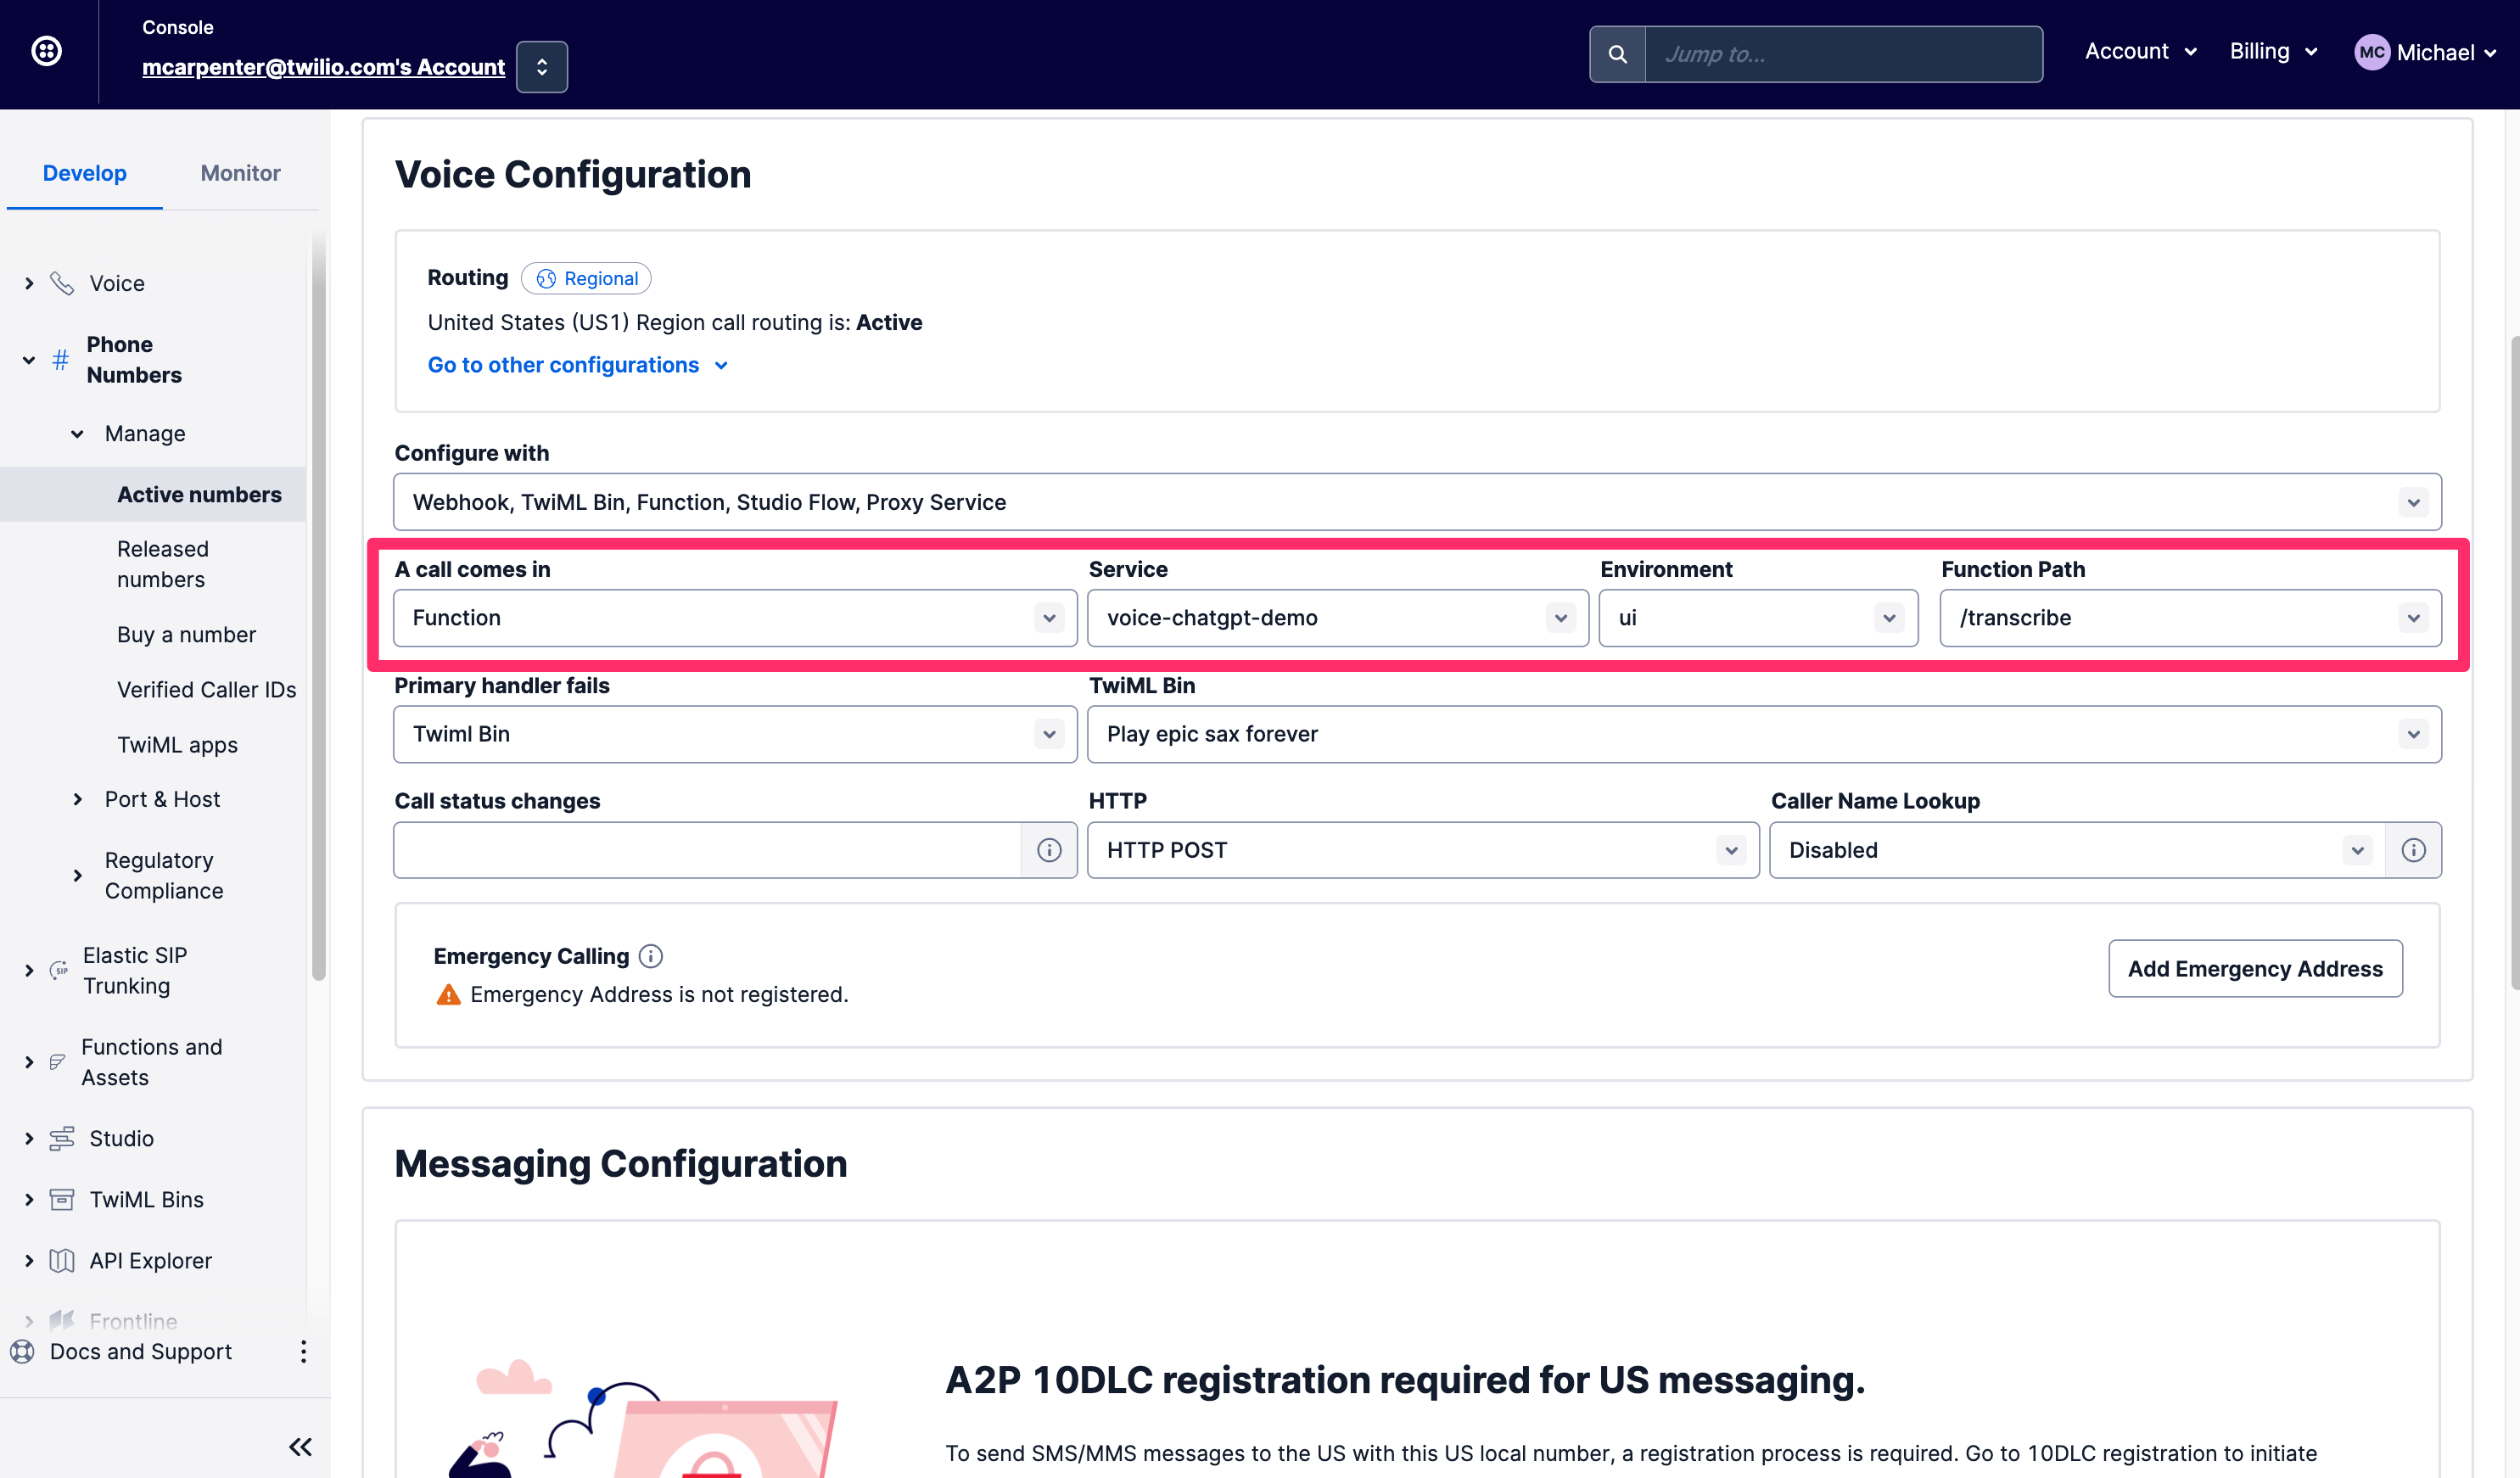
On the Develop tab navigate to the Phone Numbers section, then Manage, and choose Active Numbers. Once you've found a number you want to use, scroll down to the Voice & Fax section and under A call comes in select Function. For Service, select the Function service you just created which we named voice-chatgpt-demo. Then choose ui for Environment and lastly choose /transcribe for the Function Path since this is where your phone call should route to first.
Now give your newly configured phone number a call to test everything out!
No disassemble

One particularly great thing about this integration is that both the inputs and the responses are available to you as a developer; the speech recognition text from the person in the form of the SpeechResult parameter that gets passed to the /respond Function, and the ChatGPT-derived responses in the form of the <Say> TwiML that gets executed on the calls. This means these conversations aren't business intelligence closed boxes, and even though these Functions are executing in the Twilio Serverless environment, you can still get your hands on the content of the conversation using the Call Events API. Here's how to grab the details using the Twilio CLI:
Using this API you can retrieve the requests, responses, and associated parameters and pump them directly into your internal systems to do things like provide agents a heads-up about what the caller had been asking about before they were connected, or using the data to decorate your customer profiles in a customer data platform like Segment.
Robot Rock

Publications like McKinsey and Forbes are already opining on how generative AI technologies like ChatGPT can be used to solve business problems, so now that you have three robots working for you, what can you actually do with an integration like this? How about a frontline IT desktop support agent? Make ChatGPT search Google so your expensive IT department doesn't have to, and in the event your caller and ChatGPT can't figure it out, connect the call to your agents. Have long hold times for your healthcare specialists? Instead of playing callers smooth jazz, offer them the wisdom of ChatGPT for common non-critical ailments while they wait.
Wrap it up
So there you have it: with the help of Twilio's speech recognition, Twilio Functions, Amazon Polly Neural voices, and OpenAI's API, you've now created your very own interactive voice chatbot. Definitely keep an eye on this space and be on the lookout for advances in conversational AI and chatbot capabilities that you can leverage using Twilio.
Michael Carpenter (aka MC) is a telecom API lifer who has been making phones ring with software since 2001. As a Product Manager for Programmable Voice at Twilio, the Venn Diagram of his interests is the intersection of APIs, SIP, WebRTC, and mobile SDKs. He also knows a lot about Depeche Mode. Hit him up at mc (at) twilio.com or LinkedIn.
A huge debt of gratitude to Dhruv Patel's positively prescient post on How to Call an AI Friend Using GPT-3 with Twilio Voice and Functions. Dhruv also provided a technical review of the code in this post. Dhruv Patel is a Developer on Twilio’s Developer Voices team and you can find him working in a coffee shop with a glass of cold brew, or he can be reached at dhrpatel [at] twilio.com or LinkedIn.
Related Resources
Twilio Docs
From APIs to SDKs to sample apps
API reference documentation, SDKs, helper libraries, quickstarts, and tutorials for your language and platform.
Resource Center
The latest ebooks, industry reports, and webinars
Learn from customer engagement experts to improve your own communication.
Ahoy
Twilio's developer community hub
Best practices, code samples, and inspiration to build communications and digital engagement experiences.