Integrate Twilio Flex with Discord
Time to read: 10 minutes
February 06, 2023
Written by
Reviewed by

In recent years, Discord has become the central messaging platform for communities especially with the help of Discord bots. Through Discords extensive API, developers are able to build robust bots that are capable of various actions such as automating tasks and chatting with users. Additionally, Discord is becoming home to many large communities hosted by brands and companies such as OpenAI, Fortnite, Replit and StockX.
With the gaining traction of companies using Discord, I decided to think of ways that Twilio can be used alongside it. A fitting integration would be with Twilio Flex; it's a digital engagement center for sales and service allowing companies to build personalized customer experiences. Through Discord and Flex, you can provide your customers a way to interact with support agents using Flex Conversations. This is especially great if you already have a community on Discord so users won’t have to leave the platform to get help.
In this article, you’ll learn how to build a Discord bot that’s able to connect users on the platform to your contact center with Flex and Node.js.
Prerequisites
- A Twilio account - Sign up here.
- Set up your account with Flex Conversations. (Make sure to create your Studio Flow!)
- A Discord account.
- Node.js v16+ installed on your machine.
- The ngrok CLI - For testing.
Overview
Before I dive into the tutorial, let’s take a look at what you’ll be building and how the integration will work.
You’ll create a slash command called /support through the Discord bot so that users have a way to initiate a conversation with an agent. Additionally, this command will take an input so that the customer can provide a description of their issue.
Once a customer initiates the command, your Discord bot will initiate the Flex flow. Let’s take a look at how it’ll work:
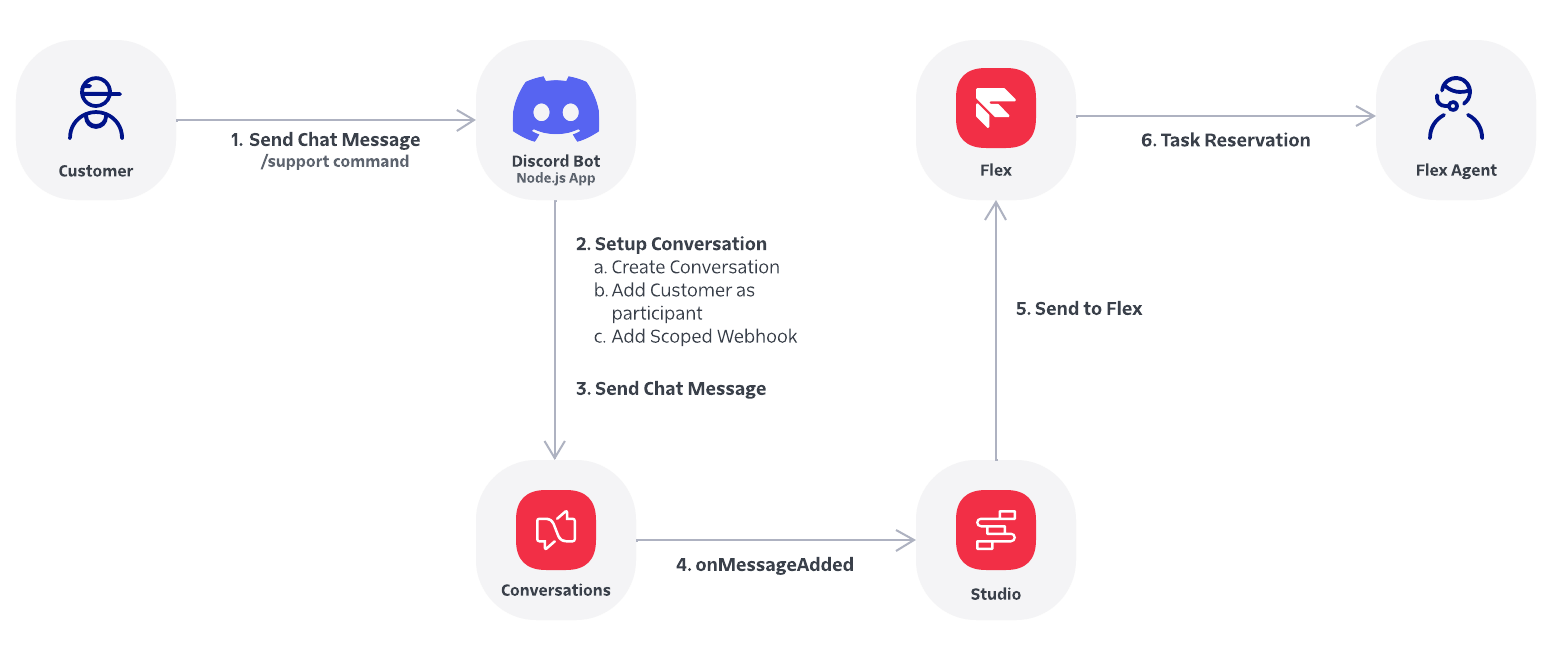
- The customer will initiate the chat by providing a brief description of their issue using the /support slash command which will be processed by your Node.js application (Discord bot).
- Your Node.js application will setup a new Conversation by:
- Creating a new Conversation resource
- Adding the Discord user/customer as a Participant of the newly created Conversation
- Adding a scoped webhook to trigger the Twilio Studio Flow to route the new Conversation to Flex.
- Your Node.js application will send the chat message to the newly created Conversation.
- Using the scoped webhook created in step 2.a, the Conversations SDK will send an “onMessageAdded” event to trigger the Studio Flow.
- The Studio Flow will use the Send To Flex widget to create a new Interaction to create a new task assignment for a worker (Flex agent).
- A Flex agent will get a task reservation and when they accept it, they’ll be added to the same Conversation.
The above flow is for customers initiating new chat messages with no existing Conversations.
For chat messages from the customer in existing conversations, steps 2, 4, 5, and 6 will be skipped. If an existing conversation with the Discord user is found, it will directly add the chat message to the Conversation using step 3.
If you’re wondering how customers will receive chat messages from the agent, you’ll set up another scoped webhook and create an endpoint in your application that will receive POST requests from Flex whenever a new message is added to the conversation. You’ll then relay the message back to the user as a direct message from your Discord bot.
Now that you’ve gone over how the integration works, let’s get started!
Build your Discord Bot
In this section, you’ll set up your server and your Node.js app, create the /support command, handle incoming messages from your users and create an endpoint to receive messages from Flex.
Set up Discord
To get started, set up a Discord server by first downloading and opening the Discord client and clicking on the green + icon on the left tab. Finally, follow the instructions to create your server.
Next, you’ll need to set up your Discord bot application. Follow the steps on the Discord.js guide and come back once you have your bot token and application ID: Setting up a bot application. Copy your bot token and your application ID (found in the General Information section of your application) and store it in a safe place - the token and ID will be used later in the tutorial.
Once your bot application is set up, follow the steps in the Discord.js guide to add your bot to your server: Adding your bot to servers. When you reach the Bot Permissions section, select Administrator. You will also need to enable Message Content Intent within the Privileged Gateway Intents section of the Bot menu.
Prepare your Node.js app
For the sake of simplicity and to focus on the Flex integration itself, you’ll be cloning a template of Node.js app that already has a basic Discord bot built out. If you already have a Discord bot built out, feel free to skip to the next section.
You can clone or download the Discord bot template here: discord-flex-template Github repository.
If you get lost or need to verify the correctness of your code, the completed project and code for this tutorial can be found here: discord-flex Github repository.
Install dependencies
Your next step is to install all the dependencies needed for the project. You will need to install Discord.js and Twilio to interact with their API’s, dotenv to store and access environment variables and Express to route and handle incoming SMS messages from your Twilio number.
To install these dependencies, open up your terminal, navigate to the directory of your Node.js app and enter the following command in your terminal:
Setup environment variables
Open up the project directory in your preferred IDE and open the .env file. You’ll see the following code:
If you are using your own Node.js application (not the cloned template), copy the above environment variables to your .env file.
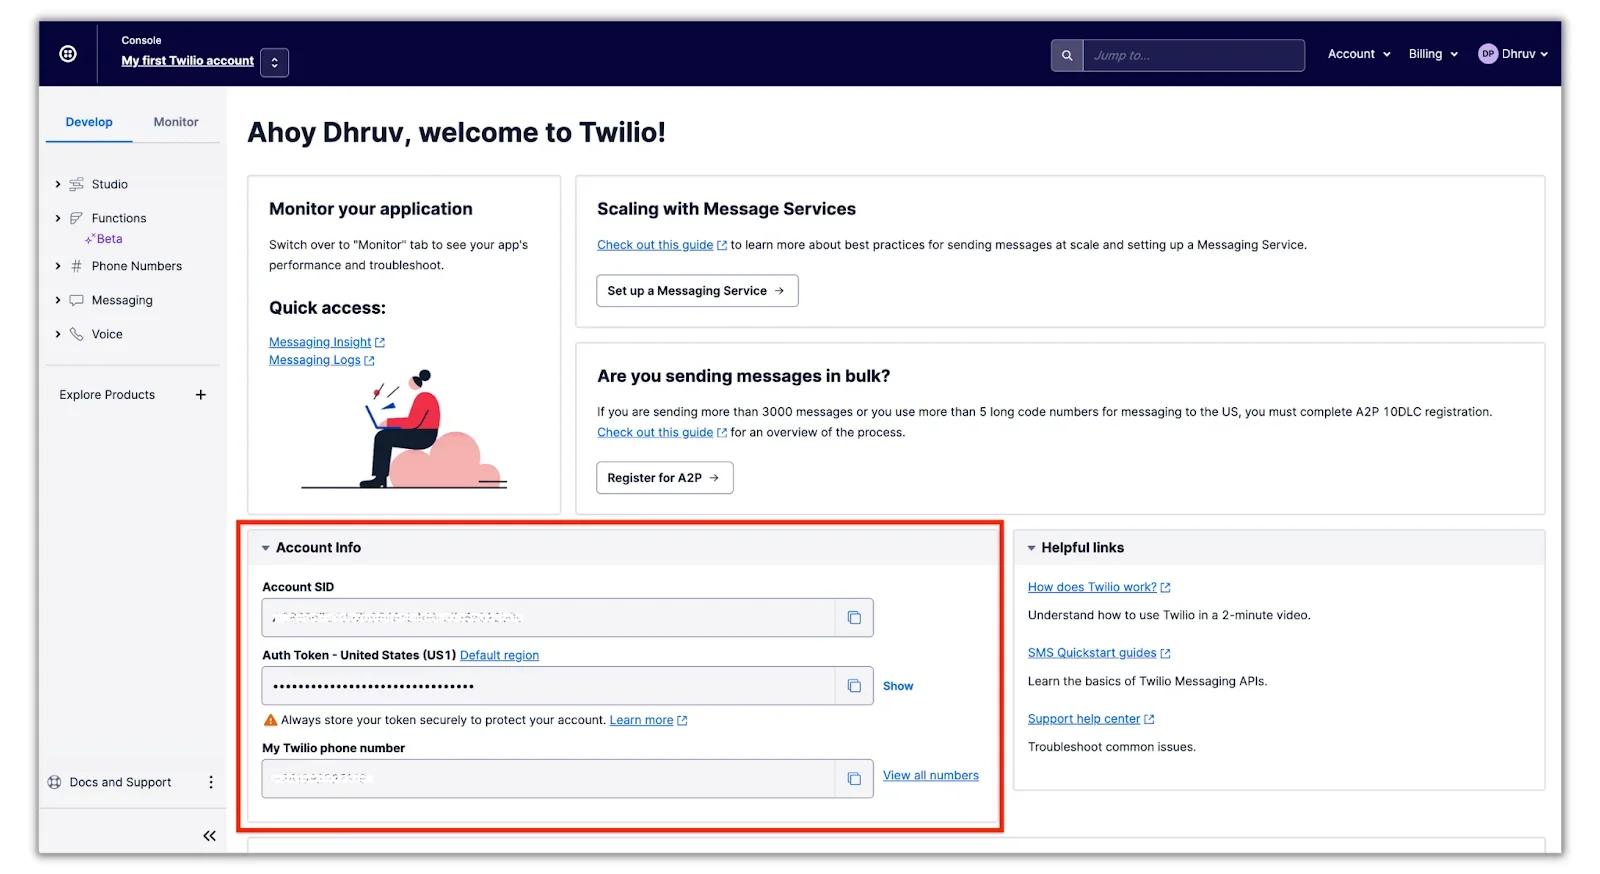
You’ll need to replace the XXXXXXXXXX placeholders with their respective values. To locate the values for the environment variables, take a look at the tabs below:
To get your Guild (server) ID you’ll first need to enable developer mode on your Discord app. You do this by heading to the Advanced section of the Discord app settings under the APP SETTINGS section on the left side of the screen and toggling Developer Mode:
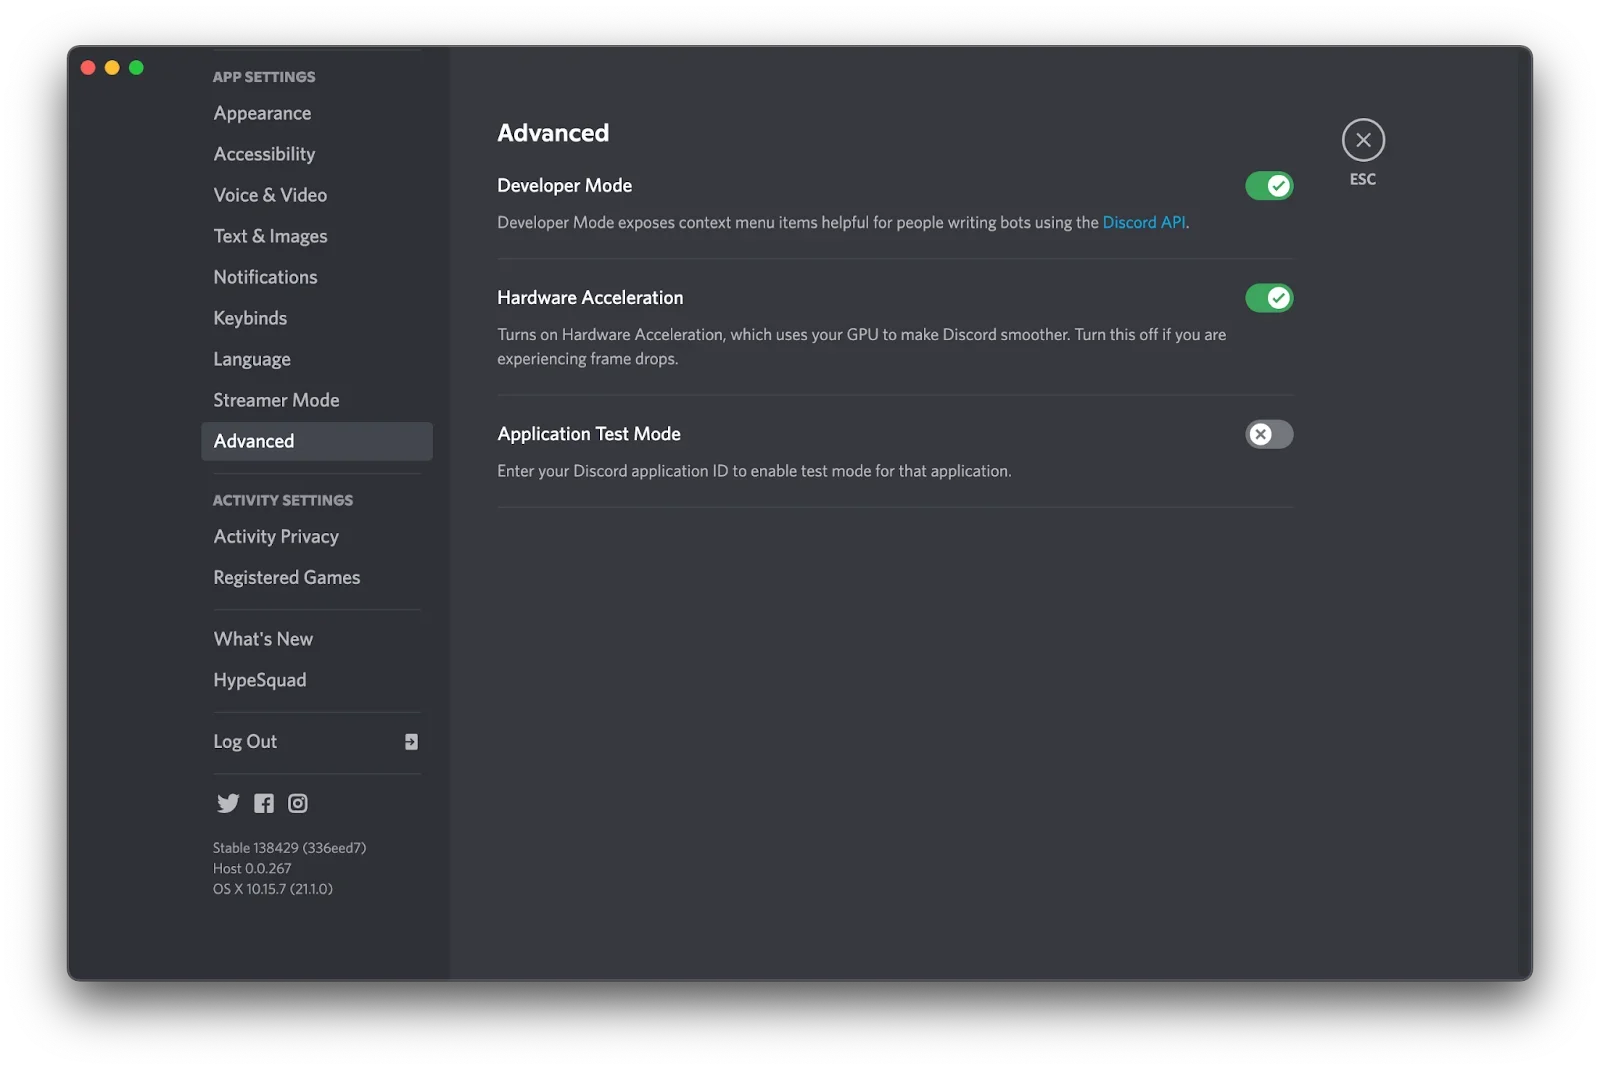 Once enabled, right-click on the server title and select Copy ID to get the guild ID.

Once you're done placing all of your environment variables, save the file.
Now that we’ve set up the Discord bot let’s start building out the components for the integration.
Create /support command
You’ll start off the integration by creating the /support slash command.
Within your project directory, create a folder called commands and create a file within it called support.js. Lastly, copy the following code within the file:
You’ll want a way for your agents to know your customers’ issues or questions before having them accept the task. To achieve this, lines 8-11 add a help description input for customers as they call the command.
When the command is called, the application checks whether a Flex Conversation is already ongoing with the customer using the fetchConversation helper function. (This helper function will be created in another file in the next section.)
If there’s no Conversation in progress, the sendAutomatedDM function is called which DM’s the user letting them know a Conversation is created along with their help description. The sendToFlex helper function (which will also be in the next section) is executed to create the Flex Conversation. It lastly replies to the user letting them know to check their DM’s since that’s where the chat will be located.
Flex integration wrapper
In this section, you’ll be creating all the functions that will be used to connect your Discord bot to Twilio Flex. Within your project directory, create a folder called service and add a file within it called discord-flex-integration.js. To keep things organized, all of the Flex functions will be stored within this file.
You’ll start by creating the two helper functions used in the previous section: sendToFlex and fetchConversation. Copy the follow code within the discord-flex-integration.js file:
The sendToFlex function is the main function that will create the Flex Conversation and/or send the customer’s message to the Flex Conversation. This function includes other helper functions that will be appended to the file.
The function starts off by using the fetchConversation function to grab the ongoing Flex Conversation to verify if there is one present. If there isn’t one present, it will create a new Conversation resource using the createConversation function. Add this function to bottom of the file:
The createConversation function returns an object of the newly created Conversation which includes the SID. The SID is then used to add the user as a Participant using the createParticipant function. Add this function to the file:
The sendToFlex function then creates the necessary scoped webhooks using the createScopedWebhooks function. Add this function to the file:
This function creates two webhooks. The first will trigger the Studio Flow you set up earlier to send the Conversation to Flex. The second will trigger the /newMessage route on your server (which we will create in the next section) whenever a message is added to the Conversation – this will be used to receive chat messages from the Flex agent.
The sendToFlex function will lastly use the sendMessage function to add the users message to the new or existing Conversation. Add this function to the file:
The xTwilioWebhookEnabled property is set to true so that the scoped webhooks will be triggered when the function executes.
Handle incoming Discord messages
The next step is to handle messages from the Discord user. Open the messageCreate.js file in the events folder (if you don’t have it, create one) and add in the following code:
This code implements an event listener that executes whenever the Events.MessageCreate event is triggered, which occurs whenever a message is sent in a channel or the Discord bots direct message inbox. Line 7 checks to see if the author of a message is not a bot and if the message is sent in a DM channel (message.channel.type == 1). If these conditions are satisfied, it means a Discord user is attempting to direct message the Discord bot. If a Conversation is present, the message will be transmitted to the Flex agent using the sendToFlex function you created earlier.
Receive messages from Flex agent
Now that you’ve set up a way for users to contact and message Flex agents, the next step is to receive incoming messages from the agents and transmit them to the user. The second scoped webhook you set up in the previous section triggers the /newMessage route whenever a message is added to the Conversation which is what you’ll be building out next.
In your project directory, open the routes.js file (if you don’t have it, create one) and add in the following code:
The code above holds the /newMessage route which captures HTTP POST requests from Twilio that contain data whenever a new message is added to a Conversation. The if(req.body.Source === 'SDK') conditional only captures messages from the agent (not the customer) and then uses the sendDM function to transmit the message to the user.
Now that the user can receive and send messages from the Flex agent, it’s time to put it to use!
Demo
In this section you’ll run your Node.js application, test the /support command, and log in to Flex to view the incoming Flex Conversation from Discord.
At this point, you should already have a public server up and running (from the environment variables section). If you don’t, spin one up using ngrok by running the following command and plugging the forwarding URL into the base URL variable in the .env file:
Register your command
Before putting the command to use, you’ll need to register it with your bot. To do this, you’ll run the deploy-commands.js script located in your project directory. If you don’t have the script in your project directory or want more information on registering slash commands, check out the Discord.js documentation: Registering slash commands.
Navigate to your terminal (ensure you’re in your project directory), open a new tab and run the following command:
The output will confirm that your command has been loaded successfully.
Run the application
Next, you’ll need to run your Node.js application. Run the following command in your terminal:
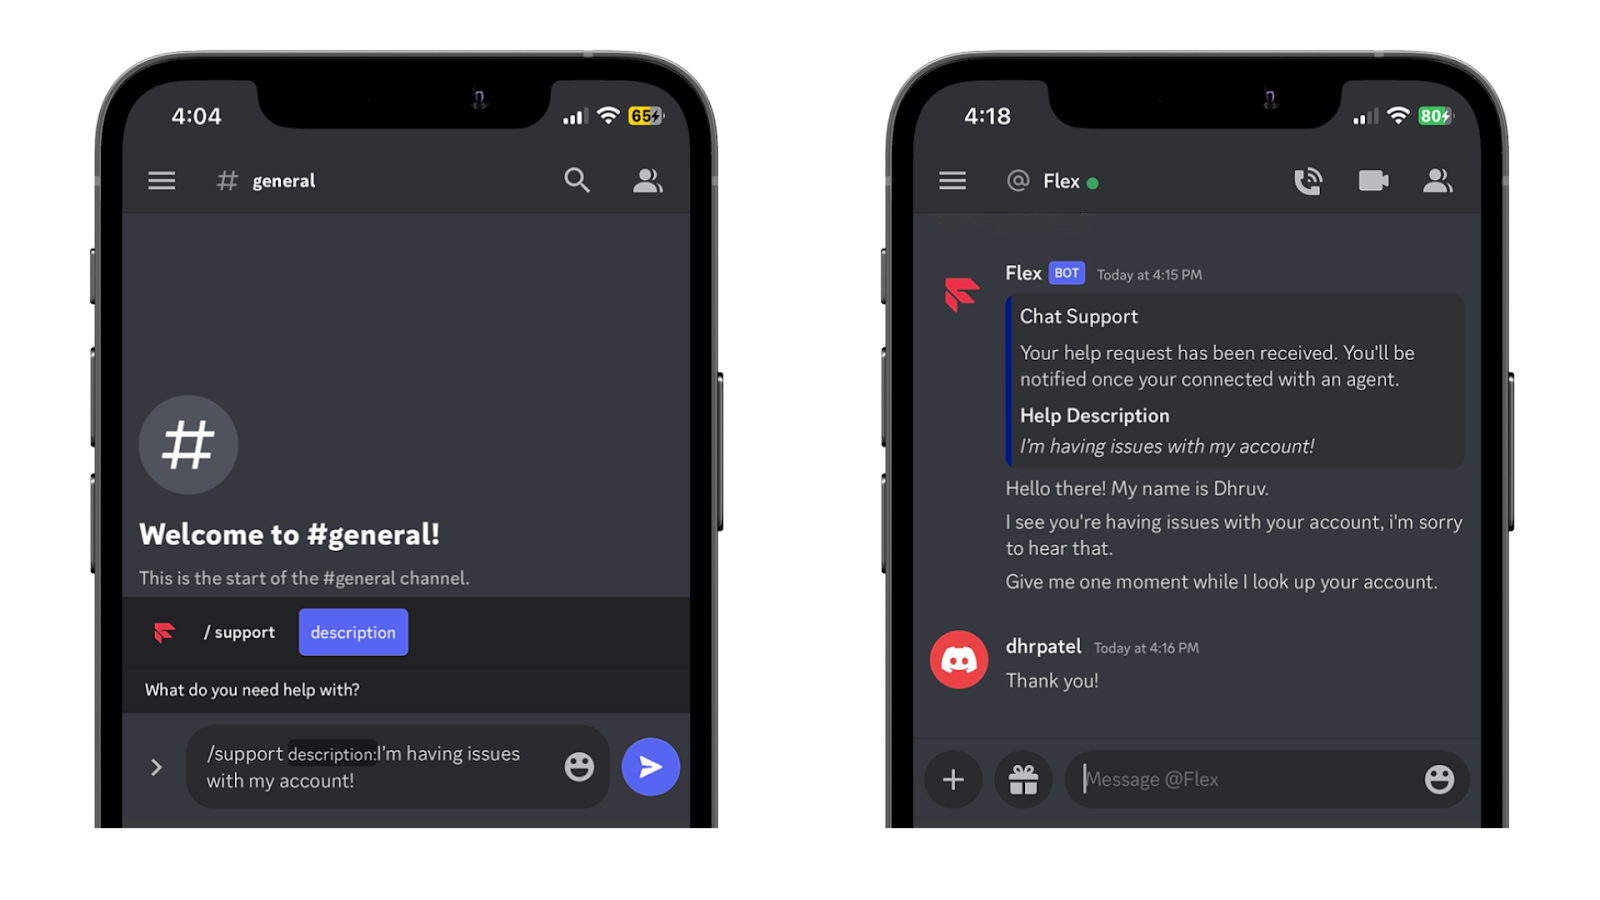
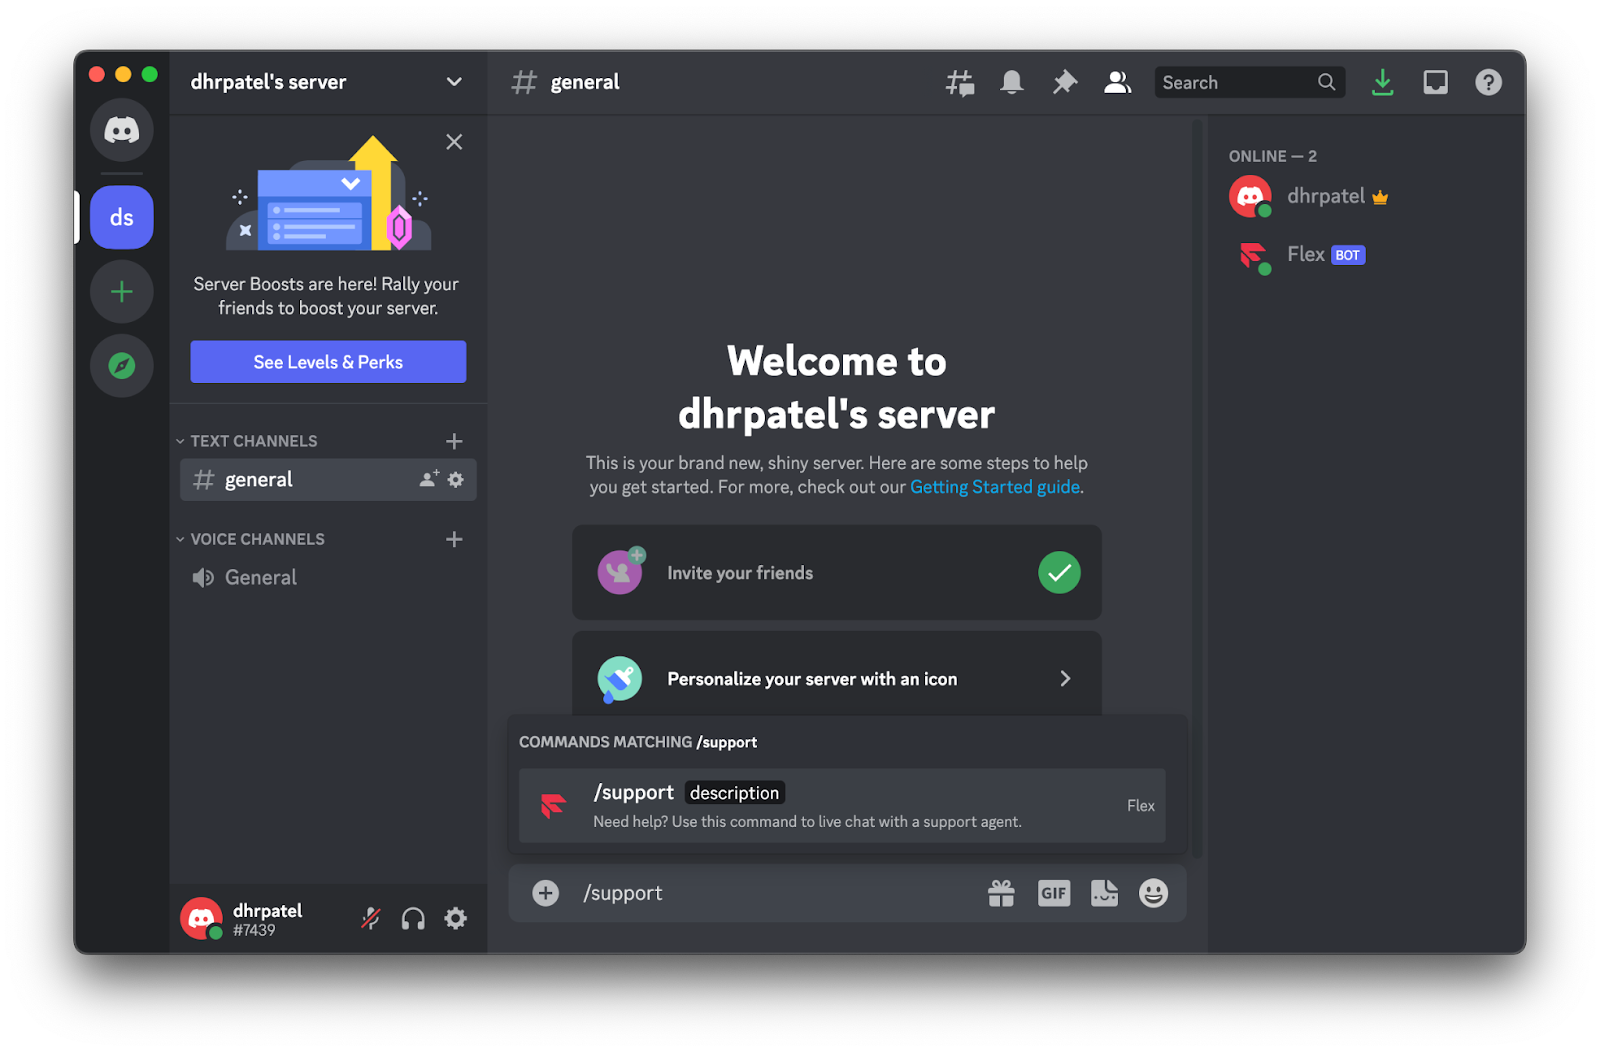
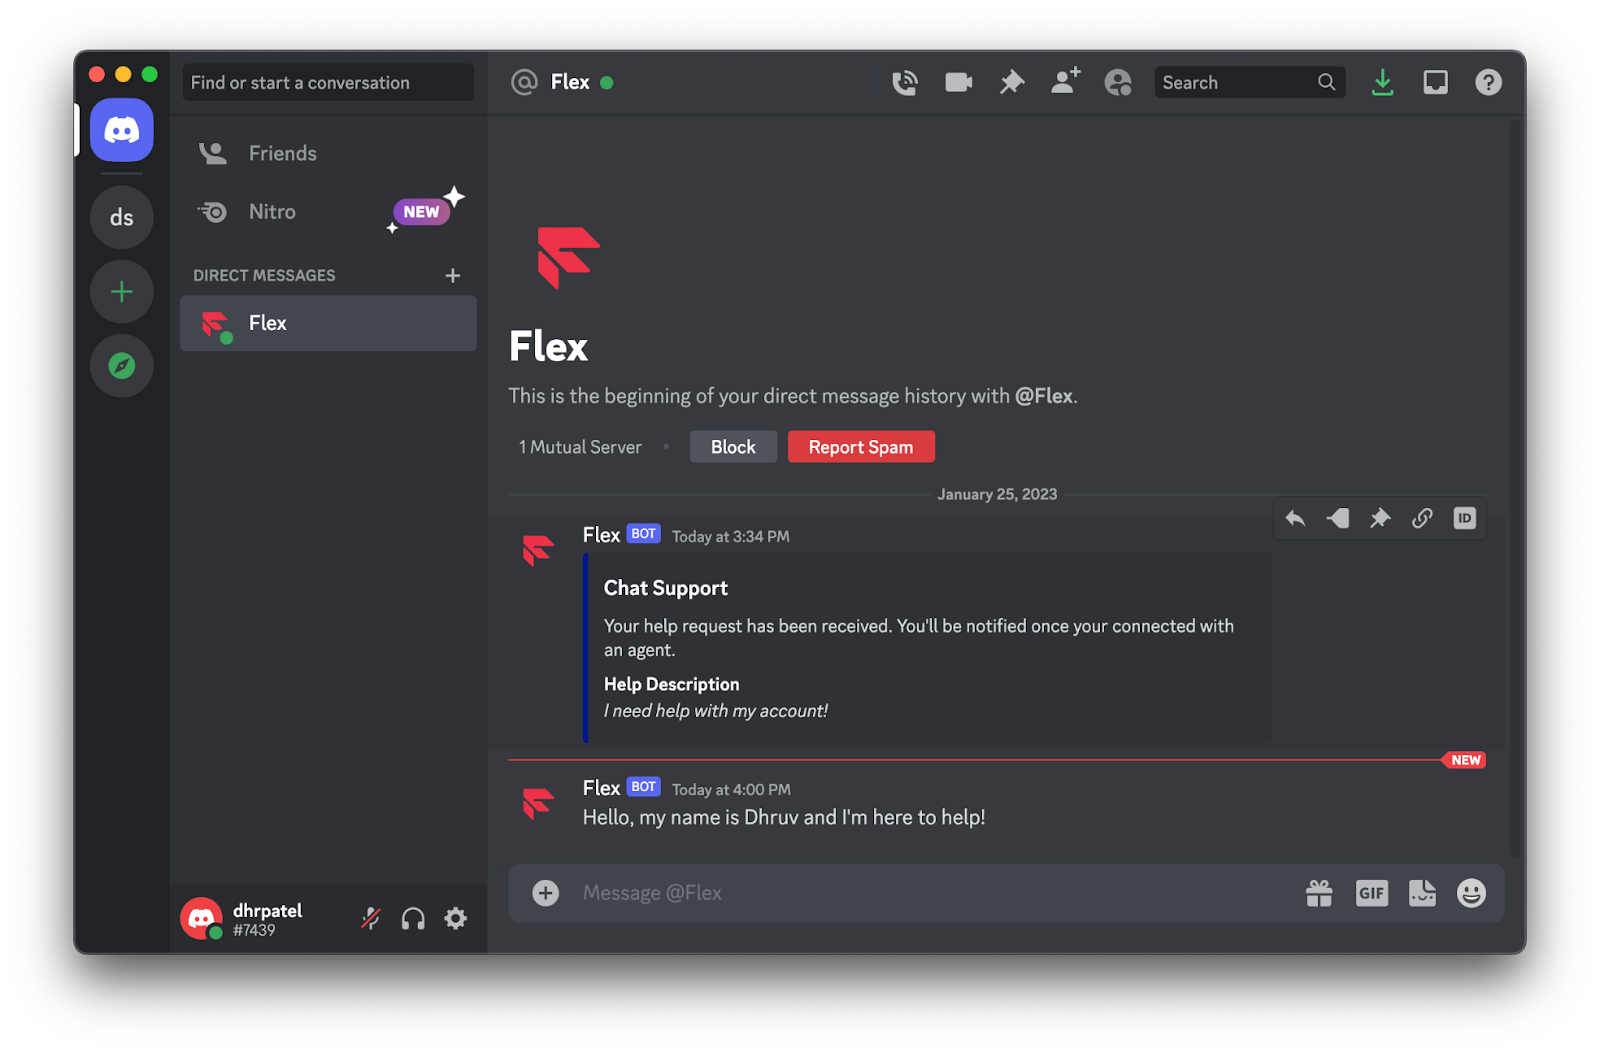
Navigate to your Discord server on your Discord app and you’ll notice your Discord bot is online. On any channel type /support and you’ll see the bot command pop up:
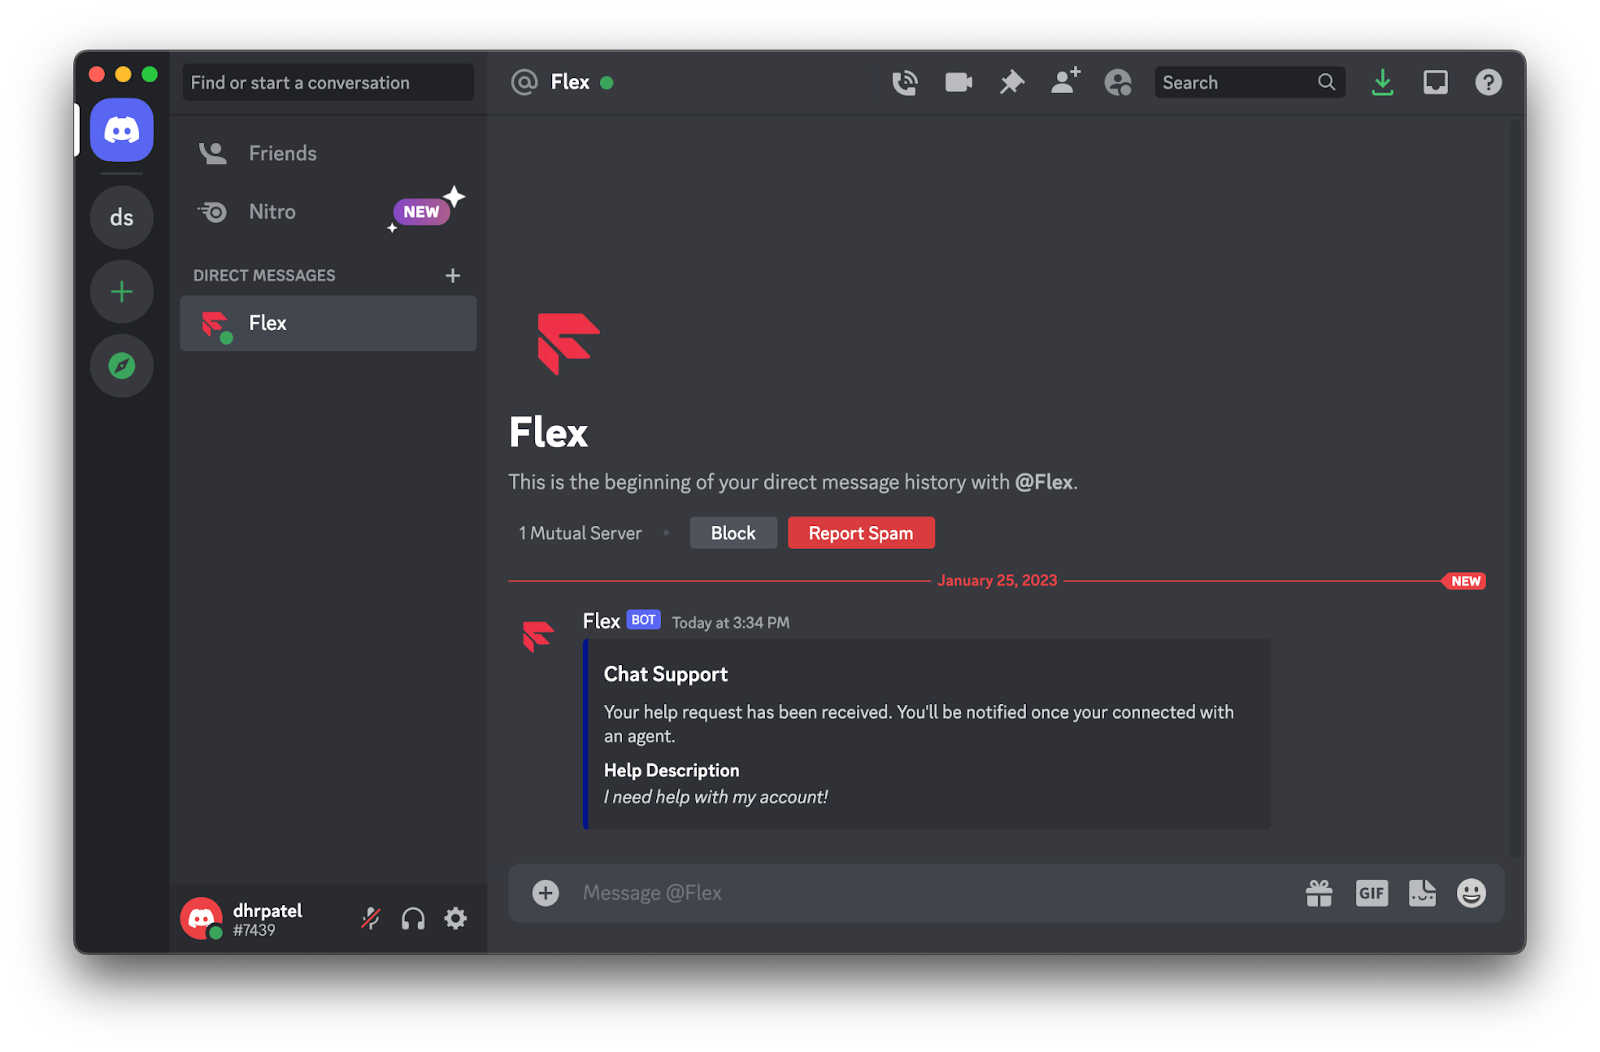
Select it and add in a description within the Description field. When you enter, navigate to your Direct Messages and you’ll see a confirmation of your support request:
Now let’s head over to Flex to view the incoming message. Log in to Twilio Flex at flex.twilio.com:
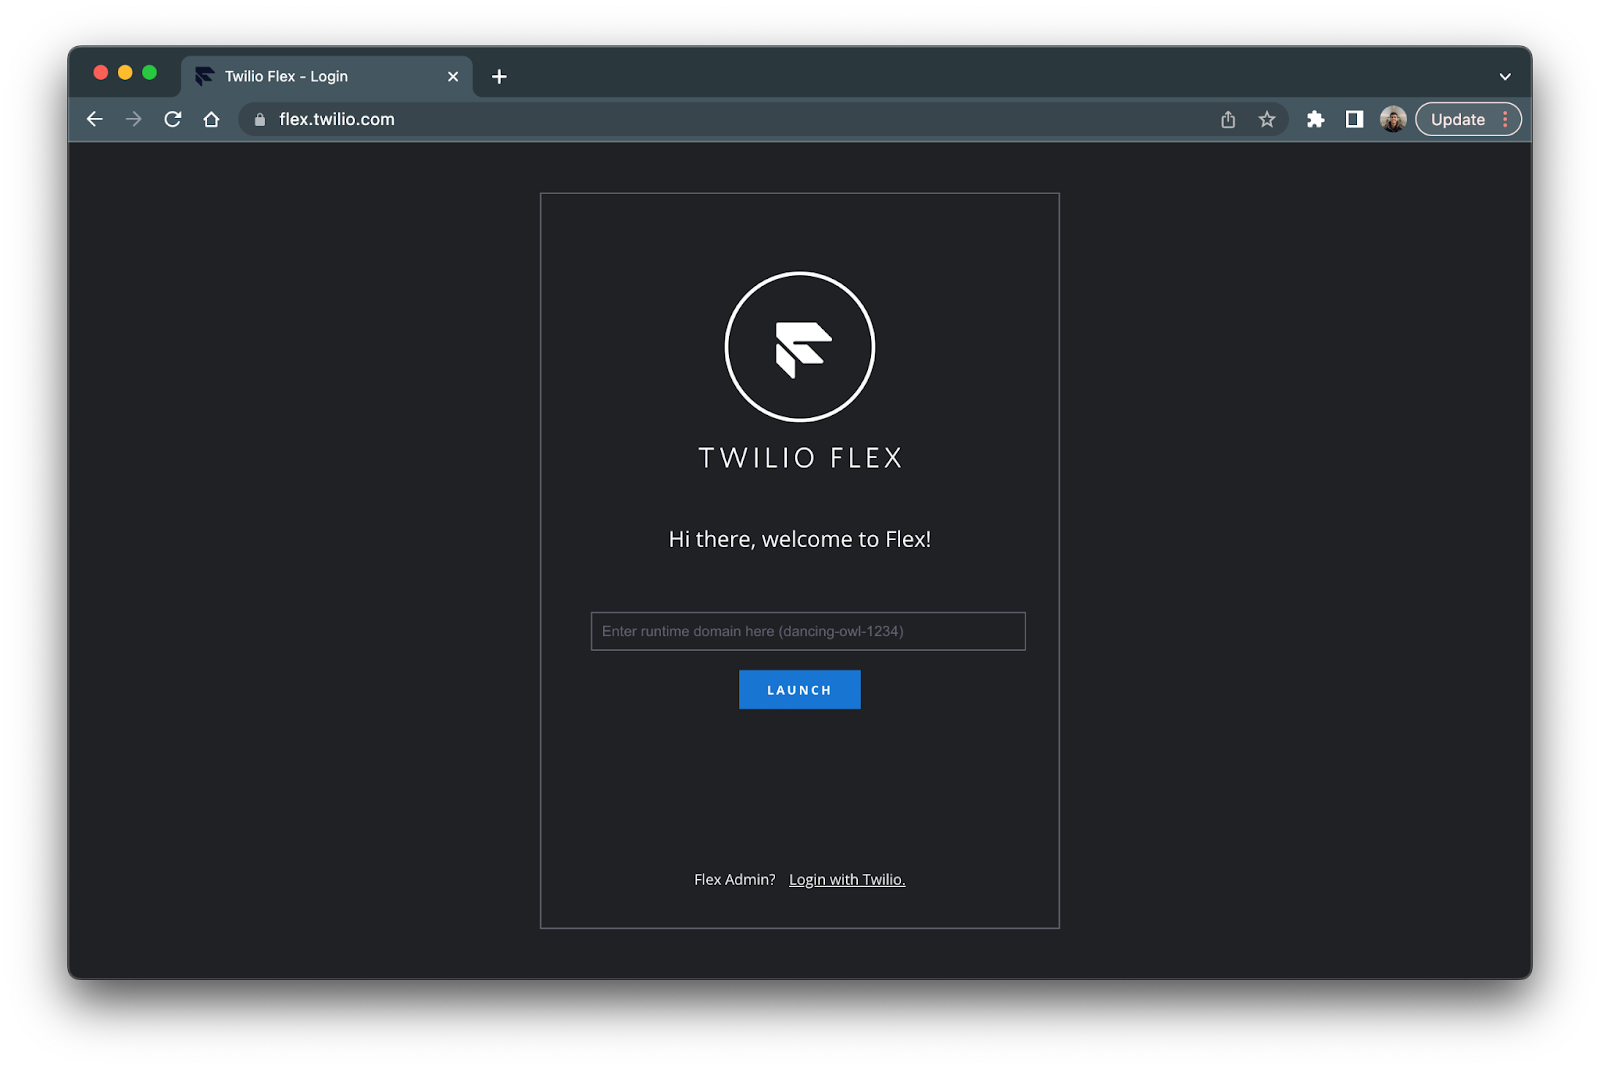
If you don’t have a domain set up yet, you can click Login with Twilio to log in as an admin with your Twilio credentials. Once you’re logged in, set your status to Available by clicking on the status on the top right corner. Then, head to the task menu which is the second button on the right panel.
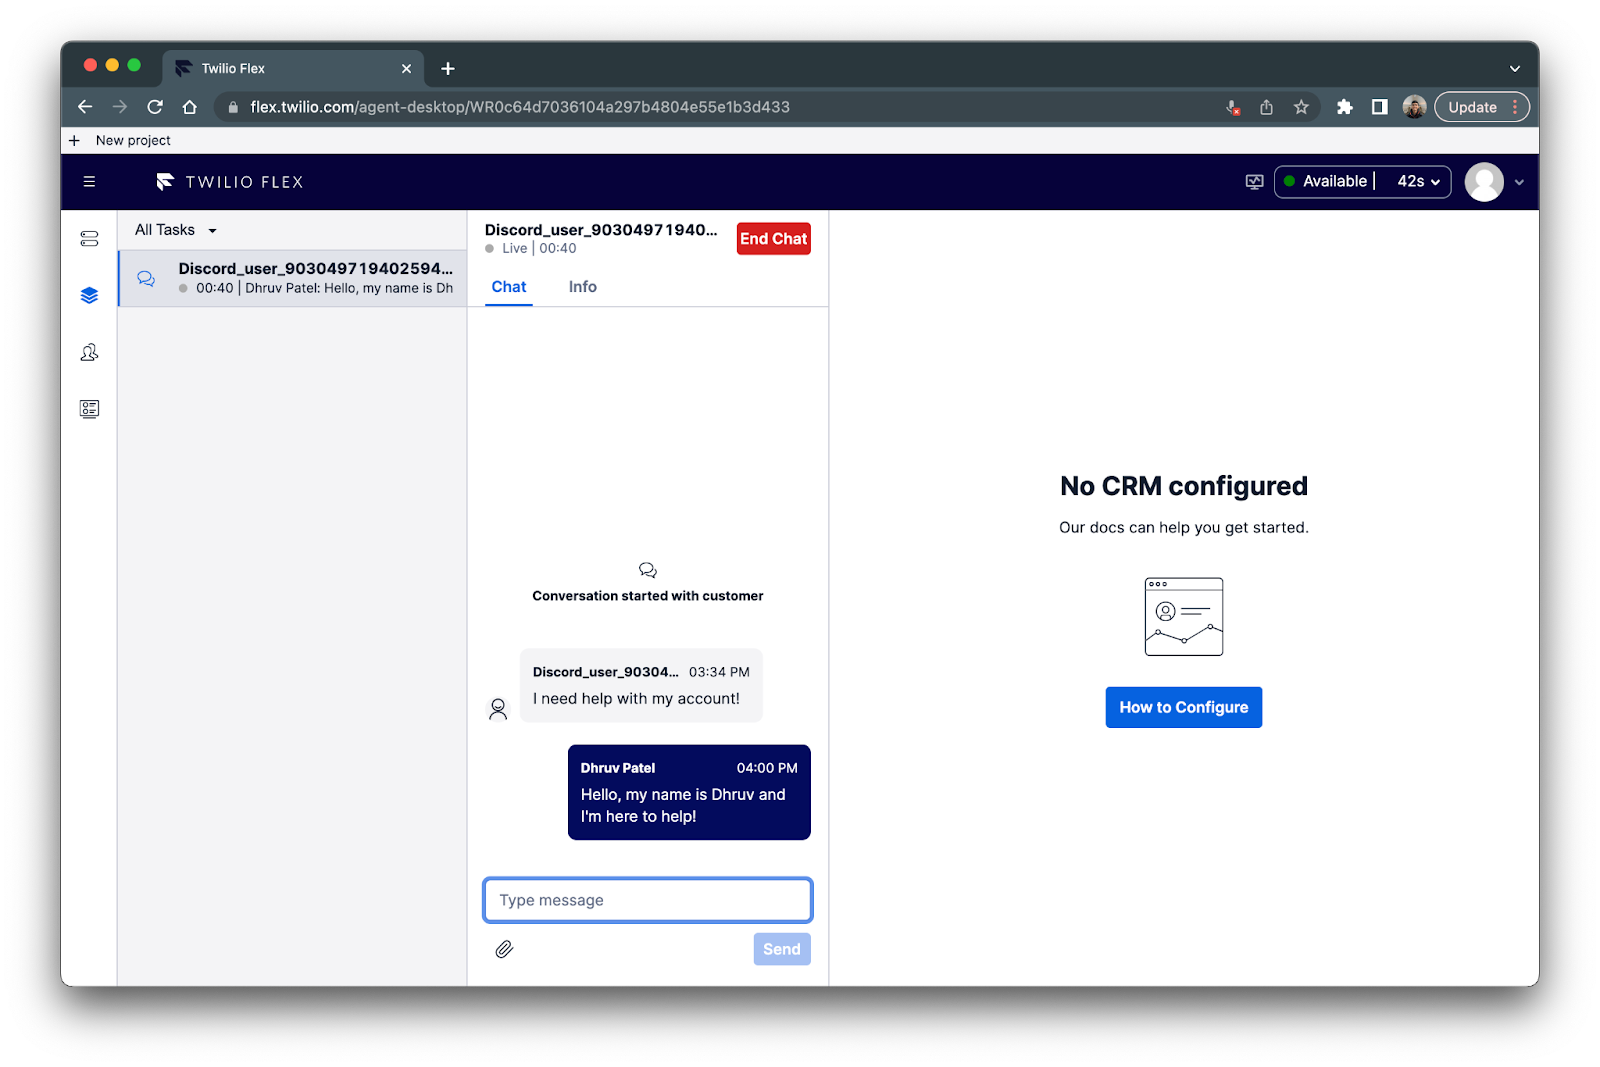
You’ll then see the incoming task from Discord. Click the green checkmark to accept the task and you’ll see your message:
Respond back and then navigate back to your direct message with your Discord bot and you’ll notice the agent message relayed back to Discord:
Nice!
Conclusion
In this tutorial, you learned how to set up a Discord bot and integrate it with Flex Conversations.
Although the Discord bot and the Flex integration gets the job done, it’s pretty basic and has much room for improvement. You can add more parameters for pre-engagement data such as email and name to the /support command. You can even enable the onParticipantAdded and onConversationRemoved webhook filters to notify the user when an agent has joined the chat and when the chat has ended.
This tutorial was inspired by the Telegram Flex integration tutorial so I recommend checking that out as well! If you’re interested in more Flex or Discord content, check out the following tutorials:
- Send and Receive SMS Messages via Discord with Twilio and Node.js
- Integrate Twilio Flex and Calendly
- Twilio Flex WhatsApp Integration Checklist
Happy building!
Dhruv Patel is a Developer on Twilio’s Developer Voices team. You can find Dhruv working in a coffee shop with a glass of cold brew or he can either be reached at dhrpatel [at] twilio.com or LinkedIn.

Related Resources
Twilio Docs
From APIs to SDKs to sample apps
API reference documentation, SDKs, helper libraries, quickstarts, and tutorials for your language and platform.
Resource Center
The latest ebooks, industry reports, and webinars
Learn from customer engagement experts to improve your own communication.
Ahoy
Twilio's developer community hub
Best practices, code samples, and inspiration to build communications and digital engagement experiences.